![[OLD SEMESTER] 15-104 • Introduction to Computing for Creative Practice](../wp-content/uploads/2023/09/stop-banner.png)
The readings, assignments, and projects below constitute the Week 2 Deliverables and are due by 11:59pm EDT on Saturday, September 11th:
- Reading: Cramer’s “Concepts, Notations, Software, Art”
- Technical Readings
- Looking Outwards 02 [Autolab & Blog]
- Assignment-02-A (Visual Harmonies) [Autolab]
- Project-02: (Variable Faces, Face Variables) [Autolab & Blog]
- Hand in (and post) your work
Create a folder names handin-02 in your course folder on your computer. Once you have all of your assignment stored inside this folder, you will zip this folder to create handin-02.zip that you will submit to Autolab.
1. Reading: Cramer’s “Concepts, Notations, Software, Art”
Please read the three-page essay, “Concepts, Notations, Software, Art” by Florian Cramer, a German/Dutch cultural theorist of new media who has written extensively on software art since the late 1990s.
Cramer prompts us to contemplate the relationship between the outer form of a generated/interactive artwork (3D print, digital image, computer animation, etc.) and the inner form of the code and algorithms which produce it. Consider:
- Where do you think the “art” is located?
- Does algorithmic art require a computer?
There is no submission due for this reading, but you may be called upon to discuss this article in recitation or class, or this may show up in a quiz.
2. Technical Readings
- Read Michell3’s Do’s and Don’ts of Style.
- Read W3Schools on JavaScript variables. Optionally, If you’re having a hard time understanding variables, do the 6 small exercises at the bottom of that page.
3. Looking Outwards 02: Generative Art
This deliverable is to be your second Looking Outwards report. Our topic for this week is Generative Art: art whose forms (images, sculptures, etcetera) have been generated by algorithms – algorithms created by artists, designers, architects, musicians, and poets.
Generative art refers to any art practice where the artist uses a system, such as a set of natural language rules, a computer program, a machine, or other procedural invention, which is set into motion with some degree of autonomy contributing to or resulting in a completed work of art.
– Philip Galanter, What is Generative Art? (2003)
Some places to get started include:
- This list of blogs and feeds.
- This list of generative artists.
- The creators linked from the ScriptedbyPurpose exhibition.
- The link archive at RadicalInfo for Algorithmic Art by Remko Scha.
- The Wikipedia article on Generative Art (could be helpful to scan).
- The work of other creators like Marius Watz, Lia, Casey Reas, Michael Hansmeyer, Quayola, Jonathan McCabe, Allison Parrish, Mitchell Whitelaw, Tina Frank, Iñigo QuÃlez, Joshua Davis, David Wicks, Robert Hodgin, Dr. Woohoo, Erik Natzke, Dave Bollinger, Moka, Matt Pearson, Alex Dragulescu, Paul Prudence, Jared Tarbell, Memo Akten, Glen Marshall, Holger Lippmann, Markos Kay, Jessica Rosenkrantz and Nervous System, Marcin Ignac, Leonardo Solaas, Philip Rideout, Mario Klingemann, Altered Qualia, Frederik Vanhoutte, Karsten Schmidt, or Leander Herzog. (Post a private message on Piazza if you find a broken/missing link here.)
Identify a project or work which you find inspirational. In a blog post of about 150-200 words, address some/all of these questions:
- Regarding the project, what do you admire about it, and why do you admire these aspects of it?
- What do you know (or what do you suppose) about the algorithm that generated the work?
- In what ways are the creator’s artistic sensibilities manifest in their algorithm?
Store this short essay in your handin-02 folder in the subfolder andrewID-02-LO under the file name blog.txt.
NEW STARTING THIS WEEK: Also, post your blog on WordPress using your nickname, and in addition to the blog text:
- Include a link (if possible) to the work. To the best of your abilities, be sure to provide the creator’s name, title of the work, and year of creation.
- Embed an image and/or a YouTube/Vimeo video of the project.
- Label your blog post with the Category, LookingOutwards-02.
- Also label your blog post with the Category for your section, e.g. Section A.
As a reminder, you may find it helpful to refer to:
- these instructions about how to publish to this WordPress blog, and
- this explanation of expectations for a Looking Outwards report.
4. Assignment-02-A (Visual Harmonies)
This programming Assignment (to be written using p5.js, and uploaded to Autolab) is intended to sharpening your skills using variables.
Study the following 400 X 400 canvas. You will notice that there are a number of “visual harmonies” (for example, there are two rectangles whose left edges are coincident).
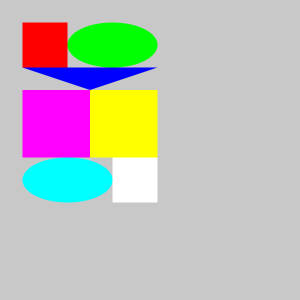
Below is a p5.js program which produces the above diagram (with some crucial pieces hidden). Of course, the harmonies are the result of numbers which articulate relationships of size and position.
|
Your task is to complete the program, using the variables shown, to complete these visual harmonies and recreate the picture. Note that these objects are “attached” to each other so we can use the variables to move the collection around as a unit or stretch the collection horizontally or vertically.
To better understand the harmonies, study the version below that has an embedded grid so you can see the positions and relationships of the objects to each other and the canvas:
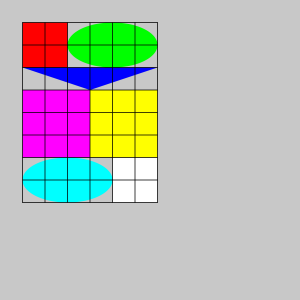
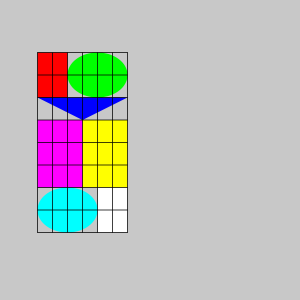
The top left of the red rectangle (and the entire collection) is (x, y). The width of each grid cell is w and the height of each grid cell is h. NOTE: in the picture above, these are all set to 30, but they could be different. Here is a picture where x = 50, y = 70, w = 20, and h = 30:
The requirements are:
- Store a copy of the template-p5only folder in your handin-02 folder and rename it andrewID-02-A. Inside this folder, copy the starting program above into sketch.js.
- Replace every “??” that is used as a parameter in the
ellipse(),rect()andtriangle()calls with some arithmetic formula consisting of some combination of the variables x, y, w and/or h, in order to reproduce the diagram. You can use the variables by themselves (e.g. y), or in combination with another using arithmetic (e.g. x + (3*w) ).- PROGRAMMING HINT: Uncomment each shape one at a time, working on its parameters before moving on to the next shape. Don’t try to solve the entire program before running it.
- There should not be any “hard-coded” coordinate numbers inside the revised invocations of
ellipse(),rect()andtriangle(); all of the shape objects should be drawn with respect to x, y, w and/or h only. - Do NOT draw the black grid lines. They are only drawn in the 2nd and 3rd pictures to help you visualize the overall sizes with respect to x, y, w and/or h.
- Once you have all shapes coded, you should test your program for different values of x, y, w and/or h to make sure the overall picture remains the same in terms of its visual harmonies. Put another way, the shapes should stay connected and in the same relationship as in the original picture. If something is out-of-whack, go back to those shapes and fix their parameters.
- In this and all future assignments, you must include additional comments to make your code more readable. For example, use comments to indicate which parts of the drawing are being drawn by which parts of the code.
- Put the following information as comments at the top of your program:
- Your name.
- Your class section.
5. Project-02: Variable Faces; Face Variables.
In this Project, you will create a face which has at least three aspects of variability.
“Chernoff Faces” are an example of generative faces, which are widely used in information visualization:
[From Wikipedia] “Chernoff Faces” are an information visualization technique, invented by Herman Chernoff in the early 1970’s, which represents multivariate data in the shape of a human face. The individual parts, such as eyes, ears, mouth and nose represent values of the variables by their shape, size, placement and orientation. The idea behind using faces is that humans easily recognize faces and notice small changes without difficulty. Chernoff used 18 variables (such as eyebrow height, jaw size, etc.) to describe a face.
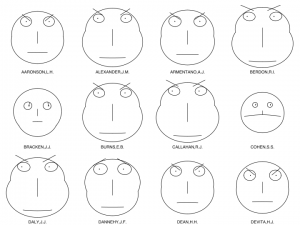
Paul Ekman’s Facial Action Coding System, by comparison, uses 46 variables to describe a facial expression. Each of these dimensions corresponds to the action of some muscle in the face.
For another example of generative face art, consider this lovely work by the young German new-media artist, Moka, in which he wrote an algorithm to imitate his own hand-drawings:
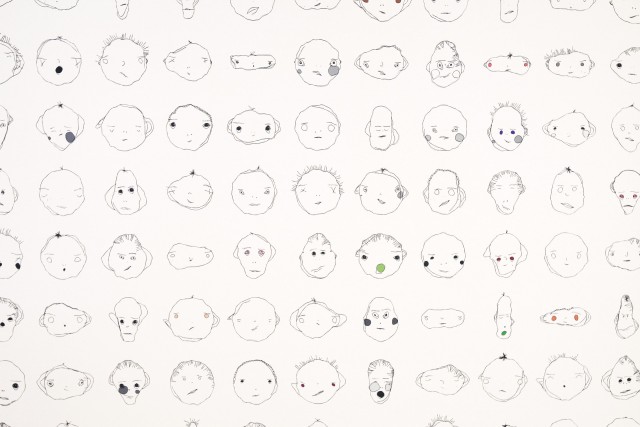
For your Project-02, create a generative face which has at least three aspects of variability, but preferably more. For example, you might have variables that specify the size, position, color, or other visual characteristics of the eyes, nose, and mouth. These could modify the face’s expression (happy, sad, etc.), and/or the face’s identity (John, Mary, etc.), and/or the face’s species (cat, monkey, etc.). You may develop this from your previous face project, or you may create an entirely new face if you wish.
- Consider whether your face is shown in frontal, profile, or three-quarters view.
- Consider things like skin color, stubble, hairstyle, piercings, interpupillary distance, cephalic index, etc.
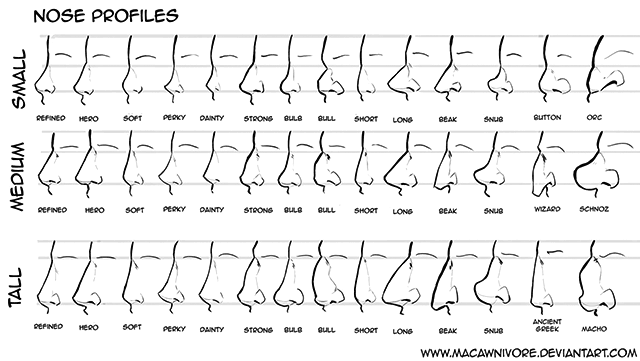
- Give special consideration to the shape of face parts, such as the shape of the head, nose, or chin. (This is a great time to experiment with curveVertex() if you haven’t already.)
The requirements are:
- Store a copy of the template-p5only folder in your handin-02 folder and rename it andrewID-02-project.
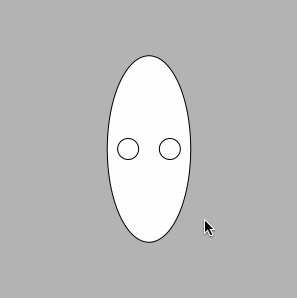
- Using a canvas size whose dimensions are 640×480 (or 480×640, whichever you prefer), create an interactive program in the sketch.js file using p5.js that generates a new face whenever the user clicks the mouse. Be sure your face has at least three aspects of variability. See the code example below for a very simple program to show you how to get started.
- Comment your code – it should be easy to tell how the code works, e.g. if the
ellipsefunction is used to draw both eyes and heads, use comments to make it clear which is which. (Note: adding comments while you are programming to document your thought process are a good idea.) - Test your program thoroughly to make sure it works as you intended on each mouse click.
NEW STARTING THIS WEEK: You will post your solution on the WordPress site for other students to see.
- Embed your p5.js sketch in a blog post on this site, using the (usual) instructions here. Make sure that your p5.js code is visible and attractively formatted in the post.
- In your blog post, write a sentence or two reflecting on your process and product. In discussing your process, it would be awesome to see any of your paper sketches from your notebook; these could be as simple as photos captured with your phone.
- Label your project’s blog post with the Category Project-02-Variable-Face.
- Also label your project’s blog post with the Category of your section, e.g. Section B.
SIMPLE EXAMPLE
Here’s a very simple example you can use to get started. Notice how the variables are re-assigned (randomly) whenever the mouse is pressed:
|
Here’s what that template looks like, when you run it and click a few times:
This template presents the minimally viable solution. We expect you to do something much more creative than this in order to earn a 2 or 3.
HELPFUL HINT: Let’s say one of your facial features is a random expression (happy, sad, angry, etc.). You can do this by setting up a variable (e.g. mouth) that has a random value of 1, 2, 3, etc. (one for each expression). Then you can use if-else in your draw function to test the current value to draw the expression:
|
1 2 3 4 5 6 7 8 9 |
if (mouth == 1) { // draw a happy mouth } else if (mouth == 2) { // draw a sad mouth } else if (mouth == 3) { // draw an angry mouth } else { // draw an expressionless mouth } |
6. Hand in (and post) your work
- Zip (compress) your handin-02 folder, which should contain folders containing your blog essay, assignment and project, and upload your zip file to Autolab, using the provided instructions..
- Remember to post your blog and your project in two separate posts on the WordPress course website with appropriate category labels so we (and students) can find your work easily.
Your zip file handin on Autolab must be submitted by Saturday, September 11th by 11:59PM EDT to be considered on time. Your blog and project posted on WordPress should be the same or similar to what you submitted in Autolab and should also be posted by the due date. (You may make minor corrections on WordPress for formatting issues.)