Assignment 8: Final Crit on “Draw Your Music” (SooJin Sohn)

DRAW YOUR MUSIC

My final project, in short, lets a webcam to scan and utilize a drawn image from a user, then output it into audio.

Description

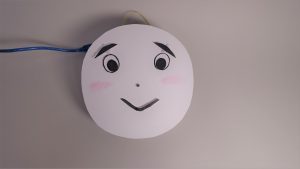
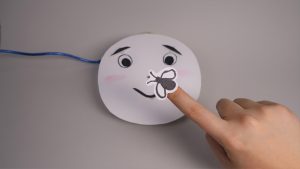
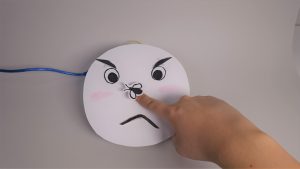
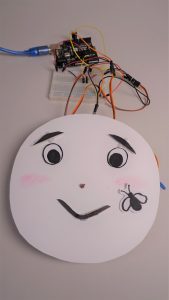
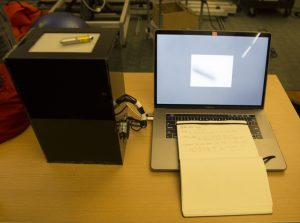
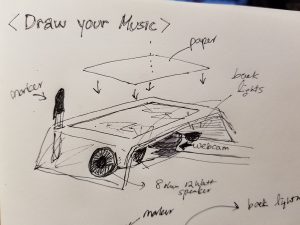
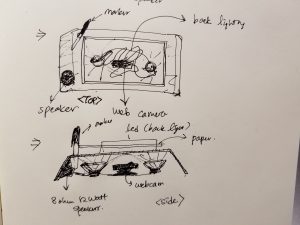
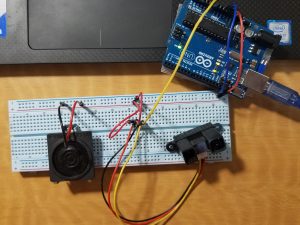
Specifically, this project connects with both Arduino and Processing, which activates a webcam to color track the color of a red laser pointer, locate its coordinates within the camera vision range, and translate that into audio ranging from 100Hz to 500Hz. The audio plays on a real-time basis, through a 8-ohm 12-watt speaker. Finally, the power is sourced from my laptop.

Major Changes

Initially, the plan was to have a usb web camera to make a screencap of a fully colored, hand-drawn image, then auralize it using Arduino’s pitch files. I have been spending the past 3 weeks to code 5 different

The biggest challenge and the problem was to merge all codes into one, where captured webcam image data had to all be converted from 2d arrays into bytes. Audio data was hard to manipulate with byte type data communicated through Processing.

Having to realize very late, I decided to simply the idea of screen capturing and analyzing web camera monitors. Thankfully, as I was simplifying the codes I had, I also learned that I could make a more interesting form of interaction. Specifically, I ended up creating a semi-tangibly interactive object, where the user shoots laser beams to interact with the machine, using a laser pointer instead of his/her hands. This was also funny since, this final format was rather very close to my very initial final project idea, where I was attempting to make a theremin-like guitar, that used a laser as a main playing tool.

Reflection + Future Plans

After finishing project, I am now having hopeful thoughts about actualizing my very initial final project idea of making a laser-guitar. I would use some slick-colored acrylic boards to cut an electric guitar, with a translucent white acrylic, interactive tracepad attached in the middle instead of 6 strings. I would 3d print, or laser cut a guitar pick that would function as a laser pointer on its own. Lastly, I would change my selection of web camera, where I can manually fix its focus setting and vision range. ( this will ultimately have me achieve a design where the webcam can still be located closer to the interaction panel)

Documentation on Google Drive(Code/Pictures/Video): https://drive.google.com/open?id=1_hBXMw25CjPZ_EIG4wJ7HDTKHdAacyU6


Assignment 7: Rough Crit on “Draw your Music”

This project again, simply turns images into sound; but based upon hand-drawn objects. Given that the construction of this project involves heavy coding before coming up with a hardware, I’m posting different codes and the execution of each code below:

  1. Arduino-Processing serial communication
  2. Start web camera, GRAY filter + capturing image when a keyboard button is pressed
  3. Load pixel values of the captured image, make update for any changes in the values.

All codes in Google Drive: https://drive.google.com/open?id=1MVJYFVdMPggZBqlvWBN4f_pIi2wlqiRa

Assignment 6: Final Project Proposal – “Draw Your Music”

SooJin Sohn – DRAW YOUR MUSIC (Proposal – Draft 1)

  • Abstract/Concept:

The core objective of this project is to explore the possibilities in conversion of media through user interaction. This project is designed to capture and scan a hand-drawing on  a piece of paper, translate the coordinates of the drawing into musical notes.

  • Material:
    1. Arduino UNO – 1
    2. Clear acrylic boards (paper scanning area)
    3. White paper
    4. Black marker (the ink needs to be strong and heavy enough to bleed through the other side of the paper)
    5. A web camera
    6. some back lighting material for eliminating shadows
    7. A push button – that triggers the camera to initiate scanning/translating of drawing into music
    8. Some heavy Processing/MAX and Arduino coding
  • Plans for Production:
    1. Make sure to build the code in the following steps:
      • Control the webcam to capture a fixed frame size of a paper.
      • Manipulate the captured image into grayscale, and define an array that saves all RGB values of each pixel.
      • Map the captured image pixels into 0 to 1, and 50Hz to 1500Hz (serial communication between Arduino and Processing)
      • Print the mapped value coordinates
      • Serial communicate the coordinate values to Arduino, and print the coordinates into auditory data.
    2. Build the hardware
      • Use the acrylic boards, and glue the webcam along with the back lighting switch.
      • Connect a simple push button switch to the Arduino (the push button should work as the trigger for scanning and initiating the translation of the image to music)

Assignment 5: Treat for a Trick (Currently Fixing)

As shown through the prototype, this project is designed to simulate a common horror movie scene, where the background music plays faster with higher pitch as a character approaches closer to a subject.

Likewise, in this project, the user will be hearing a shrill sound that plays faster as he/she reaches his/her hand closer to a candy (I changed my  initial music choice from harmonic minor scale to a violin screech sound effect).

(picture of the final product)

(picture of the final product close-up)

(picture of interaction)

For the final product, I decided to use an ultrasonic distance sensor instead of an IR distance sensor, since the sensing range was broader, which thus, allows a smoother interaction. For the speaker, I decided to use a larger, 8 ohm 2 watt, audio speakers through an addition of audio amplifiers.

In order to enhance the spook-factor, I decided to add an output vibrator attached to the target treat, where it would start vibrating when the distance sensor reads the user’s location to be close enough to the treat.

Documentation in Google Drive (Video X /Fritz X /Photos X /Code X): https://drive.google.com/drive/folders/0B70fyRiHk85qSW9vcDNuV0I2Y3c?usp=sharing

Assignment 5: Prototype for ”Treat for a Trick” (Title likely to change)

For this assignment, I am planning to play a creepy melody of a harmonic minor scale, and modify either of its speed or pitches depending on how close the user gets to an object through the sensing of a distance sensor.

This was inspired by the typical horror movie scenes, where a scene’s atmosphere intensifies as the creepy background music plays either faster or higher in pitch, while the camera gives a fast-paced, zooming-in shot of either a mysterious object or a character

To make it more Halloween-specific, I am trying to place a candy as the object that the user would be interacting with. As the user approaches closer and reaches out for the candy, the creepy melody will be playing more intensively.

As for the prototype, I’m changing the speed of the playing speed of a melody, as the distance read from the distance sensor becomes shorter (the user gets closer to the object).

Documentation in Google Drive (Fritz/Video/Code): https://drive.google.com/open?id=0B70fyRiHk85qWWowSGwtYnZlMk0

Assignment 4: Mission Impossible Line Action

Project Description:
Inspired by the movie Mission Impossible, I decided to use a DC Motor and a H-bridge to show a wire action of a miniature character (designed and sculpted by Tatyana Mustakos).

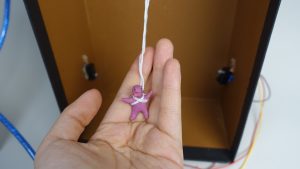
The situation I planned to portray was: The character approaches to a target treasure (white LED), going down from the ceiling. However, the character touches the security laser beam (expressed through an IR break beam) of the room, then triggers the wire to wind the character back, up to the ceiling.  Then, once the IR beams stabilize, the wire will reverse its winding direction, letting the character go down towards the target treasure again. This motion will happen in a loop.

One biggest trouble I had was maintaining the stability of the circuitry for this. While I had to mount all hardware parts to the set box,  I had to make sure each wire wasn’t falling off of each other due to gravity.
Due to these mechanical stability issues, I ended up burning my arduino up while documenting for this project. The wire motion has been moving okay, however, the motion does not perfectly sync with the ir break beam all the time, so the wires end up winding/unwinding more than they need to.

What I’ve learned:
MOTORS and H-BRIDGES ARE QUITE TRICKY (to me, at least). I’ve burnt up so many parts (wires, fans, h-bridges, AND my arduino) and I even shocked my own laptop. I had some mad fun with these happenings.

Google Drive (code/fritz diagram/ Video): https://drive.google.com/drive/folders/0B70fyRiHk85qWEZWOEF6RzZyTFk

*VIDEO*: I will re-upload the video once I get a new arduino (I burnt my arduino while documenting, and I didn’t get to capture any motor movements while the circuitry was perfectly fine)

Assignment 3: There’s a Fly on My Face

The emotion i was willing to portray through this project were happiness and anger(more like annoyance).

Upon using a face drawing, I decided to use a photo-resistor as the switch for transitioning between the two emotions.

As to add a context to the change in emotion, I further decided to regard the user’s finger as a fly that perches on the face’s nose (which is also where the photo-resistor is placed at) as the anger-triggering factor for the face.

Storyboard:


Google Drive Link (Video/Fritz/Code):
https://drive.google.com/open?id=0B70fyRiHk85qQXVGYUxWRTR5dEE