LaserCut

OVERVIEW


LaserCut provides a Universal Platform in which Users may import CAD Geometry, and prepare the File for Laser Processing. Users must have experience with any CAD Platform (or a Vector Based Graphics Program, i.e. Adobe Illustrator, CorelDraw etc.), to successfully operate within the LaserCut Software Environment. Users should also have completed Fire Extinguisher Training, and Policy/Procedure Training to successfully operate the Laser Equipment.

LASERCUT


lasercut_iconFind the LaserCut Application Icon on the Computer Desktop, and open the Application.

FILE > IMPORT

lasercut_interface

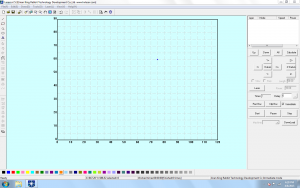
The LaserCut Interface, features various Drop-Down Menus from the Top of the screen; Command-Icon Buttons along the top and left side; a color-bar along the bottom, and Equipment Control/Layer Manager on the right side. The majority of the interface is a window, with a grid-layout. This is a TOP View of the Laser Equipment Cutting Table.

Begin, by importing a previously prepared CAD File. Adobe Illustrator (.ai) and AutoCad Drawing Exchange (.dxf) File Formats will work best for Laser CUTTING/SCORING/ENGRAVING; whereas Image formats (i.e. [.jpeg]) will work only for ENGRAVING. To import a file, browse to the ‘FILE’ Menu, and find the ‘IMPORT’ Option. Find and select your file location from the Import Window.

TOOLS > UNITE LINES

lasercut_unite_lines

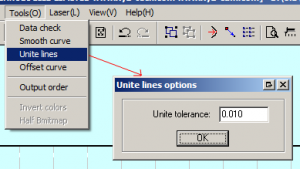
Your CAD Geometry, will be placed on the Grid. All Geometry should appear as the same color. During the import, all Joined Curve Geometry is separated/exploded into single segments- separated by their Start and End Points. Fix this issue, by selecting ALL of your Geometry (CTRL+A), then, find the ‘TOOLS’ Drop-Down Menu, and select ‘UNITE LINES’ from the list of options. A new window will appear, prompting your input for a Tolerance Value- the default setting is sufficient, Select ‘OK’ and your Geometry will be re-joined. This will create a more efficient Laser process.
BACK TO TOP

LAYERS
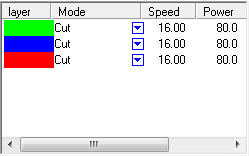

lasercut_layers Within the LaserCut Application, a User can control the order in which Geometry is Processed; and the Mode in which Geometry is Processed. To control any of these parameters, your geometry must be separated onto Layers. Your Layer Menu is located in the top-right of the LaserCut Interface. To place geometry on a Layer, or Create a New Layer, select ALL Geometry you would like to separate onto an individual Layer; then, Select a Color that suits your taste from the Color Bar at the bottom of the LaserCut Interface. Within your Layer Menu, you will find the new color listed under the Layer Column.

LAYERS > CUT ORDER

lasercut_color_layers

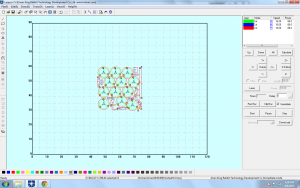
To control Cut Order, simply select a Layer, and drag it downward or upward in the Layer Menu. The Topmost Layer will cut first, and the Laser Equipment will continue to process geometry from the topmost layer- down. Cut Order, may or may not be important- depending on your File, Geometry, and Material. It is common practice, however, to cut out smaller areas first, and larger areas second. Certain Materials can bend or warp when heat is applied, so it may be necessary to cut internal structures before cutting outer/surrounding/external geometry.

The image above, indicates that all Geometry appearing in GREEN, will be processed first. BLUE Geometry, will be second- and RED Geometry will process last in the Cut Order. Note, that smaller internal geometry is cut first, and external surrounding geometry is cut last.

LAYERS > CUT MODE


lasercut_color_layers

Laser Modes, indicate how the Geometry should be processed. If you select the arrow, within any of your Layer’s Mode Columns, it will create a drop-down menu; allowing you to change how Geometry on each layer is processed:

‘CUT’ Mode, indicates that your geometry will be processed as Cut Lines, this Mode is most often used- and will cut through your material completely, as long as you’ve indicated the correct settings for Speed and Power.

‘ENGRAVE’ Mode, indicates that your geometry will be processed as Engraving Areas. To Engrave, you must have completely closed geometry (i.e. the Curve Start Point, and End Point exist in the same location) Alternately, you can import an image, and process as an Engraving File.

‘GRADE ENGRAVE’, indicates that your geometry will be processed as Gradated Engraving Areas. This is similar to ENGRAVE Mode, but different in that the engraving will adjust from a lighter engraving power near the edge areas, and a deeper engraving power near the center of you Engrave Areas. To Engrave, you must have completely closed geometry (i.e. the Curve Start Point, and End Point exist in the same location) Alternately, you can import an image, and process as an Engraving File.

‘HOLES’ Mode, is specifically for Circle Geometry, and useful for precise operations and parts. This Mode will control the Start and End Point Power for Circle Geometry, reducing fire hazards, and providing the User with less warping.

In the image above, ALL of our Geometry is listed as ‘CUT’ Mode. All Geometry will be cut completely through, in the order of the Layer List.

MODE SETTINGS


Each Mode, requires User Input settings, that will typically control Laser Speed, and Power. These settings, are dependent on Material Selection, Material Thickness, and the Laser Processing Mode. Users are responsible for knowing these values. It is difficult to remember every setting, for each combination of Material, Thickness, and Mode, so we’ve created a web-based form, that will assist you with these settings. Visit the [RABBIT] Laser Settings Page, and fill out the necessary information in the form-fields. Select the search button, and a new window will appear, with various tested-and-approved settings for your specific Laser Operation. To change your Mode’s Settings, Double-Click on the Layer you wish to edit, and a new window will appear with various parameters. Take the information from the [RABBIT] Laser Settings Results Page, and input them accordingly into the available fields.

Frequently, you may have a material that IDeATe@Hunt has yet to record settings for. In the event you cannot find settings for your operation/material- you may have to do some testing before-hand. Figuring out the correct settings, may take some time- but once you’ve figured them out, providing the information to an IDeATe@Hunt Staff Member, will ensure the successful future operation of similar Laser Processes. While testing, it is important that you recognize how SPEED and POWER can affect your outcome:

SPEED: Too much speed, won’t allow the Laser to pass through your Material. Faster Speeds (50%-100%), are useful for thinner and/or less dense materials- such as cardboard, matte board, illustration board, or paper. Slower speeds (1%-49%), are useful for thicker and/or dense materials- such as acrylic, MDF, and Plywood.

POWER: Too much Power, will cause a fire-hazard, and possible warping of your material. Higher Power (50%-100%), is useful for thicker and/or dense materials- such as acrylic, MDF, and Plywood. Lower Power (1%-49%), is useful for thinner and/or less dense materials- such as cardboard, matte board, illustration board, or paper.

You must find a safe, starting combination of these two values, before performing any test cuts. When in doubt, always use a lower power- this will eliminate additional, unnecessary fire-hazards. For instance, we could begin testing CUT settings for 1/8″ (3mm) thick Cardboard. If we use 50% Speed, and 100% Power, it will certainly CUT all the way through. However, the Power Setting is TOO HIGH for this material. Instead, start with 50% Speed, and 40% Power- if it doesn’t cut through, lower your Speed by 5%, and raise the Power 5%. Repeat this process until you’ve found reliable and consistent settings.

DOWNLOAD

lasercut_download

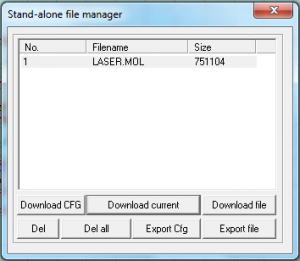
After you’ve imported your file, completed the UNITE LINES Command, organized your geometry onto layers, adjusted your Cut Order + Cut Mode, and input Laser Mode Settings- you must DOWNLOAD your file to the Laser Equipment. In the Equipment Control/Layer Menu, on the right-side of your LaserCut Interface; you will find a button near the bottom, labeled : ‘DownLoad’ Find and Select this button- and a new window will appear. This window will list any files that are currently downloaded and stored on the Equipment’s Flash Memory. Begin, by selecting the ‘Del all’ Button, to clear all existing files from the Equipment’s Memory. Next, find and select the ‘Download current’ Button, to download your current file into the Equipment’s Memory. Your file will be sent to the Laser Equipment, and you may begin Equipment and Material Preparation.

EQUIPMENT PREPARATION


Your file has been downloaded into the Equipment’s Memory, and it is ready to be processed- however, there is a specific set of tasks that must be completed before your file may be processed. Follow the Equipment’s Procedural Steps before beginning your Laser Job.
File Prep

OVERVIEW


This Guide details items and workflows discussed and reviewed during class. The Guide will assist with File Preparation for Project 1, reviewing Options, Settings, and Geometry Prep.

OPTIONS


  1. Begin by setting the correct options. Type OPTIONS into the Command Prompt and press ENTER.Units: Begin by determining the form of measurement you would like to use. Regardless of your selection (Metric or Standard), you should select a Unit that is relative yo your project’s work size. We should be using Inches, or Millimeters.
  2. Grid: Set your Grid Size & Snap to something accommodating.
    1. Inches:
      1. Grid Line Count = 360
      2. Minor Grid Lines = 0.25
      3. Major Grid Lines = 4
      4. Snap Spacing = 0.25
    2. Millimeters:
      1. Grid Line Count = 1500
      2. Minor Grid Lines = 5
      3. Major Grid Lines = 2
      4. Snap Spacing = 5
  3. Snaps: Turn your Grid Snap, and Object Snap ON. The following O-Snaps should be activated:
    1. End
    2. Mid
    3. Cen

LAYOUT


  1. Simulate your workzone, by creating a RECTANGLE that resembles the size of your work area.
    1. RECTANGLE (in)
      1. First Corner = 0,0
      2. Other Corner = 47.2441” x 35.4331”
    2. RECTANGLE (mm)
      1. First Corner = 0,0
      2. Other Corner = 1200mm x 900mm
  2. Simulate your stock by creating a RECTANGLE that resembles the size of your Material.
    1. RECTANGLE (in)
      1. First Corner = 0,0
      2. Other Corner = 12” x 12”
    2. RECTANGLE (mm)
      1. First Corner = 0,0
      2. Other Corner = 305mm x 305mm

ARRANGE


MOVE your Workzone RECTANGLE, from its Center Point, to the Grid Origin Point. (0,0,0)

  1. Select your Workzone RECTANGLE, and place it on its own Layer. Re-title the Layer as ‘WORKZONE’. Lock the Layer.
  2. MOVE your Simulated Stock, from its Center Point to the Grid Origin.
  3. Select your Simulated Stock, and place it on its own Layer. Re-title the Layer as ‘Stock’. Lock the Layer.

CREATE


  1. Create a Large CIRCLE
    1. Center of Circle = 0,0
    2. Diameter = 8” or 205mm
  2. Create a Small CIRCLE
    1. Center of Circle = (0,3”) or (0,76.2mm)
    2. Diameter = 1” or 25.4mm
  3. Select the smaller circle, type ARRAYPOLAR into the Command Prompt
    1. Center = 0,0
    2. Number of Items = 12
    3. Press Enter
    4. SELCIRC and transfer all smaller diameter CIRCLEs to their own layer.
  4. Create TEXT
    1. Height = 1” or 25.4mm
    2. Value = 12
  5. Select your TEXT, and type MOVE into the Command Prompt
    1. MOVE your TEXT from Center Point
    2. MOVE your TEXT to the Center Point of the 12 o’clock Circle
  6.  Duplicate your TEXT and re-number with one of the following options
    1.  ARRAYPOLAR
      1. ARRAYPOLAR your existing TEXT.
      2. Re-number the TEXT by Double-Clicking the TEXT.
    2. COPY
      1. COPY your TEXT from Center Point to Center Point.
      2. Re-number the TEXT by Double-Clicking the TEXT.
    3. TEXT>MOVE
      1. Use the TEXT Command to create new TEXT.
      2. MOVE the new TEXT from Center Point, to Center Point.
  7.  EXPLODE TEXT
    1. Type SELTEXT into the Command Prompt, then EXPLODE your TEXT
  8. Play
    1. Utilize Curve and Polyline Commands to create Cutting and Engraving Geometry for your Clock Face. Make it unique- make it your own!
  9. EXPORT SELECTED
    1. Select the Geometry for Laser Processing ONLY. Turn OFF any Layers that will not be processed. Export the Geometry as AUTOCAD [.dxf] Filetype. Choose ‘Default’ when prompted.

LASER OPERATION


  1.  Import
    1. Import your file into LaserCut.
  2. Operation
    1. Adjust Vector vs Raster Settings by setting specific geometry on specific Setting LAYERS.
    2. Observe all Laser Policy
    3. Operate Laser Equipment, using proper Procedural Guidlines

Project1

OBJECTIVE

Provide a physical item that illustrates your ability to develop a 2D Geometry file,  prepare the CAD file in secondary laser application, and utilize laser cutting, engraving and scoring techniques.

CRITERIA

  • Prepare a CAD File that utilizes application options, 2D Curve/Polyline geometry, layers & editing tools within Rhinoceros 3D
  • Geometry must be prepared for laser cutting, engraving and scoring processes
  • Successfully export from Rhino as [.dxf] file-type, and import into LaserCut
  • Properly prepare LaserCut file settings/preferences
  • Exhibit understanding of Equipment Policy & Procedure
  • Participate in Fire Extinguisher Identification and Use Training, provided by Environmental Health & Safety
  • Provide documentation of your work (Rhino File, LaserCut File, Images)
SUGGESTED PROJECT

*READ ME* The following is a suggested project. You are NOT required to follow these guidelines. You may create your own original project if you prefer:

Using a Clock Kit, and Acrylic Sheet- utilize Laser Cutting, Engraving and Scoring Techniques to create a functional Clock. This Project should illustrate the User’s ability to properly prepare a CAD File within Rhinoceros 3D for Laser Processing.

TOOLS

SUGGESTED MaTERIALS

  • (1) 12″ x 12″ x 1/8″ (305mm x 305mm x 3mm) Acrylic Sheet
  • (1) Clock Kit
RESOURCES

STEPS

1

Step 1

1. Begin by determining your Tools, Application Environments and Materials :

i. Tools: Rabbit Laser System

a. Power: 80 Watt

b. Bed Size: 1200mm x 900mm (47.25in x 36.43in)

ii. Applications: Rhinoceros 3D, LaserCut

iii. Materials: Available for purchase from IDeATe Lending (A29)

a. Suggested: Acrylic Sheet : 12″ x 12″ x 1/8″ (305mm x 305mm x 3mm)

b. For Suggested Clock Project: 12″ x 12″ x 1/8″ (305mm x 305mm x 3mm) & Clock Kit

2

STEP 2

2. Prepare your CAD File

i. 2D Geometry: Begin drawing and outlining your CAD file with Curve/Polyline creation and editing commands. Rhinoceros 3D Tutorials, Rhino File Prep for Clock Kit

ii. Organization & planning: Create Layers, and label them as ‘CUTTING’; ‘SCORING’ & ‘ENGRAVING’. Make the layer geometry identifiable by changing the layer color. Transfer geometry to these layers as necessary, to keep your file organized and understandable.

3

STEP 3

3. Export your CAD File

i. SELECT the geometry you would like to export. (DO NOT USE ‘Save as..’)

ii. Go to the FILE drop-down menu, and select the EXPORT SELECTED option.

iii. Export your file (preferably to a USB Flash Drive) as an AutoCAD [.dxf] file format.

4

STEP 4

4. Import, prepare, & send your file: LaserCut Tutorial

i. Find an open/available Laser System- using the computer, transfer your AutoCAD [.dxf] file to the desktop.

ii. Open the LaserCut Application.

iii. IMPORT your AutoCAD [.dxf] file into LaserCut. (use IMPORT, not OPEN)

iv. Unite Lines, and begin setting your preferences for each grouping/layer.

v. Download the file to the Laser Equipment.

5

STEP 5

5. Complete the process *see note 5

i. Prepare your material for Laser processing.

ii. Properly set the Z-Axis, and power ON the Lighting, Laser Power, and Socket Switch buttons.

iii. Close Lid, and use TEST to draw outline of Laser file.

a. IF all is aligned properly: Close lid and push START

b. IF TEST outline goes over your Material boundaries, adjust settings and/or file, re-download, and re-TEST.

*Note 5: The following should be completed and exercised to achieve & retain access to IDeATe Laser Equipment:

1. User must review and follow Laser Equipment Policy

2. User must review and follow Laser Equipment Procedure

3. User must participate and complete Environmental Health & Safety’s Fire Extinguisher Identification and Use Training

i. Fire Extinguisher Identification Training is offered in-class

ii. If you missed class on this day, you should schedule/reserve a spot in the next offering.

6

STEP 6

6. Submission/Documentation/Review: Guidlines

i. Provide (5) Semi-Professional Photographs of your work.

ii. Submit all relevant files:

a. Rhino File [.3DM]

c. LaserCut File [.EPS]

Introduction

Overview


Rhinoceros 3D is a NURBS Modeling Platform, allowing Users to directly develop and edit Curves, Surfaces, Solids or Meshes; within a 3D or 2D Work Environment. Using various Commands, Users begin to realize Creations more fluently, and the input gained becomes an essential part of their Work Method. More in-depth discussions, covered in future tutorials, will improve your understanding on how to use this platform efficiently, and the role 3D Modeling plays within several relative Creative Workflows.

DropDown Menus


Every Rhino Command, Macro, Preference, and Setting can be accessed from these menus. For beginners, it is very useful to get acquainted with these.

Command Prompt


The Command Prompt allows you to call commands or macros via text. Simply type in the Command, and press ‘ENTER’, ‘SPACEBAR’ or ‘RIGHT-CLICK’. The autocomplete option is very useful. If you partially type a command, Rhino will give you a listing of every command similar to your entry. Fuzzy Auto Complete is also useful, for those Users who begin to become more familiar with the Software. Enabled by default, fuzzy autocomplete suggests the most used candidate. For example, ‘LI’ most likely autocompletes to Line rather than something like LimitReferenceModel, and the autocomplete menu contains best partial and inexact matches.
BACK TO TOP

Viewports


Viewports are the majority of your initial view within Rhino. By Default, FRONT, TOP, RIGHT, and PERSPECTIVE Views are activated. Your Mouse Scroll Wheel will allow you to Zoom In and Out within all Viewports. CTRL and SHIFT Keys will activate different functions within these Views. For example, Right-Click and Drag within the TOP, RIGHT, or FRONT Viewports, will allow you to PAN; whereas SHIFT + Right Click within your PERSPECTIVE Viewport will allow you to PAN. You can Double-Click any Viewport Title to maximize the Viewport. Alternately, Double-Clicking a maximized Viewport will return you back to your default set-up with all (4) Views.
BACK TO TOP

Top Dock – Toolbar Groups


The tabs positioned along the top of your screen, directly underneath of the Command Prompt, are Toolbar Groups. Toolbar Groups are groupings of commands that are affiliated with similar workflows. You can Right-Click on any Toolbar Group Tab, to edit the properties, or show/hide specific groups.
BACK TO TOP

Left Dock – Toolbars


When we select certain Toolbar Groups, the Left Dock (Sidbar) Icons will change. These are some of the most common commands you will use in Rhino
You can customize your default toolbars by visiting the ‘Tools’ DropDown Menu and Selecting Toolbar Layout, or by entering Toolbar in the Command Prompt.
BACK TO TOP

Right Dock – Panels


Panels are located within the Right Dock. By Default, some of the more common Panels are loaded. The Properties Panel allows you to edit Object/Geometry Properties. The Layers Panel will allow you to organize your geometry onto Layers. Display Panel will allow you to depict the specific nature in which your geometry is represented on your screen. Finally, the Help Panel contains information on anything and everything Rhino Related.
BACK TO TOP

Bottom Dock – Snaps and Misc Settings


The Bottom Dock contains checkboxes pertaining to Object Snaps. These are only viewable if you have the ‘OSNAP’ setting activated (located at the lower-most center of your screen). Object Snaps are extremely useful for successful and correct 3D Modeling involving Post-Processing (i.e. 3D Printing, Injection Molding, Architecture etc.). By selecting the checkbox affiliated with ‘End’, any geometry we create will automatically gravitate towards existing geometry end points.

Below Object Snap, we have various quick selection settings. Your Grid Snap Settings are helpful when you prefer to use the Grid Lines for Reference Points. Ortho, will lock anything you create, to rotation limits (i.e. every 90 Degrees, 45 Degrees etc.). Planar will limit your geometry to Planar Locations, a setting best understood through experience, rather than explanation (try drawing a Polyline with the Setting OFF, and once with it ON)
BACK TO TOP

Getting Started – Options


Before you begin any Creation, you should tailor your workspace to your needs. Take for instance, Units of Measure- we can change our Units, (depending on your preference, or an outside entity) by entering Units into the Command Prompt. A new window will appear, and a DropDown Menu will allow you to change your Units to anything you desire. You can also access this setting by entering Options into the Command Prompt; or by visiting the Tools DropDown Menu, and selecting Options.

Another custom setting that will change depending on the Project, are your Grid Settings. The ‘Grid’, is featured in each one of your Viewports. The Grid is made of Major, Minor, and Axis Lines. Your Axis Lines are depicted by their bold Red and Green Colors. Your Axis Lines will change depending on your View- in the TOP View, Red is your X-Axis, and Green is Y-Axis. In your FRONT View, X-Axis remains Red, but your Green Axis Line is now corresponding with the Z-Axis. The point at which these two Axis Lines meet, is your Origin Point. This point is defined by the values X=0, Y=0, Z=0. Measurements from this point, can be referenced by your Major and Minor Grid Lines. Major Grid Lines appear in a bold dark-gray color; whereas your Minor Grid Lines appear as a thin, dark-gray line. While it may seem silly to think of these lines as tools- they will prove extremely useful when used properly with the Grid Snap Setting. You can specify the spacing of your Grid Lines by entering Grid into the Command Prompt. However, for beginners, it may be more suitable to enter Options into the Command Prompt, and browse to the Grid Options in the next window.
BACK TO TOP

Display Options


Different workflows will require different visual preferences. The ability to change the way your geometry is represented visually, can be accessed in a multitude of ways. To begin, let’s discuss the available choices:

Wireframe: Default Display Mode, Unshaded, IsoCurves and Exterior Curves.

Ghosted: Shaded, Objects appear translucent.

Shaded: Shaded, Opaque, Minimal Processing Power.

Rendered: Shaded, Simulation of Materials, Lights, Scene, and Camera; Medium Processing Power.

XRay: Shaded, Wireframe+Ghosted.

Technical: Objects appear as Technical Drawings are defined; w/ hidden lines etc.

Artistic: Soft lines, simulated Pencil Drawing effect.

Pen: Hard lines, simulated Pen Drawing effect.

To set your display mode, you can use the DropDown Menu affiliated with any one of your viewports. Alternately, you can enter SetDisplayMode into the Command Prompt. More commonly, Wireframe, Shaded, Ghosted, and Rendered Display Modes are used- thus, you may use Keyboard Commands to switch through these Display Modes: CTRL+(‘S’ = Shaded),(‘W’=Wireframe),(‘G’=Ghosted),(‘R’=Rendered). Go to the Help DropDown Menu, Select Help Topics, and type ‘Display Modes Options’ for more information.
BACK TO TOP

Layers


The ability to organize your geometry onto Layers, will prove useful with any workflow. It is a universal convenience!  The Layers Panel, in your Right Dock- will allow you to create as many layers as you like, organize, and access geometry as needed.

To create a layer, right-click in an empty space, and select New Layer. You are given the option to title the layer immediately, or you can double-click the text name and re-title the layer later on. Layers can also have SubLayers, and SubLayers can have add’l SubLayers, etc.

The Column Field immediately to the right of the Layer Name, is the Current Layer indicator (Check Mark). You may have only one Current Layer. When creating geometry, all objects will be saved to this Layer; so it is important that you place the check mark, next to the Layer you would like your geometry saved. If you forget to do this, you can always select the geometry you would like to transfer, then right-click on the Destination Layer, and select Change Object Layer from the DropDown Menu.

To the right of the Current Layer Column, we see the View Indicator (Light Bulbs). This Column controls whether the Layer is ON/Viewable, or OFF/Hidden. *Note: You cannot turn OFF your Current Layer.

In the next column, we have our Lock feature. If you lock a layer, the affiliated geometry will remain visible- but cannot be edited. This is useful with Object Snaps. Following the Layer Lock, a square color box, indicates the Layer’s Color. This will change the color of any geometry saved to the layer.

Lastly, we find the Material, Print Width, and Linetype Properties. Materials are affiliated with Rendering Workflows, and discussed in a separate Tutorial ([RHINOCEROS] Rendering Link *wip). Print Width and Linetypes are discussed in the next tutorial, [RHINOCEROS] 2D Modeling.
BACK TO TOP

Universal Tips


i. Typically, the ‘ENTER’ Key is used to activate the Command called from the Command Prompt. Several Commands in Rhino require multiple steps, and you should reference the Command Prompt frequently for instructions. The ‘SPACEBAR’ Key, and the Right Mouse Button will also function as the ‘ENTER’ Key. Use whatever is most efficient!

ii. You can Zoom with the Mouse Scroll Wheel in ANY Viewport.

iii. CTRL+Z will undo your previous command. Type Options into the Command Prompt, visit the General Setting Area, and you can adjust the max memory for the Undo Command. This will allow you to undo several operations.

iv. Commands can be called in (3) Ways: 1. Drop Down Menu Selection; 2. Entering the Command in the Command Prompt; 3. Calling for the command via Toolbar Icons/Buttons. Regardless of your selection, the Command will always appear in the Command Prompt History, above the Text Entry Area. You should begin making notes of the Text Format of the Commands, to become more efficient with your Modeling Technique.

v. Selecting any Geometry, and typing ZS into the Command Prompt, will Zoom to the Selected objects. Additionally, Left-Clicking and Dragging to your right, will create a solid outline window; any Geometry that is COMPLETELY within this window’s bounds, will be selected. Left-Clicking and Dragging to your left, will create a dashed-outline window; any Geometry that is within any portion of the window, will be selected.

vi. The Help Panel in Right Dock is extremely helpful. This Panel will AutoUpdate, when you call a command, this Panel will immediately display relative information on how to successfully carry out the command. Included are short videos (3-10 Seconds).
BACK TO TOP
END

Macbooks

During this course, we will utilize the Macbooks from IDeATe’s Virtual Cluster. The Laptops will be delivered and available for your use, during class-time. Outside of class meeting times, you can borrow a Macbook from IDeATe Lending (A29). Macbooks should be returned the same day, unless otherwise notified.

The Macbooks include dual-boot Windows & Mac operating systems, you’ll need to login to the Windows partition, in one of the following ways:

1. If your Macbook is NOT powered ON:

i. Find the OPTION & POWER Keys. While pressing & holding the OPTION key, press the POWER key once.

ii. When prompted, select the WINDOWS partition.

2. If your Macbook is powered ON, but logged into the Mac Operating System:

i. Shut-down the Macbook by selecting SHUT DOWN from the on-screen options in the login menu.

ii. Follow the instructions listed above.

**At the end of every class, you will have (5) Minutes to log-out of the Macbooks, and return them to the laptop cart. Any other items that were borrowed from the cart, must be returned in the condition (or better) than which they were received. [e.g. Wind up and wrap wired computer mice]

If you would like to borrow anything, you must visit IDeATe Lending (A29) and complete the check-out process.

Conversion

Standard (in) Metric (mm)
Fractional Decimal Decimal (Actual) Decimal (Common)
1/32 0.03125 0.79375 0.80
1/16 0.0625 1.5875 1.50
3/32 0.09375 2.38125 2.50
1/8 0.125 3.175 3.00
5/32 0.15625 3.96875 4.00
3/16 0.1875 4.7625 4.75
7/32 0.21875 5.55625 5.50
1/4 0.25 6.35 6.00
9/32 0.28125 7.14375 7.00
5/16 0.3125 7.9375 8.00
11/32 0.34375 8.73125 8.75
3/8 0.375 9.525 9.50
13/32 0.40625 10.31875 10.50
7/16 0.4375 11.1125 11.00
15/32 0.46875 11.90625 12.00
1/2 0.5 12.7 12.00
17/32 0.53125 13.49375 13.50
9/16 0.5625 14.2875 14.25
19/32 0.59375 15.08125 15.00
5/8 0.625 15.875 16.00
21/32 0.65625 16.66875 16.50
11/16 0.6875 17.4625 17.50
23/32 0.71875 18.25625 18.00
3/4 0.75 19.05 19.00
25/32 0.78125 19.84375 19.75
13/16 0.8125 20.6375 20.00
27/32 0.84375 21.43125 21.50
7/8 0.875 22.225 22.00
29/32 0.90625 23.01875 23.00
15/16 0.9375 23.8125 24.00
31/32 0.96875 24.60625 24.50
1/1 1 25.4 25.50

2D Modeling

Overview


This Tutorial reviews some of the more common 2D Geometry Commands. Creating 2D Line Geometry provides a fundamental platform for 3D  Modeling and Digital Fabrication Workflows. To begin, Users should understand how Line Geometry is defined. Every Line and/or Curve, is defined by Points- there is always a Start Point, and End Point. Some Geometry requires additional defining Point Geometry- such as Curves or Arcs. Even still, some commands use Point Locations to define specific Measurements, such as a Circle’s Center Point to Radius. Regardless of the scenario, it is important to understand that Point Geometry defines Line Geometry.

LINE


Menu Location: Curve > Line > Single Line

This command creates a Single Line, by indicating a Start Point, and an End Point. The command terminates itself after both Points are defined.

EXTEND


Menu Location: Curve > Extend Curve > Extend Curve

Use the EXTEND Command to lengthen, or shorten a Line. Pay attention to your command prompt, this will provide you with vital information on how the command is completed. You can indicate a Boundary Curve or Point to EXTEND to; or you can EXTEND Dynamically. As a final option, you may simply type in a value for your extension length.

POLYLINE


Menu Location: Curve > Polyline > Polyline

Polylines, simply put, are multiple line segments- strung together by their Start and End Points. Ultimately, the Command begins by defining a Start Point. Define the End Point, and this becomes the Start Point for your next Line Segment. Terminate the Command by pressing ENTER.

RECTANGLE


Menu Location: Curve > Rectangle > Corner to Corner

The RECTANGLE Command creates a closed, rectangular polyline. Begin by indicating a Corner, then define the Second Corner to terminate the command.

POLYGON


Menu Location: Curve > Polygon > Center, Radius

Creating a Polygon, will require some additional input within the Command Prompt. Begin the Command by indicating a Center Point; within the Command Prompt, you may change the Number of Sides by providing a numeric value. The Command terminates after defining a Radius.

CIRCLE


Menu Location: Curve > Circle

By default, the CIRCLE Command operates similarly to that of the POLYGON Command- in which the User defines the Center Point first, then the option of defining the CIRCLE by Radius, or Diameter , is provided within the Command Prompt.

ELLIPSE


Menu Location: Curve > Ellipse

Ellipses are defined by a Center Point, then two additional values define the measurement of the Ellipse’s ‘X’ Axis, and ‘Y’ Axis.

OFFSET


Menu Location: Curve > Offset > Offset Curves

Offsetting Curve Geometry duplicates a curve so that all locations on the copied curve are a specified distance from the original curve. You have the option of defining the distance, and the side to which the Curve Offsets- but you can also OFFSET a Curve to Both Sides, by selecting the ‘Both Sides’ Option (during your operation) within your Command Prompt

FILLET


Menu Location: Curve > Fillet Curves

A Fillet (pronounced FILL – IT) requires two Curves to be completed successfully. This will create a tangential arc between the two curves- simply put, you will have a rounded corner. The Command requires input for the Radius of the Arc- but be careful, too small or too large of a Radius will result in a Fillet that won’t work.

FILLETCORNERS


Menu Location: Curve > Fillet Corners

In the event that you have a Polyline or a Polygon with multiple Corners, you can call the FILLETCORNERS Command. This will function exactly as the Fillet Command, but will process a Fillet on all existing Corners of your Line Geometry.

CHAMFER


Menu Location: Curve > Chamfer Curves

Chamfering is similar to a Fillet, however, it creates a Line Segment between two Curves, instead of an Arc. This will leave you with an Angled Corner- and the Command requires (2) Distance Values to successfully complete. This Command is best experienced, rather than explained.

END

Edit & Analyze

Overview


This Tutorial reviews some of the more common Editing, Analyzing, Measuring and Transforming Commands for Rhinoceros 3D. Each Command will apply universally to any Geometry within the Rhino Interface- thus, these Commands are typically utilized most often throughout your Modeling Workflow.

WHAT


Menu Location: COMMAND ONLY

This Command will prove most useful, and most frequently relevant throughout any Modeling Workflow. Calling this command will provide you with detailed information on any selected object properties. Primarily, this Command will indicate whether or not an object is Closed, or Open- extremely useful when preparing files for any Digital Fabrication Post Process!

SEL(??)


Menu Location: NONE

Typing ‘SEL’ into the Command Prompt will provide you with multiple selection options. The Auto-Complete will create a drop-down list of all available Selection Commands. There are various methods in which you can SELECT your geometry. Getting to know these options sooner, rather than later, will save you a lot of time.

POINTSON/POINTSOFF


Menu Location: Edit  > Control Points >

Control Points, are the Points that define your Geometry. This is extremely useful for quick/minor edits to line geometry, but gets more difficult as you transition into 3D Modeling. Turning your POINTSON, allows you to edit the location of your defining Control Points. Line Segments will typically be controlled by their Start and End Points- whereas Curve Geometry will usually have multiple defining points available for editing. You will have trouble navigating around your geometry with Control  POINTSON, so turn them POINTSOFF when you are finished editing.

HIDE/SHOW


Menu Location: Edit  > Visibility >

During the Modeling Process, there will be several instances where Geometry complicates completing a separate task. You can select the Geometry, and HIDE it to complete your task. It is recommended, however, that you place the Geometry on a separate Layer, and HIDE it by toggling your Layer Visibility. It is a common mistake to constantly HIDE items- when the moment arises in which you require the Geometry to be visible once more, typing the command SHOW will make ALL hidden Geometry Visible again. You can imagine hiding multiple items, forgetting about them, and then calling the SHOW Command. A surprising ‘mess’ will ensue.

LOCK/UNLOCK


Menu Location: Edit  > Visibility >

You can LOCK selected Geometry with the LOCK Command. The item will remain Visible, and you can still Object Snap to defined points. The Geometry cannot be deleted, or edited until the UNLOCK Command is called. Similar to HIDE/SHOW, it is recommended that Users place their Geometry on a Layer, and Lock it, if they have multiple items requiring this setting.

EXPLODE/JOIN


Menu Location: Edit  > Join/Explode

There are several instances, in which Objects are made up from multiple parts. This could be a Polyline, or a Polysurface- by calling the EXPLODE Command, your Object will separate into each specific part. Polylines become Line Segments, and Polysurfaces become Surfaces. JOINing an Object back together, proves a little more difficult, as all disjointed items must be re-selected beforehand.

TRIM


Menu Location: Edit  > Trim

Performing a TRIM is exactly what it sounds like. To successfully TRIM any Geometry, however, you require an intersecting object. The TRIM Command requires that you select the Object you would like to TRIM, first; then you select the intersecting object. From this point forward, within the Operation, whichever parts you select with your mouse, will be deleted/removed.

SPLIT


Menu Location: Edit  > Split

SPLITting an object is similar to TRIMming- however, your Object retains any TRIMmings- instead of deleting them. This Command required that you select the intersecting object first; then you select the Geometry to be SPLIT.

MOVE


Menu Location: Transform > Move

The MOVE Command is helpful when you need an Object MOVEd from specific point to specific point. You can use Distance Values, or (X,Y,Z) Location Values to define Starting Position and End

SCALE


Menu Location: Transform > Scale > Scale 3D

SCALE an Object by selecting an Origin Point, first. Next, define the Object’s first reference point- preferably, this is a distance, length, or value you already know. Finally, enter the new value into the Command Prompt. This will re-size your Object to the Size you’ve indicated. Origin Point-to-Reference Point #1 = New Value. You can also Scale 1 or 2 Dimensional by using SCALE1D or SCALE2D.

COPY


Menu Location: Transform > Copy

The COPY Command allows you to create multiple copies of an Object. Alternately, you can use the MOVE Command, and set the ‘COPY’ option to ‘YES’ within your Command Prompt. Think of the COPY Command, as a MOVE Command- only you are now creating duplicates.

MIRROR


Menu Location: Transform > Mirror

MIRROR Objects by selecting the Geometry, first. Second, indicate a Center Line, this is called your ‘Mirror Plane’, and by default defined by (2) points. You also have the option of creating copies, by activating the ‘Copy’ Option within the MIRROR Command Prompt.

ROTATE


Menu Location: Transform > Rotate

ROTATE an Object by selecting the item, first. Second, indicate an Origin Point, this is called your ‘Center of Rotation’. Next, indicate your first ‘Angle Reference Point’- your object will ROTATE about the ‘Center of Rotation’, dynamically, or by a defined angle value input into the Command Prompt. You also have the option of creating copies, by activating the ‘Copy’ Option within the Command Prompt.

LENGTH


Menu Location: Analyze > Length

The LENGTH Command is great for Line Geometry. Simply select the Geometry, and use the LENGTH Command. The LENGTH of the Line can be referenced in the Command Prompt’s History at the top of your screen.

DISTANCE


Menu Location: Analyze > Dimension

Use the DISTANCE Command to get DISTANCE Values between two points. The DISTANCE Value can be referenced in the Command Prompt’s History at the top of your screen.

DIMENSION


Menu Location: Dimension > Linear Dimension

There are various DIMENSION Commands- however, specifically using the DIMENSION Command will allow you to create a LINEAR DIMENSION. This is more commonly used when providing reference to outside project members- but useful for ‘quick’ measurements on an as needed basis.

TEXT


Menu Location: Dimension > Text Block

Using the TEXT Command, will allow you to insert TEXT Objects into your Layout. You may choose the Font, and Font Style- and you can re-edit the TEXT by double-clicking the Text Object after creation. By default, the TEXT will appear with a Fill- meaning, the object is filled with a solid color (dependent on the Layer on which the Object was created). You can eliminate this fill, by using the EXPLODE Command. However, re-joining the object won’t re-fill the TEXT. See HATCH (next paragraph) for information on how to re-fill a Closed Object.

HATCH


Menu Location: Dimension > Hatch

The HATCH Command, will create a pop-up prompt, for you to select what type of fill, a Closed Object should receive. Note, that the object must be completely closed, before performing a HATCH. Typically, HATCHing is a Computer Aided Drafting Command, used to distinguish between different materials or processes for a Project. However, the command is also utilized for various Digital Fabrication Processes, such as Laser Engraving.

END