Go to your Fields: An Interactive Mechanical Flower

video: https://youtu.be/xAO66SjFdWg

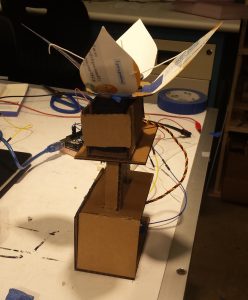
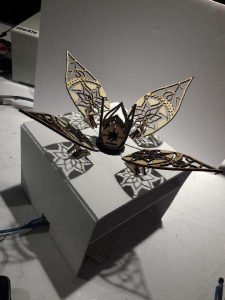
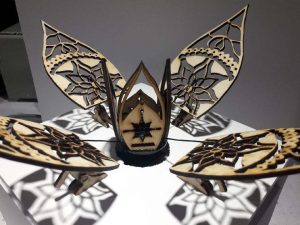
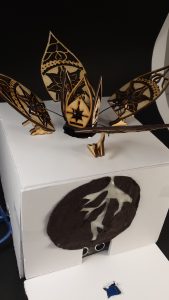
My final project is a play on a flower. With this project I wanted to present the idea that living things need human connection just as much as the usual basic essentials for survival. So light and water are replaced by physical closeness and touch: when you come closer or further away, the petals open and close, and “water” travels up the roots when you touch the base. The first part of the title comes from a quote from The Prophet by Kahlil Gibran, which describes how a bee and a flower depend on each other through their interaction.

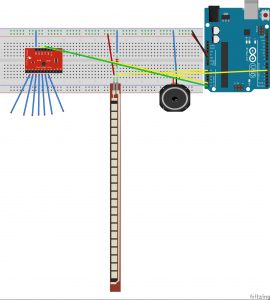
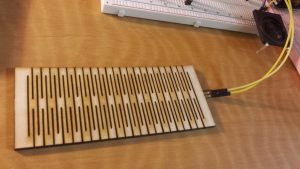
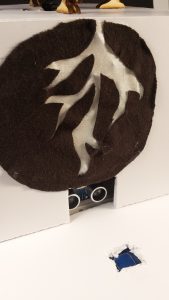
Components: The open/close motion is controlled by a servo motor attached to each petal by wire. The petals and hinges are laser-cut basswood, the base is foamcore, and the root outline is cotton fabric. The LEDs are controlled by a standalone momentary capacitive touch sensor, and the servo motor is controlled by an ultrasonic distance sensor.

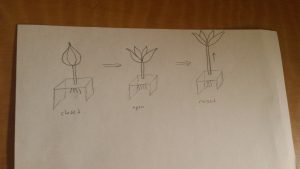
The biggest changes I made from my initial prototype were the petals, the base box, and replacing the linear actuator with lighting of the roots. I chose to replace the upward motion because I thought it wasn’t very graceful, and I felt that representing water with lights would be more effective for my purpose. I had some trouble wiring up NeoPixels, so decided to use regular small LEDs instead. I also had some trouble converting my petal drawing into dxf, but it eventually worked with some help from the Soft Fabrication class.

fritzing and sketch: final_project_NinaPrakash

Assignment 7: Mechanical Flower prototype

For the rough crit I have a cardboard prototype of my interactive mechanical flower. Currently it has two axes of motion:

  • the flower opens and closes based on distance readings from an ultrasound distance sensor (opens when you are close, closes when you are far)
  • raises or lowers with a linear actuator (nut and bolt)

Video: https://youtu.be/9XyJqv4cWkE

Fritzing and sketch: final prototype

Overall, I’ve gotten down the basic range of motion I was going for. However, the motor is too slow even with increased voltage so the raise/lower motion is not very noticeable (in the video, it’s very slowly rising) and a faster motor wasn’t strong enough to carry the weight. I also don’t really like the way the motion looks. Because of this I am considering removing the linear actuator part and focusing on interaction with just the flower.

Next steps:

  • work on form (make the flower look nicer with wooden petals, covered center, etc., replace cardboard with wood/foamcore)
  • add interaction to the petals besides distance (touch)
  • if I’m keeping the linear actuator, find a way to make the motion smoother and faster

An Interactive Mechanical Flower

Abstract/Concept

For my final project I want to create an interactive mechanical flower. The idea behind the interaction is that the flower thrives off of human touch and connection rather than sunlight and water. I am imagining a structure with a single flower bud and stem mounted on a clear box or frame, and roots suspended underneath (see images below).

Conceptually: I want to accomplish a few things with this. First, I want to explore an organic, fluid, and natural side to mechanical design as opposed to linear and strictly functional. Second, I want to portray the idea that living things need human connection just as much as they need the basics of food, water, shelter, etc.

In terms of what the flower will actually do: I want the flower to close when nobody is around and open when people come closer (the analog to opening/closing in response to sunlight). If possible it would be cool if it could “grow”, maybe get taller or raise and lower, when people touch its roots (the analog to growing in response to water and nutrients).

Hardware

  • Flower
    • Wood (probably ⅛” basswood, which has worked well for me in the past)
    • Distance sensor
    • DC motor
    • H-bridge
  • Stem
    • Long threaded rod and thing to screw it into
    • DC motor
    • H-bridge
  • Roots
    • Thin wires for the roots
    • Capacitive touch sensor
  • Base
    • Clear acrylic

Software

  • Flower
    • I need code to read the distance sensor and open/close the flower accordingly
  • Stem/roots
    • I need code that will read capacitive touch input and raise/lower the stem accordingly

Plan

  1. Make simple petals that open and close using a motor and H-bridge
  2. Make the opening/closing respond to distance sensor
  3. Create a raise/lower mechanism using motor
  4. Mount flower to this
  5. Make the raise/lower respond to touch sensors

Assignment 5 Final: Accordion

For this project I was inspired by the accordion – the way it moves and creates sound – to make a musical instrument. The instrument is made of a living hinge with a flex sensor that controls volume, and keys that each play a note using an eight-channel capacitive sensor. I wanted to make an interactive piece with which you could create music, and I also wanted to explore the flexibility and organic feel of a living hinge.

The flex sensor and volume control part went pretty smoothly, but I ran into a few challenges with the capacitive sensors. The wires were very very sensitive if they bumped against one another, so in the end I could not have all 8 keys because the holes are too close together, so I had to do 4. If I could do this project again, I would add another speaker and more capacitive touch sensors so that I could play chords, and I would add an option to change the scale (default is A major). Overall, I am pretty happy with the way it turned out – I had fun playing with the living hinge and learning how to use capacitive sensors.

sketch: Assignment5-sketch-NinaPrakash

Assignment 5 Prototyping: Nina Prakash

Video: https://youtu.be/V9rbJP_DovA

For this assignment I want to make a musical instrument inspired by an accordion with a living hinge and speaker. For the prototype, bending the wood changes the volume of the note, and pressing a button changes the note one octave higher. I didn’t have much trouble with this – making the living hinge was surprisingly simple, and I found a library that could be used to change the volume (credited in the sketch).

Moving forward I plan to use a linear soft potentiometer to change the notes instead so that you can slide your finger up and down the side of the “accordion”, but the wall is all out so I used a button for now. If possible I’d like to use two of them and two speakers so that it can play chords. I also plan to play around more with different cuts of wood and types of wood.

Fritzing and Sketch: assignment5

Assignment 4: Nina Prakash

My project is the story of a bird that responds to environmental changes. When you “plant trees” (turn on green LEDs), the bird starts flying. When you “cut trees down” (turn off the green LEDs), the bird stops flying. The motion of the wings is created by spinning wheels back and forth.

I came across a few problems with my project, mainly in construction. The first motor I used wasn’t strong enough so the motion was very minimal. I switched to a stronger motor, and switched material from plastic to cardboard and wood, which was lighter. I also had some challenges with trying to hot glue the bearings into the wheels, and figuring out how much to spin in either direction so the the bars didn’t mash into one another.

Video: https://youtu.be/nyTpDJqq0ow

Fritzing and sketch: assignment4_nina_prakash

Assignment 3: Nina Prakash

Laughing Boy: An Animated Emoji

For this assignment I animated a laughing emoji face. The story goes that the boy is always happy and laughing but really needs his personal space, so as someone gets closer to him, he laughs more slowly. The further away people are from him, the harder he laughs.

Initially I had buttons as inputs so you “tickle” the face to make it laugh, but I changed it to an IR distance sensor just for fun. I had a bit of trouble with wiring it, but they were pretty simple mistakes so it worked pretty smoothly once I fixed them. Also the output readings from the IR sensor were different every time I uploaded it, but I fixed this by playing around with how I calculated the delay and soldering a pin to the end of the wire on the IR sensor. After that it worked pretty smoothly.

Video: https://youtu.be/b4o6-_xikzI

Everything else is included in this Drive file including fritzing sketch and reflection: https://drive.google.com/open?id=0Bw2BkLX-TTddTXVobmxxczVneDQ