05 – class notes, 12 Sep 2017 — Intro to State Machines

05 – class notes, 12 Sep 2017 — Intro to State Machines

Posting code to the blog

Oops.  This didn’t make it in to my notes for class last Thursday.  One option for posting code to the blog is to use the “CodeColorer” plugin.  For your Arduino sketches switch to the Text tab and use the CodeColoer wrapper with lang=”C”

State Machines

State machines are graphs showing the relationships between various states of a system.  A light switch has a simple state machine of “on” and “off”; the transition happens by using the switch.

Here’s a state machine for a student’s MTI project from a few years ago.  It contains enough detailed information that I was able to OK the final project concept over email: MTI state machine.

Look around your environment for state machines and ask yourself, “How does this work?   How would I implement this?”

In class we looked at a simple state machine in my game that prevents cheating by keeping track of whether or not a button has been pressed and released.  Each player’s button has a state that is set to “YES” when the digitalRead() returns HIGH and set to “NO” when the digitalRead() returns LOW.

/*
The MIT License (MIT)

Copyright (c) 2014 J. Eric Townsend

Permission is hereby granted, free of charge, to any person obtaining a copy
of this software and associated documentation files (the "Software"), to deal
in the Software without restriction, including without limitation the rights
to use, copy, modify, merge, publish, distribute, sublicense, and/or sell
copies of the Software, and to permit persons to whom the Software is
furnished to do so, subject to the following conditions:

The above copyright notice and this permission notice shall be included in
all copies or substantial portions of the Software.

THE SOFTWARE IS PROVIDED "AS IS", WITHOUT WARRANTY OF ANY KIND, EXPRESS OR
IMPLIED, INCLUDING BUT NOT LIMITED TO THE WARRANTIES OF MERCHANTABILITY,
FITNESS FOR A PARTICULAR PURPOSE AND NONINFRINGEMENT. IN NO EVENT SHALL THE
AUTHORS OR COPYRIGHT HOLDERS BE LIABLE FOR ANY CLAIM, DAMAGES OR OTHER
LIABILITY, WHETHER IN AN ACTION OF CONTRACT, TORT OR OTHERWISE, ARISING FROM,
OUT OF OR IN CONNECTION WITH THE SOFTWARE OR THE USE OR OTHER DEALINGS IN
THE SOFTWARE.
*/


/*
logic_0

Some examples of logic to make a simple game using state machines.

fastest click. player A and player B click the button as
quickly as possible without holding it down. Light the LED
of the person who is ahead.

Every 25 clicks, start counting again to keep the players in
relative sync

*/


const int playerAPin = 2;
const int playerALed = 3;
int playerAPushed;
int playerACount;

const int playerBPin = 10;
const int playerBLed = 11;
int playerBPushed;
int playerBCount;

const int tieLed = 4;

const int rotateCount = 25;

// another way to use const variables is to define words that you'd
// use while talking about the sketch
const int YES = 1;
const int NO = 0;

void setup() {
pinMode(playerAPin, INPUT);
pinMode(playerALed, OUTPUT);

pinMode(playerBPin, INPUT);
pinMode(playerBLed, OUTPUT);

pinMode(tieLed, OUTPUT);
// make sure we start off with reasonable values, it's a game!
playerAPushed = 0;
playerACount = 0;

playerBPushed = 0;
playerBCount = 0;

Serial.begin(9600);
}

void loop(){

// if either player is over 25, reset them both to 0
if ((playerACount > 25) || (playerBCount > 25)) {
// "||" means "or", if ((this is true) or if (this other thing is true))
playerACount = 0;
playerBCount = 0;
}

// if they are pushing down the button, we need to see if
// they have let go of the button. We use the
// variable "playerAPushed" to keep track of previous state
// of the button
//
// this is the basic idea of a state engine in a few lines of
// code: "What was the previous state of playerA, and how
// will that change our decisions?"
if (digitalRead(playerAPin) == HIGH) {
// if playerAPushed is false, we know they have let
// go of the switch and count this as a new push
if (playerAPushed == NO) {
playerACount += 1;
playerAPushed = YES;
}
// else {
// they are holding down the button and trying to cheat!
// }
}
// but if they are not pressing the button, reset our state
else {
playerAPushed = NO;
}

// same for playerB
if (digitalRead(playerBPin) == HIGH) {
if (playerBPushed == NO) {
playerBCount += 1;
playerBPushed = YES;
}
}
else {
playerBPushed = NO;
}

// here is some code I wrote to help me debug things. I
// can comment it out and save it for future debugging.

// Serial.println("A count, pushed; B count, pushed");
// Serial.print(playerACount);
// Serial.print(" ");
// Serial.print(playerAPushed);
// Serial.print(", ");
// Serial.print(playerBCount);
// Serial.print(" ");
// Serial.println(playerBPushed);

if ((playerACount == 0) && (playerBCount == 0)) {
digitalWrite(playerBLed, LOW);
digitalWrite(playerALed, LOW);
digitalWrite(tieLed, LOW);
}
else if (playerBCount > playerACount) {
digitalWrite(playerBLed, HIGH);
digitalWrite(playerALed, LOW);
digitalWrite(tieLed, LOW);
}
else if (playerBCount > playerACount) {
digitalWrite(playerBLed, LOW);
digitalWrite(playerALed, HIGH);
digitalWrite(tieLed, LOW);
}
else { // it's a tie!
digitalWrite(playerBLed, LOW);
digitalWrite(playerALed, LOW);
digitalWrite(tieLed, HIGH);
}
}
04 – class notes, 7 Sep 2017 — Arduino Analog

04 – class notes, 7 Sep 2017 — Arduino Analog

Boring Bits

My office hours are noon to 3 this Friday (8 Sep) but I can come in at 11 if that works around a time conflict, just drop me email.

Arduino Documentation

The Arduino tutorial pages are a great resource.  In the Arduino IDE, go to File->Examples and you’ll find example sketches for, well, almost everything in Arduino.

Analog vs. Digital

In the previous class we talked about analog vs digital.  Digital only has to states: on or off, open or closed, or in the Arduino, 0 volts or 5 volts. We use pull-down resistors to force digital inputs to be 0 if they are not 5 volts.

Analog has a range between the states of digital.  A door can be half-open, a class can have final grades instead of being pass/fail, a party can range from quiet to loud depending on the people and the music.

Reading Analog Signals

Arduino Uno has six analog input pins labeled A0 to A5 that can read voltages between 0 and 5V.  Use analogRead() to read a pin, it will return a value between 0 (for no voltage) and 1023 (for around 5V).

The Arduino documentation has good circuit diagrams for setting up a potentiometer (or “pot”) and a photoresistor to be read on an analog input.  For now, only read analog signals powered by the Arduino 5V pin, outside signals might release the magic smoke from your Arduino.

To test your hardware, use the smallest sketch possible to read the analog input and write the information to the console:

// "const" is short for "constant" and means we can never change
// the value of dialPin. It's not something we would want to change,
// but making it "const" prevents us from doing it by accident

const int dialPin = 0;

void setup() {
pinMode(dialPin, INPUT);
// set up the serial console that we used in class
Serial.begin(115200);

}

void loop() {
lightValue = analogRead(dialPin);
Serial.println(lightValue);
}

Writing Analog

When we read analog we get values from 0 to 1023 from pins A0 thru A5, however when we write analog we can only write from 0 to 255 and we can only use certain pins for output, which pin varies by the type of Arduino board.

const int ledPin = 6;
int ledValue = 0;

void setup() {
pinMode (ledPin, OUTPUT);
}

void loop() {

ledValue = ledValue + 1;

// a good example of using an if statement.
// the max value for analogWrite is 255, so if ledValue
// is over 255, reset it to 0
if (ledValue > 255) {
ledValue = 0;
}

analogWrite(ledPin, ledValue );

// the delay() statement can cause real problems in your actual script. While
// the delay is happening, the arduino does nothing, it's like hitting "pause"
// on a music player.
delay(20);
}

03 – class notes, 5 Sep 2017 — Arduino 1

03 – class notes, 5 Sep 2017 — Arduino 1

Boring Stuff

If you are required to go to the Tue/Thu presentations for School of Art, email me with the dates you’ll miss.  If it’s planned as a class lab day and there’s a presentation you want to attend, just let me know in advance.

School of Art party (7 Sep,2 017) is a class lecture/assignment day.  I’d advise attending class as we’re introducing analog inputs and outputs and the first real physcomp assignment.

My office hours are noon to 3 this Friday (8 Sep) but I can come in at 11 if that works around a time conflict, just drop me email.

Class Notes

Introduction to Arduino and digital sketches.

simple digital schematic

The code we used in class with extra comments:

// -*-c++-*-
/*
The MIT License (MIT)

Copyright (c) 2014 J. Eric Townsend

Permission is hereby granted, free of charge, to any person obtaining a copy
of this software and associated documentation files (the "Software"), to deal
in the Software without restriction, including without limitation the rights
to use, copy, modify, merge, publish, distribute, sublicense, and/or sell
copies of the Software, and to permit persons to whom the Software is
furnished to do so, subject to the following conditions:

The above copyright notice and this permission notice shall be included in
all copies or substantial portions of the Software.

THE SOFTWARE IS PROVIDED "AS IS", WITHOUT WARRANTY OF ANY KIND, EXPRESS OR
IMPLIED, INCLUDING BUT NOT LIMITED TO THE WARRANTIES OF MERCHANTABILITY,
FITNESS FOR A PARTICULAR PURPOSE AND NONINFRINGEMENT. IN NO EVENT SHALL THE
AUTHORS OR COPYRIGHT HOLDERS BE LIABLE FOR ANY CLAIM, DAMAGES OR OTHER
LIABILITY, WHETHER IN AN ACTION OF CONTRACT, TORT OR OTHERWISE, ARISING FROM,
OUT OF OR IN CONNECTION WITH THE SOFTWARE OR THE USE OR OTHER DEALINGS IN
THE SOFTWARE.
*/


/*
digital_in_0

read and display status of two switches
0 == LOW == off
1 == HIGH == on
*/


// a line that starts with "//"
/* or text that starts and ends with slash-star and star-slash */
// are called "comment" lines and are ignored by the Arduino

// First, we set up some "variables" that we will use to talk to the
// external hardware.

// A variable is a way of storing information in the Arduino
// that is easy for humans to understand.

// In this sketch we will also use a "const" variable. A const can never
// be changed in the program, but can be changed before you build
// a sketch. A "const var" is used for pin assignments and other things that
// rarely need to change, but it makes it easy to change them all in one
// line of code

// left switch on the PDF
const int switchPin = 2;
const int led1Pin = 3;

// right switch on the PDF
const int momentarySwitchPin = 4;
const int led2Pin = 5;

// now we start the sketch with setup()
// setup() only runs once. it's where we put all the code we only
// want to run once when the sketch starts.

// a pin can be either "INPUT" or "OUTPUT" and we define that in
// setup() because it will never change while the sketch is running
// (you'll see complex scripts on the Internet that do this in other
// places, but those are written by experienced or crazy Arduino people.)

void setup() {
pinMode (switchPin, INPUT);
pinMode (led1Pin, OUTPUT);

pinMode (momentarySwitchPin, INPUT);
pinMode (led2Pin, OUTPUT);
}

// loop() is where our sketch actually does something. The loop()
// repeats itself from start to finish as long as the Arduino is
// turned on.

void loop() {

// use digitalRead(pin) to find out if the input pins are on
// or off. We use the terms HIGH and LOW because we're
// actually measuring the amount of electricity reaching
// the pin, but for digital, consider it the same as ON and OFF.
// HIGH: pin is ON
// a switch is ON or we want turn ON a LED
// LOW: pin is off
// a switch is OFF or we want to turn OFF a LED

digitalWrite(led2Pin, LOW);

if (digitalRead(momentarySwitchPin) == HIGH) {
digitalWrite(led2Pin, HIGH);
}

if (digitalRead(switchPin) == HIGH) {
digitalWrite(led1Pin, HIGH);
}
else {
digitalWrite(led1Pin, LOW);
}

}

02 – class notes, 31 Aug 2017 – Circuits 101

Class Notes, 31 Aug 2017 – Circuits 101

Boring Stuff

jet’s office hours:  Fridays, 1-4, IDeATe Lab.

Class Notes

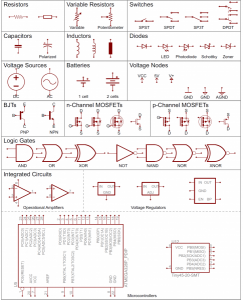
Basics of circuit drawings and making circuits.  There’s an excellent reference at Sparkfun.  Print out this graphic: and put it on the inside cover of your sketch book:


01 – notes 29 Aug 2017

ASSIGNMENT:   We skipped this very important topic in class because of networking issues.  Please read our code of conduct.  If you are not a CFA student please ask me in class or in person if you have any questions or concerns about this policy.

READING/WATCHING ASSIGNMENTS:

Golan’s TED talk

Class Notes, 29 Aug 2017

Boring half

Review the class syllabus including rules for attendance and grading.

We will add students to the blog on Thursday so you can ask questions or comment on notes or projects.

What is physical computing?

From simple to complex:

  1. light switch – simple circuit: power, switch, light
  2. electric alarm clock – shows the time, one can set the time with switches
  3. toaster oven – thermistor detects temperature, knob selects desired temperature, electric coils heat the interior
  4. DDR / game controllers – complex switches with visual or haptic/tactile feedback (vibrations)
  5. automated audio mixing board – ignore the music slang and look at the interaction between control knobs and sliders and how the board can rearrange them based on a recording
  6. メカ

Where/why does physical computing matter?

Physical computing has support in places like the Exploratorium.

Art and design + engineering and robotics ==> physical computing projects.

Golan’s Double-Taker

DDR

Daniel Rozin’s interactive mirrors.

Haptics class demo of a new product.

We will go over the artist’s statement assignment in detail on Thursday.