A low-cost interactive door lock

Premise

On most newer campus housing door are fitted with modern electronic access locks which use pin codes and  HID’s – which allow identification using cards with embedded RFID systems. This means students do not need to carry around additional key and can access their rooms using their student ID. Additionally, these locks are also connected to the internet which means students can login on their phones and add request a temporary pin to access their room.

Unfortunately, the Fairfax community has a traditional locks (picture below). I wanted to make a project which could be retro-fitted onto my existing lock and have many of the features modern locks do. I also wanted to add some additional features which tells me more information about whether my door is locked and who is in the room.

Note: This project is an extension of my Kinetic Critique which you can find here

Solution

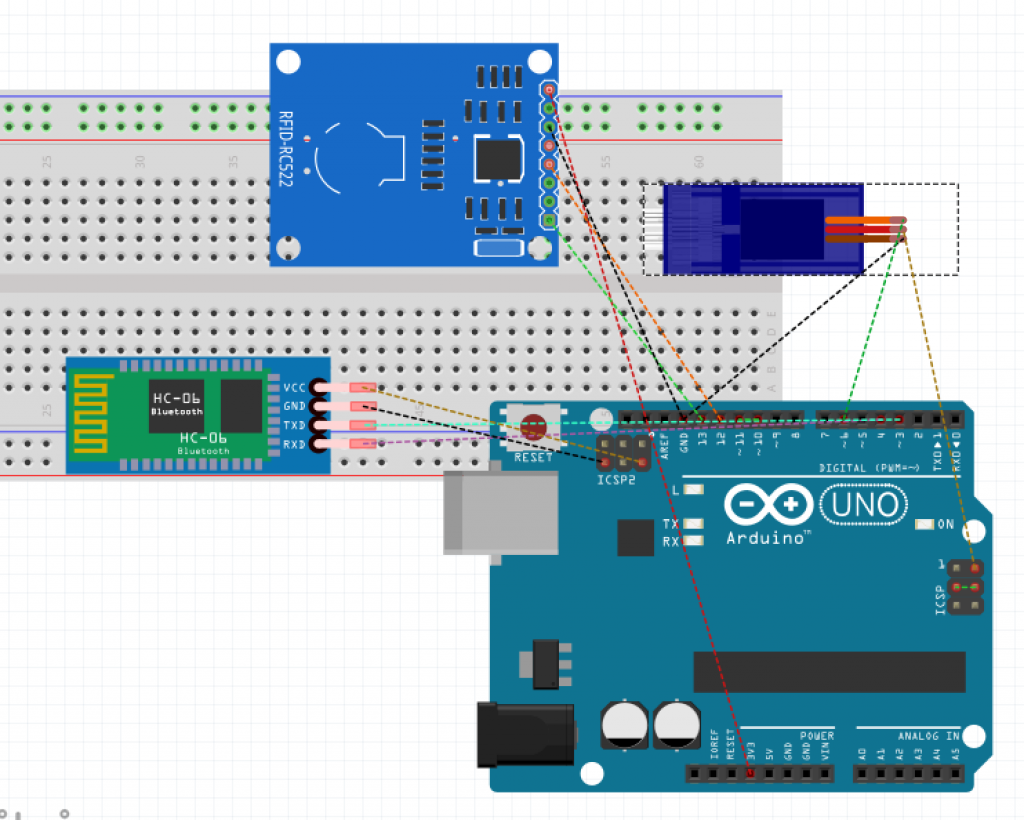
I used combination of servo motors, a bluetooth module and a RFID module to create a low-cost door lock which can be added to a mechanical lock. Since the project is bluetooth enabled I can connect my Android phone to it and send and receive data about my door lock. There are a few permanent users which can use their CMU university ID to unlock the door.

I created temporary card access feature. The owner of the door lock can send RFID codes via bluetooth to give someone temporary access to the door. The owner can also revoke access at any time by sending an  ‘!’  over bluetooth. Additionally, the status of the door can be checked by sending a ‘+’. The user will receive a ‘y’ or ‘n’ back. The user can  also lock the door at anytime by sending an ‘?’ .
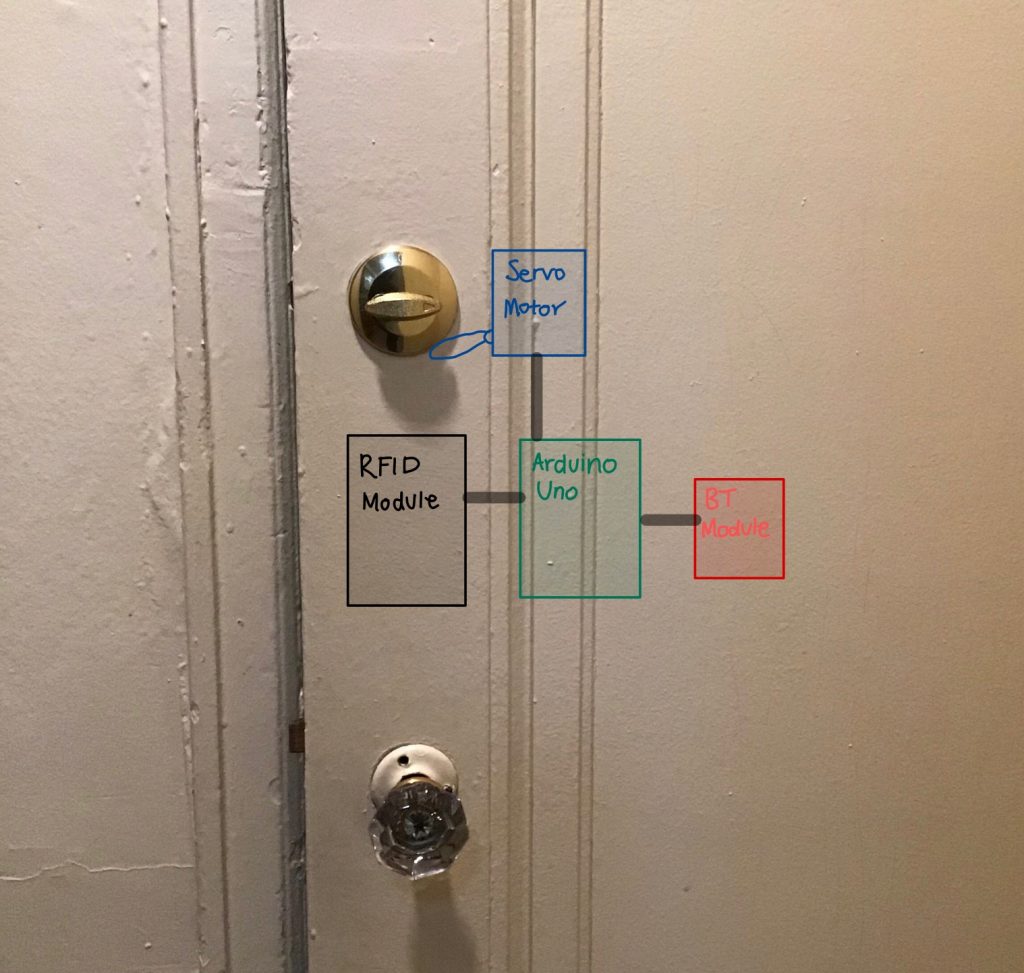
Mock-up of project on my door

Proof Of Concept 

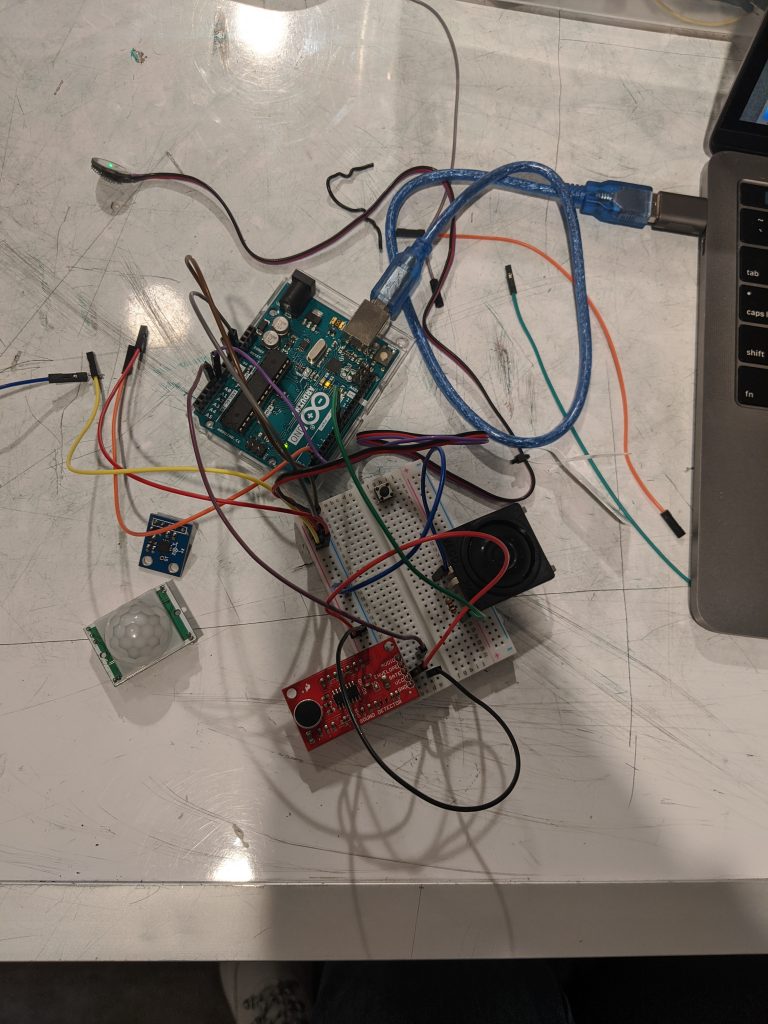
I used an Arduino Uno, RFID MFRCC522 Reader, HC05-Bluetooth Module and an Android Phone with the Bluetooth Terminal App.
 

Below is a video of me testing out a few of the features from my lock.

MTIFinal

Notes

I wanted to discuss write a little not section so that if someone wanted to recreate this project – they would be able to understand the limitations in terms of modifying my current code and hardware.

  1. Software Serial and SPI cannot be used together as they interfere with each other. I believe that this might be because both libraries are trying to interrupt – possibly at the same time – causing garbled signals from the interrupt with lower priority. In this case, Software Serial has lower priority than SPI. The alternative is to use AltSoftwareSerial  – a library that also emulates an additional serial port. Another important thing to note is that there is an alternative to AltSoftwareSerial specifically for Arduino Uno’s which use pins 3 and 4 and timer 2.
  2. HC06 module can only be used a slave bluetooth module and not as a master. If you require a master bluetooth module, you must use a HC05 module.
  3. Depending on your bluetooth module you may need to create a voltage divider for the RX/TX pins as sometimes data needs to be sent and received at 3.3V. Additionally, check what baud rate your bluetooth module should be used at as it differs from model-to-model.

If I was to extend my project, I would try to add a capacitive fingerprint reader or use a Raspberry Pi and a Pi Camera Module for face recognition. Additionally, I would replace my bluetooth module with a wifi module.
A device to help with a restful night of sleep

PREMISE

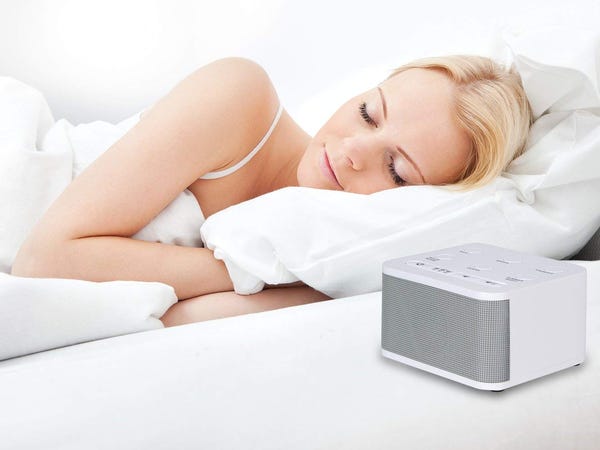
The sleep machines currently available are often not very interactive. You set the timer before you fall asleep and hope that you fall asleep before the timer finishes or you leave it on for the entire night. Another reason people tend to leave their sleep machines on the entire night is because they are afraid of loud noises waking them up during the early hours of the day.

PROPOSAL 

An interactive sleep machine which helps you fall asleep and then stay asleep! As the user falls asleep, soothing sounds will be played. Once, the user has fallen asleep the sound will be turned off. During the night, if external noises reach above a certain dB level, white noise will begin to play to cancel out the noise.

PROOF OF CONCEPT

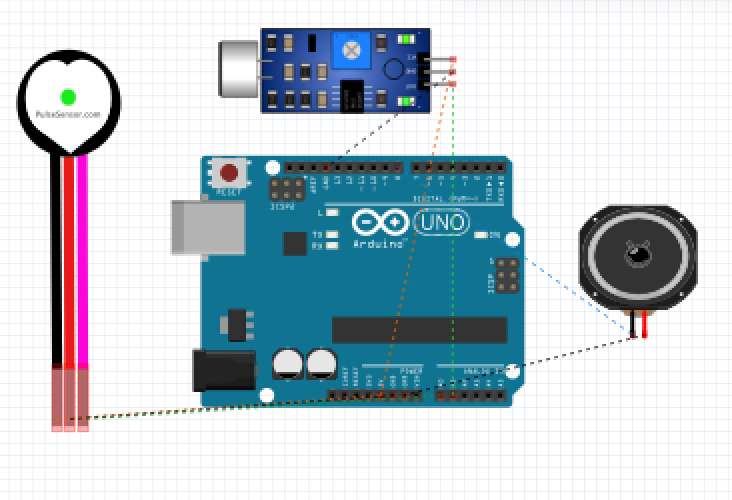
I used a pulse sensor, speaker and a microphone. The pulse sensor was used to identify what part of the sleep cycle the user is in.  The microphone monitors the sound in the room to understand whether the speaker should be triggered or not. In the mode to fall asleep, the speaker plays a calm tune and once the pulse drops it moves into sleep maintenance.


Continue reading “A device to help with a restful night of sleep”

Am I Near My Goal Yet?

This project was very challenging for me so I decided to take a different approach to the problem. As an engineer, I find it very difficult to think about physical structures. Keeping this in mind, I designed my structure for making form first before deciding how I would use it and then I further modified it to exactly what I needed.

Problem

A concept difficult difficult for kids, and adults, is understanding how close they are to their goal. Visualization is often a good technique to better understand where they stand. I decided to use visualization paired with sound effects to aid the user in their understanding of their goals.

Solution

To accomplish this, I used an Arduino Uno, a push button, a servo motor, some marbles and a glass bottle. The idea is that whenever the user gets closer and closer to their goal they can press the button and the marble will be added to the bottle. This gives the user the satisfaction from pushing the button and a hearing the clink of the marble in the bottle. Additionally, the user can always glance at the bottle to see their progress.

Possible Improvements

  • If this could be linked to you bank account you could have it automatically add more marbles as you earn more money
  • It could be time based – a countdown to your vacation

Code and Fritzing Files

Link to video

How much time is left on my timer?

Problem

I often set alarms and timers to leave for class or meetings. What I’ve realized over time is that I misjudge the amount of time that has passed on the timer and I am often not ready to move onto the next task/ leave the house when the timer goes off. Traditionally, you would have to physically go check the timer and now you can ask Alexa how much time is left on your timer. However, both of these require initiation of the interaction from the user and not from the timer. I wanted to create a timer which would notify me every quarter of the way through the set time.

My Solution

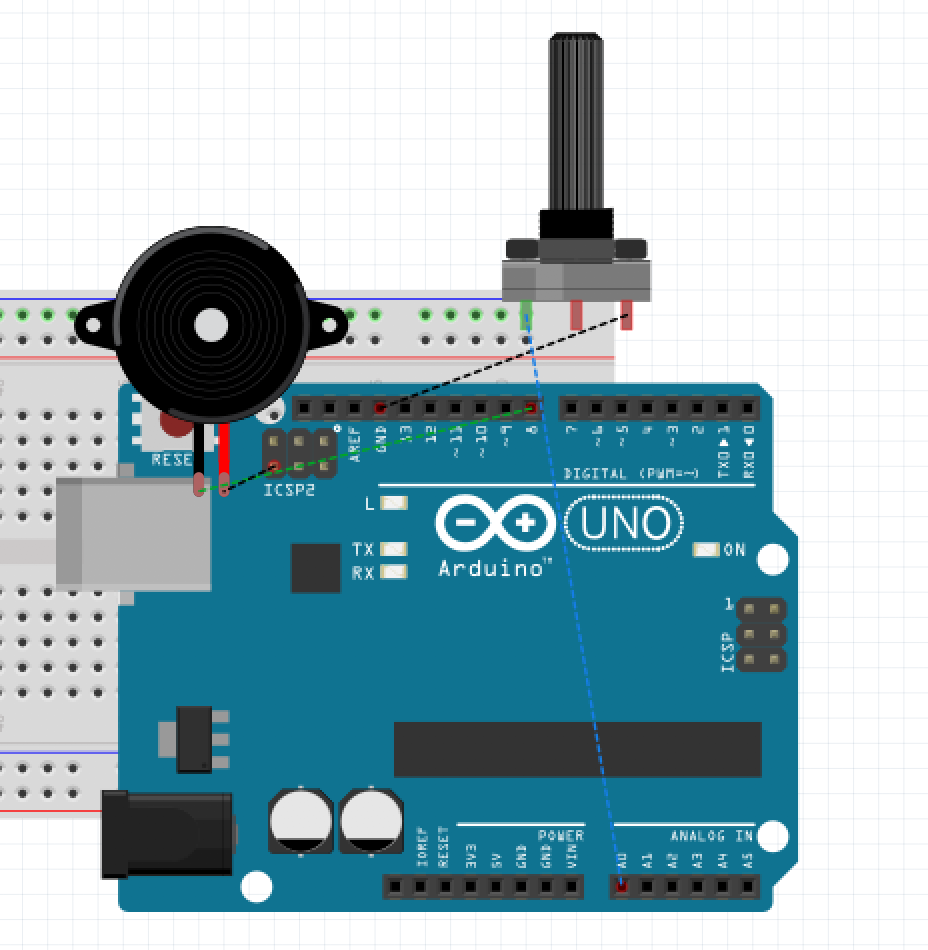
I used a Arduino Uno, a Piezo Speaker and a potentiometer. The potentiometer was used to set the length of the timer. The Piezo speaker played the arpeggio of a scale. After a fourth of the time had passed it played the 1st note, after half the time it played the first 2 notes etc. This gave a sense of finality to the end of the timer as it would start at C4 and end at C5.

Assignment7 Files

Link to Video

Improvements

A suggestion was made to link this to my google calendar which I thought it was a great idea. Another awesome suggestion was have it notify me exponentially so that as it got closer and closer to the end of the timer there would me many more notifications.


Your Personal Doorman

Idea

I often want to know who is at home when I’m on campus. If I’ve had a rough day – maybe I’d like to come home to chat with my roommate or maybe I’d like some alone time.

One might argue that Find My Friends has many of the features I require but as an Android user this feature is not available to me.  Another issue to point out is that if you live in an apartment building, like me, then there is some likelihood they they are not in the room – rather in somewhere else in the building.

If I was to extend the project, I would try to use IFTTT to notify me when someone enters and exits. Additionally, I would add temporary keys so that if friends or family are visiting they can temporarily unlock my door when they need to.

Proof Of Concept

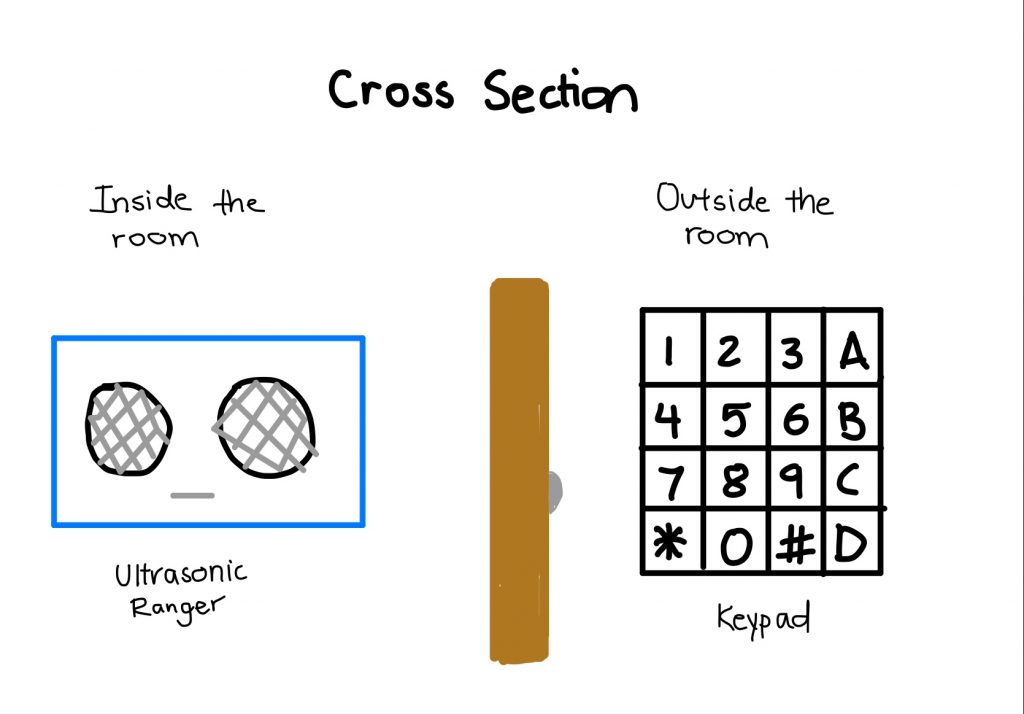
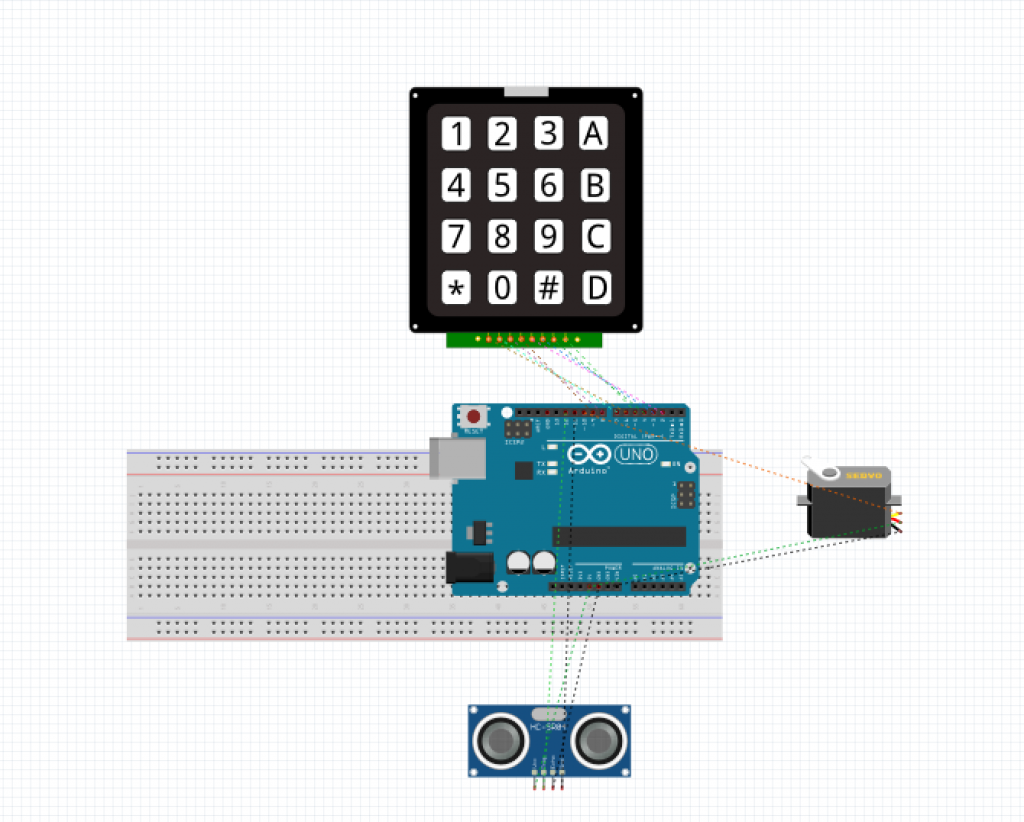
To input the password, I decided to use a keypad. Every person has an associated key, so we can track who is entering the apartment. To further incorporate the kinetic requirement of this project – I added an ultrasonic ranger which ‘unlocks the door’ when a person stands near the door from the inside.  There are also modes which can disable certain keys from working if you need privacy.

Crit2 Arduino

Link to videos


Look this Way!

Lip reading is difficult, and a large portion of the deaf community choose to not read lips.  On the other hand, lip reading is a way for many deaf people to feel connected to a world that they often feel removed from.  I have linked a powerful video where one such lip reader talks about the difficulty of lip reading but they pay-off she experiences by being able to interact and connect with anyone she wants.

Lip reading relies on being able to see the lips of the person speaking. When you are interacting with one person, this is not an issue, but what if you’re in a group setting? How do you keep track of who is talking and where to look?

Idea

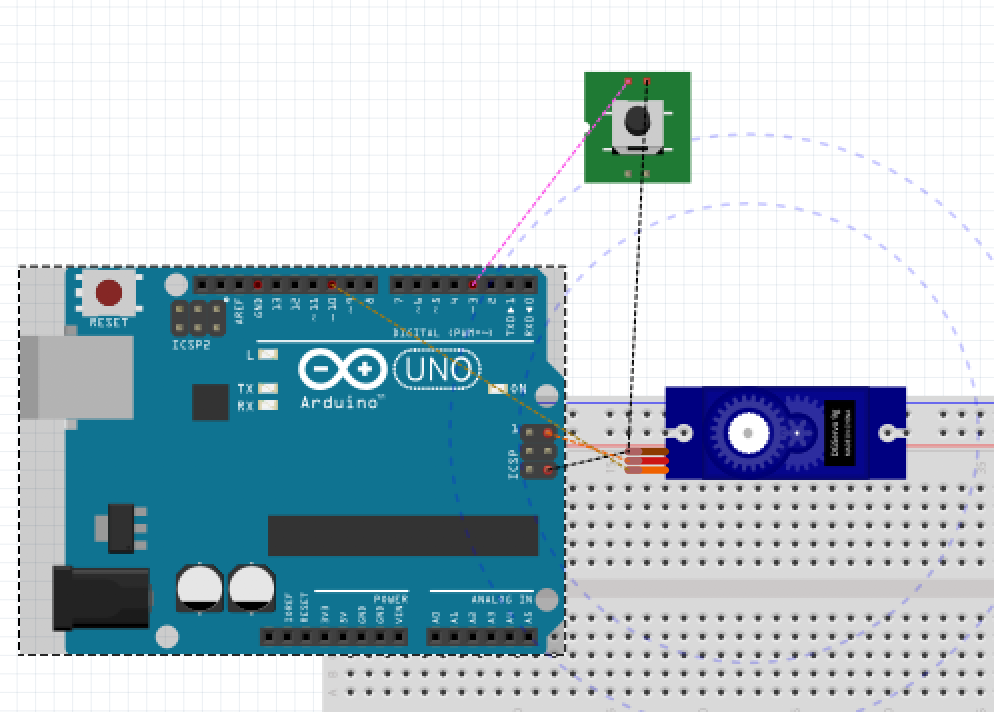
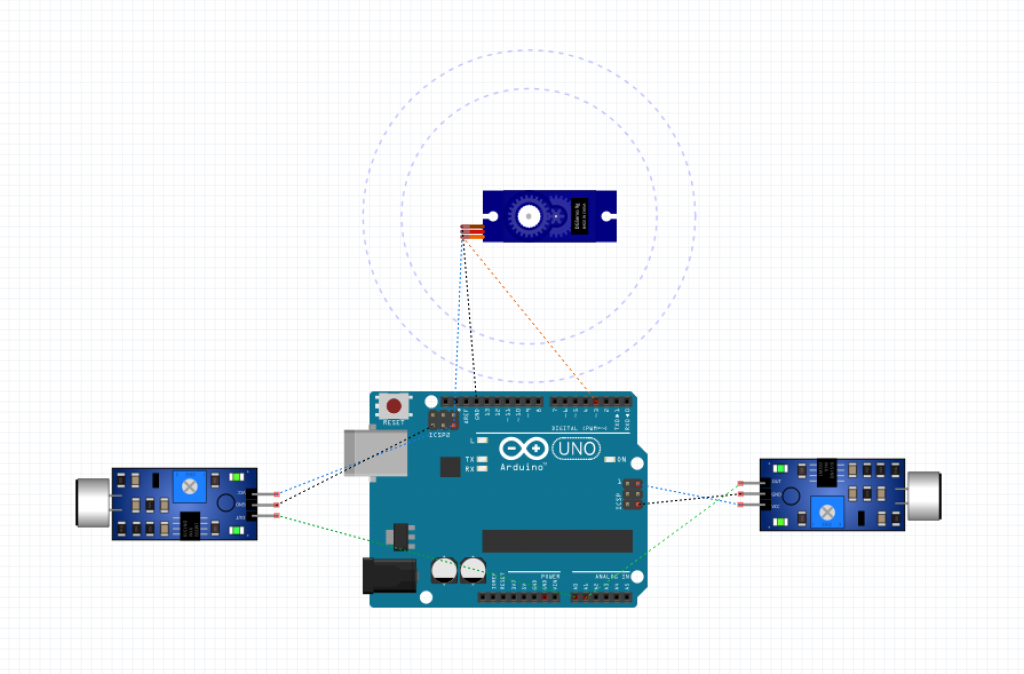
Using 4 sound detector or microphones, detect the area in which sound is coming from. Alert the user of this change in sound by  using a servo motor to point  in the direction of the sound. This allows people who are hard of hearing to understand who is talking in a group setting and focus on the lips of the person speaking at hand.

Proof Of Concept

To demonstrate this idea, I decided to use 2 sound detectors and a servo motor. My interrupt is a switch which can be used to override the process if, for example, there are too many people talking or they do not need to use this device anymore.

Below is a breadboard view of my project.

Fritzing

Assignment6

I am having some issues after updating to Catalina, so videos will come soon!

Time to Get Back To Work!

Problem

I often leave my room to go to the kitchen or answer the door and instead of going back to the work I was doing I get distracted by other things around my house. I wanted some kind of indicator that would alert me more frequently the more time I spent away from my work

I wanted to make something that would get your attention but not alarm you. Additionally, I thought it was important for my device to have a gradual change from a reminder to a more urgent indicator.

The Solution

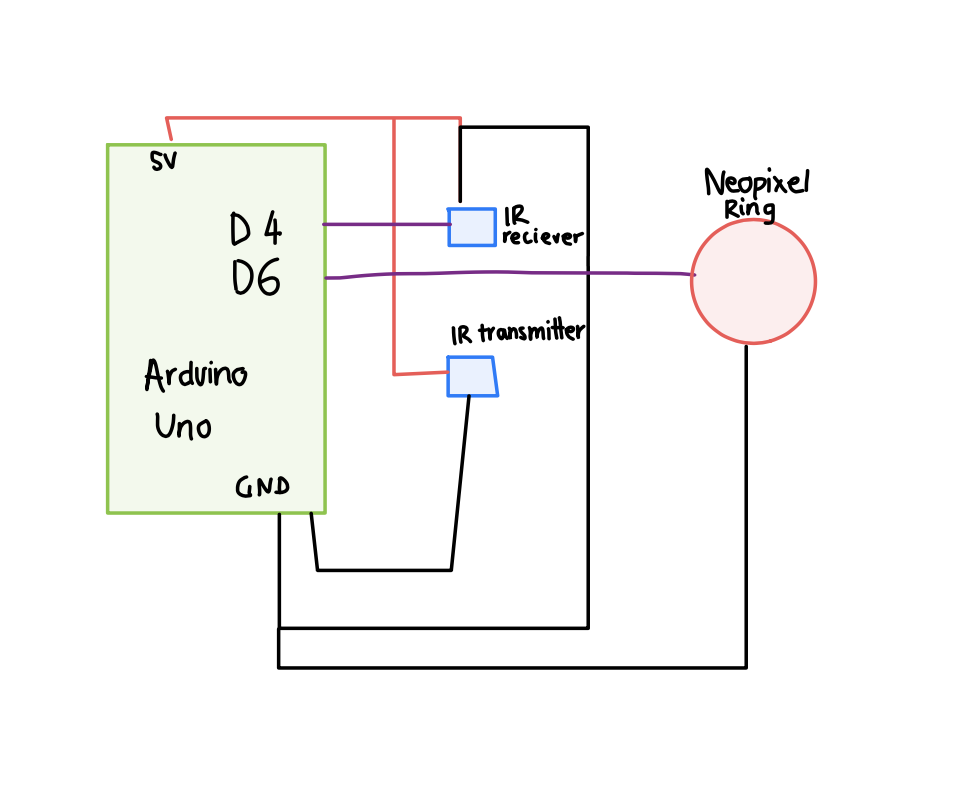
Using an Arduino Uno, IR Break Beam Sensor and a Adafruit NeoPixel Ring. I created a project which pulsates red initially very slowly and as it reaches the 2 minute mark starts to speed up – eventually turning into a flashing light. My hope is that as it flashes more frequently it is more likely to catch the user’s eye – reminding them to go back to work.

Code

Unfortunately, I couldn’t find a Fritzing part for the IR Break Beam sensor. So I made a ‘sketch’ myself 🙂


Link to Video


Concert Buddy

Problem

Does loud music damage hearing?

At concerts, the music playing is so loud that you can’t communicate with your friends. You’re feeling claustrophobic and you want to tell your friend that you want to leave, take a break and get some water. Unfortunately, you’ve virtually lost your voice from screaming every song and over the booming music its hard to speak to them. What do you do? It is also hard to find a balance in terms of getting a place near the front and also enjoying the concert at a volume that is safe for your ears.

Solution:

A wearable that can tell you options based on your current situation. One that can be worn to loud situations like parties/concert or even just construction area.

Proof Of Concept:

A device with preloaded responses and a LCD screen.  Each option is associated with a  color which indicates the  immediacy/importance of the message. The potentiometer can be used to select the message. Additionally, the device has a sound detector. The sound detector measures the volume level of the surroundings and illuminates a blue light, alerting the user that the sound level is high enough to be damaging to the ears.

Fritzing and Code

Link to Video


Visualizing Expiration

A slow transition we miss on a day to day basis is the degradation of food. I often open up my fridge to find expired milk or some vegetables gone bad. The only way of knowing whether food has gone bad in your fridge is carefully inspecting it.

Solution:

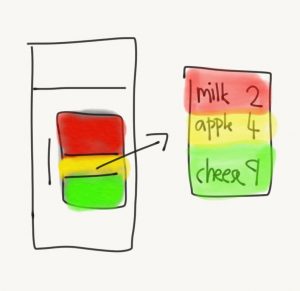
Before placing food inside fridge attach an RFID to food product and input an associated expiration date into Ardunio ~ possibly using a potentiometer or rotary encoder.  Place a 13.56 MHz RFID outside the refrigerator. The range on these devices is approximately 1 meter which means they will be able to read all the RFID tags placed inside the fridge. A screen on the front fridge can display the food associated with every tag and and a red, yellow or green backdrop to easily indicate where in the transition from edible to expiry the food is in.

Solution

Proof of Concept:

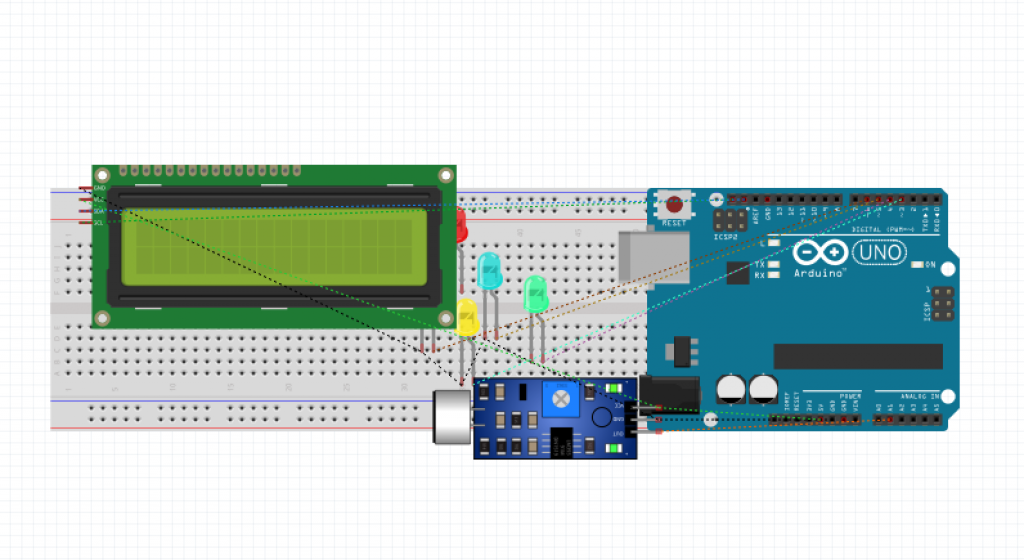
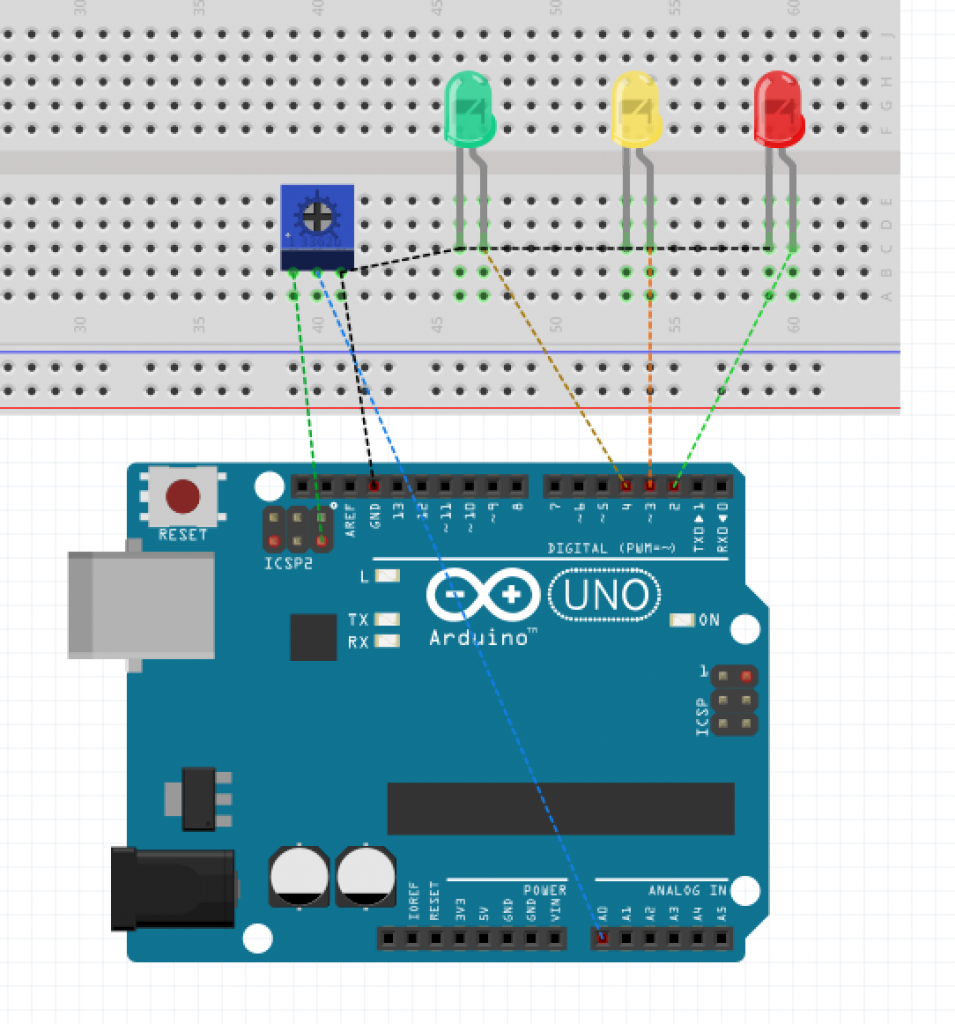
I used a potentiometer and 3 LED’s to show my proof of concept.

The potentiometer was used to input the current state of the food. I utilized millis() to  demonstrate how the colors would change as the time approaches the expiry date. Here, for demonstration purposes, made the day change every 10 seconds.

Breadboard view of circuit

Video Demonstration

Fritzing and Arduino Files


A more accessible fridge

Problem: Fridges alert users when their fridge door is open by beeping loudly. For users who are hard of hearing, this is not a feasible indicator.

Solution: Fridge flashes a bright light to get the attention of the user to notify them that their fridge door is open

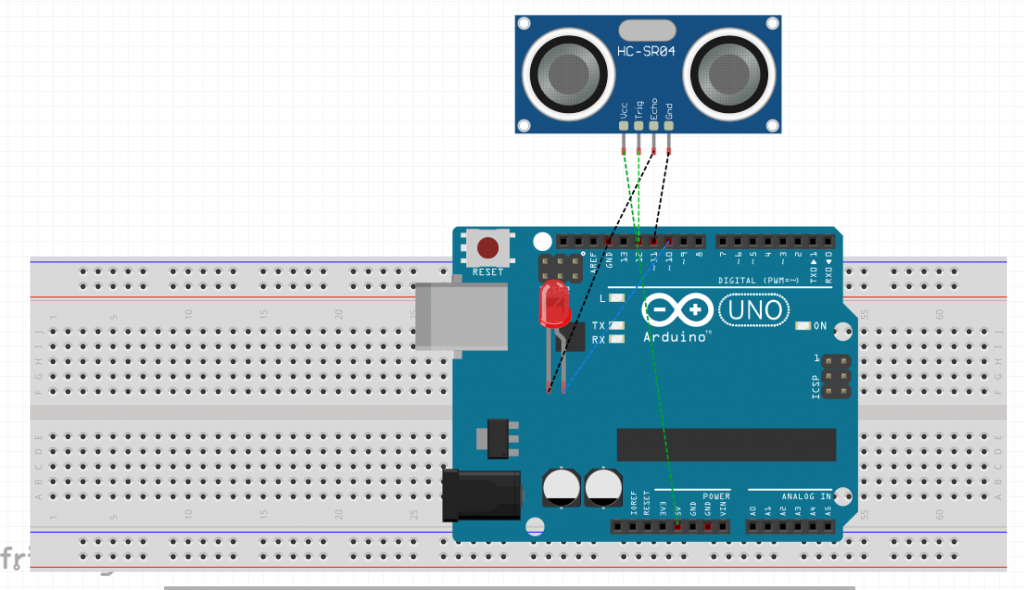
Proof of Concept: Using a ultrasound sensor, an LED and a SparkFun, I created a simple state machine. If the ultrasound sensor is sensing a distance of more than 20 centimeters it begins flashing the LED. Otherwise, the LED remains off.

Video :VID_20190909_231515

Fritzing and Arduino Code