Final Crit: Gaurav Balakrishnan

Confused Keyboard 

My initial project idea was to just make an instrument that makes people think by being not unlike what people expect. I decided to make a keyboard which looked exactly like a functioning proper keyboard but emitted noise that were slightly off. While the major idea remains the same, I noticed that this would be a very interesting model to mimic very real occurrences of things and people having perfect external appearances but functioning in confusing ways. The keyboard I have finally made is very confused most of the time, playing notes with frequencies slightly off, with tones that are varied, with different and dynamically varying magnitudes. All of this happens without any apparent pattern. However, every so often there is a period of lucidness that can be experienced where the keyboard plays exactly like one would expect. To someone who reads and learns about neurodegenerative diseases, this is a very relatable phenomena.

Components:

An old Yamaha Keyboard
Conductive Copper Foil Tape – Switches
8 ohm Speaker
Wire
10k and 15k ohm Resistors
Arduino Teensy
Class D Amplifier

Iterations

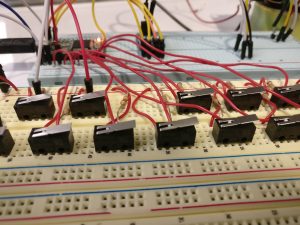
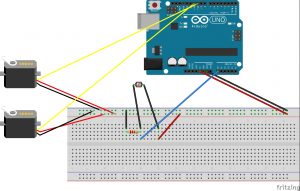
The first draft of this project was conducted with just a couple of breadboards, lever switches, and an Arduino Teensy using the DAC to output waveforms. A code was implemented to dynamicallyh randomize the kind of notes played on each key to show a proof of concept of how the project would work. The image below shows what the circuit looks like.

The Final Project 

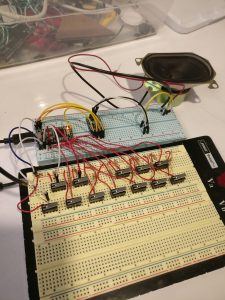
I decided to try and obtain an actual keyboard to use as a shell and the form for my project. I had two options on how to move forward with it – 1. to access the key reads using the circuits that exist on the keyboard and, 2. to completely rip out all the electronics and implement simply design switches to read using the Teensy. The latter option was selected because it proved to be slightly complicated to figure out the wiring of the keyboard’s electronics. Also, I decided to implement only an octave worth of keys but focus more on the software of the sounds generated by the keyboard. A limitation of the Teensy is also the number of inputs.

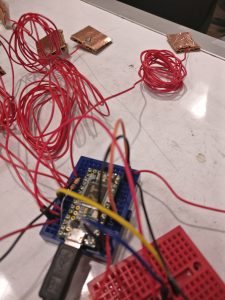
The switches were implemented using Copper Foil tape applied on the keys and in a power line running in the bottom where the keys would make contact as seen in the image below.

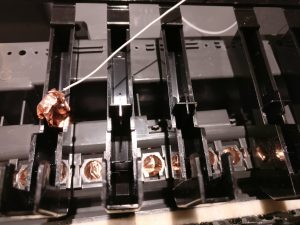
A challenge I ran into was on understanding how to make these switches function in a more reliable manner. I found that reinforcing the foil by applying multiple layers was really helpful.

The code is uploaded here. I think it was really interesting to use a DAC to produce waveforms and directly manipulate them to create various effects.

The video is here!

Assignment 7: Gaurav

My idea is to make a keyboard that is a symbol for confusion. It’s exterior will look perfectly alright but on playing it, the user will find that the keys produced tones completely different from what they expect. And the tone that each note plays varies in random time and there should be no seeming pattern in the confusion. However, there will be brief periods were the keyboard will be lucid  again – allowing the user to savor the few moments of normalcy before it is consumed again by its confusion.

The project as it stands lacks form. I decided to focus on making the essentials work and efficient code for the first draft of this project. An Arduino Teensy is used to create different types of waveforms that can be outputted through its DAC. The signal from the DAC is amplified using a standard 2.5 W Class D amplifier that then connects to the speaker. The Audio library proved to be extremely helpful in the creation and the handling of the waveforms. It took a lot of time and effort to troubleshoot and create the output of waves from the DAC and then in using the amplifier chip. However, many trivial but crucial mistakes were found that when fixed allowed the system to work quite well.

Writing the code has been one of the more challenging parts of this project. I have learnt a lot from observing how changing code in one part of the program can affect the function of all other parts. Also, I noticed that every time I added a functionality in the code, there were new edge cases that I needed to account for. This has been a great learning experience.

The next thing I want to focus on is the form of the project. My ideal path forward would be to obtain an old, cheap keyboard and strip off most of the electronics to access just the keys. I would then be able to connect the keys from the Arduino and control the sound exactly the way I described above. If this proves to be very hard, I would like to fabricate a simple but appealing keyboard using laser cut wood or acrylic.

Video 1: Perfect Sine-wave based polyphonic synthesizer

Video 2: Confused Piano


Assignment 5 Final: Twista-Wearable-Synth

I decided to make a crude version of a wearable synthesizer where capacitive touch sensors were placed without an obvious order relating to the notes. The idea was to have the user search for the notes often not knowing what the next note would be. I felt like this would lead to some unknown and interesting sounding tunes. Another feature of this system is that the scale that is played varies based on the amount of light in the environment. I envisioned a darker sounding harmonic minor sounder scale when it is night time and a happier major scale when it is day time.

This project used an Arduino Teensy because of it’s ease in creating capacitive touch sensors. I built the capacitive touch sensors using conductive tape made of Cu. A callibrated photodiode is used for measuring the amount of light in the environment.

Set Up

The form of the project is something I definitely needed to give more forethought. The long wires attached to the sensor were harder to incorporate into clothing than I had imagined. I definitely need to get better at envisioning how I want the project to look

Videos:

when there is light
when it is night

Assignment 5 : Gaurav Balakrishnan

For this assignment I decided to use capacitive touch sensors to respond to different kinds of physical interactions. I envision the project to allow the user experience physical interactions like a game with different kinds of physical interactions getting different levels of responses. The response will be in the form of a sound or specific tune. For instance, the sound played when the user hugs someone compared to the one after a handshake contains more excitement. I think this project would be a small easy way to spread happiness.

To prototype this project, I created a capacitive touch sensor using aluminum foil. I also use the CapacitiveSensor library available on the Arduino website to make this sensor. I play a certain frequency when the sensor is not engaged and a different one when it is. This proof of concept can be extended to have more number of sensors and different tunes to create the project imagined.

It will be interesting to find ways to incorporate this into the clothing of the user. I also think I will enjoy coming up with the different tunes that play in response to different stimuli.


A scene inspired by the movie Up

This project was one that really pushed me in the conceptualization phase of the project. The project conceptualization is the field in which I have been pushed the most in this class. I decided to do a scene from a movie that I hold very dear to my heart- the animated Pixar movie Up. The 72 year old balloon salesman who wants to live a life of adventure and floats his house into the sky and away with a young boy who is a stowaway.

It is something like I would dream about in my childhood. It is a symbol of hope.

The house ‘floats’ by the use of a fishline that connects to a motor and a pulley. The clouds are controlled by servo motors.

If I were to do this project again and I had more time, I would try and incorporate more sensors and moving elements into the system. I would like the house to respond to things in its environment rather than it being controlled manually.

The troubles I faced involved wiring the H-Bridge and the motor on the breadboard. I think I would consider using a different bread board the next time and soldering the parts that I can to ensure proper connections.

Nervous Shoes in a Shoebox – Gaurav

After much thought and discussion with friends, I decided to make a project that focused on the emotion of nervousness.

The idea was to create two legs with shoes attached on them that “walk” in the same place by their attachment to two servo motors. A photoresistor would be placed such that it is able to pick up when a shadow is cast on the project and someone is getting close to it. The closer the person gets, the more nervous the legs get, and the faster they move.

I made the legs out of Popsicle sticks and connected them with wire. The shoes were made of tiny red balloons.

Once I made a working prototype, I felt the shoes needed an environment to walk in. I painted the background to represent a dark and starry night. In our world today, walking alone at night is associated with nervousness.

Through this project I learned a great about the conceptualization process of a project. If I were to do this project again, I might learn how to laser cut and create better parts for the project.

This is a video of the working project:

Fritzing of the circuit:

Link to the code