Nervous Shoes in a Shoebox – Gaurav

After much thought and discussion with friends, I decided to make a project that focused on the emotion of nervousness.

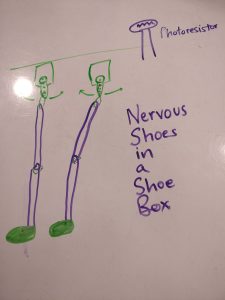
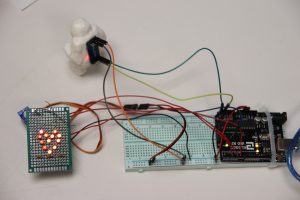
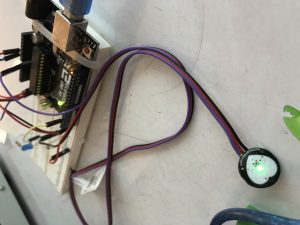
The idea was to create two legs with shoes attached on them that “walk” in the same place by their attachment to two servo motors. A photoresistor would be placed such that it is able to pick up when a shadow is cast on the project and someone is getting close to it. The closer the person gets, the more nervous the legs get, and the faster they move.

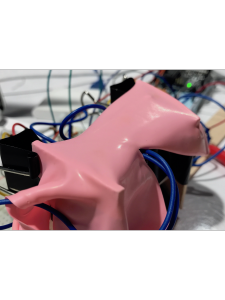
I made the legs out of Popsicle sticks and connected them with wire. The shoes were made of tiny red balloons.

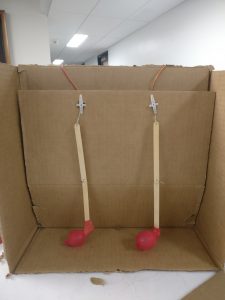
Once I made a working prototype, I felt the shoes needed an environment to walk in. I painted the background to represent a dark and starry night. In our world today, walking alone at night is associated with nervousness.

Through this project I learned a great about the conceptualization process of a project. If I were to do this project again, I might learn how to laser cut and create better parts for the project.

This is a video of the working project:

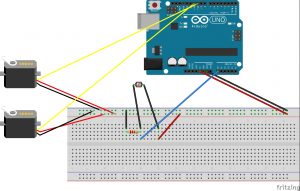
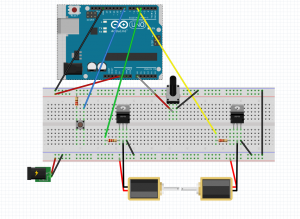
Fritzing of the circuit:

Link to the code

A Machine that Slowly and Painfully Erases Waluigi (Assignment 3)

https://photos.app.goo.gl/u3jDI1aei7ndAbJx2

I started with this:
https://photos.app.goo.gl/pU3kX9CPMZUeqGkt2
A tripod of solenoids that would behave as specified in this image:
https://photos.app.goo.gl/56XQvGq9EsVurZIG3

The emotion I was going for was futility and frailness.  I wanted the tripod to scramble about aimlessly, the firing of the solenoids powering it.  Unfortunately I over estimated the strength of the solenoids and found that they wouldn’t move when under their own weight.  I simplified, and got a bigger solenoid.

https://photos.app.goo.gl/p3MHTBIOscGNQdNb2


I found that its’ scooting about was still really weak and pathetic, which I liked.  The ideal version of this piece would have had a slice of pizza stapled toppings-down to the bottom, as the sled.

Assignment 3 Cathy Fang: Reverse Whack-A-Mole

My idea is to create a reverse Whack-A-Mole. Video demo is here:

https://drive.google.com/file/d/0B0lS0mmjvCWPZFB0ZjBBbHJqb0E/view?usp=sharing

The “hammer” (solenoid+motor) tracks the finger’s location and hits your figure if you cover the button (photoresistor).

Challenges and failure:
1. Burned an Arduino when playing around with the solenoid. The solenoid needs a 12v power but I was pulling power from both the power box and the Arduino.

2. The appearance of the project could look more stable. I did not have time or material to build a stable post or box, which affects the performance of the project.

Assignment 3: Kinetic Sculpture

My project is a kinetic sculpture. I had a lot of fun with this and spent way more time than I probably should have. The concept was about changing a physical form by switching the rotation of a motor.

My initial idea was to use string to put some object into tension and cause motion, but that was really difficult to control with a dc motor (though it probably would have been fine with a stepper motor). I then thought about how I might be able to flip a piece of paper with different colors on each side to convey a change in emotion via a shift in color. When I started to experiment with this I realized that the speed of the motor made it difficult to discern between color states, but that led me to stumble upon the form-changing aspects of this project.

Getting this piece to perform the way I wanted it to was incredibly difficult. There were a large number of variables, things were imprecise, and debugging was a major pain. In the end, I was able to elicit a very specific behavior out of the machine, but I think earlier versions filmed much better, though the final product looks quite nice in person and is much cleaner when not in motion than the others were.

Below is some process.

First success with a motor:

First success with a change in form:

Some iterations:

Final product:

Iterations of different components:

Files: goo.gl/qxMDw1

(uploaded to google drive because WP would not let me upload with the current filesize)

Clapping Hands

This project is about using motion to express emotion. Here I chose the emotion of happiness, related to the motion of clapping hands. So here is my tiny robot “Pat”.

The main components of this setup are solenoids, potentiometer, and pushbutton. Here, the solenoids represents the hands; the button represents praising words; the potentiometer represents how flattered Pat  is.

When Pat got praised (the button is pushed), he starts to clap his solenoid hands. If he is more flattered than normal (turn the potentiometer to one side), he will be happier and clap his hands faster; if he is not so flattered (turn the potentiometer to the other side), he will slow down the clapping speed back to normal.


If you want to create your clapping “Pat”, here is the code and sketch to help you:

Arduino Code File: Clapping Pat – Code

Fritzing Sketch: Clapping Pat – Sketch

Assignment 3: Unsteady

The goal of my project was to explore how heart rate can implicitly express emotion. A faster heart rate can mean many different things, from adrenaline, to fear, to excitement. In this specific case, I wanted to see how an increased heart rate can be linked to negative emotions associated with being off-balance.

As you knock the person off-balance, the heart rate increases rapidly. Once the person is back on his feet, the heart rate returns to a steadier, more relaxed rhythm. The heart rate is represented by a string of LEDs in the shape of a heart mounted on a protoboard. The protoboard is mounted to a servo, which moves in rhythm with the heart beat. The person is hand carved from a bar of soap, with an accelerometer embedded in its back.

All details (Arduino sketch, demo video, etc.) can be found here:

https://drive.google.com/drive/folders/0B0yMpI_ZOcoYRzJyZXRWZ3lidkU?usp=sharing


Assignment 3: Emma Brennan

This project displays a bodily response to an emotion or action. The solenoids under a latex membrane respond to light changes as the hand gets closer to the photoreceptor. This simulates chills as the hand gets close to the ‘skin’. The main thing I learned is to utilize simple code to check for circuit issues.

Here is the zip file for my process and final work:

Brennan_Emma_Assignment03_solenoid 2


Project 3 Who is she?

Shes sassy, she has a taste for the finer things in life.

Who is she?

Shes the posh PIR.

Wave at her like a normal person and you’ll only get a stuck up wave back…because you know deep down she doesn’t like your shoes.

I created a little machine that when you wave at it with will give you the cliché posh wave back. I did it by making an input PIR sensor and an output servo motion. I wanted it to have a fairly quick response time however I found that difficult to achieve, lets just say the delay adds to her aloofness. When you wave you will get back an irregular number of waves every time like a regular person. It generates from 1- 5 how many waves you get back. I tinkered with the speed and rotation and finally came to this as my final product.

Video link- https://youtu.be/SzFV096u0PA

Drive- link- https://drive.google.com/drive/folders/0B_JEXda9ZXwvSDViRUcwZnVySlk?usp=sharing

Assignment 3: noel lau

Can I make the sensor read the heartbeat, calculate bpm and flash a blueLED with some relation to the readings?

Emotion portrayed: annoyance and frustration at trying to write a seemingly simple code for a seemingly simple task, rather than use the library available here: https://pulsesensor.com/pages/code-and-guide

Original idea: change red/blue LED blinking patterns in accordance to BPM readings.

Difficulties: I found that thresholding techniques were needed to to process the raw sensor data (reads a spectrum of values, highs correspond to a heartbeat) to identify and count the number of heartbeats and calculate BPM. Much of the time was spent doing this.

https://drive.google.com/drive/folders/0B6vucT1cFrpgdlBVWTlUamxzV1U?usp=sharing