Assignment 5 Final: Twista-Wearable-Synth

I decided to make a crude version of a wearable synthesizer where capacitive touch sensors were placed without an obvious order relating to the notes. The idea was to have the user search for the notes often not knowing what the next note would be. I felt like this would lead to some unknown and interesting sounding tunes. Another feature of this system is that the scale that is played varies based on the amount of light in the environment. I envisioned a darker sounding harmonic minor sounder scale when it is night time and a happier major scale when it is day time.

This project used an Arduino Teensy because of it’s ease in creating capacitive touch sensors. I built the capacitive touch sensors using conductive tape made of Cu. A callibrated photodiode is used for measuring the amount of light in the environment.

Set Up

The form of the project is something I definitely needed to give more forethought. The long wires attached to the sensor were harder to incorporate into clothing than I had imagined. I definitely need to get better at envisioning how I want the project to look

Videos:

when there is light
when it is night

Sound Interaction: Printerface

Screen printing with light up ink…The goal of this project is to create a textile-based interface for music playback, so a person will not need to check their phone for a simple task.

The current form is a foam core model that houses the arduino and other cables. A USB cable processes capacitive input from the printed gesture bar at the bottom to understand a user’s intention. The paper displays visual feedback to indicate the musics state. The video below describes how the technology works.

teensyCapsenseFinal.ino


Spooky Scary Mask – Final


This is the final project of the Spooky Scary Mask, if you want to review the first part of the prototyping (the distance detector, how to play sound), please click here.

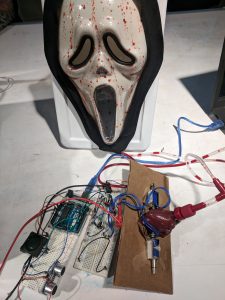
This part of the spooky scary mask, the main focus is how to work with the solinoid/fluid pumps and the mechanical part of the project. The main goal for the mechanical part is to make the fake blook flush into the mask, to create the bloody scary effect.

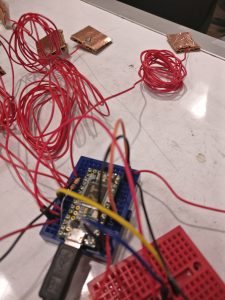
Here is the fritzing sketch for this somewhat-working demo, whichi is not a whole lot more complicated than the previous one:


Here is the code, not much have changed from prototype part 1:

//JeanZhang_yihanz
//The Bloody Scary Mask - Part 1
//This code contains code and resources from this webpage:
//http://randomnerdtutorials.com/complete-guide-for-ultrasonic-sensor-hc-sr04/


//Set up the pins
const int trigPin = 11; //Trig - green Jumper - digital 
const int echoPin = 12; //Echo - yellow Jumper - pwm
const int soundPin = 5;

const int solinoid1 = 9;
const int solinoid2 = 8;

long duration, cm, inches;


//This is the function for a spooky sound (doesn't have to be exactly like this)
void scarySound() {
 for (int i = 100; i < 1000 ; i+= 20) {
 Serial.println(i);
 tone(soundPin, i);
 delay(50);
 }
 for (int i = 1000; i > 100; i-=20) {
 Serial.println(i);
 tone(soundPin, i);
 delay(50);
 }
 noTone(soundPin); // stop the sound after the trigger
}


void setup() {
 //Serial Port begin
 Serial.begin (9600);
 
 //Define inputs and outputs
 pinMode(trigPin, OUTPUT);
 pinMode(echoPin, INPUT);
 pinMode(soundPin, OUTPUT);
 pinMode(solinoid1, OUTPUT);
 pinMode(solinoid2, OUTPUT);
}
 
void loop()
{
 digitalWrite(solinoid1, LOW);
 digitalWrite(solinoid2, LOW);
 
 
 // The sensor is triggered by a HIGH pulse of 10 or more microseconds.
 // Give a short LOW pulse beforehand to ensure a clean HIGH pulse:
 digitalWrite(trigPin, LOW);
 delayMicroseconds(5);
 digitalWrite(trigPin, HIGH);
 delayMicroseconds(10);
 digitalWrite(trigPin, LOW);
 
 // Read the signal from the sensor: a HIGH pulse whose
 // duration is the time (in microseconds) from the sending
 // of the ping to the reception of its echo off of an object.
 pinMode(echoPin, INPUT);
 duration = pulseIn(echoPin, HIGH);
 
 // convert the time into a distance
 cm = (duration/2) / 29.1;
 inches = (duration/2) / 74; 
 
 Serial.print(inches);
 Serial.print("in, ");
 Serial.print(cm);
 Serial.print("cm");
 Serial.println();

//if the person is close enough, things will be triggered
 if (cm < 20){
 digitalWrite(solinoid1, HIGH);
 digitalWrite(solinoid2, HIGH);
 scarySound();
 }
 delay(250);
}


Reflection:

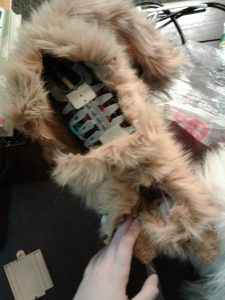
The coding and wiring part of the second half is not hard to figure out. However , the mechanical part is really hard to be done. Since I bought the mask from a Halloween store, and this is a part of a kid costume. The bloody “heart” is made for the force that can be applied by human hand. In this case however, the solinoids can’t apply


Assignment 5 (final): Sound Form

Video:

https://drive.google.com/file/d/0B0lS0mmjvCWPd1NuczBJTm9RbUk/view?usp=sharing

To reiterate my idea:

Sound exists as sound wave but is only perceived by us through vibration of objects. In this project, I want to change the way we perceive and manipulate sound by emphasizing on the motion of sound waves.

As a violinist, I feel the music through the position of my fingers. When I first learned how to find the right finger positions  to play different notes, my perception of pitch carries a more physical form (location on finger board). I am inspired by this idea and want to present that experience through this project.

As the user move their hand across the strings, the tensity/deformation of strings varies. The users will then fine tune the instrument by finding the pattern of pitch change with respect to their finger position. The sound is really unstable, which adds emotion and interaction to this instrument.

=====================================

More problems I ran into/Things I fixed:
1. The IR sensor reading was really unstable. I first changed how often I take the data but the reading still fluctuate a lot. So I googled and found that I should add a 100 uF capacitor.

2. Servo almost did not work. After I fixed the IR reading and sound input, I could not start my servo. I played around with the range of servo input and double checked the wiring, and I did not find any error. Then I increased the current and voltage input and suddenly the servo was running. (the arduino god did not give up on me!!)


Wearable-ish Synth

After prototyping the capactive sensors and the polyphonic function I went about creating an enclosure for the full piece. I lazer cut and engraved a small box to fit in the palm of ones hand, and added a strap for security and comfort. It’s not the most ergonomic thing in the world, but it functions…

I ran into extensive problems with the capacitive sensors and wiring. Hopefully someon can exlpain this to me, but for some reason whenever I used wires longer than about ~6 inches they would begin to trigger from the proximity to the power wire. I then took apart the box and added another slot to run the sensor wires through, this proved also innefective as I ran into the same problem with longer wires. If I had more time I would have set up the whole thing inside the box, but at this point I had already taken it apart several times and was doubtful I could fit everything inside this small of a form factor. I settled for being able to hold the thing, and just not move around too much.

It has a volume control on the breadboard, and you can switch notes and key by changing the pins the wires go into.

I was unable to integrate the 3axis accelerometer for the other hand, but I’m happy with the piece as it is.

Happy to demonstrate in class!

https://drive.google.com/file/d/0By_HygQXfEhJZDRTM2c5UWFmYWc/view?usp=sharing

Tatyana Mustakos Assignment 5

I made a skeleton that dances when someone is close


I wanted to rig a sort of puppet so that it dances on its own.

I made a skeleton out of polymer clay, with a wire armature so that the limbs would be strong, and so that I could use wire to join the different pieces of the skeleton together so that they would all dangle from each other, and so that there was not much resistance or friction occurring, which allows it to move more fluidly and without as much restriction

After I made the form, I attached a string to the head, which controls the height of the skeleton, and one to each limb for individual arm and leg control.

In order to move them, I would string the string through the cardboard backing(visually separating the skeleton from the mechanisms) and use a servo motor to wind up the string and shorten it, causing the limb/head to rise or fall. I realized that since the servos only rotate up to 180 degrees, there was not enough circumference being used to wrap up a large enough amount of thread to really make a difference or let the skeleton dance, so I  attached sticks to the servo,s and tied the string to the end of them. This makes it so that the circumference that the knot is traveling is substantial enough to change the length of the thread sufficiently, and is less problematic(in terms of tangling) than winding up the cord.


Once I rigged the body up, I added the speaker, which plays a tune while the skeleton dances, and hooked up a sensor that detects when someone is nearby. When the sensor is triggered, the skeleton dances by moving his limbs a semi-random amount.

Assignment 5 zip


Assignment 5: Nosy Housemates

How do you feel when you see a package at your door that isn’t for you? Personally, I get a little sad, and then I’m just curious about what’s inside. What could my housemate possibly be ordering?

I designed my project to scare/annoy anyone that lets their curiosity get the better of them and decides to be nosy — the package freaks out whenever you try to open it. (You can’t quite tell in the video, but the box vibrates slightly every 2 seconds when closed, mostly to add an extra little touch of annoyance to its presence).

Mechanics: photoresistor, speaker, LEDs, haptic feedback/vibrator

Video

testBoardVid

arduinoSketch

Halloween Special Project 5

So I finally bit the bullet and watched the exorcism the other week to get in the holiday spirit. Its safe to say that movie is horrifying, so why not recreate one of the most pivotal scenes (pun intended). I decided to rig a baby doll to spin its head 360 degrees while also emitting some pretty unpleasant sounds. I found a baby doll at a local goodwill and from there took its built in button and dialog and rewired it into my bread board in order to use the switch to trigger its pre recorded sayings as well as my components. When its foot is pressed a speaker in its back will begin to let out a wailing sound as a servo begins to turn its head 360 degrees. It will spin until the sound ends. Each time you press the foot you also get a creepy randomized saying from the baby (that of which came with the doll). If I were to do it over again I would have tinkered with the speaker I added and mess with the frequency. Secondly I wish I resolved the head rotation so that every 2 times you press its foot the head will come around to its original forward facing position, now it ends where ever the sound stops.

google drive to process-https://drive.google.com/drive/folders/0B_JEXda9ZXwvcDhtOEZuSG4ydG8?usp=sharing

youtube video-


Piano (Assignment 5, Aditi Hebbar)

This is a makeshift wooden piano, with a solenoid that moves when a key is played to create rhythm.

I had originally intended to create a self playing piano, with the solenoids moving each key when required. However, that seemed to pose too many mechanical issues (the solenoid moved up and down too much, and required a lot of room to move etc) so I gave up and used a working solenoid to create some beats instead. 🙂

link to video and files:

https://drive.google.com/file/d/0BxDLW7cgDfWoSWZVX28tNUNTRlE/view?usp=sharing

Cat’s Out of the Bag (Halloween Project)

For this project, I wanted to portray themes of nostalgia and unpleasant truths. I used a toy from my childhood, and augmented it, turning it into something slightly horrifying and much different from my idealized memory of the toy.

I started by trying to reverse engineer the toy and learn how it worked mechanically, so that would know what wires to change to suit my needs.

The toy features 5 capacitive touch sensors, a speaker, and two servos. I decided I wanted to ‘trigger’ different actions of the cat, and to do so I made a control panel with conductive tape that would allow a user to trigger different actions and play noise. These actions are Hiss, Purr, Meow, Look Left, and Look Right.

I had hoped to circuit bend the speaker board to get interesting results, but unfortunately most of the speaker timing and signal processing were in the IC, and I was not willing to mess around with the whole board due to the motor control circuits on the same pcb, as I was afraid of shorting out important components.

Instead, I made an external pitch shifter using an Atiny85, the circuit and code for this board can be found here:

http://www.technoblogy.com/show?1L02

I soldered the components to a protoboard and broke out the speaker wires for the cat toy, also soldering them to the board. I then added two buttons to allow the user to change the pitch manually, and mounted them to a control box.