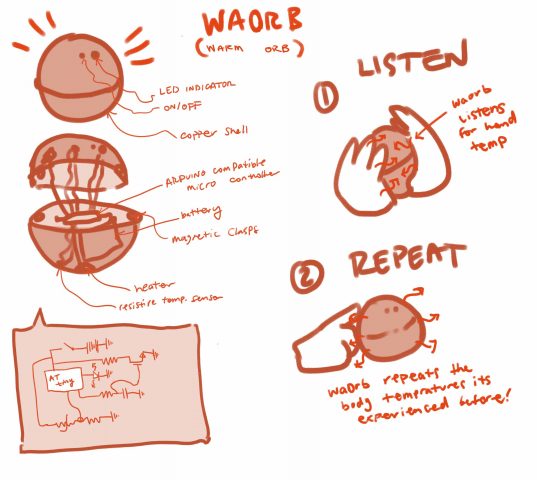
Complete Waorb


Why a Waorb? 

Pictures capture a likeness, but not the feeling of someone. I want a device so that I can feel the warmth of specific moments. So I can know my friends or lovers touched what I’m touching now and feel the warmth of their bodies when they’re far away. I want to be able to let others hold this same device and know they’re able to experience an intimate part of this moment too. I want a Waorb.  

What will I have for final critique?

In short: a completed Waorb and documentation. 

In long (Deliverables):

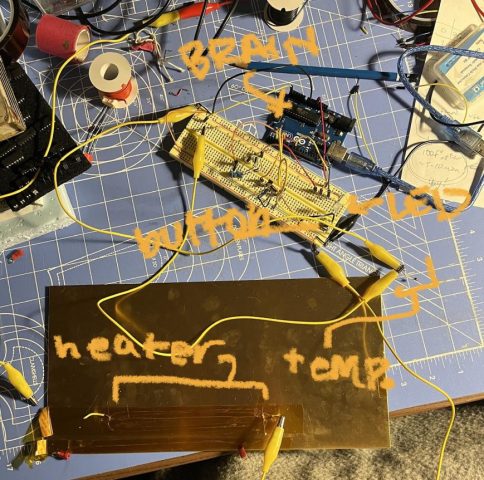
  • One (1) working Waorb (warm orb) 
  • One (1) thermal camera video of the Waorb working 
  • Several (several) photos and captions of the Waorb in various states of development 
  • One (1) narrative about what I learned in this project through the development process
  • One (1) instruction manual for how to create a Waorb of one’s own (MAYBE)
  • One (1) moving (i hope) blog post or documentation centering the key concept of the Waorb (taking a picture of the warmth of someone you love so you can share it with others and feel it again later). 
  • One (1) microgrant application to the Studio to recoup the costs of the brass orb and electronic components if when I total it up the Waorb cost me over 150 dollars (MAYBE)

Where am I right now?

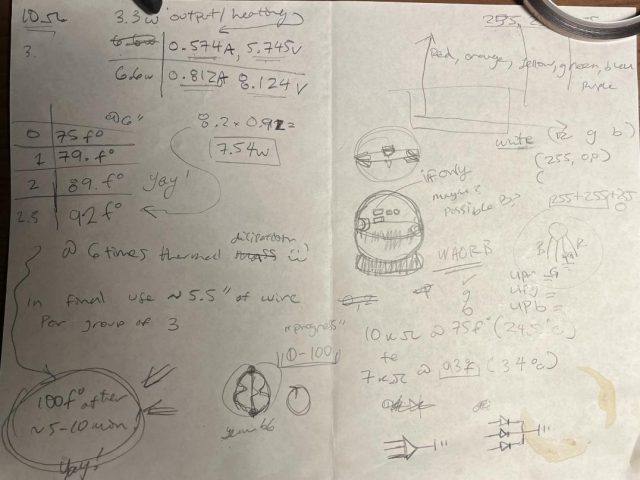
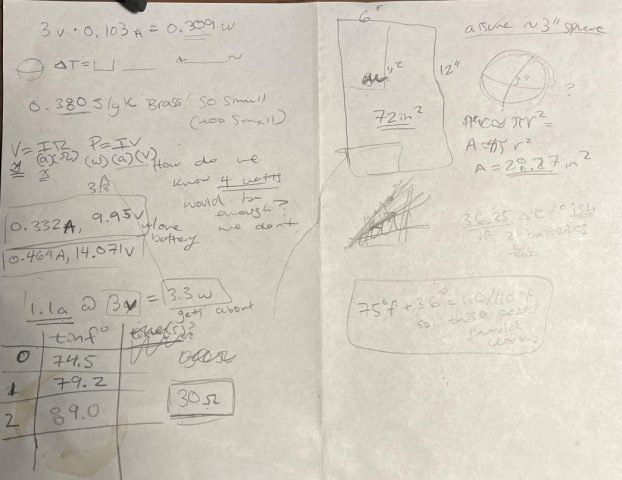
Constructing the final Waorb. I have the components I need and am building the Waorb. I have finished the magnetic clasp (which will be supplemented with another type of closure), and have begun constructing and installing the heating module. 


Person in Time, Informal Update

Woarb update:  the waorb is becoming warmer.

Seriously though… Here’s the waorb prototype circuit.

As you can see it’s basically the circuit from the waorb proposal (missing the on/off switch, heater being powered by an external power supply) with the addition of a momentary switch and a cockroft-walton ladder to power the MOSFET switching the heater.

Let’s break it down a bit more!

HEATER ELEMENT TEST

The heater is made from 40 gauge steel wire (ie. about human hair width)–and in order to achieve the right resistance (~10 ohms). The batteries I intend to use in the final waorb should be able to create about a 6.6w heater so I tested the heating elements to determine how well they could heat the brass using A and V which would produce 6.6w.

Above: my horrible math notes.

I found that on the brass sheet (about 6 times as much brass as in the waorb) I was able to heat the brass to about 89.0 degrees f.

This was important because I now know:

  1. That the woarb should perform as hoped (heating power and thermal tape attachment wise). The heating elements I created don’t catch fire.
  2. The number of wires at what length I will need in the final waorb (resistance is directly proportional to length of wire and inversely proportional to number of wires of said length). I will need 3 wires at ~5.5″ for each heating element.

CIRCUIT BUILDING

I then built the circuit needed to power on an RGB LED on a breadboard with an Arduino and installed Arduino. (As shown in the design).

After that I built the temp circuit (as shown in the design) and used the serial port on the Arduino to test it was working. Once it was working I took readings to calibrate it.

Reading | temp in F | temp in C | Temp in 10ths of C
880            71.5                    22.2                222
680            85.5                   30.1                 301
580            96.9                  35.5                355
640            94.2                  35                   350
I used these values to find a line of best fit to convert the sensor reading into 10ths of degrees C (so they can be stored accurately without floating point numbers).

After this I added the heater element back into the circuit (almost as shown on the design, added a cockroft-walton ladder to make the MOSFET work correctly).

After this I added a momentary switch to change modes in the final program.

PROGRAM  

Currently the program is able to: switch between modes when the mom switch is clicked–showing a different LED color for each, take the temperature when the switch is single clicked in listening mode–showing a white flash from the LED, record the temperature into in 10ths of degrees c to an array.

TODO: add the heater control, make the LEDs change dynamically with temperature in listen and repeat mode. I’m sure some other stuff I’m forgetting.

//vars for button stuff bool pressed;
int pressnum = 0;
unsigned long pressMil; //there is a bug where milli() runs out of space and makes measurements invalid… maybe fixed abs
int mode = 0; int test; //vars for recalibrating the temp sensor (form: y=mx+b)y is degrees in 10ths of c, x is sensor data number
float m = -0.4639; int b = 629; //array for temps recorded
int currentSlot = 0; //check to make sure this is correct
int tempsRec[100];
//write mode 0 here (ie. startup/idle mode)
void idle () {
analogWrite(9, 0);
analogWrite(10, 0);
analogWrite(11, 150); }
//write mode 1 here (ie. listening mode)
void listens () {
//temp sensing
int tempSensor = analogRead(A5);
int temp = m*tempSensor+b; //temp in 10ths of degrees C
//LEDS
analogWrite(9, 0);
analogWrite(10, 150);
analogWrite(11, 0); }
//write the picture function here (ie. take temp and store it)
void picture () {
analogWrite(9, 255);
analogWrite(10, 255);
analogWrite(11, 255);
int tempSensor = analogRead(A5);
int temp = m*tempSensor+b; //temp in 10ths of degrees C tempsRec[currentSlot] = temp; currentSlot++;
delay(500);
analogWrite(9, 0);
analogWrite(10, 0);
analogWrite(11, 0); }
//write mode 2 here, (ie. run the heater correctly)
void repeat () {
analogWrite(9, 150);
analogWrite(10, 10);
analogWrite(11, 0); }
//IRS
void switchPressed () {
pressed = true;
pressMil = millis(); }
void setup() {
// put your setup code here, to run once:
pinMode(9, OUTPUT);
pinMode(10, OUTPUT);
pinMode(11, OUTPUT);
digitalWrite(3, HIGH);
attachInterrupt (digitalPinToInterrupt (3), switchPressed, CHANGE); pinMode(A5, INPUT);
analogReference(INTERNAL);
Serial.begin(9600); }
void loop() {
// put your main code here, to run repeatedly:
//this whole part controls the mode selection and picture action
test = pressMil+500-abs(millis());
if (pressed == true) {
pressnum++;
delay(250);
pressed=false; }
if (test < 0) { pressnum=0; }
else if (pressnum >= 2) { mode++; delay(500); }
if (test > 0 && mode == 1 && pressnum == 1) { picture(); }
if (mode==3) { mode = 0; }
//these run the mode code depending on the mode
if (mode==0) { idle(); }
else if (mode==1) { listens(); }
else if (mode==2) { repeat(); }
}


Proposal — Waorb

— W A O R B — warm orb 

What is the waorb? I’m so glad you asked! 

The waorb is an arduino compatible microcontroller connected to two resistive temperature sensor circuits and two little heaters attached with thermal silicone to the inside a copper shell. 

That nice… What will it do? 

It will become waorb. 

What does that mean?

The waorb will have two modes. Listening and repeating. During the listening mode the woarb will be held firmly in both hands, after a delay/once it senses a stable temperature circa body temp it will record this temperature. In repeat mode the Waorb can be touched with by the tips of your fingers (or your whole hand but that’ll make it weird) and will repeat back all of the body temperatures it’s experienced. Because I want the waorb to be simple it will just use its shell’s ability to dissipate heat to move between tempratures. This is why it will be best to only touch the waorb with a few fingers while it is repeating. 

How will I make the Waorb and how will I learn the necessary Waorb making skills?

I asked the electrical engineer I live with to explain the basic information I would need to complete the Waorb. Over the past couple days they taught me about basic circuit components and taught me about possible options I could pursue for this project. I designed the above circuit with their help and they showed me a program https://www.falstad.com/circuit/circuitjs.html that I can use to make sure the components I’ll purchase from digikey will work together. 

I have experience in jewelry making which I believe will make the outside construction of the waorb possible. As well as limited experience with soldering/putting together electronics. While I have not programmed an Arduino, I do think that my other programming experience and the abundance of Arduino tutorials (as well as the simplicity of the program) will make waorb a possible project. 

Advert Inc Typology Machine

My typology machine is a little online game which asks players working at the poorly managed Advert Inc to name knock-off products for resale. The only catch… the objects don’t make sense and the boss hates all their ideas!

You can try the game for yourself here… or keep reading for a collection of my favorite answers. 

Still from the start of the game.

.gif of nonsense object 1

and suggested names:

  • Strangest octopus 
  • Lube
  • Bubble creator 
  • Blip Blop 
  • Hole Jelly

.gif of object 2

suggested names:

  • Slow blender
  • Film canister 
  • Screw 
  • Sprocket 
  • Turny wheel 
  • Cylinder boy 

.gif part of the gameplay.

I staged the images and videos for this game in my living room and captured them using an iphone and an app called imotion. I then compiled these images, video, and my script into an in browser game. I coded it in the frontend in html, css, javascript (this is what allows you to see the graphics and click), and then learned to write some basic python3 to connect it to flask and LMDB (this is what allows you to see other people’s answers who have also played the game).  

The aesthetic is trying to draw on the feeling of older video games (think pokemon on the gameboy), personal websites, and digital zines. In short, leaning into the ugly and potentially unmarketable. 

In keeping with its inspiration I wanted this typology to have the potential for humor. Seeing these objects and speculating about what they’re for is fun. But I also wanted to poke fun at hyper commodification and pointless jobs. The objects don’t make sense and yet they’re being sold (and you have to sell them). Jim is overly familiar and unprofessional and you still need to try and please him (but nothing you say is correct). This typology collecting machine lives online because I’ve been thinking a lot about how this hyper commodification has been affecting internet spaces… Increasingly I’ve watched censorship for the sake of advertisement make social media more sterile and more difficult to navigate. I guess in some ways this work is nostalgic for an idealized version of the internet I didn’t experience. Or… it could just be some silly names for objects. I think either is fine.  

Apps: iMotion. Languages: Html, CSS, Python3, JavaScript 

Libraries: Flask, Gunicorn, LMDB

Specific Tutorials: 

Important/extensively referenced  Documentation:

People to thank: 

Noah, for listening to what I wanted to make, sending me some amazing tutorials, and catching so many bugs as I learned about LMDB for the first time (oh, and of accepting payment in cookies) 

Golan and Nica, for listening to a million iterations of this idea and saying things like, “couldn’t it be weirder?” 

My classmates, for really helping shape this idea and encouraging me to have fun with it (and being oh so willing to help)

My classmates (again) and friends (and everyone else) for playing the game and being part of the typology

Typology Project Proposal

For my typology project I proposed a little online game which asks you to retell a story you’ve just heard.

On Thursday I got feedback on the game which had useful suggestions like how to display the data, that making it more like a game of telephone/leaning into the game aspect, and about when/how to display the instructions.

Currently I’ve finished the technologically challenging part of the project (learning how to set up a super basic python webserver and connect it to an lmdb database (and by learning I do mean following two tutorials))– and now can move on to capturing my initial story and object.

This video is of the game’s technical side working.

SEM Experience


It goes without saying this experience was incredible… but I’ll say it anyways. We were told about the amazing resolving power of the tiny image… but I was surprised by how we were able to focus at every resolution.  I was also surprised by my own desire to keep zooming out to try and see the whole object/orient myself in the image.

This is a .gif of the tip of a discarded cat’s claw ft. a little bit of dirt on the tip.

This is a picture of the joint between a fly’s wing and it’s body.

Reading One


“The photographers were militarized, even if they weren’t paid members of the military. They were taught at the School of Military Engineering at Chatham and sent with military assistants who recorded the transit with military timing, preparation, exposure, storage and later development of the plate.”

I found this aside interesting in the context early photography. In the context of what I know about early photography, (which granted is only what we were taught in Photographing America–an excellent course here at CMU), photography in the early United States was used to solidify state power through various projects. Examples include those like those we discussed in class–typologies creating a scientific concept of race (in order to justify slavery and racism), survey photography moving westward to catalog the new territory of the United States and convince people to move westward (manifest destiny), or notably Edward Curtis’ The North American Indian-a body of work supposedly undertaken to catalog the “Vanishing Race” (also a title of one of the works in the series)… but which was marred by the facts that Native Americans were not “vanishing” by experiencing a mass genocide (which Curtis’ work did not address) and that he did not in fact catalog traditional dress/rituals but rather asked Native Americans to pose for him in clothing he chose… regardless of what culture it was from or what significance it held.

The article mainly focused on where photography was lacking in terms of a scientific tool. For example, how unreliable measurements are even taken from a carefully captured photograph–in the case of early astronomical photography unusable, in survey photography labor intensive, or how in botany it highlighted a specific specimen as opposed to scientific illustrations which were designed to show a general/average. But beyond the scope of the article and these problems is that of what isn’t photographed at all. What can we understand from the information scientists and others choose not to (or are unable to) record?

LookingBackwards

hands on a cave wall
(I know some academics have mixed feelings about wikipedia… but I really do think this a good article)

Stencilled on the walls of a cave in Argentina are human hands. Still visible today, the artwork, created in splattered reds, whites, and blacks, was completed between in the 8000 year span between 7800bc and 700ad; at its newest well over a thousand years old.

The wall of hands in Cueva de los Manos is personally fascinating and academically relevant because of the way in which the artists accurately captured themselves. The prehistoric paintings which I’ve seen, including those in the cave, don’t seem particularly interested in trying to capture the face or a form which distinguishes an individual. If we think about the time and skill it takes to acquire this skill (as well as the difficulty of painting on rough rock) it makes sense. But one might argue even skilled paintings and carvings in the past interject an artist’s hand, and place some emotional distance between us and the long dead subject.

I think these hands fascinate me because long before the advent of photography, these artists were capturing the human body in a way which mimics the objectivity I feel looking the the human face in a photograph. Indeed, to me they create an even closer feeling, offering up the hands of those long gone to compare my own same shaped hand to… stripped of the cultural trappings of difference in language, clothing, or time.