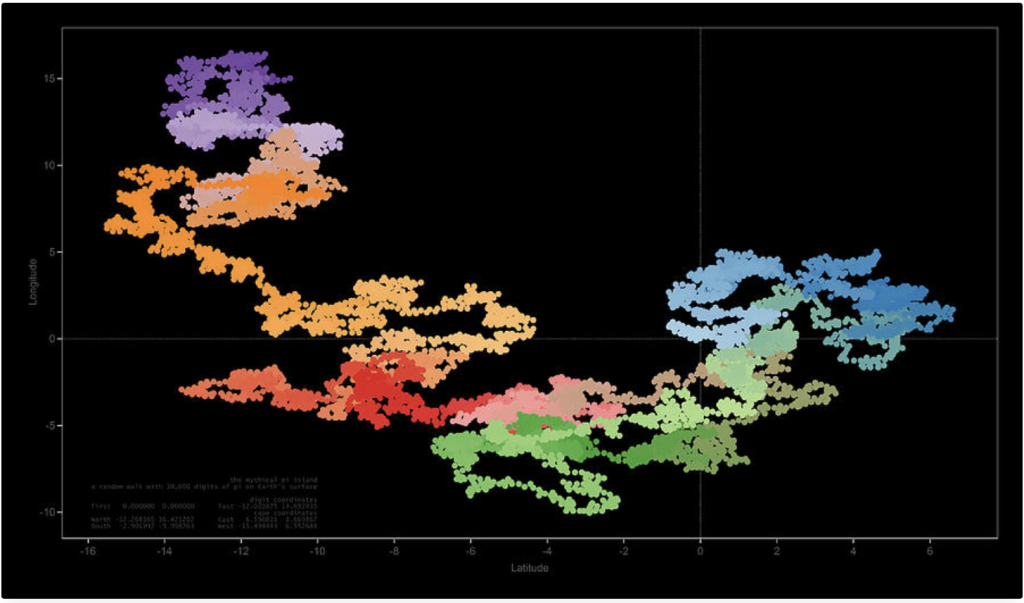
The project I am looking at this week is called “Random Walk with Pi #1” It is created by Cristian Vasile and was uploaded February 26th, 2014.
“Random Walk With Pi #1”
I really like this artist’s work overall because he uses random functions and manipulates them with these complex algorithms to make these amazing and methodical pieces.
In this piece specifically he utilized random walk (just like the one we learned in class) on pi’s first 10,000 digits which he then converted it to a geographic coordinate on earth’s surface. Clearly, he had to use very sophisticated formulas to take these random walk paths and then proportion them to coordinates on a geographical map.
What I really like about this piece is comparing it with other pieces from the same artist. He also used random walk with “E” and the golden ration. It is very cool to see how the 3 pieces are different, but also very similar in randomness because they all used random walk.
Overall, I think it is a really cool and artistic way to use random walk and complex algorithms. I never thought random walk and math would look so pretty.
The project I am looking at this week is called “Momoplanet | Inner Peace Animation” by Zigor Samaniego and his team in 2018.
I really admire this project specifically because I think it is so well crafted. Part of the part of this project was to incorporate many styles into one animation seamlessly and it not only is well done but it also elevated the story it conveyed.
Because of the many styles, the animation must of been created with multiple programs to effectively combine every medium. The team used not only 3D graphics but also “retro-futurism, illustration, stop motion, hand-drawn illustration in 3D-graphics…” So, to bring all the styles together the team must’ve used an animation software to piece together each scene.
Overall between the level of craft and certain style you can tell this work was influenced by Samaniego.
//gnmarino
//Gia Marino
//Section D

var sizeChange = .1; //makes everything 1/10th the original size

function setup() {
    createCanvas(600, 600);
    background(121, 181, 177); //cyan

}

function draw() {

    fill(250, 250, 236); //cream
    stroke(169, 96, 0); //dark orange

    scale(sizeChange);

    // makes the 1st row of mandalas and alternates every other row
    // continues till it reaches border of canvas
    for (var xSpacing = 0; xSpacing < 10000; xSpacing += 900){
        for (var ySpacing = 0; ySpacing < 10000; ySpacing += 1800){
            //push and pop makes it so spacing doesn't compound
            push();
            mandala(xSpacing, ySpacing);
            pop();

        }
    }

    // makes 2nd row of mandalas and alternates every other row
    //continues till it reaches the point where it will not be on the page
    for (var xSpacing = -450; xSpacing < 9000; xSpacing += 900){
        for (var ySpacing = 900; ySpacing < 10000; ySpacing += 1800){
            //push and pop makes it so spacing doesn't compound
            push();
            mandala(xSpacing, ySpacing);
            pop();
        }
    }
    //draws diamond pattern
    for (var dxSpacing = 450; dxSpacing < 9000; dxSpacing += 900){
       for (var dySpacing = 450; dySpacing < 10000; dySpacing += 900) {
           //push and pop makes it so spacing doesn't compound
           push();
           diamond(dxSpacing, dySpacing);
           pop();
        }
    }

    noLoop();
}

function diamond (x2, y2) {
    // translate with parameters allows the loop functions in draw to move the whole design easily
    translate(x2, y2);

    //push and pop to avoid settings effecting other functions
    push();
    translate (300, 300);
    noStroke();
    fill(169, 96, 0); //dark orange
    triangle (-30, 0, 30, 0, 0, 30);
    triangle(-30, 0, 30, 0, 0, -30);

    pop();
}

function mandala(x, y) {
    // translate with parameters allows the loop functions in draw to move the whole design easily
    translate (x, y);

    //whole shape is roughly 500 X 600 pixels before scaling
    threeLeafShape();
    circleBorder();
    flowerAndCircle();
}

function threeLeafShape() {

    //push pop makes it so the settings in this function doesn't effect other functions
    push();

    //moves top leaf to the middle of the mandala
    translate(200, 0);
    strokeWeight(5);

    //draws top leaf
    beginShape();
    vertex(100, 200);
    quadraticVertex(70, 125, 0, 100);
    quadraticVertex(60, 90, 85, 115);
    quadraticVertex(90, 40, 50, 20);
    quadraticVertex(115, 40, 115, 115);
    quadraticVertex(135, 85, 175, 80);
    quadraticVertex(120, 125, 100, 200);
    endShape();

    //push pop makes it so the translation and rotation for the bottom leaf does not effect top leaf
    push();
    //translate and rotate moves bottom leaf so it's mirrored directly undernenth top leaf
    translate(200, 600);
    rotate(radians(180));

    //draws bottom leaf
    beginShape();
    vertex(100, 200);
    quadraticVertex(70, 125, 0, 100);
    quadraticVertex(60, 90, 85, 115);
    quadraticVertex(90, 40, 50, 20);
    quadraticVertex(115, 40, 115, 115);
    quadraticVertex(135, 85, 175, 80);
    quadraticVertex(120, 125, 100, 200);
    endShape();

    pop ();

    pop();

}

function circleBorder () {

    //push pop makes it so the settings in this function doesn't effect other functions
    push();

    //translate to center of canvas to make it easier to make a border in a circular formation
    translate(300, 300);
    strokeWeight(4);

    //radius of basline circle for the tiny circles to follow and make a border along
    var r = 250;

    //makes tiny circle border on right side
    //constrained from theta -55 to theta 55 so circles do not collide with the 2 leaf shapes
    for (var theta = -55; theta < 55; theta += 15) {
        cx = r * cos(radians(theta));
        cy = r * sin(radians(theta));
        circle(cx, cy, 40);

    }
    //makes tiny circle border on left side
    //constrained from theta 125 to theta 235 so circles do not collide with the 2 leaf shapes
    for (var theta = 125; theta < 235; theta += 15) {
        cx = r * cos(radians(theta));
        cy = r * sin(radians(theta));
        circle(cx, cy, 40);

    }

    pop();
}

function flowerAndCircle () {

    //(push pop 1)push and pop make it so translated origin does not effect next function
    push();


    //puts origin in center so it is easier to draw in a circular formation
    translate (300, 300);

    //circle around flower
    //push and pop so nofill doesn't effect flower
    push();
    noFill();
    strokeWeight(5);
    circle(0, 0, 200);
    pop();

    //flower center
    strokeWeight(5);
    circle (0, 0, 35);

    //draws 8 flower petals that rotates around the center origin
    for (theta = 30; theta <= 360; theta += 45){
    //(push pop 2)
    //the push and pop in this loop makes it so it rotates only 45 each time and not 45 + theta
    push();
    rotate(radians(theta));
    ellipse( 55, 0, 45, 20);
    //pop uses push 2
    pop();
    }
    //this pop uses push 1
    pop();
}
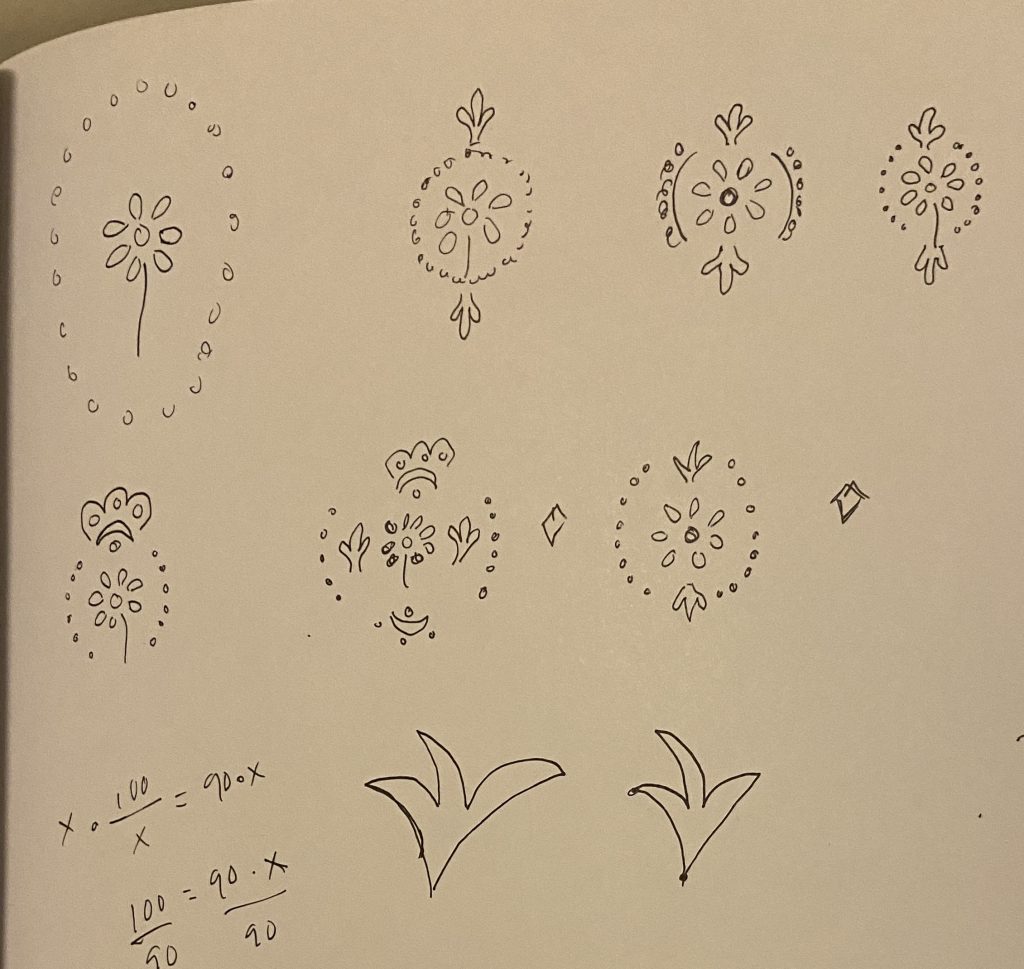
Drawings
I started off with deciding a design that I could then repeat over and over. Then after I decided, I made the design in a 500×600 pixels dimensions. Then I scaled it down and looped it. Then I felt like the pattern needed something in-between the mandala I created so I made a diamond and made a separate nested loop to repeat it so it went in the empty spaces. I had to make two nested loops for the mandala so the columns were staggered and not lined up perfectly. For the circle border I used polar coordinates so I could space it out and also not have to complete the circle. But for the flower I had to use rotation so the ellipse turned and went in a circle.
//Gia Marino
//gnmarino
//section D

var dx1;
var dy1;
var dx2;
var dy2;
var numLines = 50; //how many lines drawn between line 1 and line 2

function setup() {
    createCanvas(400, 300);
    background(200);

}

function draw() {


    //draw bottom left string art - line 1: (0, 0) (0, 300) line 2: (0, 300) (400, 300)

    drawStringArt(0, 0, 0, height, 0, height, width, height);

    //draw bottom right string art - line 1: (0, 300) (400, 300) line 2: (400, 300) (400, 0)

    drawStringArt(0, height, width, height, width, height, width, 0);

    //draw top right string art - line 2: (400, 300, 400, 0, 400, 0, 0, 0)

    drawStringArt(width, height, width, 0, width, 0, 0, 0);

    //draw top left string art - line 2: (400, 0, 0, 0, 0, 0, 0, 300)

    drawStringArt(width, 0, 0, 0, 0, 0, 0, height);

    noLoop();
}

    //function that creates string art shape
function drawStringArt(ix1, iy1, ix2, iy2, ix3, iy3, ix4, iy4) {

    line(ix1, iy1, ix2, iy2); //line 1
    line(ix3, iy3, ix4, iy4); //line 2

    dx1 = (ix2-ix1)/numLines; //change in x variables in line 1
    dy1 = (iy2-iy1)/numLines; //change in y variables in line 1
    dx2 = (ix4-ix3)/numLines; //change in x variables in line 2
    dy2 = (iy4-iy3)/numLines; //change in y variables in line 2

    //repeats drawing lines to make string art
    //starts at the beginning of line 1 and line 2
    //finishes shape at the end of line 1 and line 2

    for (var i = 0; i <= numLines; i += 1) {

        line(ix1, iy1, ix3, iy3);
        ix1 += dx1;
        iy1 += dy1;
        ix3 += dx2;
        iy3 += dy2;
    }
}
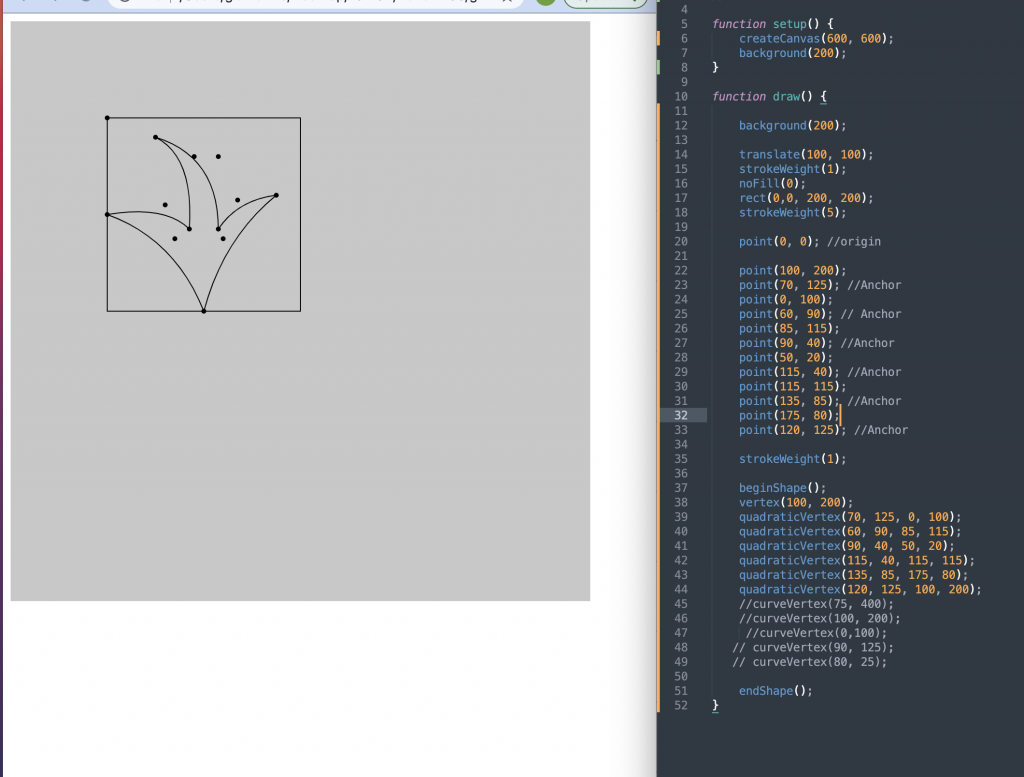
I feel like the most difficult part of this project was understanding the math and then understanding how the code works. This was necessary for me to create code that was more readable and now it is very easy to add onto.
A picture of my process of figuring out the math and how I wanted the piece to look
The work called ‘A Natural History of Networks / SoftMachine’ by Ralf Baecker really captured my attention because of his process and inspirations for his piece.
This work uses code to control liquid metal that changes with the sound. What is really interesting is this art piece is suppose to play with the dynamic of the contrast of hard logical machines with free flowing natural materials, which oddly works so seamlessly. It really emphasizes the chaos and systematic traits nature can often have, which was clearly intentional because Baecker’s background includes research in biomimicry.
A video of ‘A Natural History of Networks / SoftMachine’
This piece works by using a closed system where the machine senses and analyzes the metallic liquid and continues to reacts to its own input which creates a feedback loop. Thus creating this “homeostatic” quality.
var xCord = 300;
var yCord = 225;
var intSize = 1;
//for RBG color values
var intRed = 127;
var intGreen = 0;
var intBlue = 127;

function setup() {
    createCanvas(600, 450);
}

function draw() {

    background (200);

    fill(intRed, intGreen, intBlue);

    // Change Red attribute (RGB) color as mouse moves across screen

    intRed = 255 - (mouseX / 2.3529);

    // Change Blue attribute (RGB) color as mouse moves across screen

    intBlue = (mouseX / 2.3529);

    //changes size as mouse moves horizontally
    intSize = xCord * .01


    //if mouse is on left side then spaceship points to the left
    if (width/2 > mouseX) {
        //draws polygon
        beginShape();
            vertex(xCord, yCord);
            vertex(xCord + (5 * intSize) , yCord - (5 * intSize));
            vertex(xCord + (15 * intSize), yCord - (5 * intSize));
            vertex(xCord + (30 * intSize), yCord - (15 * intSize));
            vertex(xCord + (30 * intSize), yCord);
        endShape(CLOSE);

        //if mouse is on right side then spaceship points to the right
    }else {
             beginShape();
                vertex(xCord, yCord);
                vertex(xCord - (5 * intSize) , yCord - (5 * intSize));
                vertex(xCord - (15 * intSize), yCord - (5 * intSize));
                vertex(xCord - (30 * intSize), yCord - (15 * intSize));
                vertex(xCord - (30 * intSize), yCord);
                endShape(CLOSE);
    }


    yCord = mouseY;

   // Don't let object go off canvas if mouseY coordinate goes off canvas
    if (yCord < 0) {
        yCord = 0;
    }

    if (yCord > 450) {
        yCord = 450;
    }

    xCord = mouseX;

   // Don't let object go off canvas if mouseX coordinate goes off canvas
    if (xCord < 0) {
        xCord = 0;
    }

    if (xCord > 600) {
        xCord = 600;
    }


}
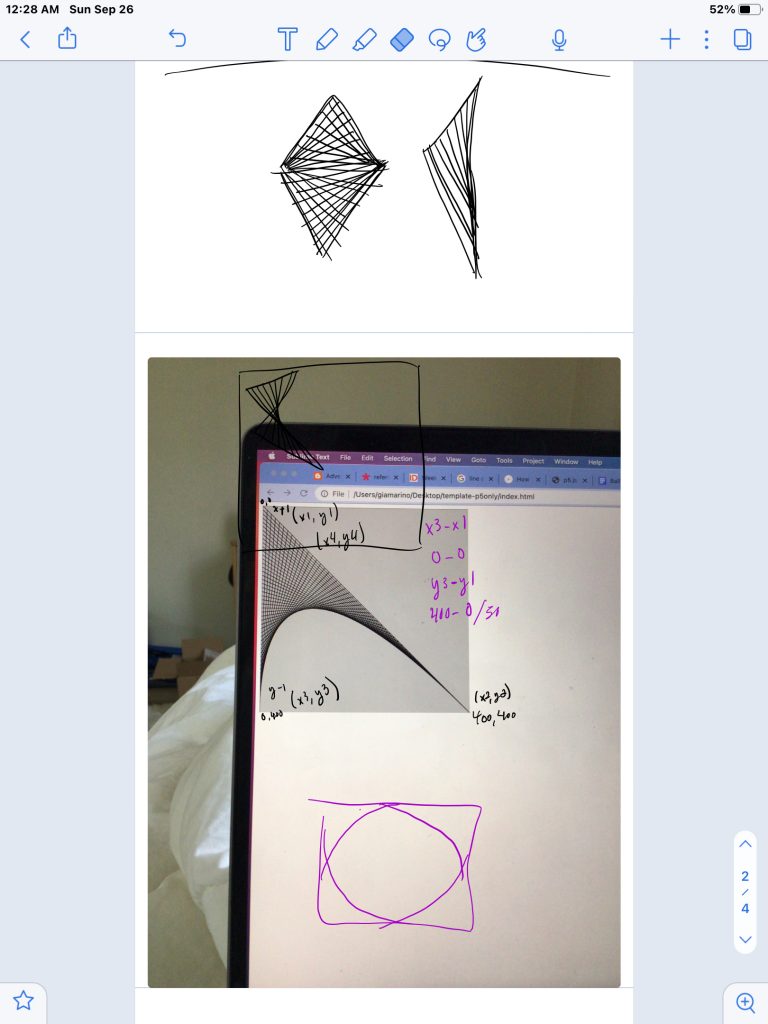
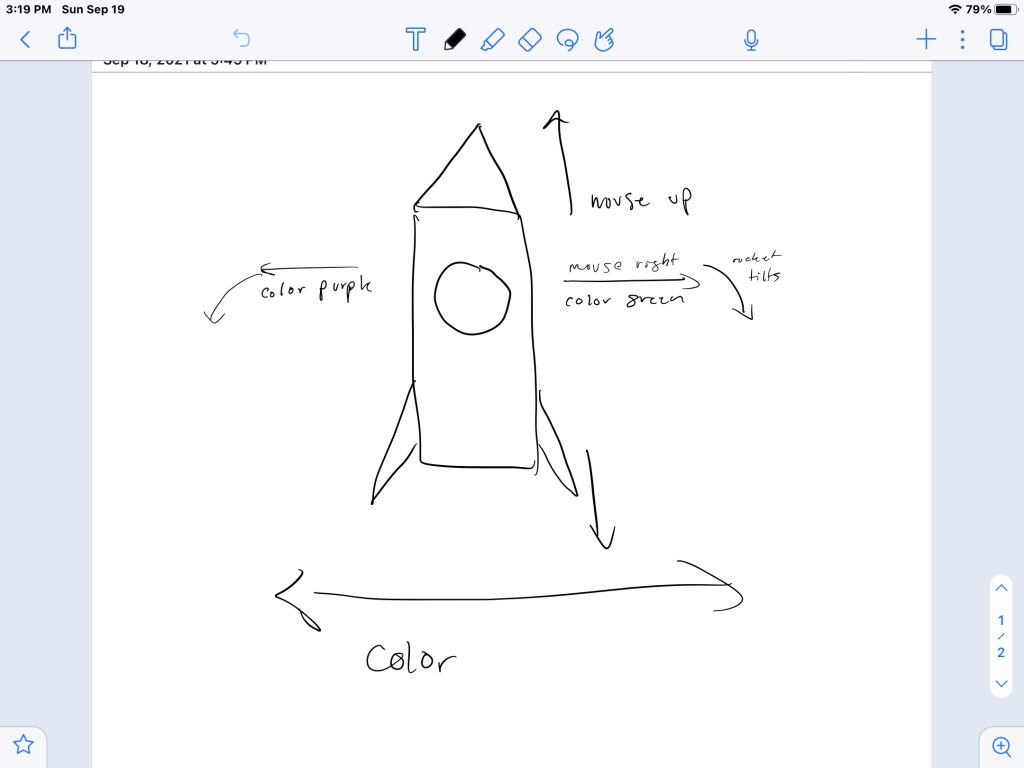
This project was difficult because it was hard to keep track of how the math is working and where your coordinates are, especially while trying to rotate and flip objects.
Also, at first I had a hard time finding an idea that sticks to the parameters and was constricted and always predictable.
Here is my starting drawing of trying to create my idea.
In the realm of digital fabrication there are many big cutting edge projects. However, many wonder how it can be helpful to everyday life. This is why I chose Para Clocks as the highlight of my blog post.
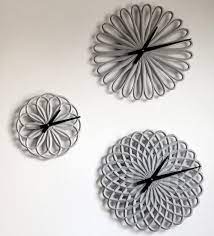
The clocks (shown in photo) are branded as “Para Clocks” and the creators are LeeLABS. The campaign started around 2012.
They are digital fabricated clocks made out of concrete that are created using parametric software. It seems that because they used a program to make their clocks, they were able to make these intricate patterns that are mathematically perfect. I think it’s very interesting how you can use coding to make artwork and everyday objects have a pattern that is mathematically correct.
You can tell the creator is using symmetry and circular patterns to make these complex but simple clock designs. Its beauty is based off its intricacy and minimalism, which is why I really enjoy these clocks.
I think they also really reflect nature because often nature is complex, but also made in a way that there is mathematical order and symmetry, thus making these clocks so attractive because nature is always beautiful to humans.
//variables to use to randomize
var head = 0
var hair = 0
var ear = 0
var nose = 0
var mouth = 0
//hair color
var color1 = 0
var color2 = 0
var color3 = 0
//variables to use to structure everything
var faceDetail = 2
var faceWidth = 300
var faceHeight = 450
//made my own grid system
var cellHeight = 80
var cellWidth = 80

function setup() {
    createCanvas(480, 640);
}

 function draw() {
    background(255);
    noStroke();
    //base skin color
    fill(249, 224, 195);
//(the ears)there are four different ear types.
//each are associated a specific number that is randomly choosen in mouse pressed functionj
//used if statement so that when mouse is pressed it only picks one option (because only one option is true)
    if (ear == 1) {
        ellipse( 1.5 * cellWidth, 3.5 * cellHeight, 2 * cellWidth, cellHeight);
        ellipse( 4.5 * cellWidth, 3.5 * cellHeight, 2 * cellWidth, cellHeight);
    } else if (ear == 2) {
        ellipse( 1.25 * cellWidth, 3.5 * cellHeight, cellWidth, 2 * cellHeight);
        ellipse( 4.75 * cellWidth, 3.5 * cellHeight, cellWidth, 2 * cellHeight);
    } else if (ear == 3) {
        ellipse( 1.5 * cellWidth, 3.5 * cellHeight, 2 * cellWidth, 1.5 * cellHeight);
        ellipse( 4.5 * cellWidth, 3.5 * cellHeight, 2 * cellWidth, 1.5 *cellHeight);
    } else {
        ellipse( 1.5 * cellWidth, 3.5 * cellHeight, 1.25 * cellWidth, cellHeight);
        ellipse( 4.5 * cellWidth, 3.5 * cellHeight, 1.25 * cellWidth, cellHeight);
    }

// (the hair) works the same as ears. has 4 different types of hair
    if (hair == 1) { //mohawk
        //fill color is completely randomized with variables in mouse pressed so that R, B, G is a completely random number everytime
        //so it can make any color in the RBG system to colorize hair
        fill(color1, color2, color3);
        rect(2.5 * cellWidth, .6 * cellHeight, cellWidth, cellHeight);
    } else if (hair == 2) { //afro
        fill(color1, color2, color3);
        ellipse(3 * cellWidth, 2 * cellHeight, 4.5 * cellWidth, 2.75 * cellHeight);
    } else if (hair == 3) { //long hair
        fill(color1, color2, color3);
        ellipse(3 * cellWidth, 2 * cellHeight, 4.75 * cellWidth, 2.5 * cellHeight);
        rect(.625 * cellWidth, 2 * cellHeight, 4.75 * cellWidth, 4.25 * cellHeight);
    } else { //bald
        //to show baldness I put a point that is hidden behind head
        point(width/2, height/2);
    }

    fill(249, 224, 195); //skin color
//heads
//same if statment system as before, 3 head types
    if (head == 1) {
        quad(cellWidth, 1.5 * cellHeight, 5 * cellWidth, 1.5 * cellHeight, 4.5 * cellWidth, 6.5 * cellHeight, 1.5 * cellWidth, 6.5 * cellHeight);
    } else if (head == 2) {
        ellipse(width/2, height/2, faceWidth, faceHeight);
    } else {
    quad( 1.25 * cellWidth, 3 * cellHeight, 4.75 * cellWidth, 3 * cellHeight, 4 * cellWidth, 6.5 * cellHeight, 2 * cellWidth,6.5 * cellHeight);
    circle(width/2, 3 * cellHeight, faceWidth);
    }
// eyes, 1 type
    fill(50);
    ellipse(2.5 * cellWidth, 3 * cellHeight, .25 * cellWidth, .5 * cellHeight);
    ellipse(3.5 * cellWidth, 3 * cellHeight, .25 * cellWidth, .5 * cellHeight);

    noFill();
    strokeWeight(2);
    stroke(50)
//nose, 4 nose types
    if (nose == 1) { //button nose
        ellipse(width/2, height/2, .75 * cellWidth, .5 * cellHeight);
    } else if (nose == 2) { // big nose
        arc(width/2, height/2, cellWidth, .75 * cellHeight, PI + HALF_PI, TWO_PI + HALF_PI);
    } else if (nose == 3) { //downwards nose
        arc(width/2, height/2, .5 * cellWidth, .75 * cellHeight, 0, PI);
    } else { //skinny nose
        arc(width/2, height/2, cellWidth, .25 * cellHeight, PI + HALF_PI, TWO_PI + HALF_PI);
    }

//mouth, 4 types
    if (mouth == 1) { //expressionless mouth
        strokeWeight(5);
        line(2.5 * cellWidth, 5 * cellHeight, 3.5 * cellWidth, 5 * cellHeight);
    } else if (mouth == 2) {//open mouth
        fill(50);
        arc(3 * cellWidth, 5 * cellHeight, 1.25 * cellWidth, cellHeight, 0, PI, CHORD);
    } else if (mouth == 3) { //smirk
        noFill();
        strokeWeight(5);
        beginShape();
        curveVertex(3 * cellWidth, 5.25 * cellHeight);
        curveVertex(3 * cellWidth, 5.25 * cellHeight);
        curveVertex(3.3 * cellWidth, 5.20 * cellHeight);
        curveVertex(3.5 * cellWidth, 5 * cellHeight);
        curveVertex(3.5 * cellWidth, 5 * cellHeight);
        endShape();
    } else { //sad mouth
        strokeWeight(5);
        arc(3 * cellWidth, 5 * cellHeight, .75 * cellWidth, .5 * cellHeight, PI, TWO_PI);
    }
//beauty marks, 2 types
    if (faceDetail == 1) { //leftside
        strokeWeight(8);
        point(2.25 * cellWidth, 5 * cellHeight);
    } else if (faceDetail == 2) {//right side
        strokeWeight(8);
        point(4.25 * cellWidth, 4 * cellHeight);
    }
}
function mousePressed() {
//baracks to make random only do integars
    head = random([1, 2, 3]);
    ear = random([1, 2, 3, 4]);
    nose = random([1, 2, 3, 4]);
    mouth = random([1, 2, 3, 4]);
    hair = random([1, 2, 3, 4]);
//hair color randomizer
    color1 = random(0, 255);
    color2 = random(0, 255);
    color3 = random(0, 255);
//added extra integars to make beauty marks less frequent and only happen 1/4 of the time
    faceDetail = random([1, 2, 3, 4, 5, 6, 7, 8]);
}
Doing this project taught me a lot about the process of coding and fixing your code when it is wrong.
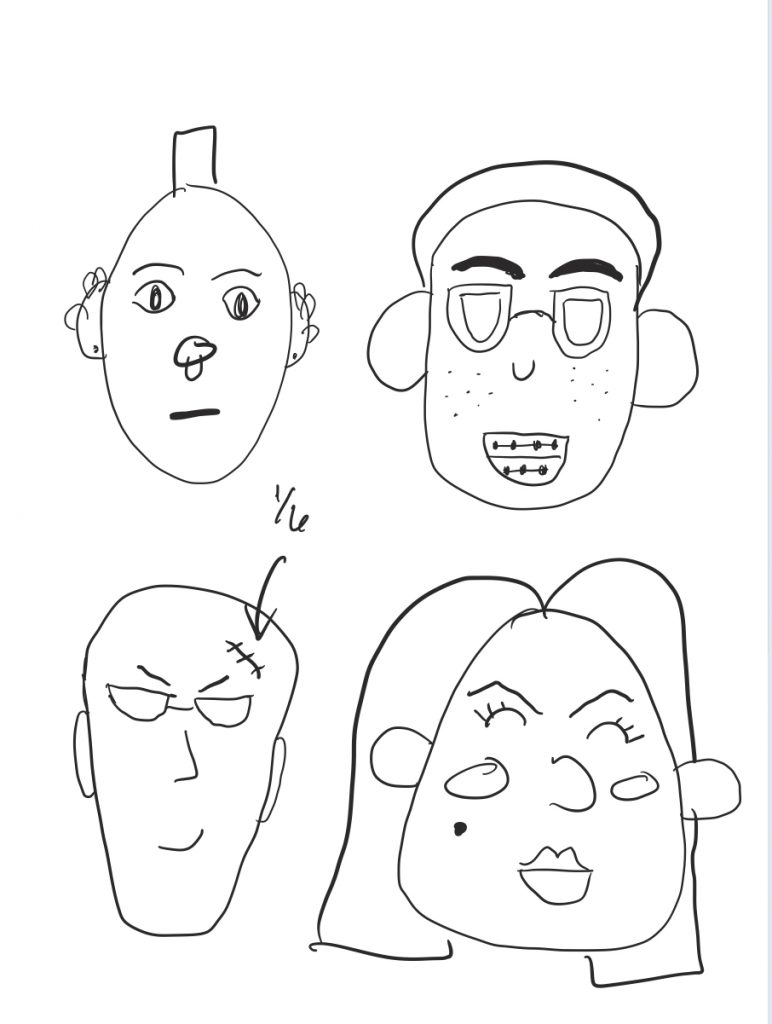
My Characters I created as inspiration
I first started off with a grandiose plan to make these 4 faces and then mix and match each part of each face so it muddles all the faces randomly. However, it was a lofty goal for the time I had.
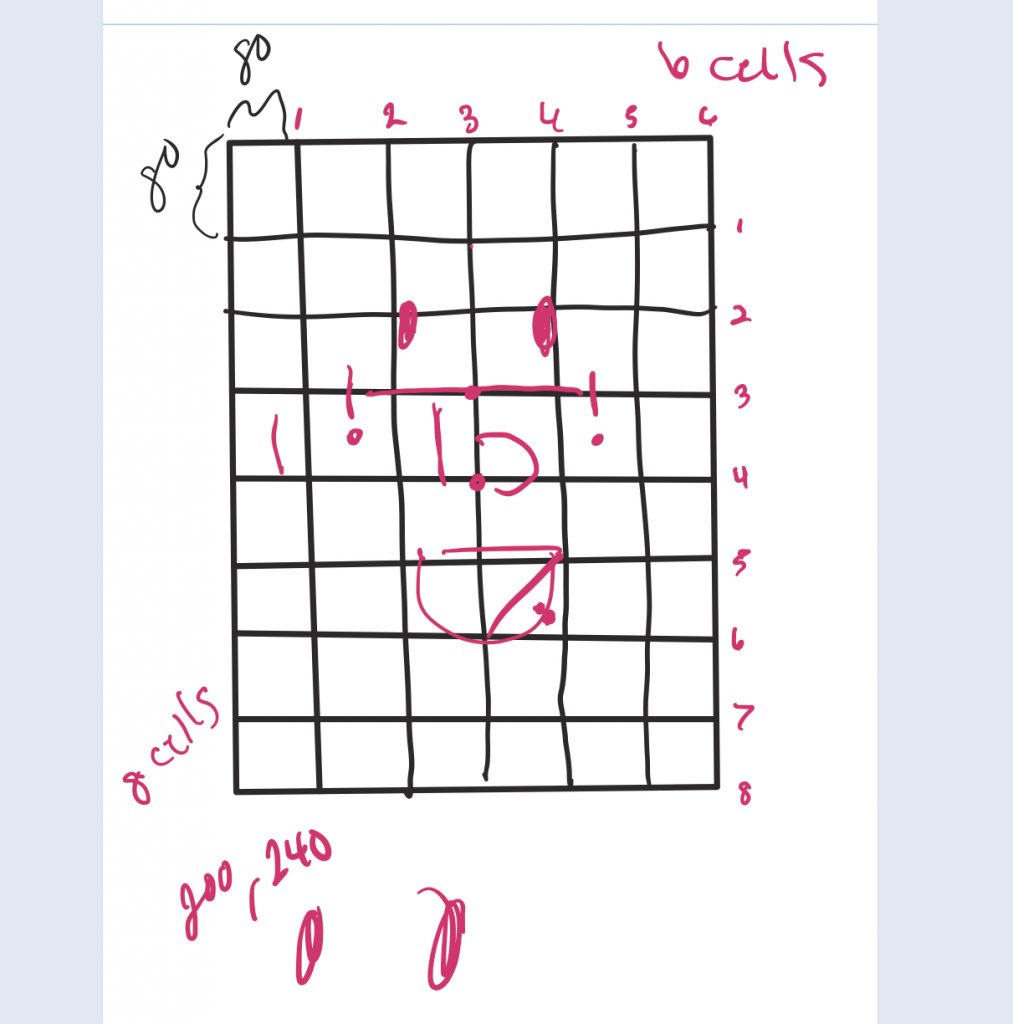
My process of figuring out my grid system
This led me to settling but still constructing my code in a fully self-made variable grid structure, if statements, and using random() to choose between the the variants I created for each facial feature.
Additionally, I randomized the faces even more by making hair colors able to be whatever shade in RBG it desires.
Overall, I learned a lot of the simple powers of the random() function and I wish I could’ve added on more to this project.
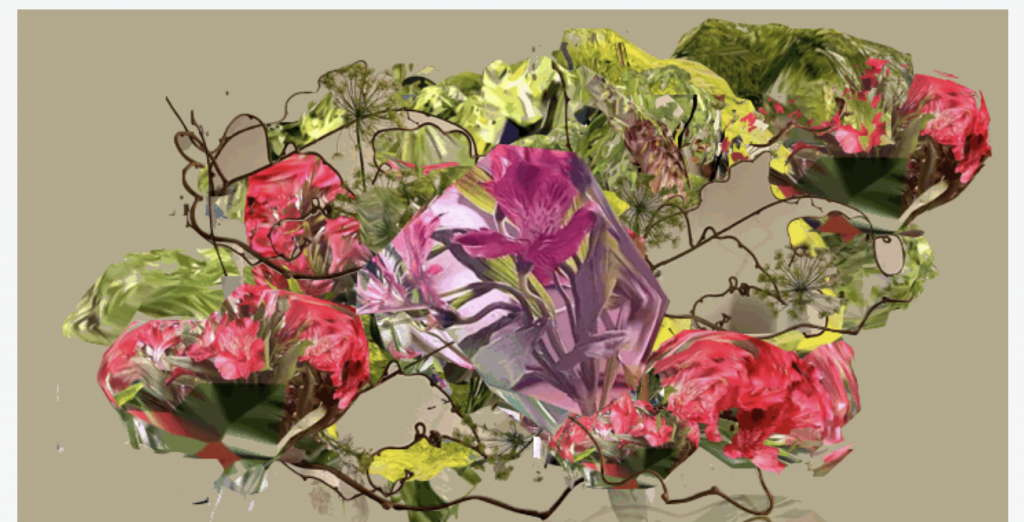
The specific artwork that I am inspired by is “Timelapse” (2021) by Katherine Frazer. She has many fun and iterative art pieces but one specifically felt very fun and vibrant to me especially after a dull day.
A frame from the generative art “Timelapse”
From what I learned in an interview, Ms. Frazer enjoys to build upon her work in a sequential process of layering and allowing for changes happening on the go, which causes her to base a lot of decisions on intuition.
After learning this, I could see it very distinctly in her work, and it made me enjoy it more. I feel like art is often very intriguing and powerful when it flows naturally. It feels freeing to look at. I also greatly respect Ms.Frazer for embracing a process many get scared by or don’t believe in.
Lastly, I love the colors and flowers in this piece. It adds to the wildness while also not covering up the careful generative layering process.
Overall, it is simple but very intricate and I think that is a great take on generative art.
![[OLD SEMESTER] 15-104 • Introduction to Computing for Creative Practice](https://courses.ideate.cmu.edu/15-104/f2021/wp-content/uploads/2023/09/stop-banner.png)