By Michell3 Ma (TA, fall 2015), updates by Tom Cortina, Fall 2020
- Basic steps to use an editor and browser
- The Chrome Developer Tools
- The Lightweight sketch.js Templates
- Setting up a local web server
It’s the recommendation of the course staff to switch over to developing with a text editor and browser to avoid bugs in the p5.js applications integrated development environment (IDE). The process for making and running your programs will be a little different, so here is a tutorial.
1. Download a Text Editor
Pick an editor. Sublime is popular but will gently bug you to send money. Atom is free. Komodo Edit 9 is free. Bluefish is also free, open-source, fast and simple on the Mac, but the windows install process seems to be a little more difficult than that of others.
All three editors have built-in support for adding colors to JavaScript programs (called “syntax highlighting”).
- Sublime: Go to http://www.sublimetext.com/3 and download Sublime 3 for your operating system. This is the editor we will be using in class for teaching.
- Atom: Go to https://atom.io/ to download Atom for your operating system.
- Komodo Edit 9: Go to http://komodoide.com/download/#edit and download Komodo Edit 9 for your operating system.
- Bluefish: Go to http://sourceforge.net/projects/bluefish/files/bluefish/ and download Bluefish for your operating system. Follow installation instructions carefully for Windows – you may need to download some support libraries.
2. Download a project template
For projects early in the semester (no sound, no attempts to access HTML content), you can use the template-p5only.zip file. Otherwise, use template-all.zip. The “-min” templates are for your personal website or other use outside of class where you want the fastest downloads. Read more about them below.
- template-p5only – p5.js only, no dom or sound addons.
- template-all – p5.js library and addons.
- template-p5only-min – the minimized “p5only” template. Lacks debugging and error checking support.
After downloading the template, expand it (probably you can double-click on it in your file browser/finder/explorer) and name the expanded directory to your project name. We’ll call this your project directory.
3. Modify the sketch.js file in your editor
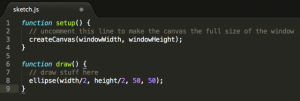
You can open the sketch.js file inside the new project directory and edit it like usual:

4. Run the html file to view your changes
After you have saved your changes to sketch.js, you can run the index.html file inside the project directory in your browser to see your sketch. However, the browser window may not resize automatically to your canvas size.
5. Submit your assignment folder
If you are submitting the Assignment to Autolab, remember to rename the project directory (folder) that contains everything (index.html, sketch.js). Rename it with andrewID_assignmentNumber_assignmentLetter, zip the folder, and then submit it.
Note: In Sublime, make sure that ‘Javascript’ is selected in the bottom right hand corner of the window. This will tell Sublime to add colors to your code.

Configuring Sublime
If you use Sublime, it will, by default, insert TAB characters into your code when you type the TAB key. Tabs are a problem because different editors and text displays interpret TABs differently, which means your carefully indented code may look like garbage in another editor, on Piazza, or on Autolab.
Please change your Sublime settings as follows:
- Open Settings using “Command-COMMA”: hold the Command key and type the comma key (“,”)
- In the “Preferences.sublime-settings — User” window, paste this code:
// Settings in here override those in "Default/Preferences.sublime-settings",

// and are overridden in turn by syntax-specific settings.

{

"tab_size": 4,

// Set to true to insert spaces when tab is pressed

"translate_tabs_to_spaces": true

} - Save your change using “Command-S”: hold the Command key and type the S key.
- Now, when you type the TAB key, it will indent to the next 4-space boundary by inserting spaces, not a TAB character.
The Chrome Developer Tools
Use the View / Developer / Developer Tools menu in Chrome to open the developer tools window.

Things you can do in Developer Tools:
-
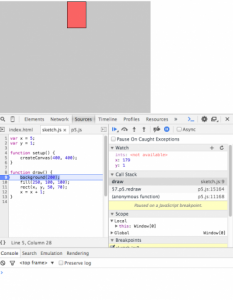
- Set a “breakpoint” – by clicking on line “9”, I stopped the running program when it began to execute line 9. Notice the moving rectangle stopped in mid-flight.
- Examine variables – by clicking on the “+” near “Watch” I can “watch” a variable. Just type the name (here, I’m watching x and y) and the current values of the variables will be displayed.
- Error messages will be displayed in the console (at the bottom) – If your program is not well-formed, or if something goes wrong during execution (for example, you misspelled a command), you should see a red message in the console at the bottom.
- Printed messages appear in the console window – look up “print” function in the p5js reference materials.
- You can even execute JavaScript commands. Look for the “>” prompt at the bottom of the page. Type
x = 1;and then restart the program by clicking on the breakpoint (line 9) to remove it, and clicking on the blue “continue” icon. You should see the red square jump back to the left becausexwas set to 1!
The Lightweight sketch.js Templates (Links in Step 2 above)
Although your p5.js programs are small (on the order of 1000 bytes – smaller than a typical web page), the p5.js libraries are nearly 1,000,000 bytes, a thousand times larger. That’s still not a big problem. Your computer memory size is measured in gigabytes, yet another factor of a thousand. For example, a 1 Mbps Internet connection will take about 8 seconds to load the p5.js library. Can we do better?
What if there was only one library that everyone shared? Isn’t that what libraries are for? If everyone used the same library, everyone’s browser would download and save the library once, and every subsequent p5.js program would skip the library download and just reuse the one that was downloaded earlier. Suddenly, p5.js programs download 1000 times faster!*
The p5.js libraries are available online just for this purpose. I’ve made some templates based on these online versions. There are 4 versions of templates. The “p5only” versions have just the p5.js library. The “all” versions have the p5.js library plus the p5.dom.js and p5.sound.js addons. The p5.dom.js addon implements functions that access, create, and modify HTML documents in the browser. The p5.sound.js addon implements functions that relate to audio.
The “min” versions are the same as the non-“min” versions except that the “min” versions do nothave helpful debugging and error-checking features, so they should not be used unless you want the absolute smallest code and fastest execution, perhaps after your program has been carefully tested.
Links to the templates appear above. I suggest you save the zip file, and whenever you start a new project, just unzip a new copy of the template directory and rename it to remind you what the new project is about. Then edit the sketch.js file inside.
The p5.js “Complete” library download
You can also work with the p5.js library download, but please do this only if you need to work with p5.js while not connected to the Internet.
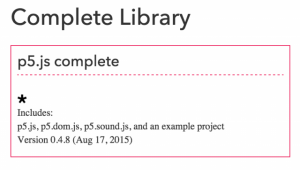
Go to http://p5js.org/download/ and download the “complete library”.

Keep in mind that you only need index.html, p5.js, and sketch.js for your project unless you would like to use the addons. If you would like to move files out of the empty-example folder, you will need to change their path name in index.html. It’s not necessary, but feel free to ask questions about that.

The problem with this library configuration is that it has two levels of nested folders. A complete project consists of the p5.js file PLUS the empty-example folder PLUS the sketch.js and index.html INSIDE the empty-example folder. SO, you must rename and zip the parent folder (originally named p5) containing everything (p5.js + empty-example folder). That’s why we now recommend the template zip files — they’re smaller, have fewer files, and have no nested folders.
Setting up a local web server
To load images and sounds from local files, you may need to run a local web server. With a local web server, instead of visiting a URL that looks like file:///Users/rbd/doc/class/104f19/examples/oct16/index.html, you visit the URL localhost:8000, which means “look for a server running on my machine using port 8000.” Of course, if there is no such server, nothing will happen, so you need to run a server!
Here are some good instructions for running a local server , some using terminal commands. You should take care to run the server in the same directory as your index.html file. To navigate to that directory, you will need to use some commands that are also described in the instructions. For Windows, you might have to install Python or PHP, or maybe you can use WAMPServer as described in the instructions.
*The only catch is that if you are off-line and you use this on-line copy of the library, the browser may be unable to load and execute your local p5.js program.
![[OLD FALL 2020] 15-104 • Introduction to Computing for Creative Practice](wp-content/uploads/2021/09/stop-banner.png)