![[OLD FALL 2020] 15-104 • Introduction to Computing for Creative Practice](../wp-content/uploads/2021/09/stop-banner.png)
EXTENDED TO SUNDAY, NOVEMBER 8th, 11:59PM EST. (LATE DAY: MONDAY, NOVEMBER 9th, 11:59PM EST).
The readings, assignments, and projects below constitute the Week 10 Deliverables and are due by 11:59pm EDT on Saturday, November 7th:
- Technical Readings
- Looking Outwards 10 [Autolab & Blog]
- Assignment-10 – A&B (Music Player) [Autolab]
- Project-10: (Interactive Sonic Sketch [Autolab & Blog]
- Handin Instructions
1. Technical Readings
- How Binary Search Works
- What is a HashTable Data Structure – Introduction to Hash Tables, Part 0 – this a simple and clear introduction to hashing. The video is so low-key, it is worth adding that the result is a data structure where you can insert and look up information using a key (such as a person’s name) in constant time, i.e. the cost of inserting and looking up is independent of the number of items in the hash table. Compare this to linear search and binary search.
2. Looking Outwards 10: Computer Music
Our Looking Outwards topic for this week is music and is specifically concerned with how artists use computation compose and perform music. (If your Looking Outwards 04 – Sound Art – was really about Music, you should take this opportunity to investigate a sound art project – please note in your blog that you are taking this option).
What’s the difference between sound art and music? There’s no clear distinction, but for the sake of this assignment, let’s say that music is created by musicians, composers, performers, and is ultimately intended for specific performances or recordings that have a beginning and an end, whereas sound art is more associated with installations, conceptual art, exhibits, galleries, and would be less likely to appear in a concert hall. For this assignment, you should restrict yourself in either case to computational music (or sound), and you may also consider new musical instruments as long as they are decidedly computational.
Identify a particular project or work in the area of music which you find interesting. In a blog post of about 100-200 words,
- Please discuss the project. What do you admire about it, and why do you admire these aspects of it?
- What do you know (or what do you suppose) about the algorithms that generated the work?
- It what ways are the creator’s artistic sensibilities manifest in the final form?
- Upload your blog to Autolab for handin credit.
- Create a blog post on this WordPress site with your blog text and:
- Link (if possible) to the work. To the best of your abilities, be sure to provide the creator’s name, title of the work, and year of creation.
- Embed an image, sound, and/or a YouTube/Vimeo video of the project.
- Label your blog post with the Category, LookingOutwards-10.
- Label your blog post with the Section, e.g. SectionC.
Some references to sound art and computer music can be found in the Looking Outward o4 assignment.
3. Assignment 10-A & B: Music Player
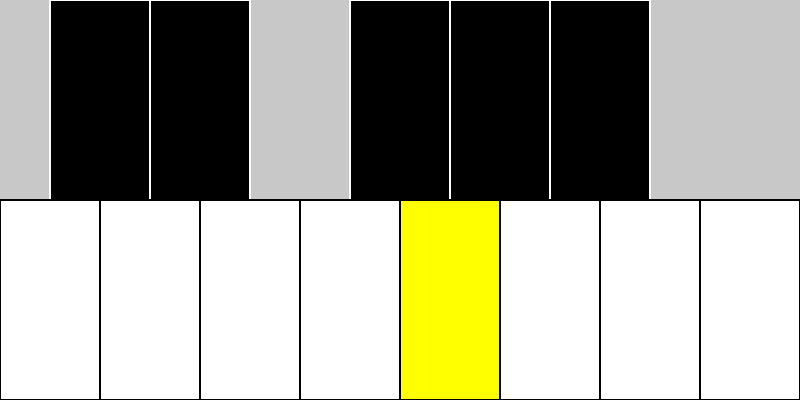
In this assignment, you will extend the Piano example from lab to create an automated music player. Your program will play a tune stored in two arrays, one for the pitches of the notes and one for the duration of the notes. The tunes are given below, with pitches shown as MIDI values and durations shown in beats. A value of 0 for a pitch means a rest (i.e. silence). As each note is played, you should highlight that key in yellow while it is playing. You will create two program submissions, one for the first tune and one for the second tune. Besides the musical data, the rest of the programs should be the same for both tunes.
TUNE 1: A CHROMATIC SCALE
Pitches:
|
1 |
[ 60, 61, 62, 63, 64, 65, 66, 67, 68, 69, 70, 71, 72 ] |
Durations:
|
1 |
[ 8, 8, 8, 8, 8, 8, 8, 8, 8, 8, 8, 8, 8 ] |
Tune 2: a FAMILIAR TUNE
Pitches:
|
1 2 |
[ 60, 60, 62, 60, 65, 64, 0, 60, 60, 62, 60, 67, 65, 0, 60, 60, 72, 69, 65, 64, 62, 70, 70, 69, 65, 67, 65 ] |
Durations:
|
1 2 |
[ 3, 1, 4, 4, 4, 4, 4, 3, 1, 4, 4, 4, 4, 4, 3, 1, 4, 4, 4, 4, 4, 3, 1, 4, 4, 4, 12 ] |
You should use an oscillator to create the sound for the Piano as we did in class. You can use any of the predefined sound waves for the oscillator. Use a frame rate of 10 for this program. Your canvas size can be the same as it was in the lab.
One beat is equal to one frame for this program, so a note that lasts 8 beats will play for 8 frames before you move on to the next note. You should call the freq function only on the frame when a note starts. Do not call it on every single frame!
Here is the general idea:
- You will need two arrays obviously, one for pitches and one for durations. You can assume the arrays will be of the same length. You can set them with the given values directly, as shown above.
- You will need a variable that keeps track of the index of which note you are playing from the arrays, starting at 0.
- You will need a counter that keeps track of how many frames a note has been playing. You will increment this by 1 for each frame that is drawn. (Remember that the draw function repeats itself, and each repetition is a frame.)
- Once the counter reaches the duration of the current note, you should reset the counter and change the frequency of the oscillator to the pitch of the next note. (For a musical rest, you can turn off the oscillator.)
- Once the entire tune is played, set the canvas to all black and stop the draw function from repeating itself.
- Your draw function should not use loops. Each repetition of the draw function is meant to represent one beat of the tune. As draw repeats itself, you will progress through the tune.
Work on a program for the first tune until you have it working correctly. (This is problem A.) Then make a copy of it and update the arrays for the new notes. (This is problem B.)
4. Project 10: Sonic Story
In this Project, you are asked to create a very short story with sound. We are expecting 15-30 seconds. You should have at least four simple “characters” in your story (e.g. a cloud, a bird, a train, etc.). The characters can be abstract and basic, no need for fine detail. The characters should move around the canvas and make their distinctive sound(s) when appropriate. You may include captions on the canvas to help tell the story but be sure they’re visible long enough to be readable (e.g. “The bird flew away as the train left the station.”). You can set the frame rate very low (e.g. 1) so that each frame is essentially one picture of the story.
Use the system variable frameCount to trigger parts of your story. For example:
if (frameCount >= 20 && frameCount < 25) { trainLeavesStation(); }
Suggestions
You can find lots of free sounds at freesound.org. You can also search for “sound effects” and find many sources. “Sound effects” can be interpreted broadly. The sounds can be spoken words, musical tones, animal sounds, natural sound, etc. No profanity, please.
Once you get a collection of sounds, you may wish to edit them or select the parts you want. We suggest using Audacity unless you already have a favorite audio editor. In Audacity, you can easily select the part of a sound that you want, and then use “File:Export Selected Audio…” to write the selection as a .wav file. You can use monophonic or stereo sounds. Audacity gives you many other options, e.g. you can adjust the volume (amplitude) of a sound.
If you use sound files, you will need to run a local server to make the sounds accessible to the browser running your sketch. Put the sound files in the same directory as index.html and sketch.js.
After you develop your sketch, if you have sound files, you will have to upload each one as Media to WordPress, then reference the sounds by the full WordPress URL in order to make your code work as a blog.
As with images, load all sounds in preload() so that the sounds are actually available to play when you try to play them.
Requirements
- Write a comment in your program that explains the general story line. Hand in the program on Autolab with the sound files you are using. Keep the sound files very short. They should be generally 1-3 seconds at most per sound.
- Besides uploading your program and sounds to Autolab, embed your p5.js sketch in a blog post on this site. Make sure that your p5.js code is visible and attractively formatted in the post.
- In your blog post, write a sentence or two reflecting on your process and product. Don’t forget to describe your 4 sounds/tones/effects.
- Label your project’s blog post with the Category Project-10-Sonic-Story and your section, e.g. SectionA.
5. Handin and Post Your Work
- Zip (compress) your handin-10 folder, which should contain folders containing your blog essay, assignments (A & B), and project and upload your zip file to Autolab.
- Remember to post your blog and project in separate posts on the WordPress course website with appropriate category labels so we (and students) can find your work easily.
Your zip file handin on Autolab must be submitted by Saturday, November 7th by 11:59PM EDT to be considered on time. Your blog posted on WordPress should be the same or similar to what you submitted in Autolab and should also be posted by the due date. (You may make minor corrections on WordPress for formatting issues.)