![[OLD FALL 2020] 15-104 • Introduction to Computing for Creative Practice](../wp-content/uploads/2021/09/stop-banner.png)
The readings, assignments, and projects below constitute the Week 9 Deliverables and are due by 11:59pm EDT on Saturday, October 31st:
- Technical Readings/Background
- Looking Outwards 09 [Autolab & Blog]
- Assignment-09 (Animation Walk Cycle) [Autolab]
- Project-09 (Custom Pixel) [Autolab & Blog]
- Handin your work
1. Technical Readings (Background)
- Animating a walking character with sprite images.
- Dan Shiffman’s p5.js Pointillism Example
- Brief timeline of computational portraits (by Golan Levin)
2. Looking Outwards 09: on Looking Outwards
Our Looking Outwards topic for this week is: the Looking Outwards assignments by your peers!
This week, we hope you’ll find inspiration in the things your friends have discovered. Find one or two peers in the course whom you know. Browse through their Looking Outwards assignments until you find something unfamiliar, that sounds like it could be interesting. Read your peer’s reviews, then check out the project they cite. In a blog post of about 100-200 words,
- What are your thoughts about the cited project? In what ways do you agree or disagree with your peer’s assessment? Respond to their report with some thoughts of your own. What can you productively add to their discussion of the project?
- Link (if possible) to the original work, and to your peer’s Looking Outwards post. (Be sure to provide the creator’s name, title of the work, and year of creation.)
- Embed an image, sound, and/or a YouTube/Vimeo video of the project.
- Label your blog post with the Categories LookingOutwards-09 and your section, e.g. SectionE.
3. Assignment 09-A: Animation Walk Cycle
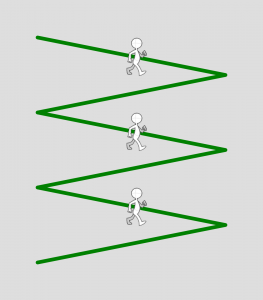
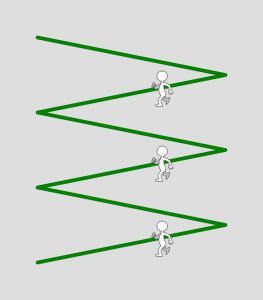
In this Assignment, you are asked to write code to animate a walking character with sprite images. (You are provided, below, with the necessary sprite images for the character facing to the right.) The final goal of this Assignment is to create a scene where up to three characters walk back and forth down a canvas. Here are a few snapshots of what this might look like:
Here is the source image for the walk cycle of the animated character we’ll be using:
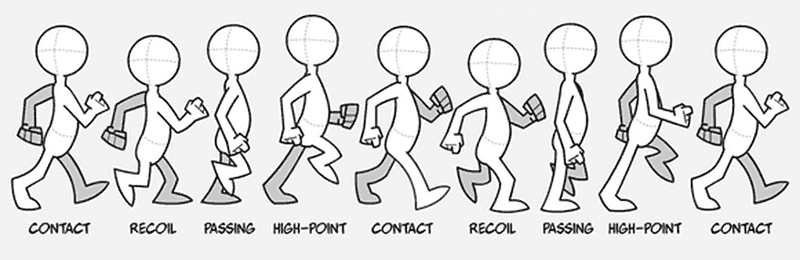
The individual frames of this animation can be found in this Imgur.com album. There are 8 frames, which are provided to you as .PNG images with transparent backgrounds.
Start with the following code:
|
1 2 3 4 5 6 7 8 9 10 11 12 13 14 15 16 17 18 19 20 |
var walkImage = []; // an array to store the images function preload(){ // These URLs are for the individual walk cycle images, // stored in the imgur album http://imgur.com/a/85DTu var filenames = []; filenames[0] = "http://i.imgur.com/svA3cqA.png"; filenames[1] = "http://i.imgur.com/jV3FsVQ.png"; filenames[2] = "http://i.imgur.com/IgQDmRK.png"; filenames[3] = "http://i.imgur.com/kmVGuo9.png"; filenames[4] = "http://i.imgur.com/jcMNeGq.png"; filenames[5] = "http://i.imgur.com/ttJGwkt.png"; filenames[6] = "http://i.imgur.com/9tL5TRr.png"; filenames[7] = "http://i.imgur.com/IYn7mIB.png"; for (var i = 0; i < filenames.length; i++) { walkImage[i] = loadImage(filenames[i]); } } |
Instructions
-
- Create a global array to hold the three characters, initially empty.
- Write code to model each character as an object. You will need three methods:
- makeCharacter – a constructor that creates and returns an object representing a walking character. Each walking character has the following properties:
x – horizontal location of the center of the character, given by a parameter
y – vertical location of the center of the character, given by a parameter
dx – horizontal velocity of the character (delta x), given by a parameter
dy – vertical velocity of the character (delta y), given by a parameter
facingRight – Boolean representing whether the character is facing right or not (default: true)
imageNumber – a number that indicates which of the positions
the character is in, corresponding to an image number (default: 0)
stepFunction – a reference to a function that updates the walking character for the next frame
drawFunction – a reference to a function that draws the appropriate image for the walking character in the correct position - stepCharacter – a method that updates the walking character for the next frame, has no parameters (see special instructions below)
- drawCharacter – a method that draws the walking character, has no parameters (see special instructions below)
- makeCharacter – a constructor that creates and returns an object representing a walking character. Each walking character has the following properties:
- setup – Create a canvas of size 700 x 800 with a frame rate of 20. Set the image mode to CENTER. (see the p5.js reference). Then create and store the three characters (using a loop) so that they start at positions (100, 100), (300, 100) and (500, 100). Each should have a dx of 5 and dy of 1, facing right, in the contact position (image #0).
- draw – Create a light gray background. Then draw the 6 green lines using a helper function drawLines (see bullet below). Then use a loop to draw the three characters, one by one. Call each character’s step function first, then its draw function. If the vertical position of the character reaches 700, change its vertical position to 100 so that the character repeats the walking path.
- drawLines – For this helper function for the draw function, the lines extend from x=100 to x = 600, the endpoints of the lines on the left are at y = 100, 300, 500 and 700, and the endpoints of the lines on the right are at y = 200, 400, and 600.
Special Instructions
Initially, write your stepCharacter and drawCharacter functions so the character moves down and to the right along the green lines from left to right only. This should (hopefully) be straightforward. If you can get the three characters to walk along their initial paths from the left side to the right side, then you will get 2 of the 3 points. Get this done before you tackle the harder problem of making them walk to the left when we don’t give you those images.
In order to get the characters to walk to the left, you will need to do some clever programming. Essentially, when the character is supposed to walk to the left, you should change the coordinate system so that the origin is in the top right of the canvas and x should increase going right to left. You can do this by using translate(700,0) to translate the origin from (0,0) to (700,0). Then you can use scale(-1, 1) to flip the x axis. (It’s as if you’re looking at the canvas from behind!) The dx and dy for your characters should remain the same, but their x coordinate should change. Think about where the character is when its on the right end of the lines but you look at the canvas from behind. Remember that when you do the translation and scaling, you should do them in between a push and pop since you don’t want to permanently change the coordinate system.
The final goal is to make the characters walk to the right, then to the left, then to the right, etc., moving back up to the starting position (100,100) when they reach the bottom of the path. If you can get the final program working as specified, then you can achieve the 3 points!
Style and documentation
Be sure to follow our coding style guidelines and document your code for anything that doesn’t seem obvious.
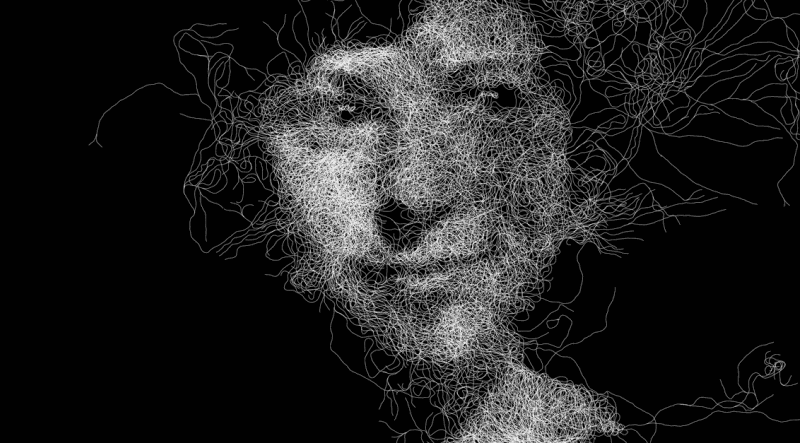
4. Project 09: Computational Portrait (Custom Pixel)
In this creative Project, to be uploaded to WordPress, you will create a computational portrait, using some kind of original surface treatment (such as a “custom pixel”) of a hidden underlying photograph.
For context of the creating portraits using computational processes, read this timeline/history by Golan Levin.
Requirements
- The portrait must be an un-retouched photograph of a person that you can access on imgur.com. Ideally, it should be a photograph of you, although you may use a photograph of another person if you do not want to upload your photo to imgur.com. It may not be a faculty member, TA, celebrity, politician, or religious figure. Think about finding a photograph that will express something artistic when you convert it. Do not upload a photograph of someone you know (family, friends) without their permission. The photograph should focus on the face only. No additional body parts below the shoulders.
- Students whose religions prohibit the representation of sentient beings are excused from the first constraint, and may create a representation of an animal instead, or make some other proposal by arrangement with the professors.
- You may not display the original photograph in unaltered form at any time. You may only display the portrait generated from it.
- You must use an actual photograph as a starting point for a computational interpretation; you may not synthesize a portrait “from scratch” (as you did in your Variable Faces project).
- Dimensions may be no larger than 480×480 pixels, though smaller canvases are fine.
- In order to earn 3 points, you must show creativity in your portrait representation. Simply duplicating what you see in the example code will not earn full credit.
Sample Code:
We hope the examples in the timeline get you thinking, and as usual, we hesitate to provide sample code. Still, it’s helpful to know how to set up an image for algorithmic interpretation. We highly recommend you look at Dan Shiffman’s great p5.js Pointillism Example for a start.
Here are the Project-09 Requirements:
- Create a computational portrait program in p5.js, as described above.
- Be sure to include your code in your Autolab submission.
- When you’re done, embed your p5.js sketch in a blog post on this site, using the (usual) instructions here. Make sure that your p5.js code is visible and attractively formatted in the post. Include some comments in your code.
- In your blog post, write a sentence or two reflecting on your process and product. In discussing your process, it would be awesome to see any of your paper sketches from your notebook; these could be as simple as photos captured with your phone.
- Include a couple screen-shots of your finished portrait.
- Label your project’s blog post with the Category Project-09-Portrait and your section, e.g. SectionB.
5. Handin and Post Your Work
- Zip (compress) your handin-09 folder, which should contain folders containing your blog essay, assignment, and project and upload your zip file to Autolab.
- Remember to post your blog and project in separate posts on the WordPress course website with appropriate category labels so we (and students) can find your work easily.
Your zip file handin on Autolab must be submitted by Saturday, October 31st by 11:59PM EDT to be considered on time. Your blog posted on WordPress should be the same or similar to what you submitted in Autolab and should also be posted by the due date. (You may make minor corrections on WordPress for formatting issues.)