zip: assignment 4
video: https://youtu.be/h3AtkzsaTRg
Introduction to Physical Computing
60-223 Fall 2017
zip: assignment 4
video: https://youtu.be/h3AtkzsaTRg
For this assignment, I wanted to tackle the story of the Loneliest Whale and create a children’s mobile prototype that gives the whale friends!
The By matching the tones of the whale’s call using a potentiometer, you also match the level that all the whales swim at, so by matching the tones, you conclude the story of the Loneliest whale by finally giving it companionship.
To create this project, I connected servos that moved together (the companion whales) to sit at their own level with a potentiometer, while the Loneliest Whale moves at a different level (a different servo). Simultaneously, the entire mobile is placed on a laser-cut disk so that when I hold the top of the motor, the entire motor’s body (and thus the whole mobile) rotates instead. I couldn’t figure out how to turn the whales without tangling the wires any other way. Finally, the potentiometer used for the companion whales are connected to the output of one speaker (that emits a range of tones.) The intention is that the Lonely whale is emitting a singular tone in another speaker, and then the level the whales swim together at would be the same tone of the Lonely whale (so that their sounds match).
The above was the ideal, and I can say that what I achieved was quite close, but would require a little bit more tweaking to get higher fidelity.
The biggest problem I experienced was programming using millis() to avoid delay(). Overall, my process was to program each individual part (motor, servos, and sound) separately, and then mesh them together at the end. To do so meant I needed to avoid delay() all together to have everything run smoothly.
Another problem worth mentioning, was the problem of not getting the motor to work towards the end, because the tone() function I used caused problems in the pwm pins I had attached my motor too. This was a small but documented problem I solved! (With a lot of happiness).
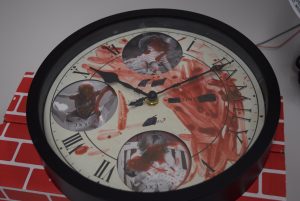 “Who has never killed an hour? Not casually or without thought, but carefully: a premeditated murder of minutes. The violence comes from a combination of giving up, not caring, and a resignation that getting past it is all you can hope to accomplish. So you kill the hour. You do not work, you do not read, you do not daydream. If you sleep it is not because you need to sleep. And when at last it is over, there is no evidence: no weapon, no blood, and no body. The only clue might be the shadows beneath your eyes or a terribly thin line near the corner of your mouth indicating something has been suffered, that in the privacy of your life you have lost something and the loss is too empty to share.”
― Mark Z. Danielewski, House of Leaves
Technical Reflection:
I initially wanted to represent the action of ‘killing’ time through the shadow of a knife over the clock, but found the lamp didn’t produce a pronounced shadow. I also had the idea to fire a toy gun at the clock in a cycle, but I realized that these kinds of ideas were too blunt. I found that using just fake blood splattered on the clock face provided enough of a clue as to what’s happening to the clock.
The motor I was using was also fairly low torque, so I wasn’t able to slow down the clock enough to resemble a normal clock without stopping the motor completely. Also, the motor I was using was far too loud to hear the ticking of the clock, I might have also compensated through some other timer to generate noise.
Overall, I’m pretty happy with this project, I feel I was fairly successful in achieving the atmosphere I wanted to create.
Zip File with Fritzing schematic and code:
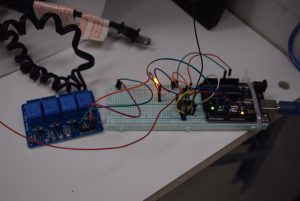
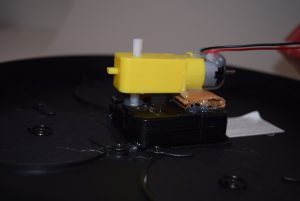
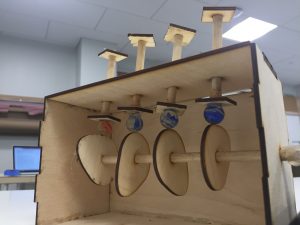
For my assignment, I wanted to tell a story through a simple automaton that would run off of CAMs. I worked on CADing the system up first to create a simple visual story; for my story, I wanted the watcher to visually see the CAMs turning moving with the motors and simply pushing wooden pegs up in a wave like motion.

Wanting to keep the circuit as simple as possible, I used a TIP20 motor and a DC wall plug to simply just power the motor and the Arduino code to just toggle the motor from being on and off.

I got the CAMs moving pretty successfully (in the video below).
However, when attaching my whole system together, unfortunately, there was a little bit too much friction and the top blocks would not line straight which led to problems. Trying to remedy this situation, with Ian’s advice, I hot glued marbles to the bottom of each block, but the issue of non straight blocks prevailed. Ultimately, if I were to do this project again, I would probably double up on my CAM thicknesses and maybe cut the system out of acrylic for a smoother system.
Arduino Code: Automaton
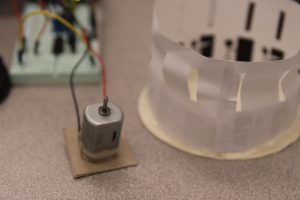
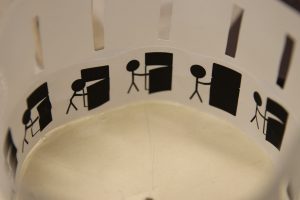
For this assignment, I made a zoetrope. A zoetrope is one of the most primitive forms of animation, and it uses static images and optical illusion to create the impression that an image is animated. You can change the scene being animated by switching out the paper strips, as well as reverse direction and speed up/slow down the spinning.
I originally wanted to an inverse zoetrope, which features 2D cut outs that go around the rim of the spinning platform and projects the image onto the inside of the backdrop with slits. However, my original animated scene (opening a fridge door) was too fragile to be cut out.
I ran into a lot of issues with this project, actually, even though it looks pretty simple. The minimum number of frames you can have to satisfactorily achieve the illusion of motion is 12, and it was difficult to get find stills with just the right amount of change between them to look animated. Another issue was the size constraint. Since the motor I’m using can be powered solely by an Arduino, I ran into issues with the lack of torque from the motor, so I had to stick to a small platform. I also wasted a lot of time trying to figure out what was wrong with my circuit, when it turned out that I just had a bad wire connecting the motor to the voltage supply.
If I were to do this over, I think I would give another try to the inverse zoetrope, and make a design more well-suited to it.
Demo video:
https://drive.google.com/file/d/0B0yMpI_ZOcoYaGZjRUppUnRFMU0/view?usp=sharing
*Circuit and code directly from class example

Tell a short story with movement, due 23:59, Wed, 11 Oct, posted to this category
Requirement: a story that can be told with motion. Must use H-bridge controller, can use any other hardware in the lab or that you fab.
If we our out of h-bridge chips or you need a motor that we’ve run out of in A10, email and I’ll replace them ASAP. Also check with lending to see if they have a motor or h-bridge you can use in the short term.
Stories have at least three states:
Experiment with the pins on your h-bridge chip. If you change directions, first bring the motor to a stop with
digitalWrite(enablePin, HIGH);
or the A1 and A2 combination that lets your motor glide to a stop.
All the sketches in a zip file: class-8