The Indexical Mark Machine

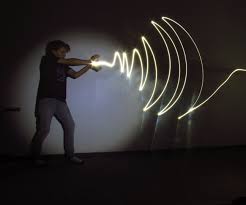
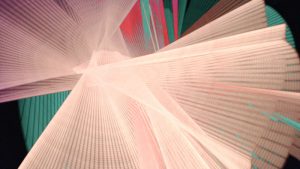
I want to make a drawing machine.  What interests me about machines drawing is rhythms in mark making, rather than accuracy and depiction.  I think what’s beautiful about mechanical drawing is the pure abstraction of endless uniform marks done in a pattern, simple or complex, that is evidence of the same motion done over and over again.  
I feel what’s most beautiful about all art is the presence of the indexical mark: the grain of a brush stroke, the edge and slight vibrations in a line of ink that prove it was drawn with a human hand, or the finger prints in a clay sculpture.  I make the case that the difference between artistic media is defined by indexical marks.  Do two works have different indexical marks?  Then they are different forms of art entirely, showing us different aspects of compositional potential.

So I want to invent new indexical marks, ones that the human hand is not capable of producing.  I want to see patterns fall out of a mechanical gesture that I built, but didn’t anticipate all the behaviors of, and to capture a map of these patterns on paper.


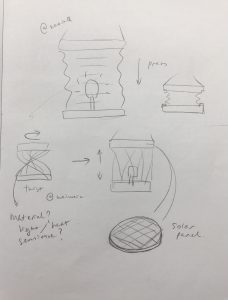
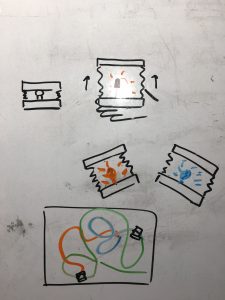
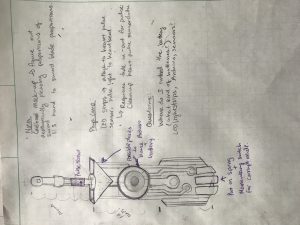
I don’t care if the machine can make a representational image; rather I want to make a series of nodes and attachments that each make unique patterns, which can each be held by mechanical arms over a drawing surface, each hold a variety of drawing tools, and be programmed into “dancing” together.

Hardware

  • 5 V stepper motors
  • 12 V Stepper motors
  • 12 V DC motors
  • Sliding potentiometers; light and sound sensors (I want the frequencies of the mark making mechanisms to be adjustable by both controlled factors and factors influenced by the environment. )
  • Controller frame
  • Card board for prototyping the structure of the machine
  • Acrylic to be laser cut for the final structure


Software

  • Built from the ground up.  The most complex programing will be that of the arms which position the drawing attachments over different places on the drawing surface.  I may use a coordinate positioning library for a configuration of motors that pushes and pulls a node into various positions with crossing “X and Y” arms.


Timeline


  • Weeks 1 and 2

Make several attachable drawing tool mechanisms which each hold a drawing tool differently, and move it about in a different pattern.


  • Week 3

Build a structure that holds the attachable nodes over a drawing surface, with the capability of arms to move the nodes across different areas of the surface.


  • Week 4

Control board and sensory responders that can be used to change patterns of the arms, and the nodes.


  • Week 5

Program built-in patterns that the controls will influence factors of.

  • Week 6

Make some more nodes, and make some drawings!

Project Proposal: Fishies

Concept statement:

I plan on making an automatic fish feeder/ pump system that responds to texts (or emails, or some similar interaction) – certain key phrases will trigger specific responses in the system. I want to use this project to synthesize a more human interaction between people and their fish — while texting isn’t the most intimate form of communication, it’s such a casual means of talking to other people that I think it will be useful in creating an artificial sense of intimacy.

Hardware: some sort of feeding mechanism (motor-based?), submersible pump (small), lights (LEDs), fish tank, fish (I already have the last two, don’t worry)…. I’m not sure what I’d need to connect w/ an arduino via sms or through wifi

Software: I’ll need software to make the arduino respond to texting (or something similar),  and then perform fairly straightforward mechanical outputs

Order of constructing and testing: first I need to get the arduino response down pretty well, since the project largely hinges on that, then creating a feeding mechanism will be the next priority… everything after that will largely be “frills”/things that aren’t crucial to the project. As I add components, I’ll need to figure out how to display them non-ratchetly. I’m also definitely going to need constant reminders to document my process.

Final project proposal: smartCUP (updated)

Here is the updated proposal

Abstract 

How do we make art, and better yet, how do we express ourselves through art? Traditionally, people express thoughts and feelings through intentional choices of color, stokes, medium. I want to experiment with idea of skipping artists’ intentional choices and allowing their body (or physical properties of their body make these choices. I believe this will allow artists’ to have a closer (physical) connection with their artwork because their body would go through the same change in states as their artwork.

I want to upcycle paper cups (ones you would get at starbucks) as a tool for drawing. The cup can animate the user’s interaction (opening cup, drinking, warming up drinks, even socializing with cups), and then it will take these (unstaged) interactions into art.

Concept drawing

Cup design: to be added

Inspiration:

Hardware

  • temperature sensor
  • Neopixel LED
  • tilt sensor
  • potentiometer
  • photo-sensitive paint

Software (tentative)

  • blynk — connecting arduino data to PC
  • pygame (looking for better option for UI)

Order of construction and testing

  1. Potentiometer + tilt sensor -> color change of Neopixel LED
  2. temp sensor -> color change of Neopixel LED
  3. Fit things into cup
  4. proximity sensor -> 2 cups interact
  5. make an information poster for the final show
  6. write up my artist’s statement for the final show

=======================================

Abstract 

How do we make art, and better yet, how do we express ourselves through art? Traditionally, people express thoughts and feelings through intentional choices of color, stokes, medium. I want to experiment with idea of skipping artists’ intentional choices and allowing their body (or physical properties of their body make these choices. I believe this will allow artists’ to have a closer (physical) connection with their artwork because their body would go through the same change in states as their artwork.

I want to make a lantern as a tool for drawing. The lantern will be tied to the user’s hand. User’s body temperature controls how much the lantern expands, which then changes the intensity of color; User change color by changing the orientation of their hand and lantern. A virtual canvas will then capture the states and motions of the lantern to form a painting.

Concept drawing

Lantern design:

Lantern motion:

Sample output:
          

Hardware

  • accelorometer
  • temperature sensor
  • Neopixel LED

Software

  • blynk — connecting arduino data to PC
  • pygame (looking for better option for UI)

Order of construction and testing

  1. Accelerometer -> color change of Neopixel LED
  2. make lantern shade
  3. temp sensor -> lantern shade expand and contract
  4. work on data threading (location + orientation)
  5. work on UI
  6. QR code (for user to save artwork)
  7. make an information poster for the final show
  8. write up my artist’s statement for the final show


Assignment 6: Text-to-Speech Keyboard

Abstract / concept statement

I want to make a mobile keyboard that reads aloud the words typed into it. If someone were to lose their ability to speak, this device could be an easy way for them to quickly communicate by typing what they want to say, since typing has become so natural to most people.

Hardware

The most crucial element of hardware in my project is the keyboard. After doing some research I believe that using a keyboard with the older PS/2 port I will be able to have my keyboard interact with the arduino. I will also need a speaker and power supply or maybe rechargeable battery (it would be nice to have it all be wireless).

Software

The trickiest part of the software process will probably be the text-to-speech. I have found a library on github that is used for arduino text-to-speech and an example of it being used online so hopefully I wont run into any issues with that. I’ve also found a library for the keyboard.

https://github.com/jscrane/TTS text to speech

https://github.com/PaulStoffregen/PS2Keyboard ps/2 keyboard

Order of construction and testing

1. get keyboard input

2. use keyboard input to make text-to-speech happen

3. figure out wireless power supply

4. craft some sort of container that hides wires, leaving just the keyboard and speaker exposed.

I’m not sure if this project is maybe too simple for a final project, but I like this idea because of the accessibility it could provide someone in need. It is possible that I will add to or modify this idea to better suit the assignment if needed.

Final Project Proposal

Abstract

I’d like to make an interactive 3D drawing box. Users can draw an object in 3d space and see their drawing projected onto an interactive cube in real time. It will use Unity, Arduino, a projector, and the Leap Motion Sensor. It is heavily inspired by Ralf Breninek’s project: https://vimeo.com/173940321

As well as Leap Motion’s Pinch Draw:

Image result for pinch draw leap motion

Unfortunately, Pinch Draw is currently only compatible with VR headsets, so it won’t translate directly to my project idea. That’s where I think some of the technical complexity comes in- I will probably have to write my own custom program.

Hardware

  • Projector
  • Cube (made from white foam core)
  • Stand for cube
  • Stepper motor
  • Arduino
  • Leap Motion Sensor
  • Power supply

Software

  • Uniduino
  • Unity
  • Firmata for Arduino
  • Arduino

Order of Construction and Testing

  1. Order supplies and follow tutorials for 3D drawing tutorials for Unity
  2. Connect projector to computer and figure out dimensions/projection logistics for program
  3. Build projection cube
  4. Use Firmata and Uniduino to control Arduino and motor based on Unity output
  5. Put whole project together: project Unity game onto cube, have cube respond to hand gesture commands, finalize user interface
  6. Information poster and artist’s statement for final show

Project 6: Final Project Proposal **Now in Technicolor**

As someone who suffers from variations of moods to put it very plainly I resort to color in my day-to-day life to brighten my mood or change the way I feel about myself. How can color be a projection of you and can it really make you alter your current state? I want to make something larger scale, to the point were a person could fit inside. My concept would be a light installation that you step inside and cameras can detect what color you are wearing and once detected change the lights in the environment to match the color. I am currently debating if I should have pre assigned lab coats one would put on of simple jewel tones or if I should allow people to enter wearing what ever they are wearing and having the lights respond from there (I might not have the skill to be able to pull that off). I feel that with pre assigned colors I will have a greater degree of control of the environment.

Hardware-

  • Color changing light bulbs (maybe the Phillips hues bulbs because those can be programmed)
  • Some kind of body sensing camera
  • And an enclosed box I would make (thank goodness I’m product design haha)

Software- As of right now I am still figuring that out. Probably something that can also connect to the light bulbs like IFTTT or just the Phillips hues app.

Timeline-

  1. Get the camera to sense movement and just turn 1 light on
  2. Get the camera to sense 1 color and have it turn 1 light on to match that color
  3. Get the camera to sense 1 color and have it turn 2 lights on to match that color
  4. Get the camera to understand there are 3 (maybe 4) colors being worked with and have it be able to sense at least 2 and have lights act accordingly.
  5. Camera can now detect all 4 different colors and lights act accordingly.
  6. Get lab coats with specific colors
  7. Build box
  8. Attach lights and camera and lab coats
  9. Polish!

Final Project Proposal: Transistor Prop

Project fundamentals

My final project can be a cosplay prop that uses phys comp fundamentals to bring the prop closer to functions/behaviors in its original work, enhance static features, and bring others to engage with the great works that these props come from.

Phys Comp Components: Light sensors, IR sensors, mp3 shields, momentary switches, LED light strips

Things that a prop can be modified to do: light up (different patterns of lighting, color, intensity), make sounds/play dialogue, change configuration (physical changes, like add/remove armor, Psychopass gun etc.)

Besides adding to the list of things the prop does, I also want to think more about making a meaningful interaction between user and prop, perhaps through symbolism, theme, addition of a custom mode/feature.

Transistor Sword:

Red’s sword has several tutorials that incorporate physical computing elements already. I really love this game, and it means a lot to me, so I would want to move forward with this project proposal, but understand if it’s already done well.  

Here’s one good example of tutorials to make the phys comp version of the Transistor Sword: http://chrixdesign.blogspot.com/2016/06/transistor-sword-closer-look-at.html

Chris’s version of the sword has two modes of glowing and is sound reactive. However, she doesn’t use an Arduino, and has hacked the project using circuits and components from OTHER devices.

Input = sound

Output = LED light states

Proposal:

Interaction 1:Install a pulse sensor to the handle, outline where a person’s hand should go.

Input = pulse sensor

Output = LED light strips PULSE in time with heartbeat detection


Interaction 2: Corrupt Mode via button

Input: Pressure downwards (press sword into ground)

Output: LED strip color change into corrupt mode (green is normal, red is corrupt), maybe pulse red

State machine would be able to recognize if the sensor or the switch is activated and change sword light color to show sword mode.


I will try to think of ways to make this more interactive, but the purpose of this project would be purely entertainment-focused as a cosplay prop. As a prop, its function can remain purely aesthetic as most props are created to replicate the original work’s as closely as possible and supplement a person’s cosplay project. Giving it the ability to respond to outside stimuli will bring it closer to its function in-game, further pushing it semblance with the original work.


Other Alternatives Considered:

Overwatch Heroes

League of Legend Heroes

Psychopass gun: Yes, lots of dremmel work

Final Project Proposal-Changing of the Seasons

Abstract 

I wanted to create an organic interactive kinetic installation that represented the changing of the seasons, which was mainly inspired by the temperamental weather we are experiencing. It will be a tree that is mounted on a turntable which will spin at different rates depending on the interaction with the user. It will also have leaves that will change color corresponding with the appropriate response. Lastly, the branches will be connected to a pulley system which will determine their angle. The idea is that there will be four settings or ‘seasons’ that will be represented by the tree. I currently have two running ideas for the user interaction. The first requires a motion sensor that will track the speed at which the user walks past the installation and use this information to determine the corresponding season. The second idea relies on the facial expressions or mood of the user.


Hardware

  • Materials for the body of the tree (wire?)
  • (Clear) Acrylic for leaves
  • RGB LEDs
  • High torque motor
  • High precision motor
  • springs
  • PIR Motion sensor or webcam ( depending on direction)
  • at least 2 speakers
  • micro SD Card and adaptor

Software

  • Stores and plays multiple different tracks
  • Use open CV for the facial recognition component if necessary
  • Controls the RGB LEDs and motors

Order of construction and testing:

  1. Make a leaf that can turn different colors using RGB LED
  2. Make turntable with hole in center for wires
  3. Make the trunk of the tree using wires
  4. Make body of tree hollow to mount on turntable
  5. Design housing for the motor that controls branches
  6. Build branches with corresponding leaves
  7. Find way to control multiple LEDs with different settings (different variations of colors for each season)
  8. Figure out how to make the LEDs and motors work at the same time without tangling wires
  9. Figuring out a way to conceal the strings and wires
  10. Learn how to play multiple different tracks on the speakers and determine if one is enough or if two is necessary for the full effect
  11. Learn how to use SD Cards
  12. Mount PIR  and figure out the threshold values
  13. Learn how to use facial recognition software and webcam (determine if it is worth the extra work)
  14. Let other people try it out and see what their reaction/ interaction with it is ( can they figure it out or is it not obvious enough)
  15. Fix everything that doesn’t work
  16. Repeat!


final project: 3D mirror (Aditi Hebbar)

Abstract / concept statement

inspiration is from a project from the MIT tangible media group titled “Moving Blocks Mimic Human Movements” (https://www.youtube.com/watch?v=PTm1e-tJJEg) . I intend to create an 2D array of movable blocks as in the picture below:

Each block would have a single neo pixel LED on top of it. The goal of the project would be to use this array to create a sort of “3D mirror” (the LED’s create the color; the blocks move up or down to add depth) reflecting objects/people front of it. In contrast to the MIT lab project which aims to mimic human movement, this project aims to mimic human appearance.

Hardware

  • Kinect camera (depth sensing is easy with this)
  • Raspberry pi (uses open cv to detect objects/humans, moves blocks/ add colour to LED’s accordingly)
  • Acrylic blocks, have to laser cut (number depends on size of array, TBD)
  • Singular adafruit neopixel LED’s (number depends on size of array, TBD)
  • Multiplexing hardware (need to be able to control numerous blocks and LED’s, unsure of how many/what type)
  • Solenoids/vacuum tubes? to move the blocks, unsure what hardware to use to facilitate easy vertical movement

Software

I’ll need some software that’s able to identify the contours of a person’s body (so I can do cool stuff like add depth with the blocks only to image person’s body), and openCV is perfect for this.

Order of construction and testing

  1. Figure out how to make a single acrylic piece move up and down at different levels, and add the neo pixel LED on top controlling both simultaneously.
  2. Figure out how to multiplex several blocks.
  3. Create a 2D array of blocks with LED’s on top.
  4. Create the multiplex and attach to rpi. Control the movement of the blocks/LEDs efficiently with RPI. Ask for help if required.
  5. Debug, and get feedback at this point.
  6. Figure out how to use the Kinect and openCV to get desired input.
  7. Control Blocks and LEDs with input
  8. show it to someone who isn’t in phys comp and ask them to try it out
  9. incorporate feedback, add aesthetic and make a case if required.
  10. make an information poster for the final show.
  11. write up my artist’s statement for the final show.