Rjpark – Project 06 – Abstract Clock

rjpark_abstractclock

var H; // current hours
var M; // current minutes
var S; // current seconds
var hr; // hour rgb
var hg;
var hb;
var mr; // minute rgb
var mg;
var mb;
var sr; // second rgb
var sg;
var sb;
var bc; // background color
var lc; // line color

function setup() {
    createCanvas(380, 480);
}

function draw() {
	H = hour();
	M = minute();
	S = second();

	var mapH = map(H, 24, 0, height, 0);
	var mapM = map(M, 59, 0, height, 0);
	var mapS = map(S, 59, 0, height, 0);

	// switching colors depending on day or night
	// day = midnight (0:00) to noon (12:00)
	// night = noon (12:00) to midnight (24:00)
	if (H < 12) { // day
		hr = 170;
		hg = 40;
		hb = 250;
		mr = 45;
		mg = 250;
		mb = 45;
		sr = 30;
		sg = 185;
		sb = 250;
		bc = 220;
		lc = 0;
	}
	if (H >= 12) { // night
		hr = 50;
		hg = 5;
		hb = 75;
		mr = 10;
		mg = 60;
		mb = 10;
		sr = 30;
		sg = 35;
		sb = 90;
		bc = 30;
		lc = 255;
	}

	// day or night colored rectangles
    fill(hr, hg, hb);
    noStroke();
    rect(0, 0, width / 3, height);
    fill(mr, mg, mb);
    noStroke();
    rect(width / 3, 0, width / 3, height);
    fill(sr, sg, sb);
	noStroke();
	rect(2 * width / 3, 0, width / 3, height);

	// moving of rectangle for hours
	fill(bc);
	noStroke();
	rect(0, 0, width / 3, mapH);

	// moving of rectangle for minutes
	fill(bc);
	noStroke();
	rect(width / 3, 0, width / 3, mapM);

	// moving of rectangle for seconds
	fill(bc);
	noStroke();
	rect(2 * width / 3, 0, width / 3, mapS);

	// markings for hours, minutes, seconds
	for (var hi = 0; hi < 24; hi ++) {
		stroke(lc);
		strokeWeight(1);
		line(0, (height / 24) * hi, width / 12, (height / 24) * hi);
		if (hi == 3 || hi == 6 || hi == 9 || hi == 12 || hi == 15 || hi == 18 || hi == 21) {
			line(0, (height / 24) * hi, width / 6, (height / 24) * hi);
			line(width / 3, (height / 11.9) * hi, 6 * width / 12, (height / 11.9) * hi);
		}
	}
	for (var mi = 0; mi < mapM; mi ++) {
		stroke(lc);
		strokeWeight(1);
		line(width / 3, (height / 11.9) * mi, 5 * width / 12, (height / 11.9) * mi);
	}
	for (var si = 0; si < mapM; si ++) {
		stroke(lc);
		strokeWeight(1);
		line(2 * width / 3, (height / 5.9) * si, 3 * width / 4, (height / 5.9) * si);
	}
}

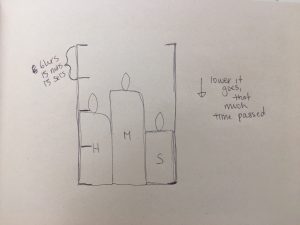
I drew my inspiration from candle clocks which was used a long time ago to tell time. You can tell how much time as passed by seeing how much of the candle has melted. Similarly, I created an abstract clock that mimics the candle clock, only mine has tick markings on the side so you can better tell what time it is.

(in regards to longer tick markings) It goes from 12am to 6am to 12pm to 6pm to 12 am again for the hours. It goes from 0 to 15 to 30 to 45 minutes. The seconds go by 10s. Also, when the time hits 12pm, the colors switch from bright (day) to dark (night) colors.

Rjpark – Looking Outwards 05

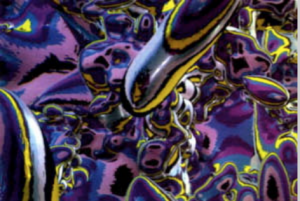
Image of Kawaguchi’s 3D Computer Graphic

The 3D computer graphics I chose were made by Yoichiro Kawaguchi, an international computer artist from Japan. He creates a lot of graphic art that has soft, fluid shapes and forms and he gains his inspiration from patterns in seashells and spiraling plants. You can see a lot of that in his art; each shape/object has a circular, spiral pattern within it. I admire the fact that although his work is random and chaotic – placement of shapes is random and shape sizes are different – in a sense, there’s consistency and similarity too, mainly due to the patterns within these shapes. It’s both hectic and peaceful to look at. In terms of the algorithm, he imitated growth patterns from seashells and plants using a function/technology called “metaballs”, which produces organic-looking n-dimensional objects.

Yoichiro Kawaguchi

Rjpark – Project 05 – Wallpaper

rjpark_wallpaper

var z = 150; // "zooming" the lines
var sw = z/20; // stroke weight of lines
var swl = z/100; // stroke weight of leaves
var l = z/10; // leaves placement on lines
var ls = z/5; // leaves size

function setup() {
    createCanvas(600, 600);
   	background(190, 175, 155);
    noLoop();
}

function draw() {
	// set 1 of vertical lines (in even numbered columns)
   	// vx1 = variable for x coordinate movement
   	// vy1 = variable for y coordinate movement
   	for (var vx1 = 0; vx1 < width/10; vx1 ++) {
   		for (var vy1 = 0; vy1 < width/10; vy1 ++) {
   			stroke(90, 70, 60);
   			strokeWeight(sw);
   			line((z/2)+z*vx1, z*vy1, (z/2)+z*vx1, (z/2)+z*vy1);
   		}
   	}
	// set 2 of vertical lines (in odd numbered columns)
   	// vx2 = variable for x coordinate movement
   	// vy2 = variable for y coordinate movement
   	for (var vx2 = 0; vx2 < width/10; vx2 ++) {
   		for (var vy2 = 0; vy2 < width/10; vy2 ++) {
   			stroke(120, 50, 20);
   			strokeWeight(sw);
   			line(z*vx2, (z/2)+z*vy2, z*vx2, z+z*vy2);
   		}
   	}
	// set 1 of horizontal lines (in even numbered columns)
   	// hx1 = variable for x coordinate movement
   	// hy1 = variable for y coordinate movement
   	for (var hx1 = 0; hx1 < height/10; hx1 ++) {
   		for (var hy1 = 0; hy1 < height/10; hy1 ++) {
   			stroke(120, 50, 20);
   			strokeWeight(sw);
   			line((z/2)+z*hx1, (z/2)+z*hy1, z+z*hx1, (z/2)+z*hy1);
   		}
   	}
	// set 2 of horizontal lines (in odd numbered columns)
   	// hx2 = variable for x coordinate movement
   	// hy2 = variable for y coordinate movement
   	for (var hx2 = 0; hx2 < height/10; hx2 ++) {
   		for (var hy2 = 0; hy2 < height/10; hy2 ++) {
   			stroke(90, 70, 60);
   			strokeWeight(sw);
   			line(z*hx2, z*hy2, (z/2)+z*hx2, z*hy2);
   		}
   	}
   	// set 1 of leaves on first xy coordinate of vertical lines (set 1)
   	for (var vx1 = 0; vx1 < width/10; vx1 ++) {
   		for (var vy1 = 0; vy1 < width/10; vy1 ++) {
   			fill(80, 110, 75);
   			noStroke();
   			ellipse((z/2)+z*vx1+l, z*vy1, ls, ls); // leaf body
   			triangle((z/2)+z*vx1+l, z*vy1-(ls/2), (z/2)+z*vx1+l+(ls/2), z*vy1, (z/2)+z*vx1+l+(ls/2), z*vy1-(ls/2)); // leaf tip

   			stroke(0);
   			strokeWeight(swl);
   			line((z/2)+z*vx1+(ls/5), z*vy1+(ls/3), (z/2)+z*vx1+l, z*vy1); // leaf veins

   	   		fill(130, 140, 90);
   	   		noStroke();
   	   		ellipse((z/2)+z*vx1, z*vy1-l, ls, ls); // leaf body
   			triangle((z/2)+z*vx1, z*vy1-l-(ls/2), (z/2)+z*vx1+(ls/2), z*vy1-l, (z/2)+z*vx1+(ls/2), z*vy1-l-(ls/2)); // leaf tip

   			stroke(0);
   			strokeWeight(swl);
   			line((z/2)+z*vx1-(ls/3), z*vy1-(ls/5), (z/2)+z*vx1, z*vy1-l); // leaf veins
   		}
   	}
   	// set 2 of leaves on first xy coordinate of horizontal lines (set 1)
   	for (var hx1 = 0; hx1 < width/10; hx1 ++) {
   		for (var hy1 = 0; hy1 < width/10; hy1 ++) {
   			fill(205, 185, 90);
   			noStroke();
   			ellipse((z/2)+z*hx1-l, (z/2)+z*hy1, ls, ls); // leaf body
   			triangle((z/2)+z*hx1-l-(ls/2), (z/2)+z*hy1, (z/2)+z*hx1-l, (z/2)+z*hy1+(ls/2), (z/2)+z*hx1-l-(ls/2), (z/2)+z*hy1+(ls/2)); // leaf tip

   			stroke(0);
   			strokeWeight(swl);
   			line((z/2)+z*hx1-(ls/5), (z/2)+z*hy1-(ls/3), (z/2)+z*hx1-l, (z/2)+z*hy1); // leaf veins

   			fill(250, 240, 190);
   	   		noStroke();
   	   		ellipse((z/2)+z*hx1, (z/2)+z*hy1+l, ls, ls); // leaf body
   	   		triangle((z/2)+z*hx1-(ls/2), (z/2)+z*hy1+l, (z/2)+z*hx1, (z/2)+z*hy1+l+(ls/2), (z/2)+z*hx1-(ls/2), (z/2)+z*hy1+l+(ls/2)); // leaf tip

   	   		stroke(0);
   			strokeWeight(swl);
   			line((z/2)+z*hx1+(ls/3), (z/2)+z*hy1+(ls/5), (z/2)+z*hx1, (z/2)+z*hy1+l); // leaf veins
   		}
   	}
   	// set 3 of leaves on first xy coordinate of vertical lines (set 2)
   	for (var vx2 = 0; vx2 < width/10; vx2 ++) {
   		for (var vy2 = 0; vy2 < width/10; vy2 ++) {
   			fill(80, 110, 75);
   			noStroke();
   			ellipse(z*vx2+l, (z/2)+z*vy2, ls, ls); // leaf body
   			triangle(z*vx2+l, (z/2)+z*vy2-(ls/2), z*vx2+l+(ls/2), (z/2)+z*vy2, z*vx2+l+(ls/2), (z/2)+z*vy2-(ls/2)); // leaf tip

   			stroke(0);
   			strokeWeight(swl);
   			line(z*vx2+(ls/5), (z/2)+z*vy2+(ls/3), z*vx2+l, (z/2)+z*vy2); // leaf veins

   	   		fill(130, 140, 90);
   	   		noStroke();
   			ellipse(z*vx2, (z/2)+z*vy2-l, ls, ls); // leaf body
   			triangle(z*vx2, (z/2)+z*vy2-l-(ls/2), z*vx2+(ls/2), (z/2)+z*vy2-l, z*vx2+(ls/2), (z/2)+z*vy2-l-(ls/2)); // leaf tip

   			stroke(0);
   			strokeWeight(swl);
   			line(z*vx2-(ls/3), (z/2)+z*vy2-(ls/5), z*vx2, (z/2)+z*vy2-l); // leaf veins
   		}
   	}
   	// set 4 of leaves on first xy coordinate of horizonal lines (set 2)
   	// replaces leaves on second xy coordinate of vertical lines (set 2) because first coordinate of first row of horizontal lines need leaves
   	for (var hx2 = 0; hx2 < height/10; hx2 ++) {
   		for (var hy2 = 0; hy2 < height/10; hy2 ++) {
   			fill(205, 185, 90);
   			noStroke();
   			ellipse(z*hx2-l, z*hy2, ls, ls); // leaf body
   			triangle(z*hx2-l-(ls/2), z*hy2, z*hx2-l, z*hy2+(ls/2), z*hx2-l-(ls/2), z*hy2+(ls/2)); // leaf tip

   			stroke(0);
   			strokeWeight(swl);
   			line(z*hx2-(ls/5), z*hy2-(ls/3), z*hx2-l, z*hy2); // leaf veins

   	   		fill(250, 240, 190);
   	   		noStroke();
   	   		ellipse(z*hx2, z*hy2+l, ls, ls); // leaf body
   	   		triangle(z*hx2-(ls/2), z*hy2+l, z*hx2, z*hy2+l+(ls/2), z*hx2-(ls/2), z*hy2+l+(ls/2)); // leaf tip

   	   		stroke(0);
   			strokeWeight(swl);
   			line(z*hx2+(ls/3), z*hy2+(ls/5), z*hx2, z*hy2+l); // leaf veins
   		}
   	}

}

I knew from the start that I wanted to implement nature and earth tones into my wallpaper. So, I created a simple, stair-shaped pattern for vines and pairs of leaves at each intersection of the stair-shaped lines.
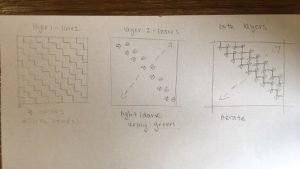
 

Although this looks like an easy pattern to code, there were a lot of different parts to consider. I had to iterate the vertical and horizontal lines both across and down; I had to make 4 double for-loops to make this happen. So, there are 2 sets of vertical and horizontal lines each. You can see the 2 sets by color (red-ish brown and dark brown). I also had to iterate the pairs of leaves at one end of each vertical and horizontal line (2 sets for each), so, I also had to make 4 double for-loops to make this happen.

Lastly, I created global variables that make it easier for the user to change the dimensions of the shapes in the wallpaper. Of those global variables, only one has to be changed because the others are dependent on that one global variable, z. If the user changes z, the entire wallpaper will either “zoom” in or out.
Rjpark – Looking Outwards 04

Photo of Šarapovas’ Muscial Scultpure

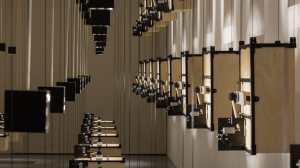
Artist Andrius Šarapovas’ room-sized, interactive, musical sculpture features 77 individual installations comprised of a metal bar, sound activator, sound damper, resonator, and mechatronics that are used to make generative music. The project consists of 16 notes, C, D, F and G spread across 4 octaves, which are distributed throughout the room so that one can hear different music compositions at different points in the room. A note is made by the project’s algorithm which is activated by the algorithms from the apps on the Tele2’s 4G network. The algorithm for the project uses one second of 4G statistical data to generate one second of music. With multiple phones and installations, this creates a rhythm or musical pattern and sound volume. The pitch is determined by the amount of data that’s being downloaded on the phones. This algorithm seems so simple, yet it’s outcome is amazing. “The probability of the repetition of an identical four-note combination is about once in every 98,304 activations”, Šarapovas explains. What’s so admirable about this project is that the algorithm is very straightforward but the result is so complex and combinatory. You can see the artist’s artistic sensibility through this fact. As it states in the article, “Early on, Šarapovas settled on a minimalist spatial object that would consist of a number of identical segments… to balance the sound, control noises, dampen different notes, and activate sounds”.

Šarapovas Massive Robotic Instrument

Rjpark – Project 04 – String Art

rjpark_stringart

function setup() {
    createCanvas(400, 300);
    background(0);
}

function draw() {
    // white boxes
    fill(255);
    noStroke();
    rect(100, 0, 100, 150); // top left

    fill(255);
    noStroke();
    rect(300, 0, 100, 150); // top right

    fill(255);
    noStroke();
    rect(0, 150, 100, 150); // bottom left

    fill(255);
    noStroke();
    rect(200, 150, 100, 150); // bottom right

    // variables for x and y coordinates
    x1 = 0; // starting coordinate bottom left
    y1 = 300; // starting coordinate bottom left
    x2 = 0;
    y2 = 150; // creates straight line across at height of 150
    
    x3 = 200; // starting coordinate bottom center left
    y3 = 300; // starting coordinate bottom center left
    x4 = 0;
    y4 = 150; // creates straight line across at height of 150

    x5 = 200; // starting coordinate bottom center right
    y5 = 300; // starting coordinate bottom center right
    x6 = 0
    y6 = 150; // creates straight line across at height of 150

    x7 = 400; // starting coordinate bottom right
    y7 = 300; // starting coordinate bottom right
    x8 = 0
    y8 = 150; // creates straight line across at height of 150

    x9 = 100; // starting coordinate top left
    y9 = 0; // starting coordinate top left
    x10 = 0;
    y10 = 150; // creates straight line across at height of 150

    x11 = 100; // starting coordinate top center left
    y11 = 0; // starting coordinate top center left
    x12 = 0;
    y12 = 150; // creates straight line across at height of 150

    x13 = 300; // starting coordinate top center right
    y13 = 0; // starting coordinate top center right
    x14 = 0;
    y14 = 150; // creates straight line across at height of 150

    x15 = 300; // starting coordinate top right
    y15 = 0; // starting coordinate top right
    x16 = 0;
    y16 = 150; // creates straight line across at height of 150

    // curves
    stroke(0);
    strokeWeight(1);
    // bottom left
    for (var a = 0; a <= 1; a += 0.1) {
        x2 = lerp(0, width/4, a); // lines go out to the right from 0 to 100 pixels
        y1 = lerp(height, height/2, a); // lines go up from 300 to 150 pixels
        line(x1, y1, x2, y2);
    }

    stroke(255);
    strokeWeight(1);
    // bottom center left
    for (var b = 0; b <= 1; b += 0.1) {
        x4 = lerp(width/2, width/4, b); // lines go out to the left from 400 to 300 pixels
        y3 = lerp(height, height/2, b); // lines go up from 300 to 150 pixels
        line(x3, y3, x4, y4);
    }

    stroke(0);
    strokeWeight(1);
    // bottom center right
    for (var c = 0; c <= 1; c += 0.1) {
        x6 = lerp(width/2, 3*width/4, c); // lines go out to the left from 400 to 300 pixels
        y5 = lerp(height, height/2, c); // lines go up from 300 to 150 pixels
        line(x5, y5, x6, y6);
    }

    stroke(255);
    strokeWeight(1);
    // bottom right
    for (var d = 0; d <= 1; d += 0.1) {
        x8 = lerp(width, 3*width/4, d); // lines go out to the left from 400 to 300 pixels
        y7 = lerp(height, height/2, d); // lines go up from 300 to 150 pixels
        line(x7, y7, x8, y8);
    }

    stroke(255);
    strokeWeight(1);
    // top left
    for (var e = 0; e <= 1; e += 0.1) {
        x10 = lerp(width/4, 0, e); // lines go out to the left from 100 to 0 pixels
        y9 = lerp(0, height/2, e) // lines go down from 0 to 150 pixels
        line(x9, y9, x10, y10);
    }

    stroke(0);
    strokeWeight(1);
    // top center left
    for (var f = 0; f <= 1; f += 0.1) {
        x12 = lerp(width/4, width/2, f); // lines go out to the left from 100 to 200 pixels
        y11 = lerp(0, height/2, f) // lines go down from 0 to 150 pixels
        line(x11, y11, x12, y12);
    }

    stroke(255);
    strokeWeight(1);
    // top center right
    for (var g = 0; g <= 1; g += 0.1) {
        x14 = lerp(3*width/4, width/2, g); // lines go out to the left from 300 to 200 pixels
        y13 = lerp(0, height/2, g) // lines go down from 0 to 150 pixels
        line(x13, y13, x14, y14);
    }

    stroke(0);
    strokeWeight(1);
    // top right
    for (var h = 0; h <= 1; h += 0.1) {
        x16 = lerp(3*width/4, width, h); // lines go out to the left from 300 to 400 pixels
        y15 = lerp(0, height/2, h) // lines go down from 0 to 150 pixels
        line(x15, y15, x16, y16);
    }
}

My inspiration for this project was sine waves and my own twist to the project was dividing things into 2. So, I first split the sine wave into the arch and the dip. Then I divided the canvas into top and bottom and put the arch on the bottom half and the dip on the top half. Afterwards, I chose 2 colors (white and black) and made every box in both the top and bottom half of the canvas switch colors (without the same colored boxes on top of each other). Then I colored in the lines/curves I made with the opposite color of the box that they’re in. Lastly, I shifted the top half of the canvas by half a curve (or 1 box). The resulting image is what I have above.

Rjpark – Looking Outwards 03

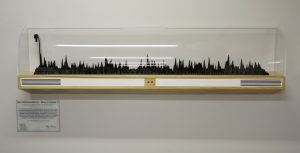
Photo of 3D printed sculpture of Obama’s speech

Gilles Azzaro’s 3D printed sound sculptures are works of art that honor the things he finds important in life like his friend’s baby’s first cry or Neil Armstrong speaking about walking on the moon. In this specific project, Azzaro created a sculpture of sound waves from Obama’s speech, The Next Industrial Revolution. In order to do this, it took 2 printers and 200+ hours as well as an installation of a green light that follows the sound waves as the speech is told. You can tell through the green light that the creator cared not only about the visual or auditory aspect of the project but also about the connection between the two. In fact, I admire that addition (green light) to the project the most. It’s already fascinating enough to try creating a visual representation of sound but it’s even more fascinating to connect an audience’s auditory and visual sense with something as simple as a green light running across the sculpture for the audience’s eyes to follow. I find the attention to this small but important detail really admirable and innovative. This 3D printing project serves not only as a piece of beautiful artwork but also as a testament to important historical and worldly events.

3D Printing Project

Gilles Azzaro

Rjpark – Project 03 – Dynamic Drawing

rjpark_dynamicdrawing

// create variables for randomizing color of circles
var r1 = 255;
var b1 = 0;
var g1 = 255;
var r2 = 0;
var b2 = 255;
var g2 = 255;
var r3 = 255;
var b3 = 255;
var g3 = 0;
var r4 = 170;
var b4 = 255;
var g4 = 170;
// create variables for direction change
var angle = 0;

function setup() {
    createCanvas(640, 480);
}

function draw() {
    background(0);
    // restrict mouseX to 0-640
    var x = max(min(mouseX, 640), 0);
    // create variable for size change of circles
    var size = x * 400 / 640;
    push();
    rotate(radians(angle));
    // pink circle
    fill(r1, b1, g1);
    ellipse(x, 0, size, size);
    // blue circle
    fill(r2, b2, g2);
    ellipse(640, x, size, size);
    // yellow cirlce
    fill(r3, b3, g3);
    ellipse(640 - x, 480, size, size);
    // green circle
    fill(r4, b4, g4);
    ellipse(0, 480 - x, size, size);
    pop();

    if (x < 250) {
        // colors change
        r1 = 0;
        b1 = 255;
        g1 = 255;
        r2 = 255;
        b2 = 255;
        g2 = 0;
        r3 = 170;
        b3 = 255;
        g3 = 170;
        r4 = 255;
        b4 = 0;
        g4 = 255;
        // direction changes
        angle = 0;
    }
    if (x > 250) {
        // colors change
        r1 = 255;
        b1 = 0;
        g1 = 255;
        r2 = 0;
        b2 = 255;
        g2 = 255;
        r3 = 255;
        b3 = 255;
        g3 = 0;
        r4 = 170;
        b4 = 255;
        g4 = 170;
        // direction changes
        angle += 5;
    }
}

The 4 things I changed about the circles according to the movement of the mouse across the screen (not up and down) were color, direction, size, and position. As the mouse moves towards the right, the colors change, the size of the circles increase and the circles start to rotate. In addition, the circle follows the mouse across the screen until rotation.

Rjpark – Looking Outwards 02

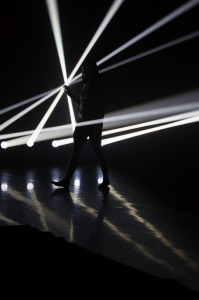
Photo of Dancer and Lights Interacting (Pattern Recognition by Memo Akten)

The project, Pattern Recognition by Memo Akten, is an interactive performance between dancers and lights. Essentially, the lights follow the movement of the dancer, making the dance more dynamic and the movements more continuous. What I admire about this project is the ability of the lights to detect movement of a specific dancer. The reason being that, artistically, the lights can emphasize the movement of one dancer over the others and help direct the audience’s attention to where the choreographer wants their attention to be. I, a dancer myself, find this project fascinating because it adds so much more to the experience of a dance performance.

To briefly explain how this works, there’s a training phase where the learning algorithm analyzes the movement of the dancer (training data) and spits out a model. Then in the prediction phase, new data (paired to a target) is inputted into the model and the model eventually creates an output, a prediction of movement. When creating this project and algorithm, Memo Akten definitely thought about the themes of learning and memory for both the dancer and the machine. As stated in the article below, “Computational Creativity research is not only concerned with the creative output of the algorithms or technical implementation details, but is equally — if not more — concerned with the philosophical, cognitive, psychological and semantic connotations of machines exhibiting creative behavior, or acting creative”.

Pattern Recognition

Review of Machine Learning in Artistic Context

Rjpark – Project 02 – Variable Faces

rjpark_variablefaces

// variables for facial feature dimensions
var eyeSize = 20;
var pupilSize = 5;
var faceWidth = 100;
var faceHeight = 150;
var mouthSize = 5;
// variables for face color
var facer = 10;
var faceg = 15;
var faceb = 20;
// variables for eye color
var eyesr = 5;
var eyesg = 10;
var eyesb = 15;
// variables for pupil color
var pupilsr = 15;
var pupilsg = 20;
var pupilsb = 25;
// variables for mouth color
var mouthr = 20;
var mouthg = 25;
var mouthb = 30;
 
function setup() {
    createCanvas(640, 480);
}
 
function draw() {
    background(230);
    // face
    fill(facer, faceg, faceb);
    stroke(facer, faceg, faceb);
    strokeWeight(2);
    ellipse(width / 2, height / 2, faceWidth,  faceHeight);
    // locations of facial features
    var eyeLX = width / 2 - faceWidth * 0.25;
    var eyeRX = width / 2 + faceWidth * 0.25;
    var pupilLX = width / 2 - faceWidth * 0.25;
    var pupilRX = width / 2 + faceWidth * 0.25;
    var mouth1 = width / 2.1
    var mouth2 = width / 1.9
    // eyes
    fill(eyesr, eyesg, eyesb);
    strokeWeight(2);
    ellipse(eyeLX, height / 2, eyeSize, eyeSize);
    ellipse(eyeRX, height / 2, eyeSize, eyeSize);
    // pupils
    fill(pupilsr, pupilsg, pupilsb);
    strokeWeight(2);    
    ellipse(pupilLX, height / 2, pupilSize, pupilSize);
    ellipse(pupilRX, height / 2, pupilSize, pupilSize);
    // mouth
    stroke(mouthr, mouthg, mouthb);
    strokeWeight(mouthSize);
    line(mouth1, height / 1.7, mouth2, height / 1.7);
}

// when the user clicks, these variables are reassigned
function mousePressed() {
	// variables reassigned for facial feature dimensions
    faceWidth = random(100, 300);
    faceHeight = random(100, 300);
    eyeSize = random(17, 50);
    pupilSize = random (5, 15);
    mouthSize = random (3, 13);
    // variables reassigned for eye color
    eyesr = random (0, 255);
    eyesg = random (0, 255);
    eyesb = random (0, 255);
    // variables reassigned for face color
    facer = random (0, 255);
    faceg = random (0, 255);
    faceb = random (0, 255);
    // variables reassigned for pupil color
    pupilsr = random (0, 255);
    pupilsg = random (0, 255);
    pupilsb = random (0, 255);
    // variables reassigned for mouth color
    mouthr = random (0, 255);
    mouthg = random (0, 255);
    mouthb = random (0, 255);
}

In this project, I focused on not only changing the dimensions of 3+ different facial features but also changing the color of each of of those features. I made variables for r, b, and g for each facial feature so I could randomize the colors with each click.

Rjpark – Looking Outwards 01

Introduction Video of the Cooper Hewitt Pen

The Cooper Hewitt Pen is a pen designed to allow the visitor to save his or her experience at the museum by scanning a sign at each display and accessing those same displays on the web at home. In addition, it allows visitors to draw on interactive tables set up throughout the museum. The goal of the pen is to teach people about design, and what better way to learn about design than by designing yourself? That’s why Cooper Hewitt proposed this idea of visitor technology: for people to engage in the works of a museum rather than just observing them.

In order to create this visitor technology, a lot of design teams, manufacturing companies, engineers, and management teams were involved. The concept of the Cooper Hewitt Pen itself was created by two design teams, Local Projects and Diller Scofidio + Renfro. Then, prototypes of the pen were made through the teamwork of 5 companies/teams: Undercurrent (a management consulting firm), Sistelnetworks (a wireless product company), General Electric, Makesimply (a manufacturing company), and Tellart (Cooper Hewitt’s own digital team). When creating the prototypes, Cooper Hewitt and Undercurrent were inspired by Sistelnetworks’ vWand, an inventory control device that had most of the technical requirements of the interactive pen they were trying to make.  As a result, this project used the current software Sistelnetworks used with a few changes made to the internal circuits and electronics in order to fit the function of their pen. Afterwards, the final prototype of the pen was manufactured by Sistelnetworks and Makesimply. Lastly, the pen was available for use at the Cooper Hewitt Museum.

What’s so amazing about this pen is that it allows for the continuation of an experience, whenever and wherever. I can take out my phone and look at the same displays I looked at in the museums without having to go back to the museum itself. Having this kind of interactive technology everywhere will allow people to personalize and amplify the quality of each experience forever. In addition, it will allow people to think or see things differently. The interaction between the user and product allows the user to learn about how the product reacts to his or her specific actions. It forces the user to make connections between action and result as well as to think about what to do next and to question what else could happen if a different action were to be taken. It makes the user think more in depth about a certain experience and to view it differently, which inevitably makes the user mentally and creatively grow.

Using the Pen

Designing the Pen