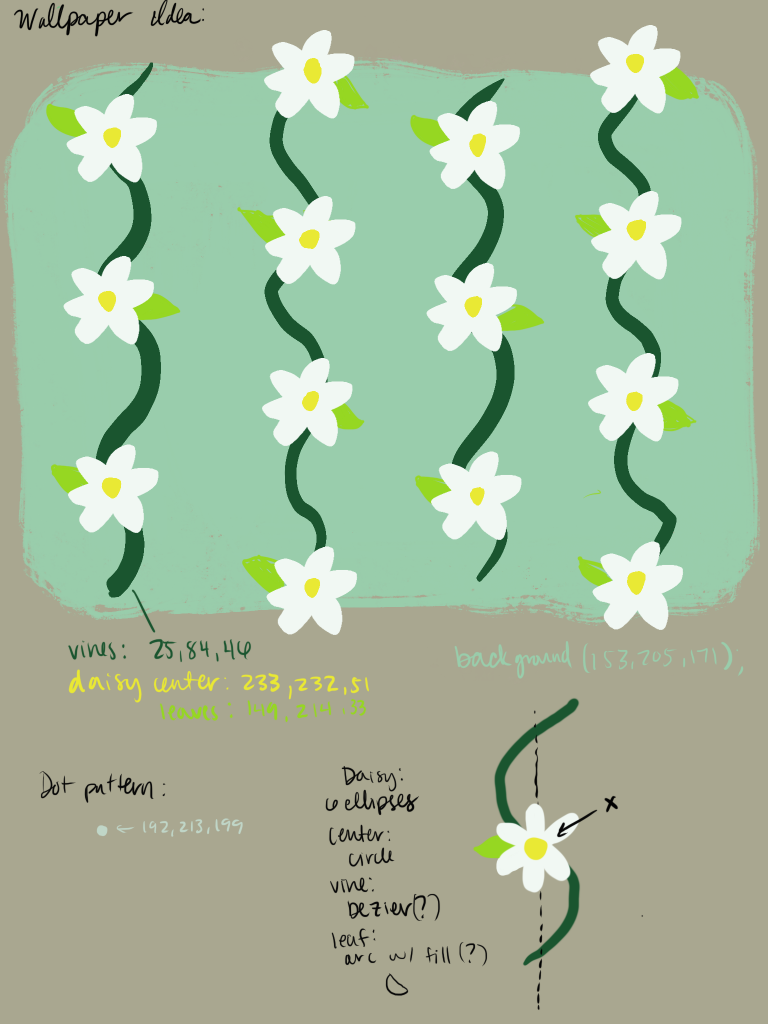
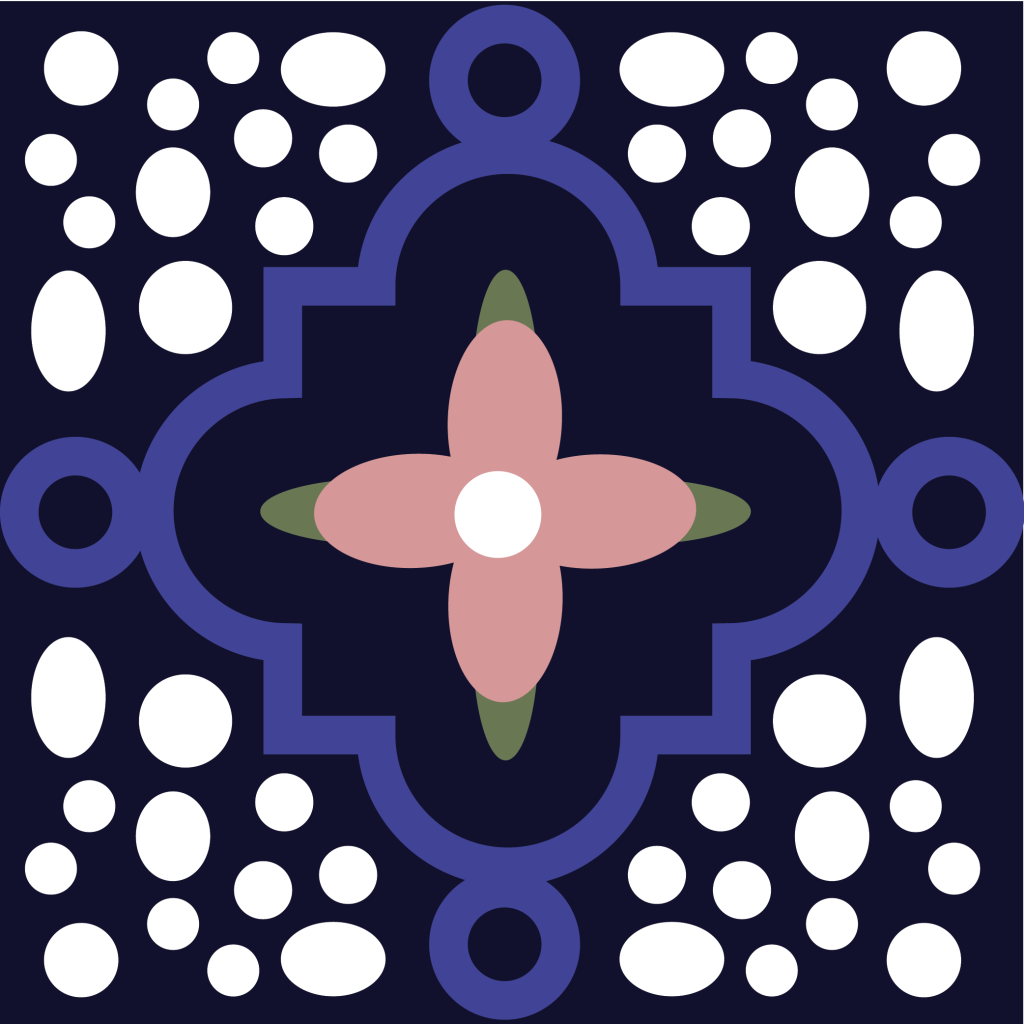
LO 5 – 3D Computer Graphics

“So Long, Farewell” by Ferdinand Vazquez

“So Long, Farewell” is a 3-dimensional graphic piece by Ferdinand Vazquez, Lighting Generalist at Digital Domain.

Described as a “still life rendering using Maya and Mental Ray”, this project depicts a realistic bird’s-eye view of assumably a dining table and a variety of different accessories. By the multiple sketches that the artist presents at the bottom of the project, Vazquez shows the process that he followed and the applications that he used to create such piece. These applications include Autodesk Maya (Maya), a 3-dimensional computer animation software with powerful modeling, rendering, simulation, texturing, and tools, as well as Mental Ray, a production-quality ray tracing application for 3-dimensional rendering.

As portrayed in the piece, Vazquez’s artistic abilities are completely evident, from the appropriate shading and lighting to the intricate details of every aspect of the picture. All of these qualities contribute to the graphic piece’s overall success in achieving realism and imitation of a real-life perspective.

Project 5-Wallpaper

I was inspired by the floral wallpapers that were in the archive and I decided to go with something similar to that. I went with a daisy theme and added vines, leaves, and dots in the background to add a consistent pattern.

wallpaperDownload
var x=50;
var y=50;
var angle=0;

function setup() {
    createCanvas(600, 600);
}

function draw() {
    background(153, 205, 171);
    noStroke();
    //dot background
    for (var i=0; i<=600; i+=25){
        for (var n=0; n<=600; n+=25){
            fill(192, 213, 199);
            circle(i, n, 7);
        }
    }
    //vines
    for (var x=0; x<=600; x+=150){
        push();
        translate(x, 0);
        vines();
        pop();
    }
    //leaves
    for (var x=0; x<=600; x+=300){
        for (var y=0; y<=1500; y+=150){
            push();
            translate(x, y);
            leaves();
            angle+=180;
            pop();
        }
    }
    for (var x=150; x<=600; x+=300){
        for (var y=-50; y<=1500; y+=150){
            push();
            translate(x, y);
            leaves();
            angle+=180;
            pop();
        }
    }
    //daisies
    for (var x=50; x<=750; x+=300){
        for (var y=50; y<=1500; y+=150){
            push();
            daisy(x, y);
            pop();
        }
    }
    for (var x=200; x<=600; x+=300){
        for (var y=0; y<=1500; y+=150){
            push();
            daisy(x, y);
            pop();
        }
    }
    noLoop();
}

function daisy(x, y) {
    push();
    translate(x, y);
    scale(0.9);
    for (var angle=0; angle<360; angle+=15){ //petals
        stroke(210);
        strokeWeight(0.75);
        fill(241, 248, 243,);
        bezier(0, 0, 100, 10, 50, 90, 0, 0);
        rotate(radians(angle));
    }
    fill(233, 232, 51);
    circle(0, 0, 15); //center
}

function vines() {
    stroke(25, 84, 46);
    strokeWeight(12);
    noFill();
    for(var y=0; y<height; y=y+1){
        point(60-25*sin(radians(1.5*y)), y);
    }
}

function leaves() {
    push();
    scale(0.5);
    translate(100, 125);
    rotate(radians(angle+110));
    stroke(25, 84, 46, 150);
    strokeWeight(0.75);
    fill(149, 214, 33);
    bezier(1,0,-47,-80,-47,-120,0,-175);
    bezier(0,-175,47,-120,47,-80,-1,0);
    line(1, 0, 0, -175);
    pop();
}

During this project I offset the daisies to add some interest. I also had to work with bezier curves, which was difficult because I haven’t done that before. I used bezier curves with the petals and leaves. I initially wanted to use ellipses, but I saw someone make a flower in p5.js online using bezier curves, but with pointed tips. I realized that you can have the two anchor points in the same place and make a better looking flower petal.

I used the pointed tips method with two bezier curves next to each other to make the leaves and then played with the sizes of everything using scale(); until I was happy.

Initial sketch

Looking Outwards 05: 3D Computer Graphics

“Portrait of Hope” Leticia Gillett

I decided to look at “Portrait of Hope” by Leticia Gillett. I admire it because the skin looks so realistic yet stylized at the same time. It can be hard to portray mature skin because there are more details to worry about but Gillett did a great job. I don’t know a lot about the algorithms that generated and/or rendered the work but she works at Walt Disney animation and mentions LookDev. Gillett’s piece resembles a lot of the animation styles you see in modern Disney movies, and it is meant to be a portrait of her personal hero Jane Goodall. You can tell that she really admires the person she’s portraying with the soft light and dignified appearance of the person.

Looking Outwards – 05 – 3D Computer Graphics

Jennifer Steinkamp creates digital animations to explore the ideas of space, perception, and motion. Her piece called “Womb” was featured at Talley Dunn Gallery in August 23, 2019.

“Womb” – Talley Dunn Gallery – August 23, 2019

“Womb” joins art, design, and spatial experience into one. Viewers can walk up to an interactive wall of fruit. The fruits follow the movement of the people and continues to move on its own even after people stop moving. I admire how eccentric and lively the piece is. The vibrant colors, coupled with movement and wind sound effects, results in a transformative experience. Steinkamp uses 3D modeling software and Photoshop in order to generate “Womb”. She uses careful calibration to the dimensions of the physical space. All of her work is centered around femininity. Her artistic sensibilities manifest in “Womb” because the piece is all about taking up space. Similar to a womb that takes up space within the body in order to generate life, her artpiece generates transformation, movement, and life as well.

Project-05 Wallpaper

wallpaper
//Rishi Karthikeyan 
//rkarthik
//section B 
//HW 5 Project Floral Wallpaper  

var y = 0;
var x = 0;

function setup() {
    createCanvas(600, 600); 
    background(16, 18, 43);
    text("", 10, 15);

    rectMode(CENTER);

}

function draw() {
	background(16, 18, 43);
	
	push(); 

	translate(60,60);
	for (y = 0; y < 500; y += 120) {
		for (x = 0; x < 500; x +=120) {
			drawPattern(y);
			drawFlower(x, y);
		}
	}

	pop();
}

function drawPattern(y) {
	
	//lighter blue pattern outline 
	noFill();
	fill(16, 18, 43);
	strokeWeight(5);
	stroke(65, 68, 144);
	
	circle(x+26, y, 30);
	circle(x-26, y, 30);
	circle(x, y-26, 30);
	circle(x, y+26, 30);
	rect(x, y, 52, 52);
	circle(x+50, y, 18);
	circle(x-50, y, 18);
	circle(x, y+50, 18);
	circle(x, y-50, 18);

	//dark blue boxes 
	stroke(16, 18, 43);
	strokeWeight(5);
	rect(x, y, 20, 52);
	rect(x, y, 52, 20);

	//white ellipses for background
	fill(255);
	noStroke();

	//ellipses top left 
	circle(x-50, y-50, 9);
	circle(x-25, y-35, 7);
	circle(x-18, y-42, 7);
	circle(x-30, y-45, 9);
	circle(x-40, y-48, 6);
	circle(x-32, y-53, 6);
	circle(x-48, y-34, 6);
	circle(x-52, y-41, 6);
	circle(x-36, y-24, 10);
	ellipse(x-38, y-38, 8, 10);
	ellipse(x-50, y-20, 8, 14);
	ellipse(x-20, y-52, 12, 8);

	//ellipses top right 
	circle(x+50, y-50, 9);
	circle(x+25, y-35, 7);
	circle(x+18, y-42, 7);
	circle(x+30, y-45, 9);
	circle(x+40, y-48, 6);
	circle(x+32, y-53, 6);
	circle(x+48, y-34, 6);
	circle(x+52, y-41, 6);
	circle(x+36, y-24, 10);
	ellipse(x+38, y-38, 8, 10);
	ellipse(x+50, y-20, 8, 14);
	ellipse(x+20, y-52, 12, 8);

	//ellipses bottom left 
	circle(x-50, y+50, 9);
	circle(x-25, y+35, 7);
	circle(x-18, y+42, 7);
	circle(x-30, y+45, 9);
	circle(x-40, y+48, 6);
	circle(x-32, y+53, 6);
	circle(x-48, y+34, 6);
	circle(x-52, y+41, 6);
	circle(x-36, y+24, 10);
	ellipse(x-38, y+38, 8, 10);
	ellipse(x-50, y+20, 8, 14);
	ellipse(x-20, y+52, 12, 8);

	//ellipses bottom right 
	circle(x+50, y+50, 9);
	circle(x+25, y+35, 7);
	circle(x+18, y+42, 7);
	circle(x+30, y+45, 9);
	circle(x+40, y+48, 6);
	circle(x+32, y+53, 6);
	circle(x+48, y+34, 6);
	circle(x+52, y+41, 6);
	circle(x+36, y+24, 10);
	ellipse(x+38, y+38, 8, 10);
	ellipse(x+50, y+20, 8, 14);
	ellipse(x+20, y+52, 12, 8);

}

function drawFlower(x, y) {
	
	//green leaves
	fill(108, 117, 86);
	noStroke();
	ellipse(x, y+10, 10, 30);
	ellipse(x, y-10, 10, 30);
	ellipse(x+10, y, 30, 10);
	ellipse(x-10, y, 30, 10);
	
	//pink flowers 	
	fill(204, 153, 153);
	ellipse(x, y+10, 15, 20);
	ellipse(x, y-10, 15, 20);
	ellipse(x+10, y, 20, 15);
	ellipse(x-10, y, 20, 15);
	
	//blue center 
	fill(65, 68, 144);
	circle(x, y, 10);

}

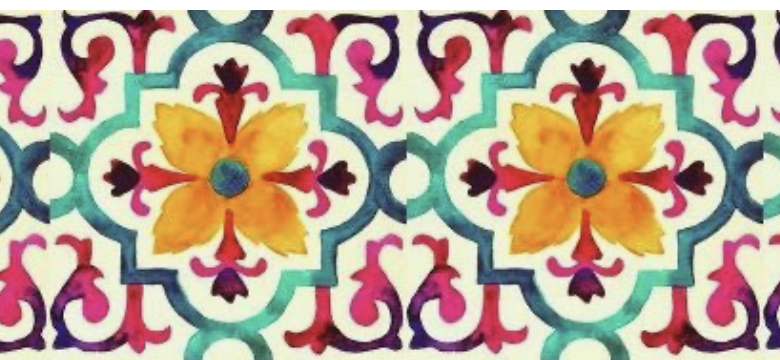
For this project I was inspired by the style of kitchen tiles; I love the way the designs on these create so many different points of visual interest. I wanted to create my own version of it with a darker color scheme. This project was really fun and helped me better understand how to use loops. 

Initial inspiration image
Initial sketch as a pattern on Illustrator

LO-05 3D Computer Graphic

“Skin” Johnathan Zawada, 2016

In 2016, Johnathan Zawada created “Skin” for Flume’s Grammy-winning album of the same name. Zawada created this 3D computer graphic with node structures and algorithms to generate different variations of the flower petals and patterns/textures on the petals. He also used Adobe programs in editing.

I admire the level of detail in this piece. Zawanda created intricate patterns on each petal creating a really interesting composition in contrast to the simplicity of the background. I also admire how his use of color evokes the same emotion as the music from the album. This sync between the imagery and the sound enhances the experience of the song.

Zawada’s artistic sensibilities are seen in this piece through the balance of “light and feathery” like the flowers and “concrete” elements like the silver bells. Zawada states he wanted to “explore ways of making the digital become organic and find tension points between comfort and discomfort.” Zawada went on to create more audiovisuals for Flume’s live shows and future albums.

The Creator’s Project interview with Zawada, 2:08-3:05 discusses “Skin”


Project 5 – Wallpaper

butterandmilk
// Yoo Jin Kim
// 15104 - section D
// yoojink1@andrew.cmu.edu
//Project-05

function setup() {
    createCanvas(490, 490);
    noLoop();
}

function draw() {
	background(145,204,236);
	noStroke();
	//repetition of butter on plate as wallpaper
	for (var x = 0; x < width; x += 80) {
		for (var y = 0; y < height; y += 80 ) {
		push();
		translate(x, y);
		drawButter();
		pop();
		}
	}

	//repetition of milk as wallpaper
	for (var x = 0; x < width; x += 80) {
		for (var y = 0; y < height; y += 80 ) {
		push();
		translate(x - 60, y - 60);
		drawMilk();
		pop();
		}
	}

	//orange juice
	fill(255,140,0);
	ellipse(197, 189, 12, 3);
	quad(191, 189, 203, 189, 203, 202, 191, 202);
	ellipse(197, 202, 12, 3);
}

//milk drawing
function drawMilk() {
	//milk cup - gray
	fill(207, 212, 214);
	ellipse(97, 79, 14, 3);
	quad(90, 79, 104, 79, 104, 103, 90, 103);
	ellipse(97, 103, 14, 3);

	//milk - white
	fill(255);
	ellipse(97, 89, 12, 3);
	quad(91, 89, 103, 89, 103, 102, 91, 102);
	ellipse(97, 102, 12, 3);
}

//butter drawing
function drawButter() {
		//plate dark side - light gray
		fill(212, 211, 206);
		quad(66, 49, 75, 55, 51, 63, 42, 55);

		//plate right light side - white
		fill(233,229,234);
		quad(75, 55, 75, 56, 51, 64, 51, 63); 
		//plate left light side - white
		quad(42, 55, 51, 63, 51, 64, 42, 56);

		//butter light side - light yellow
		fill(255, 229, 155);
		quad(49, 50, 67, 45, 71, 49, 53, 55);
		//butter light side (cut piece)
		quad(49, 56, 53, 61, 46, 62, 42, 57);

		//butter medium dark side - medium dark yellow
		fill(236,195,93);
		quad(49, 50, 53, 55, 53, 61, 49, 56);
		//butter medium side (cut piece)
		quad(42, 57, 46, 61, 46, 62, 42, 58);

		//butter dark side - dark yellow
		fill(218,177,72);
		quad(71, 49, 71, 55, 53, 61, 53, 55);
		//butter dark side (cut piece)
		quad(46, 61, 53, 60, 53, 61, 46, 62);
}

I personally love the butter and milk emojis so I wanted to make a wallpaper containing these emojis. It looks quite simple from far away, but I tried to detail the butter as much as I could to replicate the emoji in my iPhone as closely as possible. I added a slight randomness of orange juice for visual playfulness.

reference image

LO 5 – Computer Graphics

Christoffer Bjerre – Echoes of Light (2016)

Chris Bjerre is a multidisciplinary motion graphic designer whose works are dark, intricate, and maximalistic. His interest in dark and moody atmosphere with a monochromatic palette is seen all throughout his works, especially Echoes of Light. Echoes of Light is an exploration project of geometric infinity. The film shifts from a light (white) to dark (black) scheme. The structures create a chaotic pattern from a simple paradigm.  The top softwares he uses are After Effects, Premier Pro, Adobe Illustrator. This specific project’s renders heavily relied on a software called Octane compiled and produced in a software called Cinema 4D. Bjerre states, “the fractals are just made with any type of geo and multiple instances of moextrude.” I admire the shapes and sharp color contrast in this video the most.

Echoes of Light by Chris Bjerre / Music by Johann Johannsson

Looking Outwards 5: 3D Modeling

A piece from Iris van Herpen’s Sensory Seas collection

The 3D modeling project I chose to highlight is Iris van Herpen’s portfolio in 3D printed fashion. In 2011, Iris van Herpen created intricate fashion designs through 3D modeling which paved the merge between technology and fashion. Iris van Herpen is known as the Dutch fashion designer that fused technology with traditional couture craftsmanship.

A video that shows the 3D modeling processes. Start at 2:08.

What I admire the most about her and her designs is that mathematical computations are difficult enough as it is – but seeing her being able to bring life to such beautiful 3D designs is a whole other story. Her creativity and intelligence is inspiring. It’s really obvious how the themes behind each of her clothing lines really shine through in the way the clothing looks and makes somebody feel. It’s not just some random patterns – you can see the craftsmanship behind them.

LO 05 – 3D Computer Graphics

Peter Tarka

AUDI Q-riosity


Today, I will be talking about a 3D rendering project done by Peter Tarka in the Niche & Wearesoclal design agency for Audi UK. For Audi’s advertising campaign in the UK, Peter was asked to think of a new space for the vehicles to exist in—representing the car’s personality and features in abstract form. I admire this project because through shapes and color, the artist was able to successfully encapsulate the branding of Audi, yet still modernizing the vehicles for the advertising campaign. Peter Tarka effectively creates a new innovative (dreamy) environment, merging the artificial world with the real-life product. I believe that Peter used a 3D rendering software to complete the designs: perhaps C4D, or keyshot, etc. It is also very possible that Peter implemented code in order to streamline his code, or apply physics, or rules for the animation. 

Visit the portfolio here