Project 6 – Abstract Clock

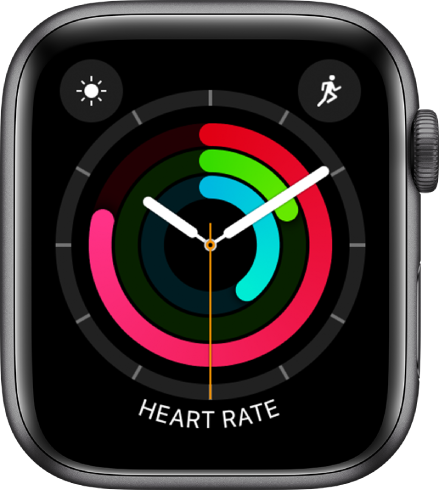
For Project 6, I created a rather simple 24 hr clock but displayed abstractly. I purposely duplicated multiple clocks into one composition to create visual intrigue and guide the eye through the mesmerizing movement of the seconds, minutes, and hours. I was inspired by the Apple Watch and its demonstration of time through simplicity and color.

sketch
function setup() {
    createCanvas(400, 400);
    background(220);
    text("p5.js vers 0.9.0 test.", 10, 15);
    angleMode(DEGREES);
}

function draw() {
    background(38, 84, 124);

    //clock transformation
    //total of nine clocks
    push();
    translate(80, 80);
    scale(0.3);
    rotate(-90);
    clock();
    pop();

    push();
    translate(320, 320);
    scale(0.3);
    rotate(-90);
    clock();
    pop();

    push();
    translate(80, 320);
    scale(0.3);
    rotate(-90);
    clock();
    pop();

    push();
    translate(320, 80);
    scale(0.3);
    rotate(-90);
    clock();
    pop();

    push();
    translate(200, 80);
    scale(0.3);
    rotate(-90);
    clock();
    pop();

    push();
    translate(200, 320);
    scale(0.3);
    rotate(-90);
    clock();
    pop();

    push();
    translate(200, 200);
    scale(0.3);
    rotate(-90);
    clock();
    pop();

    push();
    translate(80, 200);
    scale(0.3);
    rotate(-90);
    clock();
    pop();

    push();
    translate(320, 200);
    scale(0.3);
    rotate(-90);
    clock();
    pop();

}

function one() {
    //seconds function
    let s = second();
    strokeCap(SQUARE);
    noFill();
    strokeWeight(50);
    stroke(6, 214, 160);
    //movement
    let secondHand = map(s, 0, 60, 0, 360);
    arc(0, 0, 100, 100, 0, secondHand);
}

function two() {
    //minute function
    let m = minute();
    strokeCap(SQUARE);
    noFill();
    stroke(255, 209, 102);
    //movement
    let minuteHand = map(m, 0, 60, 0, 360);
    arc(0, 0, 200, 200, 0, minuteHand);
}
 function three() {
    //hour function
    let h = hour();
    strokeCap(SQUARE);
    noFill();
    stroke(239, 71, 111);
    //movement
    let hourHand = map(h % 24, 0, 24, 0, 360);
    arc(0, 0, 300, 300, 0, hourHand);

 }

 function clock() {
    //entire clock
    one();
    two();
    three();
    //center of clock
    fill(255);
    noStroke();
    circle(0, 0, 50);
 }


Inspiration:

LO 06 – Randomness

Nervous System: Jessica Rosenkrantz, Jesse Louis-Rosenberg

Growing Objects (2014)


Growing Objects (2014)

Today, I will be talking about a project called Growing Objects” (2014), by a design studio, Nervous System (Jessica Rosenkrantz and Jesse Louis-Rosenberg). The project features 3D printed sculptures that encompass the structure and patterns present in nature. To create these mesmerizing objects, the designers used “truly” random numbers, where they adopt the logic of the pattern and formations and translating it into scientific theories and algorithms for a design using computational systems. They used posters to show the algorithmic investigations of nature to explain the math, science, and natural inspiration behind the 3D printed objects. Although the “randomness” is based on true observations from nature, these sculptures do not directly mimic specific phenomena, but rather are open-ended explorations of the mathematics and logic behind them. I admire this project because when looking at the 3D printed objects, you can get a feeling of the natural object that it was inspired by. The subtle personalities are translated to the recreated forms, yet still different in an organized, unorganized way. The creator’s artistic abilities show when they take this a step further, incorporating movement to represent “growth” when in motion to enhance user interaction. 

Differential Growth Process (2014)

Visit Portfolio here

LO 05 – 3D Computer Graphics

Peter Tarka

AUDI Q-riosity


Today, I will be talking about a 3D rendering project done by Peter Tarka in the Niche & Wearesoclal design agency for Audi UK. For Audi’s advertising campaign in the UK, Peter was asked to think of a new space for the vehicles to exist in—representing the car’s personality and features in abstract form. I admire this project because through shapes and color, the artist was able to successfully encapsulate the branding of Audi, yet still modernizing the vehicles for the advertising campaign. Peter Tarka effectively creates a new innovative (dreamy) environment, merging the artificial world with the real-life product. I believe that Peter used a 3D rendering software to complete the designs: perhaps C4D, or keyshot, etc. It is also very possible that Peter implemented code in order to streamline his code, or apply physics, or rules for the animation. 

Visit the portfolio here

Project 5 – Wallpaper

sketch
function setup() {
    createCanvas(410, 380);
    background(220);
    text("p5.js vers 0.9.0 test.", 10, 15);
}

function draw() {
    background(241, 224, 197);
    
    //flowers
    for(var column = 1; column <= 7; column += 1) {
        //column 1
        push();
        translate(50, 50 * column);
        flowers(1);
        pop();

        //column 2
        push();
        translate(150, 50 * column);
        flowers(1);
        pop();

        //column 3
        push();
        translate(250, 50 * column);
        flowers(1);
        pop();

        //column 4
        push();
        translate(350, 50 * column);
        flowers(1);
        pop();

        //leaves
       for(var row = 1; row <= 7; row += 1) {
            //row 1
            push();
            translate(100, 50 * row);
            leaves(1);
            pop();

            //row 2
            push();
            translate(200, 50 * row);
            leaves(1);
            pop();

            //row 3
            push();
            translate(300, 50 * row);
            leaves(1);
            pop();
        }

        //dots
        for(var shape = 1; shape <= 40; shape += 1) {
            fill(41, 39, 76);

            //shape 1
            push();
            translate(10 * shape, 8);
            circle(0, 0, 3);
            pop();

            //shape 1
            push();
            translate(10 * shape, height - 8);
            circle(0, 0, 3);
            pop();
        }

        }

function flowers() {

    noStroke();
    push();
    translate(0, -10);
    //pedal color
    fill(255, 104, 107);
    //pedals
    circle(-10, -4, 20);
    circle(10, -4, 20);
    circle(0, -11, 20);
    circle(8, 8, 20);
    circle(-8, 8, 20);
    //center pedal
    fill(247, 230, 48);
    circle(0, 0, 10);
    pop();

}

function leaves() {
    fill(0, 168, 120);
    noStroke();

    push();
    translate(0, -10);
    rotate(radians(320));
    arc(0, 0, 27, 7, 0, PI, OPEN);
    arc(0, 0, 27, 7, PI, 0, OPEN);
    pop();


}

}

For this project, I wanted to create a simple, yet visually intriguing wallpaper. I was inspired by Tyler the Creator’s clothing brand, Golf. The simple shapes are repeating patterns are attractive to the eye.

I used for loops to complete the project. I first had to create a function for the different components in the design, such as the flower, the leaves and the dots. Then, using the for loop, I just called the functions and translated it accordingly.

Tyler the Creator – Golf

LO 04 – Sound Art

Estudio Guto Requena

Noíze Chairs


Noize Chair, Sao Paulo, Brazil 2012

Today, I will be talking about a project called Noíze Chair (São Paulo, Brazil 2012) by Guto Requena. The Noíze Chair was digitally conceived from the merge of sounds captured in the streets of Sao Paulo with a Brazilian design Icon. The Giraffe Chain by Lima Bo Bardo, Marcelo Ferraz, and Marcelo Suzuki was digitally modeled in 3D, a genuine reproduction of its physical model. This digital model was deformed through its fusion with audio files collected at Santa Ifigênia Street – Downtown Sao Paulo. The result is a manifest-chair, that instigates reflection beyond the act of sitting. The digital file with the audio and the chair was then 3D printed. City voices, suburban noises and the resonance of concrete Braizilian design landmarks is placed in a piece that exceeds the normal design process. I admire this project because it merges Product design with culture, and history of the geological location. The end result is not only a visually effective design, but a piece that carries so much meaning and story behind it. The multiple recorded city noises are overlapped and average, then the sound waves are reflected on the chair as a “shockwave.” It is clear to see Guto Requena’s artistic abilities manifest in his piece through his thoughtful process and understanding of culture and providing a new product to experience it in a different way. 

View Portfolio here

Project 4 – String Art

sketch
var dx1;
var dy1;
var dx2;
var dy2;
var numLines = 100;
var angle = 0;

function setup() {
    createCanvas(400, 400);
    background(220);
    text("p5.js vers 0.9.0 test.", 10, 15);
}

function draw() {
    background(0);
    stroke(255);
    strokeWeight(0.25);

    dx1 = (0)/numLines;
    dy1 = (400)/numLines;
    dx2 = (400)/numLines;
    dy2 = (0)/numLines;
    var x1 = 0;
    var y1 = 10;
    var x2 = 0;
    var y2 = 400;

    for (var i = 0; i <= numLines; i += 1) {

        //bottom left
        line(x1, y1, x2, y2);
        //top right
        line(x1 + 400, y1, x2, y2 - 400);
        //bottom left 2
        line(x1 + 400, y1 + 400, x2 - 400, y2 - 400);
        //top right 2
        line(x1, y1 - 400, x2 + 400, y2);
        //mouse movement  
        line(x2, y1, x1, mouseY);
        line(x2, y1, x1 + 400, mouseY);

        //opacity change
        if(mouseX > 0) {
            stroke(max(mouseX, 0));
        }
        x1 += dx1;
        y1 += dy1;
        x2 += dx2;
        y2 += dy2;

    }

    
}

I was inspired by geometric lines, and parabolic curves.

Project 3 – Dynamic Drawing

sketch


function setup() {
    createCanvas(400, 400);
    rectMode(CENTER);
}

function draw() {
    background(30, 30, 40);
    noStroke();
    translate(200, 200);
    let angle = mouseY;
    rotate(radians(angle));
    //rectangle
    translate(-200, -200);
    fill(221, 115, 115);
    var m = max(min(mouseX, 400), 0);
    var size = m * 350.0 / 400.0;
    rect(10 + m * 190.0 / 400.0, 200.0,
         size/2, size/2);
    fill(234, 217, 76);
    size = 350 - size;
    rect(200 + m * 190.0 / 400.0, 200.0,
         size/2, size/2);
    //circles
    fill(209, 209, 209);
    var m = max(min(mouseY, 400), 0);
     var size = m * 350.0 / 400.0;
    circle(10 + m * 190.0 / 400.0, 200.0,
         size/2);
    fill(81, 163, 163);
    size = 350 - size;
    circle(200 + m * 190.0 / 400.0, 200.0,
         size/2);
    //small circle
    var m = min(min(mouseX, 400), 0);
    var size = m * 350.0 / 400.0; 
    fill(100, 178, 200);
    size = 250 - size;
    circle(m * 190.0 / 400.0, 200.0,
         size/10);
    //small circle pink
    var m = min(min(mouseX, 400), 0);
    var size = m * 350.0 / 400.0; 
    fill(240, 178, 200);
    size = 250 - size;
    circle(width - (m * 190.0 / 400.0), height - (200.0),
         size/10);
    //vertex circles
     fill(59, 53, 97);
    var m = max(min(mouseY, 400), 0);
     var size = m * 350.0 / 400.0;
    circle((10 + m * 190.0 / 400.0) + 100, (200.0) + 100,
         size/5);
    fill(196, 224, 249);
    size = 350 - size;
    circle((200 + m * 190.0 / 400.0) - 100, (200.0) - 100,
         size/5);
    //other vertex circles
     fill(171, 73, 103);
    var m = max(min(mouseY, 400), 0);
     var size = m * 350.0 / 400.0;
    circle(width - ((10 + m * 190.0 / 400.0) + 100), height - ((200.0) + 100),
         size/5);
    fill(173, 246, 177);
    size = 350 - size;
    circle(width - ((200 + m * 190.0 / 400.0) - 100), height - ((200.0) - 100),
         size/5);

}

I was inspired by random movements of shapes and the pattern that could be formed from it. The color palette was a big factor in this project.

LO 03 – Computational Fabrication

John Edmark

Blooms: Strobe-Animated Sculptures


Blooms: Strobe-Animated Sculptures

Today, I will be taking a look at John Edmark’s 3D printed sculpture, Bloom. These sculptures are designed to animate when spun under a strobe light. The animation is achieved by progressive rotations of the golden ratio. This project caught my attention because it is mostly inspired by nature, through his use of the golden ratio which can be found in pinecones and sunflowers. The sculpture is satisfying to look at, but also very discomforting at the same time. The movement and flexibility from a plastic object is very provocative and unexpected. I believe that the author used some sort of an intricate variable system to map out the shapes before 3D printing. The creator’s artistic sensibilities are present in the final form not only through the visually appealing outcome, but also his careful and intentional use of scale, and proportions to create these kinetic sculptures. 

View portfolio here

Blooms: Strobe Animated Sculptures

LO 02 – Generative Art

Moka Schitta: Knots


Today I will be analyzing generative art created by Moka Schitta. Upon entering his portfolio site, I was greeted by colorful computational designs that reflect the artist’s style. To dive deeper into his/her work, I will be talking about the piece Knots (2020). Knots is a 60 second animation loop of knots that will never untie. Regarding the project, I really admire the pure fact that the artist used code to diversify their designs. The quick processing that is possible with code really elevates his/her work, and generates multiple pieces, which in other mediums, would take a long time to produce. For me personally, the idea of creating multiple versions of one project, generated through code is captivating.  If I had to guess the algorithm used for this piece, perhaps it is done using some sort of “delay” function, and having a colored background as base, and an overlaying an opaque color. And everytime the code is generated, it erases part of the opaque overlay, thus revealing the colorful background, and creating the “knot” shape. The creator’s artistic sensibilities are present and loud in their algorithm. As you can see, the general color scheme of the “knots” are visually appealing, and the concept behind this project is very meaningful. 

View portfolio here

Project 2 – Variable Face

sketch
//Joseph Kim
//Section D
var eyeWidth = 45;
var eyeHeight = 40;
var faceWidth = 200;
var faceHeight = 260;
var mouthWidth = 60;
var mouthHeight = 30;
let eColor = 180;
//eyes
let fColor = 80;
//face
let bgColor = 0;
//background
let mColor = 120;
//mouth
let earColor = 40;
//ear
let hColor = 20;
//hair
let bColor = 0;
//eyebrow
let iColor = 0;
//iris

function setup() {
    createCanvas(640, 480);
    background(220);
    text("p5.js vers 0.9.0 test.", 10, 15);
}

function draw() {
    background(bgColor);
    noStroke();
    fill(fColor);
    rect((width / 2) - (faceWidth / 2), (height / 2) - (faceHeight / 2), faceWidth, faceHeight / 2);
    ellipse(width / 2, height / 2, faceWidth, faceHeight);
    //face

    fill(eColor);
    var eyeLX = width / 2 - faceWidth * 0.25; 
    var eyeRX = width / 2 + faceWidth * 0.25;
    arc(eyeLX, (height / 2) - 10, eyeWidth, eyeHeight, 0, PI, CHORD); 
    arc(eyeRX, (height / 2) - 10, eyeWidth, eyeHeight, 0, PI, CHORD);
    //eyeball

    fill(earColor);
    var earLX = (width - faceWidth) / 2;
    var earRX = width - ((width - faceWidth) / 2);
    arc(earLX, height / 2, 30, 30, PI / 2, radians(270), CHORD);
    arc(earRX, height / 2, 30, 30, radians(270), PI / 2, CHORD);
    //ears

    stroke(bColor);
    strokeWeight(5);
    strokeCap(SQUARE);
    var eyebrowLX = width / 2 - faceWidth * 0.35;
    var eyebrowRX = width / 2 + faceWidth * 0.35;
    line(eyebrowLX, (height / 2) - faceHeight / 6, eyebrowLX + (faceWidth * 0.2), (height / 2) - faceHeight / 6);
    line(eyebrowRX, (height / 2) - faceHeight / 6, eyebrowRX - (faceWidth * 0.2), (height / 2) - faceHeight / 6);
    //eyebrow
    
    fill(iColor);
    noStroke();
    circle((width / 2) - (faceWidth * 0.25), height / 2, 10);
    circle((width / 2) + (faceWidth * 0.25), height / 2, 10);
    //iris
    
    noStroke();
    fill(hColor);
    arc((width - faceWidth) / 2, ((height - faceHeight) / 2), faceWidth, 90, 0, PI / 2, PIE);
    arc(width - ((width - faceWidth) / 2), ((height - faceHeight) / 2), faceWidth, 90, PI / 2, PI, PIE);
    //hair

    noStroke();
    fill(mColor);
    arc((width / 2), (height / 2) + (faceHeight / 4), mouthWidth, mouthHeight, 0, PI);
    //mouth

}

    function mousePressed() {

    faceWidth = random(120, 300);
    faceHeight = random(200, 400);
    eyeWidth = random(20, 70);
    eyeHeight = random(40, 70);
    mouthWidth = random(10, 100);
    mouthHeight = random(10, 80);
    mouthColor = random(30, 200);
    eColor = color(random(255), random(255), random(255));
    fColor = color(random(255), random(255), random(255));
    bgColor = color(random(255), random(255), random(255));
    mColor = color(random(255), random(255), random(255));
    earColor = color(random(255), random(255), random(255));
    hColor = color(random(255), random(255), random(255));
    bColor = color(random(255), random(255), random(255));
    iColor = color(random(255), random(255), random(255));


} 

I first began with the sample code provided on the website. Then, I began customizing the shapes, and added facial features that I thought would be interesting. I found that using variables instead of specific coordinate points are actually easier to work with because I don’t have to be attentive of decimal points. A good part of my process was from trial and error, learning from mistakes. In order to add more visual interest, I had to do some research on how to apply variable color.