![[OLD SEMESTER] 15-104 • Introduction to Computing for Creative Practice](../../../../wp-content/uploads/2023/09/stop-banner.png)
//Name: Hari Vardhan Sampath
//Section: E
//eMail address: harivars@andrew.cmu.edu
//Project-06

function setup() {
    createCanvas(450, 300);
}

function draw() {
    var s = map(second(), 0, 60, 0 , width); //runs from left to right
    var m = map(minute(), 0, 60, 0 , width); //runs from left to right
    var h = map(hour(), 0, 24, height , 0); //runs from bottom to top
    var cR;
    var cG;
    var cB;
    // color caliberation for the background w.r.t. hour
    if (hour() > 0 & hour() < 6) {
        cR = 0;
        cG = 50;
        cB = 100;
    }
    else if (hour() > 6 & hour() < 15) {
        cR = 50;
        cG = 150;
        cB = 250;
    }
    else if (hour() > 15 & hour() < 19) {
        cR = 50;
        cG = 150;
        cB = 250;
    }
    else if (hour() > 19 & hour() < 24) {
        cR = 0;
        cG = 25;
        cB = 51;
    }
    background(cR, cG, cB); // cliberated background

    // grid for second
    for (var xS = 0; xS <= width; xS += width/60) {
        stroke('rgba(10, 10, 10, 0.9)');
        strokeWeight(1);
        line(xS, 200, xS, height);
    }
    // grid for minute
    for (var xM = 0; xM <= width; xM += width/60) {
        stroke('rgba(10, 10, 10, 0.9)');
        strokeWeight(4);
        line(xM, 100, xM, 200);
    }
    // grid for hour
    for (var xH = 0; xH <= width; xH += height/24) {
        stroke('rgba(10, 10, 10, 0.9)');
        strokeWeight(10);
        line(width/2, xH, width - height/2, xH);
    }
    // second runs along the horizontal grid left to right
    push();
    stroke(cR, cG, cB);
    strokeWeight(2);
    line(s, 200, s, height);
    pop();
    // minuit runs along the horizontal grid from left to right
    push();
    stroke(cR, cG, cB);
    strokeWeight(3);
    line(m, 100, m, 200);
    pop();
    // hour runs along the vertical grid from bottom to top
    push();
    stroke(cR, cG, cB);
    strokeWeight(9);
    line(width/2, h, width - height/2, h);
    pop();
}
Category: SectionE
LO6: Random Computational Art
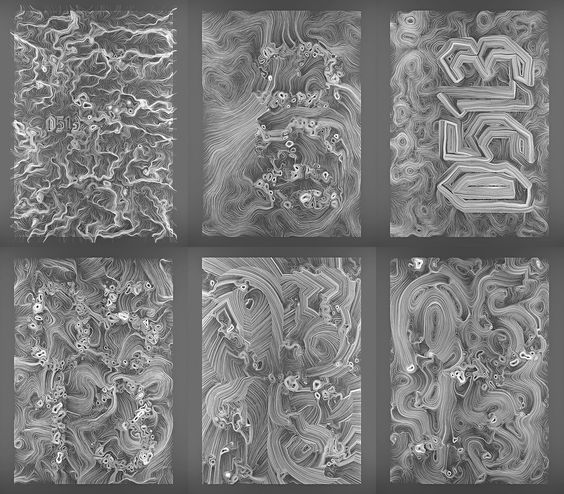
the computational art using randomness that i’m interested in is Wired0513 by deskriptiv.
In this work, the artist uses random lines and curves to form unique patterns that look like weaving wires. Inside those random wires, we can recognize the “0513” texts formed by the wires.
This is very interesting because the artist uses randomness in exploring the uncertainty of how a line will go and where it’s going, but also controlling them by creating a text from it. I think the author first define the text that occupies a certain part of the space in the whole canvas, and then when the line goes by, it just goes around the text rather than across it. This is similar to some kind of ant marching movement, so I think part of the inspiration comes from the nature as well.
This artwork using randomness is also inspiring for architecture work. We usually deal with different landscapes, so this randomness can help us generate different complicated contours and lanscapes, so that we can find some parts where we can build houses.
link here
Project 06
Abstract Clock
For my clock, I attempted to represent time using the method of burning candles. As we progress into the hour, the candle will become shorter and shorter until the 59th minute is reached. Then, the candle will reset to the original height. The light stripes in the background represent the hour of day on a 24-hour basis.
sketch
// Theresa Ye
// Section E
// thye@andrew.cmu.edu
// Project-06

var x = [16,16,8,12,14,15,16,16,24,28,16,16];
var y = [0,0,-8,-24,-16,-12,-24,-32,-20,-8,0,0];

function setup() {
    createCanvas(400, 400);
    frameRate(7);
}

function draw() {
    background(179,217,217);

    // make background stripes (light stripes = hour)
    strokeWeight(10);
    stroke(102,179,179);
    for (var i = 1; i < hour(); i++) {
        line(0,i*height/hour(),width,i*height/hour());
    }

    translate(width/2 - 16, 400 - 16);

    //make candle :> (candle burning = minutes)
    fill('yellow');
    stroke(0);
    strokeWeight(2);
    rect(6,0,20,-300 + 5*minute()+ 3)
    ellipse(16,-300 + 5*minute() + 3,20,10);

    //make flame :>
    var npoints = x.length;
    fill('pink');
    beginShape();
    for (var i = 0; i < 12; i++) {
        curveVertex(x[i] + random(-3,3),-300 + 5*minute() + y[i] + random(-3,3));
    }
    endShape(CLOSE);
}
Looking Outwards 06
Randomness.
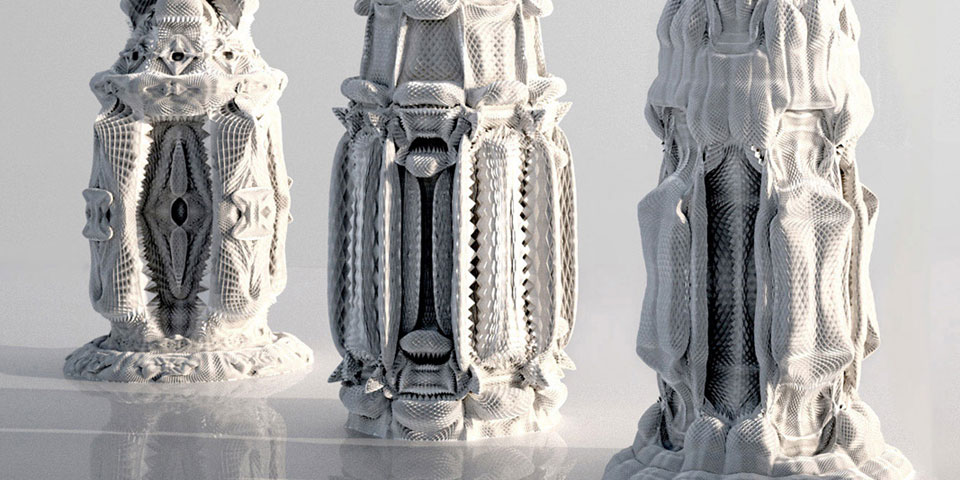
I find the architect, Michael Hansmeyer’s work to be especially interesting. Hansmeyer is an architect who creates generative design through what he calls “happy accidents” that result from randomness. He uses computer algorithms to generate and fabricate architectural forms that are then 3d-printed. He believes that the combination of randomness, computation, and fabrication allows for inventive ways to convey space and sensations.
“Architecture should surprise, excite and irritate”. The complexity of modern architecture does not long for a meticulous drawing by hand, but rather an abstract, open-minded, computational approach. Hansmeyer’s works are all extremely fine and beautiful, with new and unique objects and ways of assembly. Structures, surfaces, and interactions between them are highly detailed and create extreme visual stimulation.
Generated 3D Scene
I am interested in David Mignot’s work in using python codes to generate a series of objects in Blender. The randomness is expressed through the random function to vary the type, height, and material of objects. Each time the function creates a different rendered scene that would take days to model by hand. David expressed his artistic sensibilities in attempting to control the randomness of variables so that the final result looks harmonic. It showcases how randomness needs to be controlled in computational art so that the generated work still looks “designed” rather than messy and purely random.
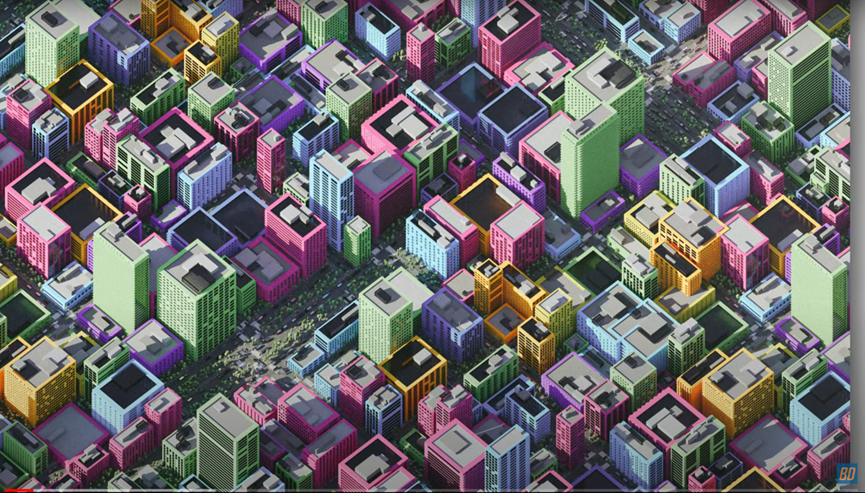
The work intrigues me in terms of creating generative art in 3d forms. Typically, Blender is used for 3d modeling individual objects for the CG industry. However, David opened up a new possibility in utilizing randomness to generate 3d scenes by coding, which might be a helpful method to create large repetitive scenes quickly.
Abstract clock
This is my abstract clock, I try to record my schedule in a day. Like during the day, I typed notes, or during the night, I drank coffee. The hour plays a role in changing the background color, the minute plays a role in changing the scene content, and the second plays a role in the flicking of elements.
//Jason Jiang
//Section E


function setup() {
    createCanvas(400, 400);
    colorMode(HSB)
    }


function draw() {
//Setting scenes for different time
    if(hour()>=0 & hour()<=6){
        sleep()
    }
    if(hour()>=6 && hour()<=18){
        note()
    }
    if(hour()>=18 && hour()<=24){
        coffee()
    }
}

//0:00-6:00
function sleep(){
    var secondcount = map(minute(), 0, 60, 0, 3600)+second()
    var c = map(hour(), 0, 6, 0, 100)
    var h = map(secondcount, 0, 3600, 0, 90)

    //Changing background color per hour
    background(80, 100-c, 100)

    //Drawing battery
    noFill();
    strokeWeight(10)
    rect(width/2-25, height/2-50, 50, 100)
    rect(width/2-7.5, height/2-60, 15, 5)

    //Changing color and height of battery per second, the battery becomes full per hour
    strokeWeight(0)
    push()
    translate(width/2, height/2)
    rotate(radians(180))
    fill(255-c, c, 0)
    rect(-20, -45, 40, h)
    pop()
    //Drawing lightning
    lightning()
}

//Flickering lightning per second
function lightning(){
    if (second()%2==0){
        push()
        translate(width/2, height/2)
        strokeWeight(8)
        rotate(radians(-10))
        line(10, -25, -10, 0)
        line(-10, 0, 10, 0)
        line(10, 0, -10, 25)
        pop()
    }
}

//6:00-18:00
function note(x, y, m){
    var secondcount = map(minute(), 0, 60, 0, 3600)+second()
    var m = floor(map(minute(), 0, 60, 0, 10))
    var x = map(secondcount, 0, 3600, 0, 340)
    var y = 10+m*40
    var c = map(hour(), 6, 18, 0, 100)
    //Changing background color per hour
    background(30, c, 100)

    //Changing line length per second, a row takes 6 minutes
    fill(50)
    strokeWeight(0)
    rect(25, y, x, 15)
    strokeWeight(5)

    //Flickering line per second
    if(second()%2==0){
        line(x+30, y-5, x+30, y+20)
        }
    //Adding lines for previous minutes
    for(var i=0; i<m; i++){
        strokeWeight(0);
        rect(25, 10+i*40, 340, 15)
        }
}

//18:00-24:00
function coffee() {
    var secondcount = map(minute(), 0, 60, 0, 3600)+second()
    var c = map(hour(), 18, 24, 0, 100)
    var h = map(secondcount, 0, 3600, 0, 140)

    //Changing background color per hour
    background(200, c, 50)

    //Drawing coffee cup
    fill(20, 50, 40);
    strokeWeight(10)
    rect(width/2-50, height/2-50, 100, 150)
    noFill();
    strokeWeight(15)
    rect(width/2-92.5, height/2-10, 40, 60)
    strokeWeight(0)
    fill(255)

    //Changing height of coffee per min
    rect(width/2-45, height/2-45, 90, h)

    //Adding heat
    heat()
}

//Flickering heat per second
function heat(){
    strokeWeight(6)
    noFill()
    var w = width/2
    var h = height/2
    if (second()%2==0){
        for(i=0; i<3; i++){
            bezier(w-30, h-70, w-20, h-80, w-40, h-100, w-30, h-110)
            w+=30
        }
    }
}Project 05 – wallpaper
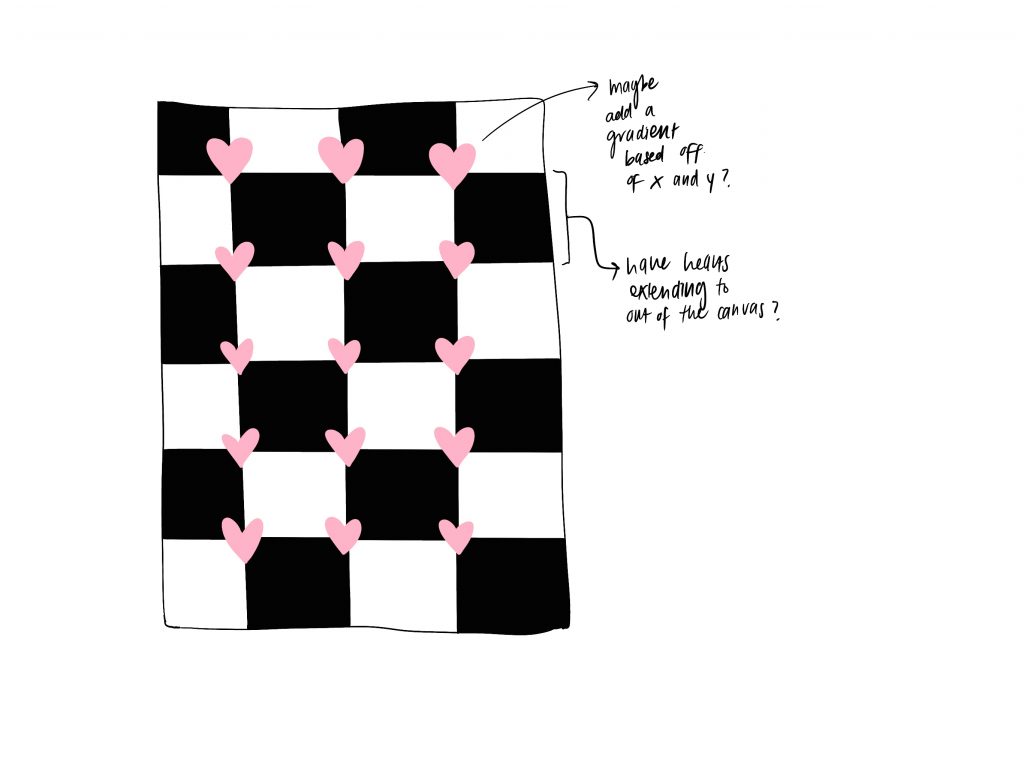
I wanted to make a pattern that I would actually wear: currently the patterns I am into are checkers, and I have been loving colored hearts (typically 3D and glossy) in my graphic design. I decided to combine the two together to make my wallpaper, paying attention to make the hearts are on the corners of the checkers.
sketch
function setup() {
    createCanvas(320, 320)
    background(220);
    text("p5.js vers 0.9.0 test.", 10, 15);
}
s=40;
function draw () {
    rectMode (CORNER);
    for (var row = 0; row <8; row +=1) {
        for (var col = 0; col <8; col += 1) {
            fill (((row+col)%2) *255);
            rect (col*40, row*40, 40, 40);
        }
    }
    for (x = 0; x < width+80; x += s) {
    for (y = 0; y < height+40; y += s) {
      fill(310*x/width, 100, 255);
      heart(x+s/2-20, y+s/2-30, s/2);

    }
  }
}

function heart(x, y, size) {
  beginShape();
  vertex(x, y);
  bezierVertex(x - size / 2, y - size / 2, x - size, y + size / 3, x, y + size);
  bezierVertex(x + size, y + size / 3, x + size / 2, y - size / 2, x, y);
  endShape(CLOSE);
}
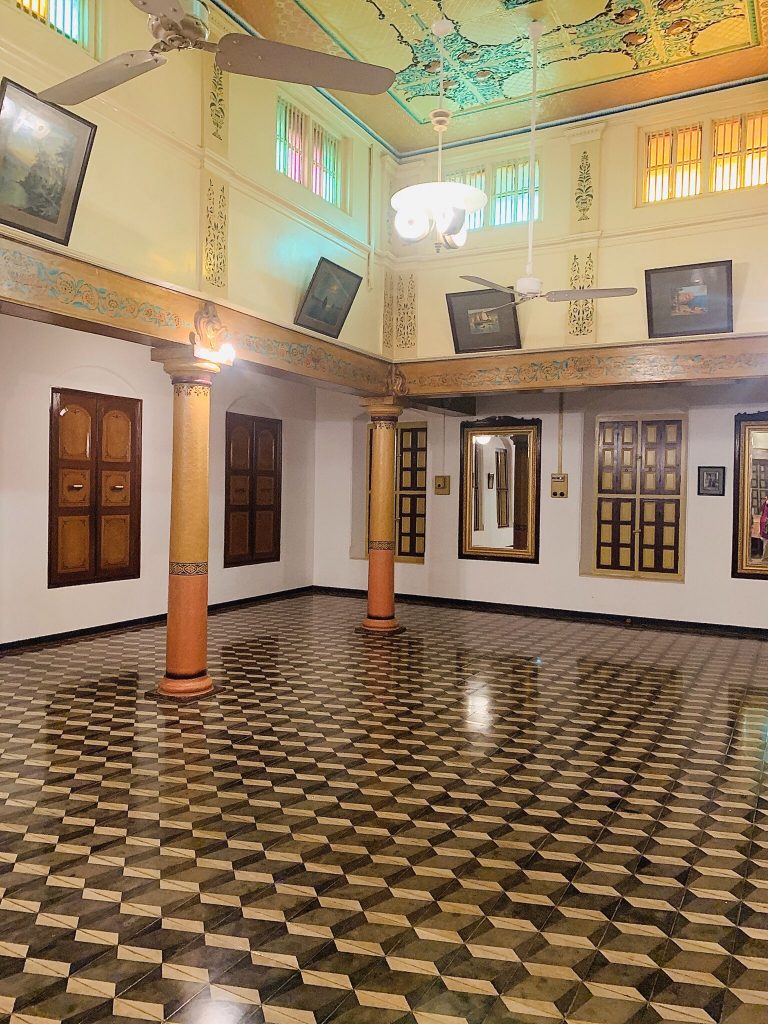
Project 05: Wallpaper/Floor Tiles
Inspired by the South Indian – Chettinad’s Athangudi tiles
//Name: Hari Vardhan Sampath
//Section: E
//eMail address: harivars@andrew.cmu.edu
//Project-05

function setup() {
    createCanvas(600, 550);
    background(0); // black
}

var r = 10; // initialize red
var g = 10; // initialize green
var b = 10; // initialize blue

function draw() {
    drawGrid();
    noLoop(); // to mainitain gradient
}


function drawGrid() {
    var s = 50; //side of the cube
    for (var y = 0; y <= height; y += s + s/2) {
        var green = 5; //initialize green
        for (var x = 0; x <= width; x += s) {
            fill(r, g, b);
            cube(x, y, s);
            r += 3 //increment red
            g += 2 //increment green
            b += 1 //increment blue
        }
    r += 2 //increment red
    b += 3 //increment blue
    }
}

function cube(x, y, s){
    // first face of the cube with colormix of r & g
    push();
    translate(x, y);
    noFill();
    rotate(radians(30));
    stroke(2);
    fill(r, g, 0);
    quad(0, 0, s, 0, s/2, s*sqrt(3)/2,
            -s/2, s*sqrt(3)/2) ;
    pop();
    // second face of the cube with colormix of g & b
    push();
    translate(x, y);
    rotate(radians(30 + 120));
    stroke(2);
    fill(0, g, b);
    quad(0, 0, s, 0, s/2, s*sqrt(3)/2,
            -s/2, s*sqrt(3)/2) ;
    pop()
    // third face of the cube with colormix of r & b
    push();
    translate(x, y);
    rotate(radians(30 + 120 + 120));
    stroke(2);
    fill(r, 0, b);
    quad(0, 0, s, 0, s/2, s*sqrt(3)/2,
            -s/2, s*sqrt(3)/2) ;
    pop()
}Project 5: Wallpaper
Red Textile Design
The most challenging part of the project was getting the gradients and the for loops to work properly.
sketch – Copy
// Ana Furtado
// Section E
// Project 5 Textile


function setup() {
    createCanvas(570, 600);
    background(255); // white background
}

function draw() {
    noStroke();
    fill(0,0,0);
    rect(0,0,600,20);
    fill(0,0,0);
    rect(0,580,600,20);
    long()
    lines()
    whitecircles()
    whitecircles_1()
    circles()
    noLoop();
}


function long() { //black to red to black ellipses
    var red = 20

    for (var y = 40; y < 600; y += 40) {
        if (y <= 300){
            red+=20
        } if (y>= 300) {
            red -= 20;
        }
        for (var x = 0; x < 600; x += 95*2) {
            //noStroke()
            stroke(0);
            strokeWeight(7);
            fill(red, 0, 0);
            ellipse(x,y,190,40);
        }
    }
}

function circles() { //red to black to red circles and random red smaller circles
    var red2 = 255
    for (var y = 0; y < 700; y += 40) {
        if (y <= 300){
            red2-=35;
        } if (y>= 300) {
            red2 += 35;
        }
        for (var x = 0; x < 600; x += 95) {
            stroke(0);
            strokeWeight(1);
            fill(red2, 0, 0);
            circle(x, y, 30);
            fill(random(0,255),0,0);
            circle(x,y,15)
        }
    }

}

function whitecircles() { //white inbetween circles
    for (var y = 60; y < 700; y += 40) {
        for (var x = 50; x < 600; x += 95) {
            stroke(0);
            strokeWeight(.75);
            fill(255);
            circle(x, y, 12);
        }
    }

}
function whitecircles_1() { //row 1 white inbetween circles
    for (var y = 20; y < 60; y += 40) {
        for (var x = 50; x < 600; x += 95) {
            stroke(0);
            strokeWeight(.75);
            fill(255);
            circle(x, y, 12);
        }
    }

}
function lines() { //white lines and thin black lines to make grid
    for (var x = 50; x < 600; x += 95) {
        stroke(255);
        strokeWeight(2);
        line(x,0, x, 600);
        stroke(0);
        strokeWeight(.25);
        line(x,0, x, 600);
        for (var y=60; y<600; y+=40){
            //stroke(255);
            //strokeWeight(2);
            //line(0,20,570,20);
            //line(0,y,570,y);
            //stroke(0);
            //strokeWeight(.25);
            //line(0,20,570,20);
            //line(0,y,570,y);
        }
    }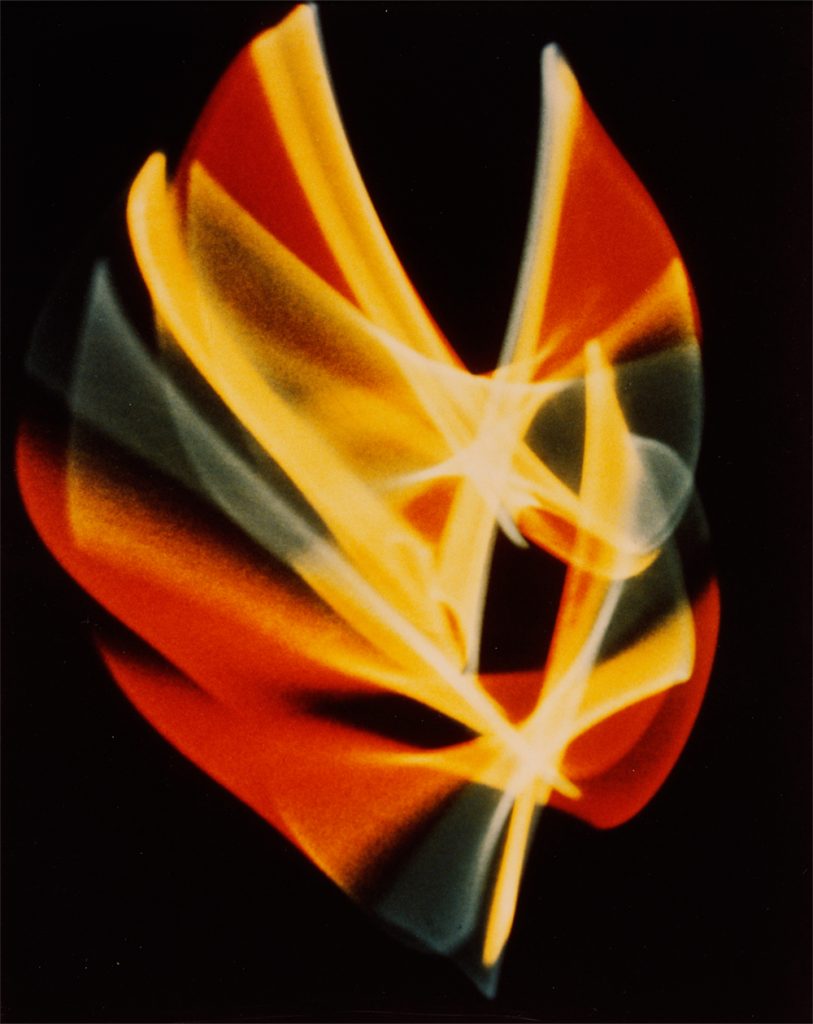
}LO 05: Oscillion by Benjamin Francis Laposky, 1950
Benjamin Francis Laposky was a mathematician, artist and draftsman who is one amongst the early computer graphic visualizer. His work titled Oscillon, a collection of images generated using oscilloscope to manipulate electronic waves. Laposky utilized long exposure photography to capture the movement of these waves that appeared on the screen. These waves were manipulated using cathode ray oscilloscope with sine wave generators and various other electronic circuits that the abstract art. The most interesting thing about Laposky’s work is the abstract quality achieved by geometric precision related to mathematical curves and Lissajous Figures.