Assignment 6: Text-to-Speech Keyboard

Abstract / concept statement

I want to make a mobile keyboard that reads aloud the words typed into it. If someone were to lose their ability to speak, this device could be an easy way for them to quickly communicate by typing what they want to say, since typing has become so natural to most people.

Hardware

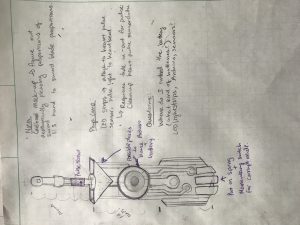
The most crucial element of hardware in my project is the keyboard. After doing some research I believe that using a keyboard with the older PS/2 port I will be able to have my keyboard interact with the arduino. I will also need a speaker and power supply or maybe rechargeable battery (it would be nice to have it all be wireless).

Software

The trickiest part of the software process will probably be the text-to-speech. I have found a library on github that is used for arduino text-to-speech and an example of it being used online so hopefully I wont run into any issues with that. I’ve also found a library for the keyboard.

https://github.com/jscrane/TTS text to speech

https://github.com/PaulStoffregen/PS2Keyboard ps/2 keyboard

Order of construction and testing

1. get keyboard input

2. use keyboard input to make text-to-speech happen

3. figure out wireless power supply

4. craft some sort of container that hides wires, leaving just the keyboard and speaker exposed.

I’m not sure if this project is maybe too simple for a final project, but I like this idea because of the accessibility it could provide someone in need. It is possible that I will add to or modify this idea to better suit the assignment if needed.

Final Project Proposal

Abstract

I’d like to make an interactive 3D drawing box. Users can draw an object in 3d space and see their drawing projected onto an interactive cube in real time. It will use Unity, Arduino, a projector, and the Leap Motion Sensor. It is heavily inspired by Ralf Breninek’s project: https://vimeo.com/173940321

As well as Leap Motion’s Pinch Draw:

Image result for pinch draw leap motion

Unfortunately, Pinch Draw is currently only compatible with VR headsets, so it won’t translate directly to my project idea. That’s where I think some of the technical complexity comes in- I will probably have to write my own custom program.

Hardware

  • Projector
  • Cube (made from white foam core)
  • Stand for cube
  • Stepper motor
  • Arduino
  • Leap Motion Sensor
  • Power supply

Software

  • Uniduino
  • Unity
  • Firmata for Arduino
  • Arduino

Order of Construction and Testing

  1. Order supplies and follow tutorials for 3D drawing tutorials for Unity
  2. Connect projector to computer and figure out dimensions/projection logistics for program
  3. Build projection cube
  4. Use Firmata and Uniduino to control Arduino and motor based on Unity output
  5. Put whole project together: project Unity game onto cube, have cube respond to hand gesture commands, finalize user interface
  6. Information poster and artist’s statement for final show

Project 6: Final Project Proposal **Now in Technicolor**

As someone who suffers from variations of moods to put it very plainly I resort to color in my day-to-day life to brighten my mood or change the way I feel about myself. How can color be a projection of you and can it really make you alter your current state? I want to make something larger scale, to the point were a person could fit inside. My concept would be a light installation that you step inside and cameras can detect what color you are wearing and once detected change the lights in the environment to match the color. I am currently debating if I should have pre assigned lab coats one would put on of simple jewel tones or if I should allow people to enter wearing what ever they are wearing and having the lights respond from there (I might not have the skill to be able to pull that off). I feel that with pre assigned colors I will have a greater degree of control of the environment.

Hardware-

  • Color changing light bulbs (maybe the Phillips hues bulbs because those can be programmed)
  • Some kind of body sensing camera
  • And an enclosed box I would make (thank goodness I’m product design haha)

Software- As of right now I am still figuring that out. Probably something that can also connect to the light bulbs like IFTTT or just the Phillips hues app.

Timeline-

  1. Get the camera to sense movement and just turn 1 light on
  2. Get the camera to sense 1 color and have it turn 1 light on to match that color
  3. Get the camera to sense 1 color and have it turn 2 lights on to match that color
  4. Get the camera to understand there are 3 (maybe 4) colors being worked with and have it be able to sense at least 2 and have lights act accordingly.
  5. Camera can now detect all 4 different colors and lights act accordingly.
  6. Get lab coats with specific colors
  7. Build box
  8. Attach lights and camera and lab coats
  9. Polish!

Final Project Proposal: Transistor Prop

Project fundamentals

My final project can be a cosplay prop that uses phys comp fundamentals to bring the prop closer to functions/behaviors in its original work, enhance static features, and bring others to engage with the great works that these props come from.

Phys Comp Components: Light sensors, IR sensors, mp3 shields, momentary switches, LED light strips

Things that a prop can be modified to do: light up (different patterns of lighting, color, intensity), make sounds/play dialogue, change configuration (physical changes, like add/remove armor, Psychopass gun etc.)

Besides adding to the list of things the prop does, I also want to think more about making a meaningful interaction between user and prop, perhaps through symbolism, theme, addition of a custom mode/feature.

Transistor Sword:

Red’s sword has several tutorials that incorporate physical computing elements already. I really love this game, and it means a lot to me, so I would want to move forward with this project proposal, but understand if it’s already done well.  

Here’s one good example of tutorials to make the phys comp version of the Transistor Sword: http://chrixdesign.blogspot.com/2016/06/transistor-sword-closer-look-at.html

Chris’s version of the sword has two modes of glowing and is sound reactive. However, she doesn’t use an Arduino, and has hacked the project using circuits and components from OTHER devices.

Input = sound

Output = LED light states

Proposal:

Interaction 1:Install a pulse sensor to the handle, outline where a person’s hand should go.

Input = pulse sensor

Output = LED light strips PULSE in time with heartbeat detection


Interaction 2: Corrupt Mode via button

Input: Pressure downwards (press sword into ground)

Output: LED strip color change into corrupt mode (green is normal, red is corrupt), maybe pulse red

State machine would be able to recognize if the sensor or the switch is activated and change sword light color to show sword mode.


I will try to think of ways to make this more interactive, but the purpose of this project would be purely entertainment-focused as a cosplay prop. As a prop, its function can remain purely aesthetic as most props are created to replicate the original work’s as closely as possible and supplement a person’s cosplay project. Giving it the ability to respond to outside stimuli will bring it closer to its function in-game, further pushing it semblance with the original work.


Other Alternatives Considered:

Overwatch Heroes

League of Legend Heroes

Psychopass gun: Yes, lots of dremmel work

Final Project Proposal-Changing of the Seasons

Abstract 

I wanted to create an organic interactive kinetic installation that represented the changing of the seasons, which was mainly inspired by the temperamental weather we are experiencing. It will be a tree that is mounted on a turntable which will spin at different rates depending on the interaction with the user. It will also have leaves that will change color corresponding with the appropriate response. Lastly, the branches will be connected to a pulley system which will determine their angle. The idea is that there will be four settings or ‘seasons’ that will be represented by the tree. I currently have two running ideas for the user interaction. The first requires a motion sensor that will track the speed at which the user walks past the installation and use this information to determine the corresponding season. The second idea relies on the facial expressions or mood of the user.


Hardware

  • Materials for the body of the tree (wire?)
  • (Clear) Acrylic for leaves
  • RGB LEDs
  • High torque motor
  • High precision motor
  • springs
  • PIR Motion sensor or webcam ( depending on direction)
  • at least 2 speakers
  • micro SD Card and adaptor

Software

  • Stores and plays multiple different tracks
  • Use open CV for the facial recognition component if necessary
  • Controls the RGB LEDs and motors

Order of construction and testing:

  1. Make a leaf that can turn different colors using RGB LED
  2. Make turntable with hole in center for wires
  3. Make the trunk of the tree using wires
  4. Make body of tree hollow to mount on turntable
  5. Design housing for the motor that controls branches
  6. Build branches with corresponding leaves
  7. Find way to control multiple LEDs with different settings (different variations of colors for each season)
  8. Figure out how to make the LEDs and motors work at the same time without tangling wires
  9. Figuring out a way to conceal the strings and wires
  10. Learn how to play multiple different tracks on the speakers and determine if one is enough or if two is necessary for the full effect
  11. Learn how to use SD Cards
  12. Mount PIR  and figure out the threshold values
  13. Learn how to use facial recognition software and webcam (determine if it is worth the extra work)
  14. Let other people try it out and see what their reaction/ interaction with it is ( can they figure it out or is it not obvious enough)
  15. Fix everything that doesn’t work
  16. Repeat!


final project: 3D mirror (Aditi Hebbar)

Abstract / concept statement

inspiration is from a project from the MIT tangible media group titled “Moving Blocks Mimic Human Movements” (https://www.youtube.com/watch?v=PTm1e-tJJEg) . I intend to create an 2D array of movable blocks as in the picture below:

Each block would have a single neo pixel LED on top of it. The goal of the project would be to use this array to create a sort of “3D mirror” (the LED’s create the color; the blocks move up or down to add depth) reflecting objects/people front of it. In contrast to the MIT lab project which aims to mimic human movement, this project aims to mimic human appearance.

Hardware

  • Kinect camera (depth sensing is easy with this)
  • Raspberry pi (uses open cv to detect objects/humans, moves blocks/ add colour to LED’s accordingly)
  • Acrylic blocks, have to laser cut (number depends on size of array, TBD)
  • Singular adafruit neopixel LED’s (number depends on size of array, TBD)
  • Multiplexing hardware (need to be able to control numerous blocks and LED’s, unsure of how many/what type)
  • Solenoids/vacuum tubes? to move the blocks, unsure what hardware to use to facilitate easy vertical movement

Software

I’ll need some software that’s able to identify the contours of a person’s body (so I can do cool stuff like add depth with the blocks only to image person’s body), and openCV is perfect for this.

Order of construction and testing

  1. Figure out how to make a single acrylic piece move up and down at different levels, and add the neo pixel LED on top controlling both simultaneously.
  2. Figure out how to multiplex several blocks.
  3. Create a 2D array of blocks with LED’s on top.
  4. Create the multiplex and attach to rpi. Control the movement of the blocks/LEDs efficiently with RPI. Ask for help if required.
  5. Debug, and get feedback at this point.
  6. Figure out how to use the Kinect and openCV to get desired input.
  7. Control Blocks and LEDs with input
  8. show it to someone who isn’t in phys comp and ask them to try it out
  9. incorporate feedback, add aesthetic and make a case if required.
  10. make an information poster for the final show.
  11. write up my artist’s statement for the final show.

Final Project Proposal – Sarika Bajaj

For my final project, I will be making a “mechanical worm” in a cage that responds when someone taps the glass case around it.

My original idea was to make a geometric wood lamp shade that had the ability to “open up” or “collapse” that could be controlled using muscle wire or a motor. However, I wanted something with a bit of a better interaction, so the muscle wire and wood actuation will actually be quite similar still, just packaged in a different story.

I’m thinking for my form, the worm will be placed in a little enclosure as below that will either be filled with a mix of natural and plastic items to create this sense of a mechanical/artificial world.

Hardware:

Wood needed to make the worm
Some type of motor/muscle wire to actuate the worm
Arduino and external power supply
Some type of hand sensing (IR camera?)

Software:

Some software needed to use the body sensing hardware (perhaps, Max that sends signals over OSC to the Arduino)

Order of construction and testing:

  1. create the mechanical system of the worm
  2. actuate the lamp using dc motors or muscle wire for simple movement
  3. set up the “tap” sensing feature
  4. have the worm set up in the cage and create different interactions per type of tap, plus what the worm will be doing in its “normal state”
  5. have the worm tested in an environment with lots of people and see how it works
  6. work out any issues
  7. clean up the final form of the worm and tank

Assignment 6: Final Proposal


Abstract / concept statement

I want to play with the idea of IoT gone wrong – what happens when we make our objects smarter? What if we develop artificial intelligence in our device to the point where our device try to reason about how best to function? As human beings, do we imbue what we create with our flaws?

To do this, I want to create an installation with a couple objects exhibiting this idea.

I’m unsure which ideas to use, but here’s a list of things I might do:

  1. A table or chair that slopes off when you try to use it (made on a micro scale)
  2. A mouse or glass of water that actively hides and avoids being used
  3. A toaster that launches toast far too high
  4. A roomba/roomba-like device that tries to vaccum up things you’re currently using
  5. A fork that swivels out of the way of food when you try to use it to grab something
  6. A cup that tips over once it’s semi-filled
  7. A blanket that shivers or refuses to come off of you
  8. Lights that get sleepy over time, dimming or slacking until they’re shaken awake
  9. A tie that moves on its own, anxiously

Hardware

It depends on what I decide to pick for this project, I might be interested in the super-toaster, but I’m not sure how to implement it. I’ve been considering using a fly-wheel to launch the toast, but unfortunately this might mean I’m unable to toast any bread I put in.

For the mouse that avoids you, I would just a couple distance sensors, and I could move the tail back and forth like a real tail for the mouse.

The table might use some kind of servo or linear actuator to move the legs up and down, and some kind of force sensor to know when you are putting stuff on it.


Software

Idea dependent

Order of construction and testing


  1. Decide on what projects I’ll do, and then buy supplies
  2. reverse engineer any devices I need, and start building prototype
  3. Ask for help with mechanical issues with prototypes
  4. develop working prototype
  5. Work on aesthetic polishing