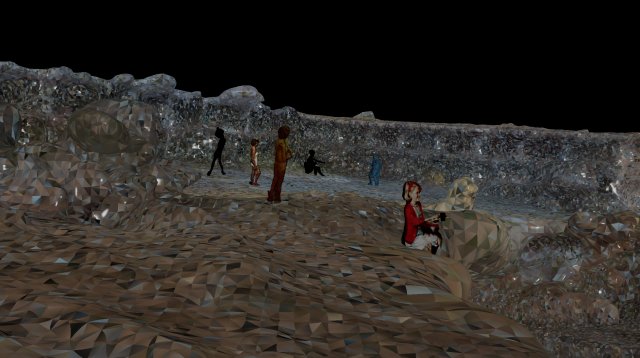
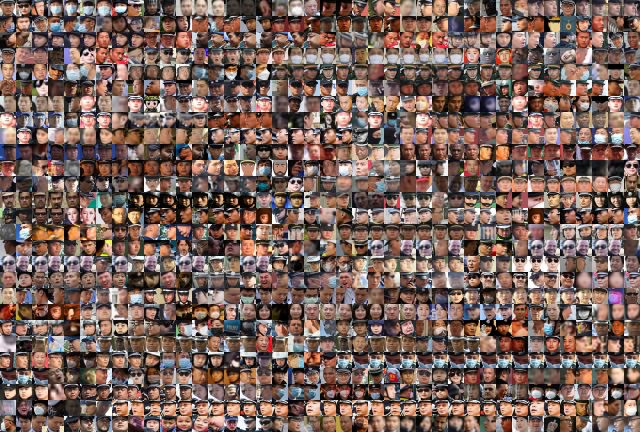
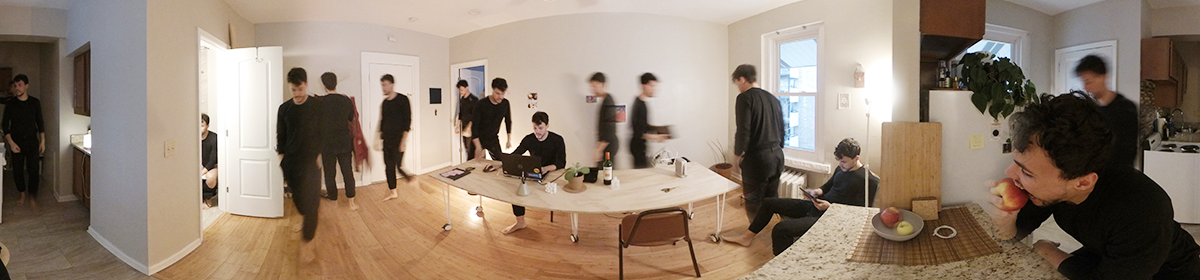
For my final project, I really wanted to subvert the way that I think of history. The way I envision environments or events of the past is mostly through 2D planes – through flat photos and videos. I wanted to use this project as a tool to help me view older spaces in a more dynamic way. I was inspired by Claire Hentschker’s Merch Mulch piece. After viewing her work, I had taken an interest to photogrammetry through archived footage, however I also really wanted to see what an old space would look like if it still had people existing within it.
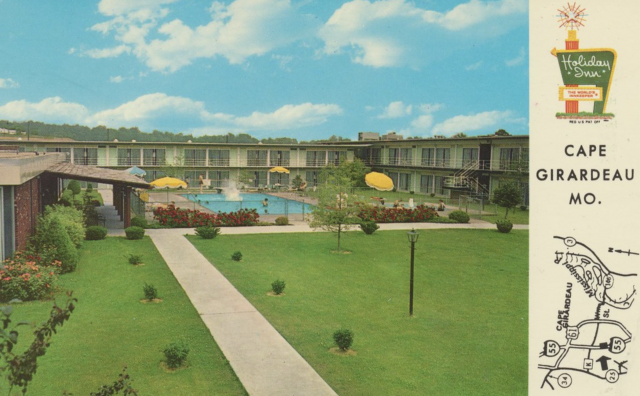
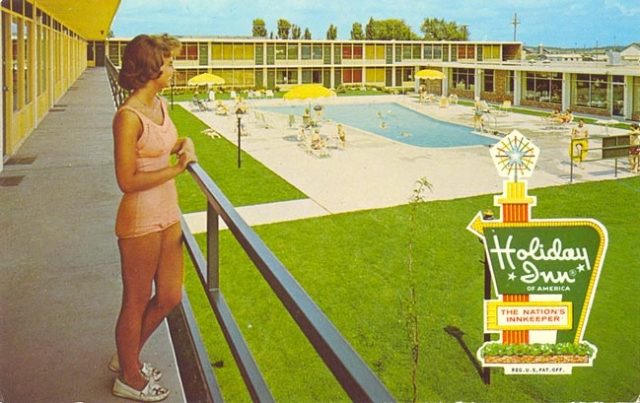
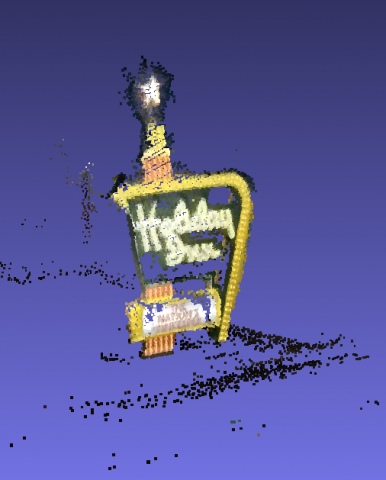
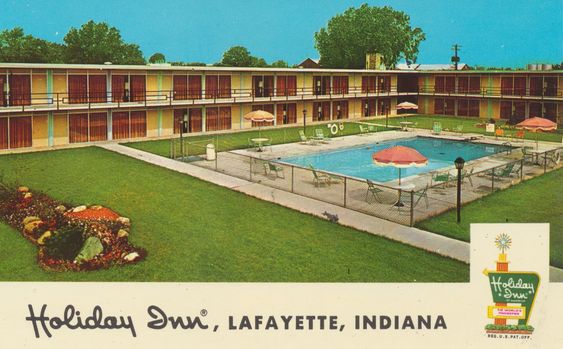
While searching through archives, I found a giant stash of vintage postcards by Holiday Inn – each with almost the exact same hotel layout, but all from different physical locations. I thought that it would be interesting to use the multiple angles these postcards provide to create one “general” 3D Holiday Inn through photogrammetry. However, all of the images were too low in quality and didn’t match up well enough to get a good scan.
z
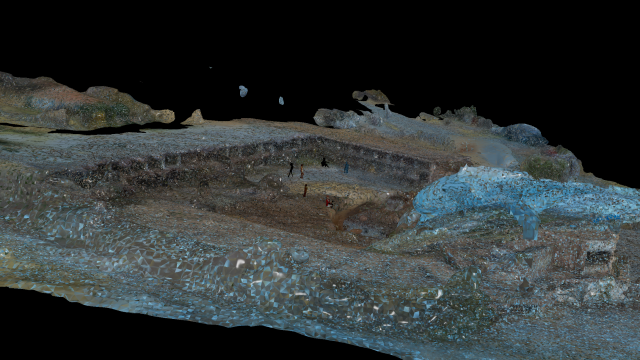
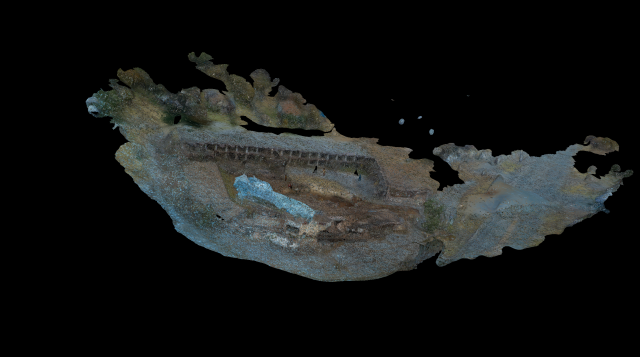
But I luckily just happened to stumble upon a video of someone flying a drone over an abandoned Holiday Inn. I decided that this footage – since it was much better quality than anything else I had gathered- would be the source I would use to recreate the inn.
Using ffmpeg, COLMAP, and Meshlab I was able to create an overall environment that resembles an older Holiday Inn (thankfully the loss of detail during the photogrammetry process smoothed over the modern-day, destruction as an added bonus). I was still very interested in not only making the space 3D, but the people as well. I was able to do this by taking people out of the postcards and extracting their form with PIFuHD. Because of the poor quality, some people came out unrecognizable, but I kept them in anyways.
Right now, the environment just exists as a space, but I hope that later I can somehow make it interactive (either the camera moves or the people within the space) and add more elements like old signage.
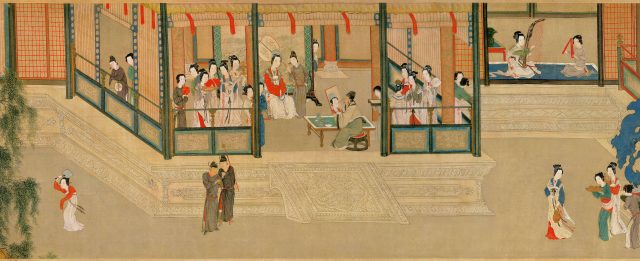
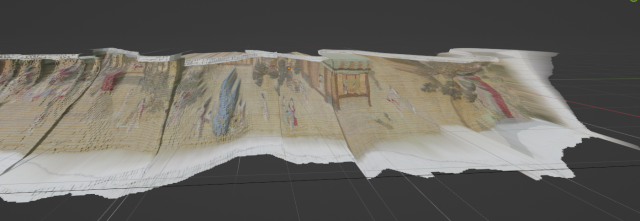
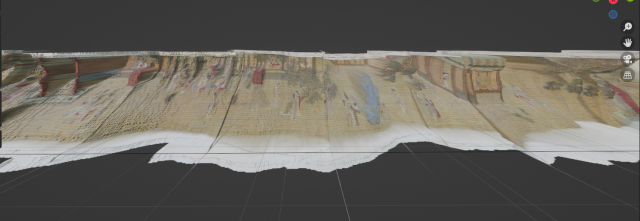
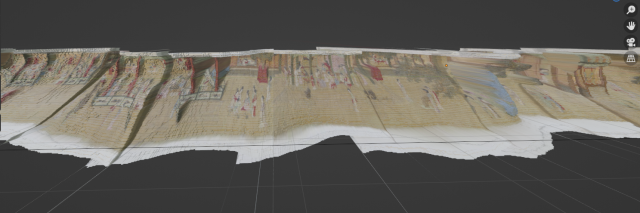
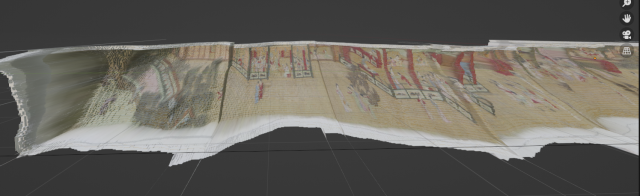
My project is a traversing experience through the 3d version of a scroll painting Spring Morning in the Han Palace.(See image above)Focusing on the study of the experimental perspective technique – the cavalier perspective – use in traditional Chinese painting, the project studies the contrast and connection between the traditional western drawing perspective technique and the eastern drawing perspective technique.
Technique&Workflow:
The first idea of me is to “photogrammetry just through one picture”
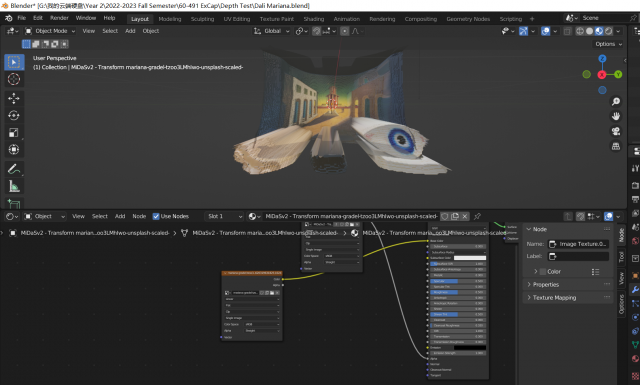
Runway ML for depth estimation + surface displacement in blender
The technique of depth estimation can generate a general gradient of the grey-scaled image from a single picture. The gradient logic is: the white part represents the components that are closer to the camera, and the dark part represents the components that are farther away from the camera. Then I applied the gradient map as a displacement map to the subdivided surface in blender- it will render a “bumpy” surface and created a semi-3D model.
Test Cases:
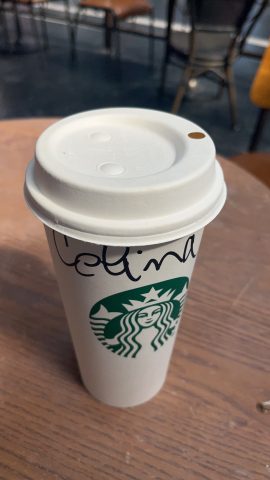
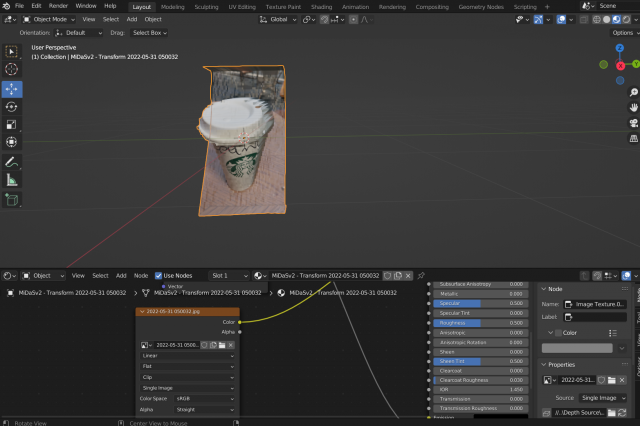
Test Case 1: Coffee Cup
Actual Picture & Depth Estimation Generated Gradient Map
Blender Model
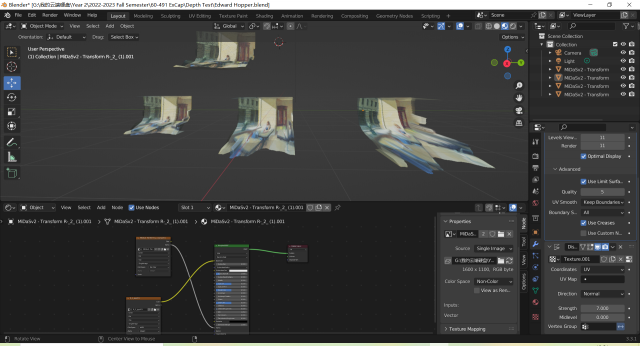
For further study – instead of actual photographs – I choose to process oil paintings, intending to bring out 3D spaces from unreal worlds.
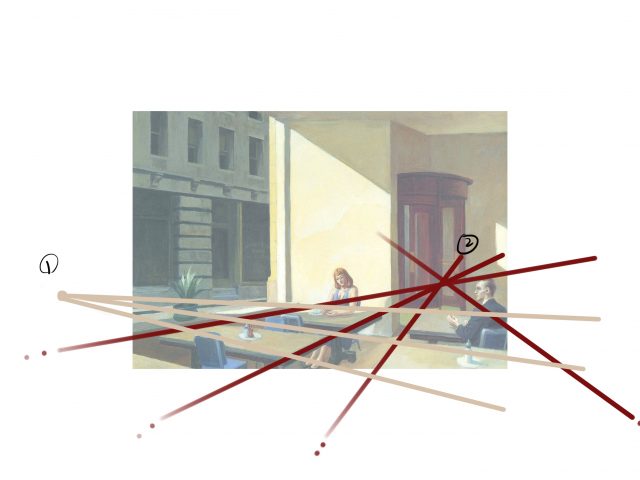
These two models work well because they follow the rule of the classic western drawing technique: perspective. (either 1-point perspective or 2-point perspective that required vanishing points)
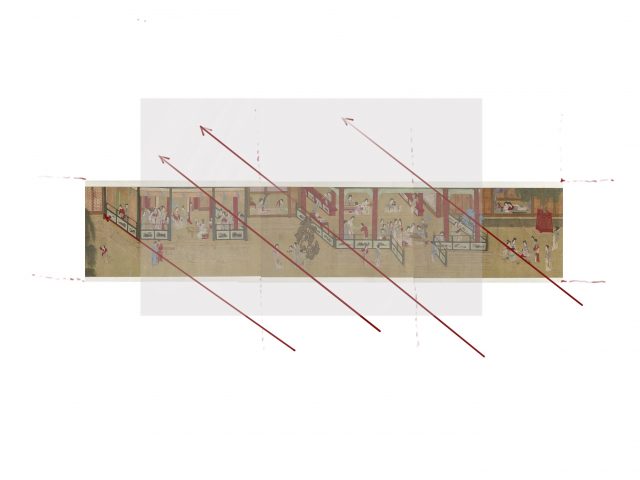
However, in ancient Chinese scroll paintings, the painters do not apply point perspective as a painting technique. They instead use cavalier perspective – also called scattered perspective – in their long scroll paintings.
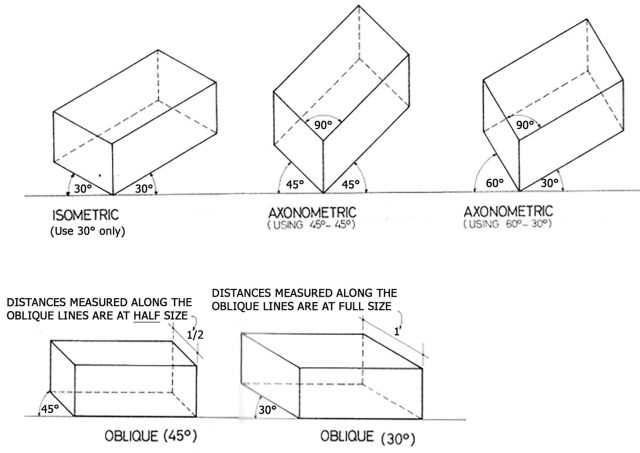
“Oblique Projection is a type of technical drawing that is used for drawing graphical projections of three-dimensional objects on two-dimensional planes. The most common technique used for technical drawing is Oblique Projection.
From the first or second century to 18th-century Oblique Projection was used almost universally by Chinese artists for depicting rectilinear objects such as houses.”
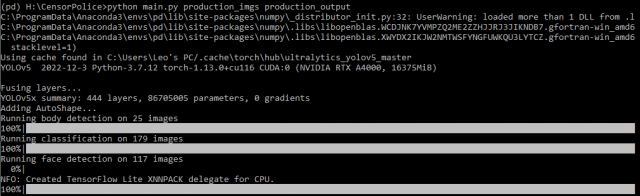
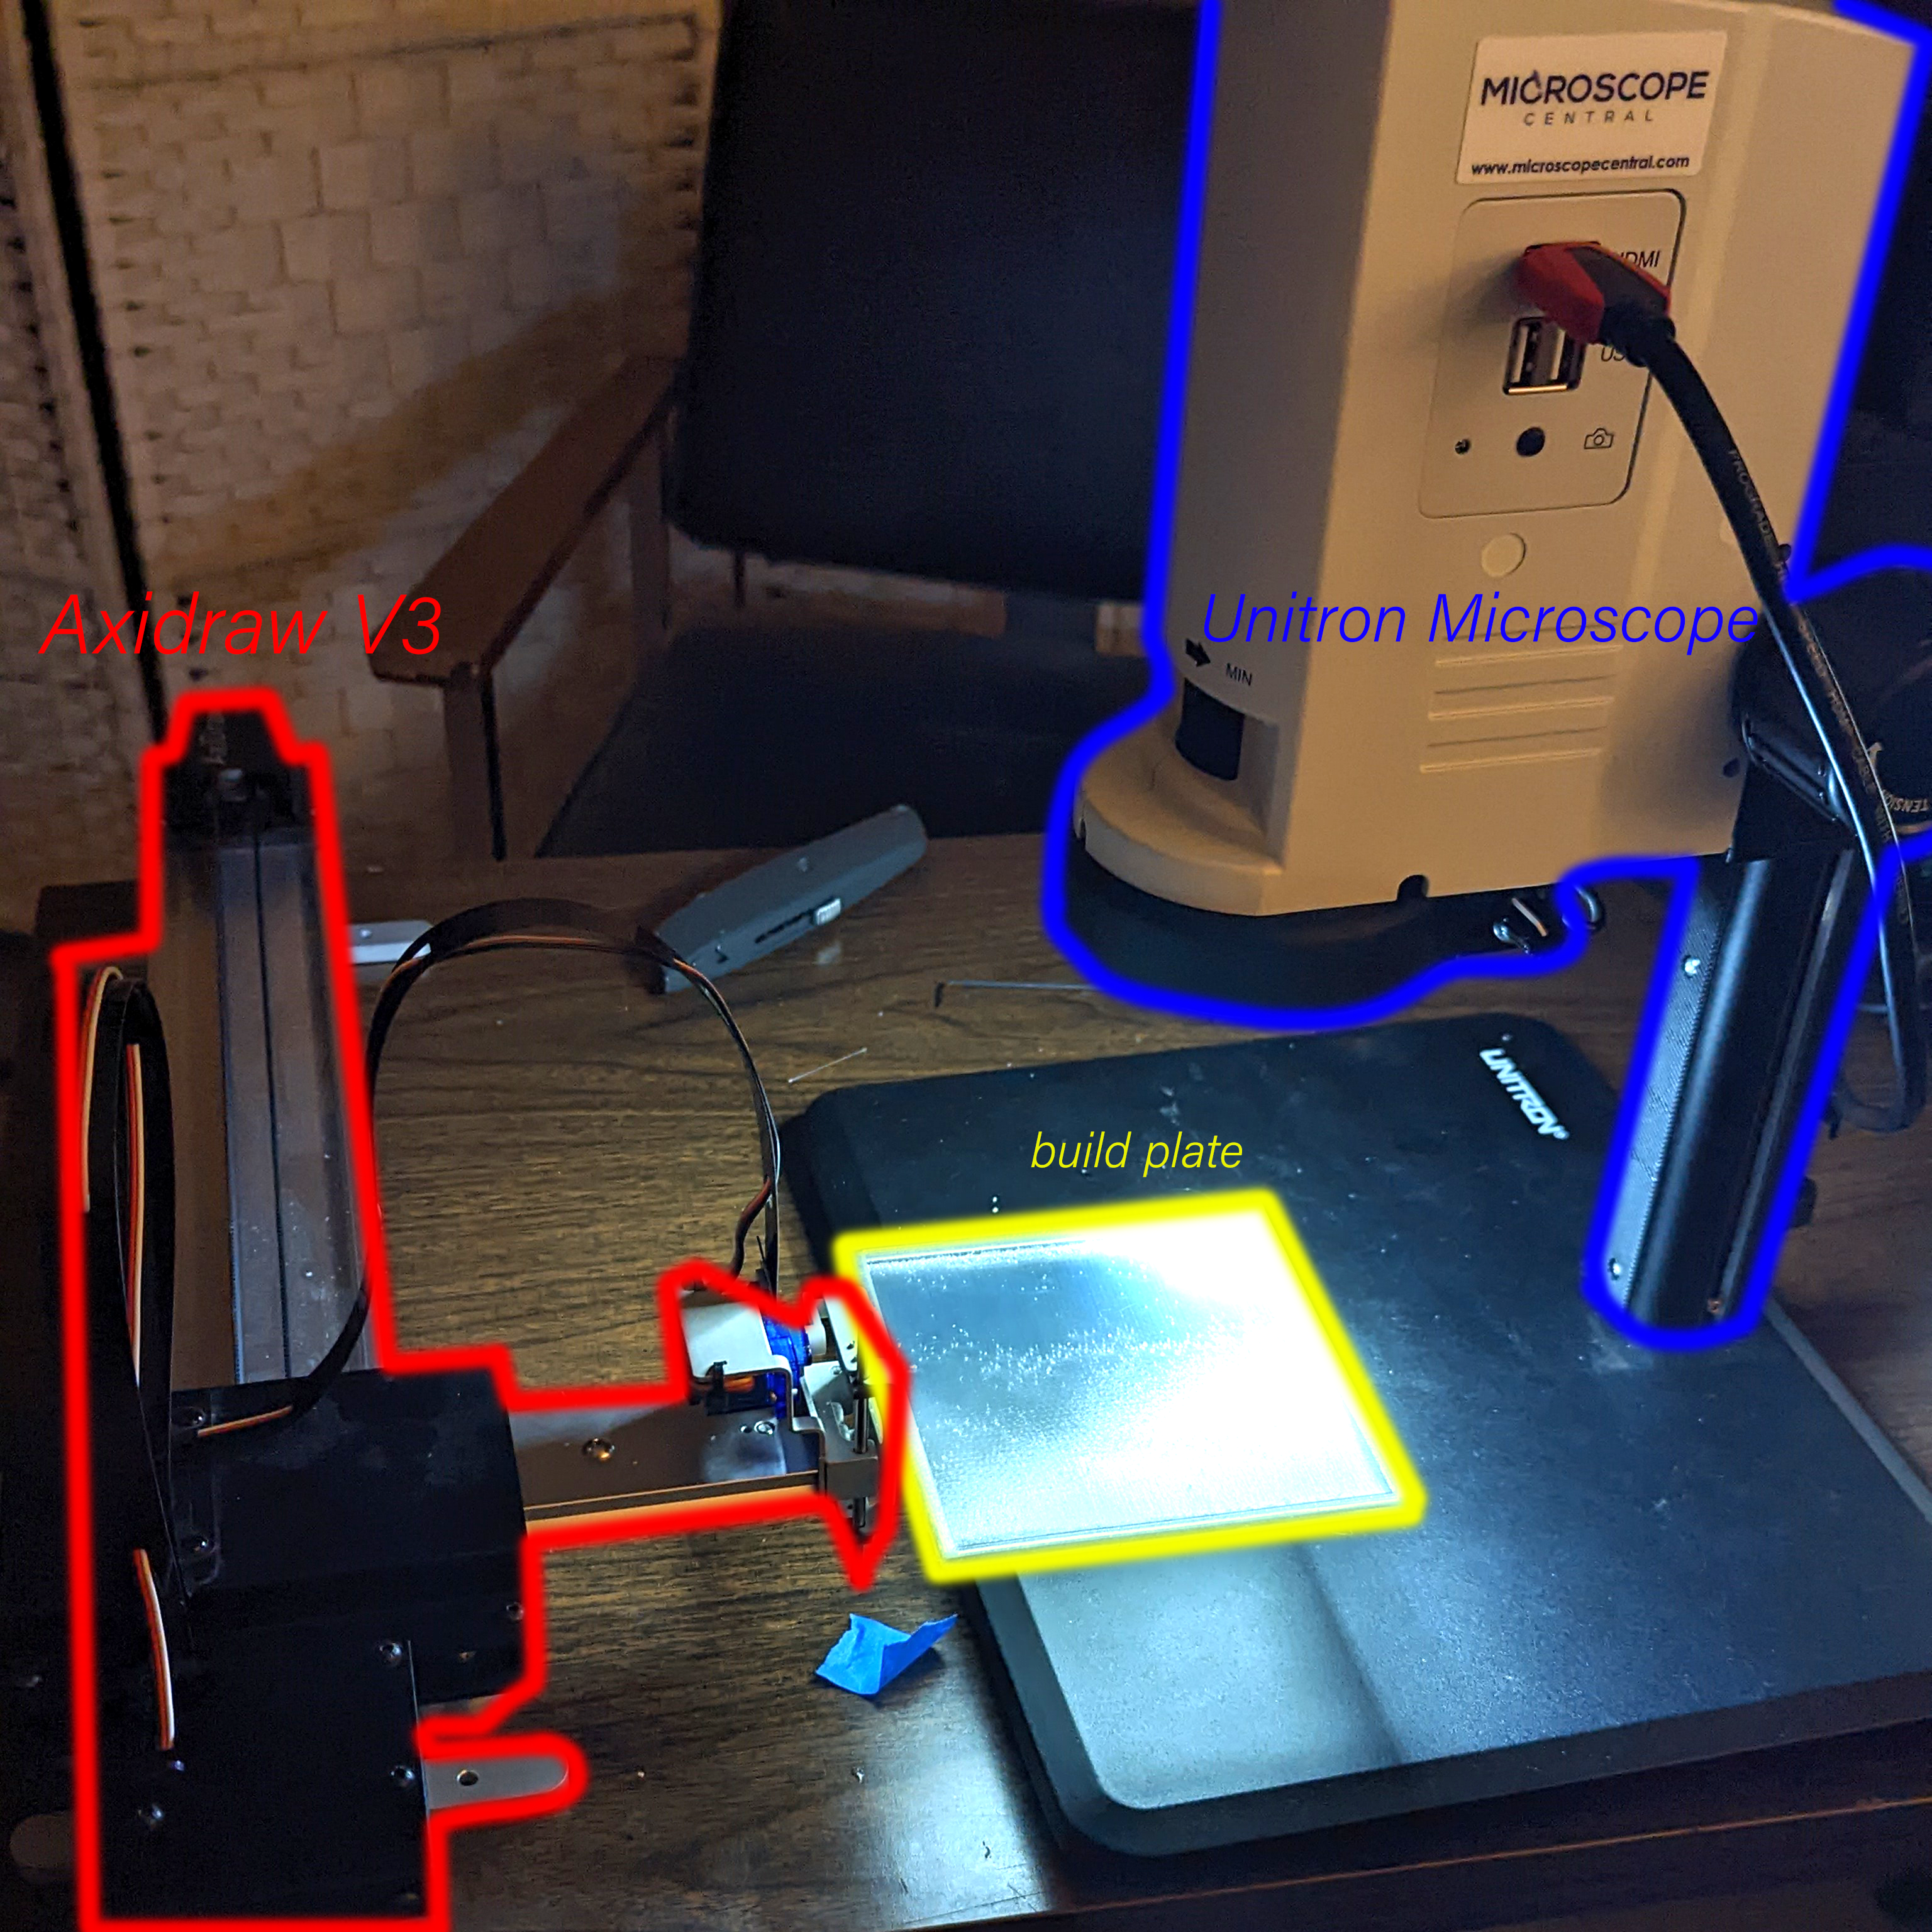
For my final project I created a pipeline for obtaining super hi-res , stitched together images from the studio’s Unitron zoom microscope.
The main components of the capture setup I have are the axidraw a3, a custom 3d printed build plate , and the Unitron Zoom HD microscope.
These items are all connected to my laptop which is running a processing script that moves the axidraw build plate in a predetermined path, stopping along that path and outputting the microscope image at each point along the path. With this code I have full control over the variables that move the axidraw arm and can make scans with a specific number of images, image density, and the time interval that the capture is occuring.(This code was given to me by Golan Levin, and was edited in great collaboration by Himalini Gururaj, and Angelica Bonilla)
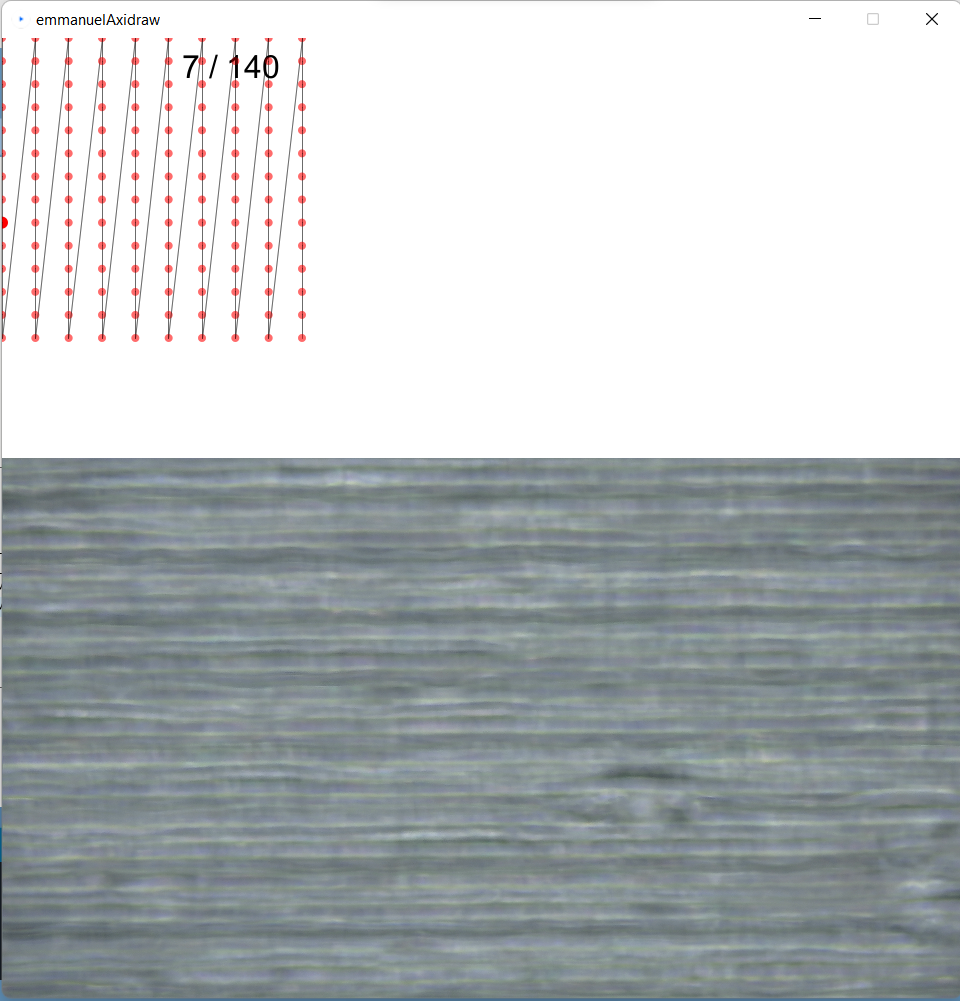
the counter above displays the progress through the scan and below is an output window to check focus and placement of the mounting plate
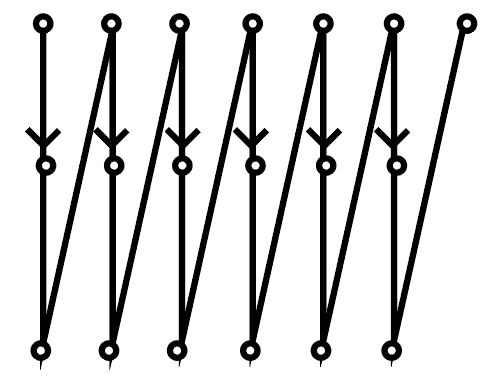
this is a simplified version of how the robot path is shaped
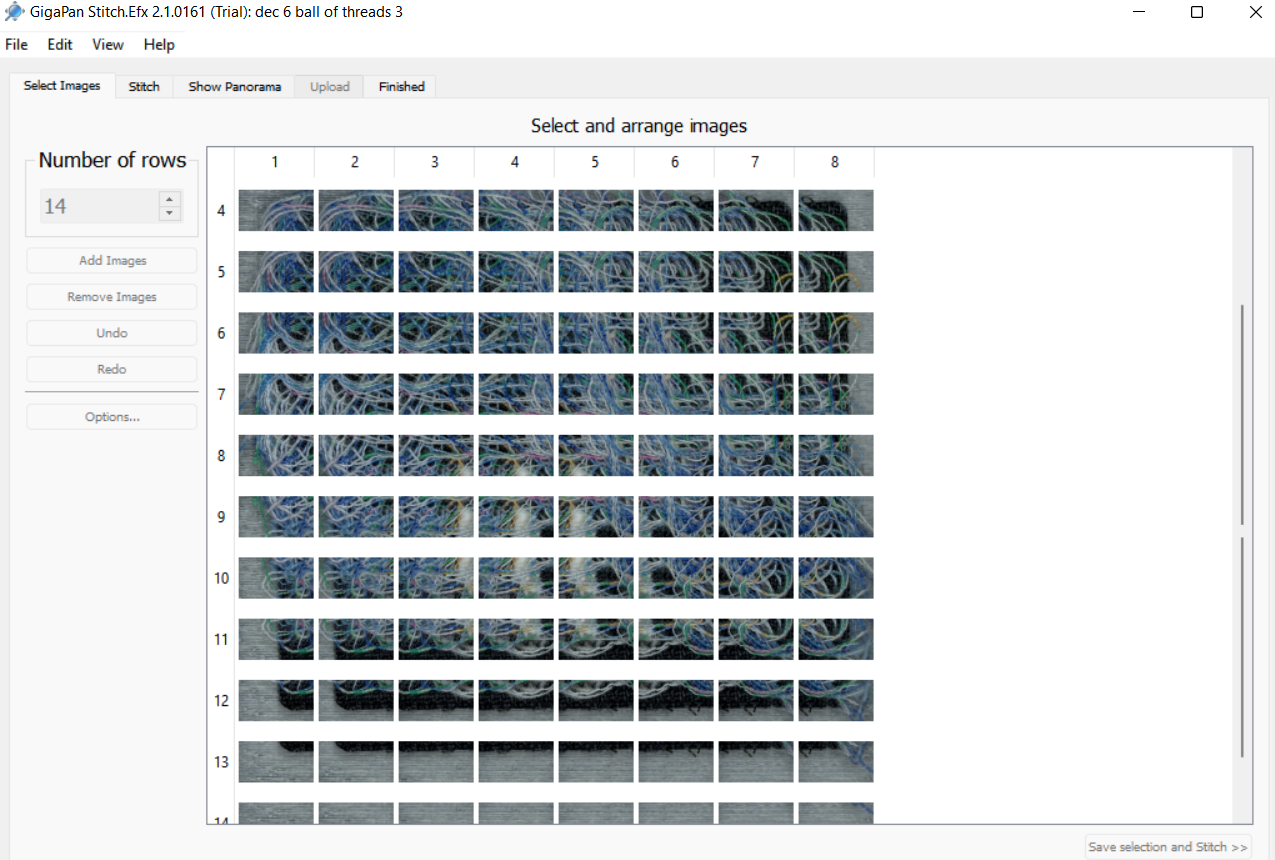
From here I put the output images from the processing program into a software called gigapan stitch to have the edges of each photograph aligned and merged together. each photograph needs some amount of overlap for the software to be able to detect and match up edges
From here the images go straight to being hosted on the gigapan website and are accessible to all.
Here are some I have made so far with this method.
This process for scanning objects opens up scanning to a host of subjects that a flatbed scanner may not be able to capture. Such as objects with strange topology and subjects that ideally should not be dried out. I also believe that with a proper stitching software I will be able to record images with density and dpi that go beyond a typical flatbed scanner.
I have a lot I would change about my project if I was given a chance to restart or work on it further. I didn’t have enough time to give softwares similar to gigapan a shot, and I think in many ways gigapan is a less-efficient, data capped method for image stitching than may be necessary for what I need. I also wish the range of objects I could capture did not have so many stipulations. At the moment I am only able to get a small sliver of the plane of my subject in focus. where I would have preferred to stitch together different focal planes. the subjects also have to be rigid enough to not deform or slosh around during axi-draw bed transit. With this project I am super excited to get a chance to photograph live mushroom cultures I have been growing and other biomaterial that does not scan well in a flat bed scanner. I want to utilize this setup to it’s fullest potential and be able to use the microscope near maximum magnification while having it be viewable.
This project really tested a lot of my observational and hence problem solving skills. There were many moments where after viewing my exported images I was able to detect an issue in the way I was capturing that I could experiment with, such as realizing that increasing the amount of overlap between images doesn’t increase dpi unless I am actually increasing my magnification strength, or realizing with a zig zag path that half of my images are being stored in the wrong order.
Once a again very big thanks to all of the people who helped me at every step of the way with this project. Y’all rock.
Breaking up with a robot after an intimate relationship defined by a lack of dancing.
Rompecorazones (Heartbreaker)
In this video (in case you didn’t watch it), I am wearing a traditional Colombian Cumbia dress as I dramatically break up with a robot.
This project, at it’s core, is a vent piece that contextualizes my failure in attempting to have a robot dance with me.
My Person in Time project, at is core, was creating a robotic interaction that would follow me as I moved or danced with it. But I wasn’t able to get quite there. I spent roughly 2 months continuously debugging a UR5 Cobot (Collaborative Robot), as I attempted to have it follow my face in real time. Using Handsfree.js, python and a couple of dozen cups of coffee, I was able to partially achieve this daunting task.
Without getting too much into the technical implementation of my robotic interactions, I had a lot of issues wrapping my head around different SDK’s and networking protocols for communicating with the robot with my computer. It’s not easy to make code for the robot to move, but it’s even harder to do so remotely from your computer. So I spent a lot of time trying to figure out how these pieces went together. I eventually hacked it, but I realized that to get to a step where the robot would be able to move smoothly with me, would take a lot more time and effort than I had. At this point I had grown bitter with the robot, verbally abusing it every time I could. Because I knew it would never be good enough to properly dance with me at this rate.
Needless to say, this piece as a whole is a testament to the technical failures that I experienced, technical failures that made me consider whether or not I wanted to drop this class at times. This piece was the process of coming to terms with my lack of technical expertise, but it is also a testament to my learning.
In terms of the video, I did consider using music/a background track (specifically of cumbia beats). But the jovial nature of cumbia sounds went against the tone of the video, and I found that my voice alone was appropriate enough for this project. Like any project, I find a billion ways in which my storytelling could be improved. I spent hours trying to figure out how to film myself interacting with the robot, and there are many distinct motions of the robots (as well as bugs) that I didn’t do justice in this documentation.
Special thanks to Oz Ramos, Madeline Gannon, and Golan Levin for helping me get started with the UR5! We developed a special relationship.
Special thanks to Neve (and Clayton), Mikey, Em, Ana, Will, Benford and Lauren for saving my butt with the narrative/filming/set up of the video! I am not a video person, so I genuinely couldn’t have made this without everyone who helped me figure these things out.
This is (intended) to be a command line slurp detection tool that would automatically embed captions into the video whenever a slurp sound appears. It would also produce an srt file, which would give you the time stamps of every slurp that occurred in the video.
Why is this interesting?
I particularly thought the idea of capturing just slurps was quite humorous and in line with my previous project with PersonInTime. Additionally, while preexisting human voice datasets, with the most well known one being AudioSet, do have tokens for classifying human sounds. However, their corpus of human sounds only contains digestive sounds pertaining to mastication, biting, gargling, stomach-grumbling, burping, hiccuping and farting. None of these are slurping, which I argue is the most important human digestive sound in the world. I feel like this is wasted potential, as many (many) people would benefit from being able to detect their slurps.
Where will/does/would this live?
This would live as a github repository/tool available for all to detect their slurps.
What does this build off of?
This work was primarily inspired by Sam Lavigne’s videogrep tool, which generates an srt file using vosk and makes supercuts of user-inputted phrases on videos. Audio classification tools have also been around, with some famous ones being tensorflow’s yamnet and OpenAi’s recent release, Whisper .
This work is a continuation of thoughts I had while completing my experiments for PersonInTime. In particular, I was thinking a lot about slurps when I fed my housemates all those noodles, which organically led to this idea.
Self-Evaluation
Where did you succeed, what could be better, what opportunities remain?
I failed in almost every way possible, since the slurp detector has yet to be made. Perhaps the way I’ve succeeded is by gathering research and knowledge about the current landscape of both captioning services on github and the actual exportable models used on teachable machine.
The thing itself
my slurp dataset which I will use to make my slurp detector
The Process
I started this process by first just trying to replicate Sam Lavigne’s process with vosk, the same captioning tool used in videogrep. However, I soon realized that vosk was only capturing the english works spoken, and none of the other miscellaneous sounds emitted by me and my friends.
So then I realized that in order to generate captions, I had to generate my own srt file. This should be easy enough, I foolishly thought. My initial plan was to use Google’s Teachable Machine to smartly create a quick but robust audio classification model based on my preexisting collection of slurps.
My first setback was stubbornly refusing to record slurps with my microphone. At first I was extremely averse to that idea because I had already collected a large slurp-pository from my other videos from PersonInTime, so why should I have to do this extra work of recording more slurps?
Well, naive me was unaware that Teachable Machine prevents you from uploading audio datasets that aren’t encoded using their method, which is basically a webm of the recording plus a json file stored in a compressed folder. Then, I thought to myself, it shouldn’t be too hard to trick teachable machine into thinking my slurp-set was actually recorded on the website, just by converting the file into an webm, and providing the appropriate tags in the json file.
This was my second mistake, since what the heck were frequencyFrames? The other labels were pretty self explanatory, but the only documentation I could find about frequency Frames was this one Tensorflow general discussion post where some guy was also trying to upload his own audio data to Teachable Machine. The code posted in that discussion didn’t work and I may have tried to stalk the questioner’s github to see if they posted the complete code (they did not). The person who responded, mentioned the same data for training with the speech_commands dataset, which was not what I wanted since it did not have slurps in it.
So after looking at this and trying to figure out what it meant, I decided my brain was not big enough at the time and gave up.
I decided to record on Teachable Machine in the worst way possible, recording with my laptop microphone while blasting my slurps-llection hopes that the slurps would be recorded. I did this with the aim to get something running. I still had the naiveté that I would have enough time to go back a train a better model, using some other tool other than Teachable Machine. (I was wrong)
So I finished training the model on teachable machine, and it worked surprisingly well given the quality of the meta-recorded dataset. However, I didn’t realize I was about to encounter my third mistake. Teachable Machine audio models only exported as TF.js or TFlite and not as keras, which was the model type that I was most used to handling. I had also already found a srt captioning tool on github that I wanted to base my modified tool off of (this one, auto-subtitle, uses Whisper oooo) but in python, and I thought the easiest way to combine the tools would be to load the model with plain Tensorflow. Determined to work with something I was at least somewhat familiar with, I tried converting the TF.js layered model into a TF saved model. To do this, I used the tfjs-converter that tensorflow already provided for situations like these. After some annoying brew issues, I converted the model to python. Which is where I’d encounter my fourth mistake.
What I didn’t realize while I was converting my model was that the teachable machines audio component is based off the the model topology of the Tensorflow.js Speech Commands model, which as the name implies is build on top of Tensorflow.js and there isn’t any documentation on non javascript implementations or work arounds, which ultimately dissuaded me from trying to test out whether my converted keras model would even work or not.
At this point, I thought, maybe I shouldn’t even be using Teachable Machine at all? (which was probably what I should’ve done in the first place, since the amount of time I’ve spent trying to work around unimplemented things would’ve been enough to train an audio classification model). I looked at RunwayML’s audio tools. Currently, their selection is very limited (4, noise reduction, silence gap deletion, caption production and real-time captioning), and it wasn’t exactly what I wanted either. I encountered the same problem as I did with vosk, it only recorded words.
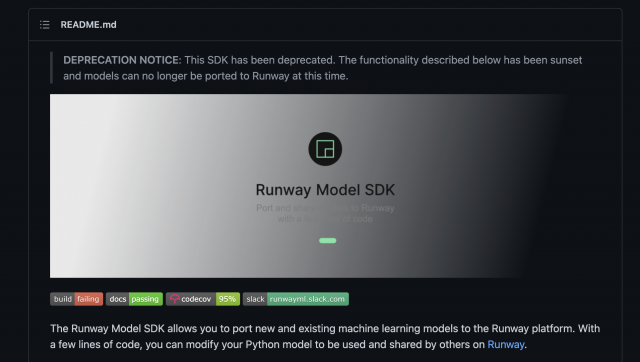
At this point I turn to the almighty Coding Train videos to give me some more insight, and from there I learn about RunwayML-SDK, where you should be able to port your own trained models into their built-in tools. Wow, perfect! me thinks with excess zealotry. For when I hath opened the github repo, what did I see?
This repository was archived + deprecated LAST MONTH (November 8th 2022).
After a whimsical look at some p5.js (ml5 SoundClassifiers are default the microphone, with no documentation on other audio input sources on their website or in the code directly of which I could find) I was back a square one.
Although there are many captioning repositorys written in python, there are almost none that are written in javascript. The most I could find was this one, api.video, which is a fancier fork of another repository that basically is a wrapper for a transcription service, Authot (interesting name choice). They just send the video over the Authot, get the vtt file and return it as that.
At this point I realize that I’m back to square one. I initially wanted to use Teachable Machine because of personal time constraints; I thought it’d be an easier way for me to get the same final product. But given the kind of probing I had to do (completely in the dark about most of these things before this project), it was not worth it. Next steps for me would be to just train an audio classification model from scratch (which isn’t bad, I just allocated my time to the wrong issues) and take my captioning from there in python. For now, I have my tiny slurp dataset. :/
 z
z