The readings, assignments, and projects below constitute the Week 8 Deliverables and are due by 11:59pm EDT on Friday, October 18th:
- Technical Readings
- Looking Outwards 08 [Blog]
- Assignment-08-A (Eye Tracking) [Autolab]
- Assignment-08-B (Mixies) [Autolab]
- Note: There is no Project 8 this week due to the lab exam
1. Technical Readings
- (Concepts are: images, pixels, local server, load image files, preload()
- Introduction to images by John Kuiphoff
- Continuing to learn about objects, this is a lecture on objects by Dan Shiffman:
- Below is a another video of Dan Shiffman discussing how an Object can own a reference to an image in p5.js. We recommend you watch it.
2. Looking Outwards 08: The Creative Practice of an Individual
This Looking Outwards is different from previous ones. Instead of identifying a project that you like, this time you will identify and study the work of a person whose work you admire. Your mission is to get an overall feel for that individual’s body of work by watching them give a 45-minute artist lecture.
For this Looking Outwards, we’ve decided to limit your choices to the ~150 speakers who have spoken at the Eyeo Festival (and its smaller sibling, the Inst-Int Festival).
Over the past 5 years, these Minneapolis-based festivals have curated an amazing group of speakers who work in computational new media and interactive arts. They work as artists, designers, architects, musicians, directors, activists, engineers and inventors. In nearly every case, the festivals have posted videos of their lecture presentations on their Vimeo account.
Browse the following Vimeo channels. Watch a lecture video that seems interesting.
- https://vimeo.com/channels/eyeo2015
- https://vimeo.com/channels/eyeo2014
- https://vimeo.com/channels/eyeo2013
- https://vimeo.com/channels/eyeo2012
- https://vimeo.com/channels/eyeo2011
- https://vimeo.com/channels/instint2014
- https://vimeo.com/channels/instint2013
Of course, we understand that 45-50 minutes is a significant investment of your time. To help you choose a speaker who is best matched to your interests, you might find it helpful to browse the web pages of the actual festivals, which contain helpful indexes to their speakers:
- http://eyeofestival.com/
- http://eyeofestival.com/2014/
- http://eyeofestival.com/2013/
- http://eyeofestival.com/2012/
- http://eyeofestival.com/2011/
Now, in a blog post of about 150-200 words,
- Briefly summarize the person’s bio, perhaps with a bit of supplemental Googling. Who are they? where are they based? What did they study? How do they describe themselves and what they do?
- Discuss the person’s body of work. What do you admire about the way they work, and why do you admire these aspects of it? Which projects of theirs do you admire the most, and why?
- Observe how they present. What strategies do they use to present their work effectively? What can you learn about how to present your own work?
- Link to the speaker’s web site. You can generally find links to their site(s) in the Vimeo video descriptions.
- Embed their lecture video. If possible, additionally embed a video of one of their projects that you admire.
- Label your blog post with the Categories LookingOutwards-08 and your section, e.g. SectionC.
Some brief remarks:
-
- Some speakers have presented more than once at the Eyeo Festival. For the best overview of their work, we recommend you search for their first (oldest) lecture at the festival. Often (but not always), their first lecture is an overview of their practice,
while their second lecture is an “update”. On the other hand, it’s great to see the cutting-edge stuff, too. - Some of the videos are from panels or 5-minute “Ignite” lectures. Ignore those; choose the 30-60 minute talks instead.
- Yes, it so happens that (Professor) Golan Levin is one of the Eyeo Speakers. You may not select him. Move along.
- Some speakers have presented more than once at the Eyeo Festival. For the best overview of their work, we recommend you search for their first (oldest) lecture at the festival. Often (but not always), their first lecture is an overview of their practice,
3. Assignment 08-A: Eye Tracking
In this Assignment, you will write code to locate the brightest pixel in an image.
Background.
To help you appreciate why this might be interesting, please watch the following two short videos. Both of the projects documented in these videos were created by Evan Roth and members of his artist collectives, the Graffiti Research Lab (GRL) and the Free Art and Technology (FAT) Lab, respectively. Both projects depend heavily on being able to find the brightest pixel in an image.
The first video describes L.A.S.E.R. Tag (2007), an application in which the bright spot of a laser pointer is tracked by a camera system. The path of this laser pointer is used to control building-scale interactive projections, in order to create building-scale “virtual graffiti”, viewable for miles:
![]()
In the second video, Roth and his collaborators created the Eyewriter (2009), an inexpensive, open-source eye-tracker. Roth created the Eyewriter as a custom tool for Tempt One (Tony Quan), a legendary LA graffiti artist who became totally paralyzed due to ALS (amyotrophic lateral sclerosis, or Lou Gehrig’s Disease). At the time when the Eyewriter project was released, eye-trackers cost $20,000+, and used entirely proprietary software. The Eyewriter, by contrast, could be built for less than $100 in parts, and was the first low-cost eye-tracker with free, open-source software. It was an eye-tracker made by artists, for an artist, to help him regain a life of creativity he had lost. With it, Tempt was able to draw again for the first time in seven years. [The original video about Tony Quan is no longer available, but here is a video about Eyewriter. -RBD]
eyewriter tracking software walkthrough from zach lieberman on Vimeo.

Why is this example relevant? Well, as with the L.A.S.E.R. Tag project, eye-trackers also work by finding the brightest point in an image. In order to estimate where you are looking, eye-trackers compare the location of the center of the pupil, with the location of the brightest point or points — generally a glint or reflection on the eye of one or two nearby infrared LEDs. This video makes this clear:
![]()
The Task.
In this assignment, you will use a provided template to write code that computationally locates the brightest pixel in an image of an eye. This task is a precursor to eye-tracking, as well as many related interactions.
In fact, there are three images for you to work with, and your code must work correctly with all of them. They are here:
http://i.imgur.com/qR0I6iF.png
All you have to do is ensure that your code sets the values of the two variables, brightestPixelX and brightestPixelY, correctly. The template will take care of the rest (including drawing the transparent yellow cross-hairs). When you’re done, your project should look something like the following GIF. (The program advances to the next eye image each time you click):
![]()
One critical part of this program is accessing the pixels of the current image. How many times does your program do this? Let’s see, …, 192 x 143 pixels is about 27 thousand times every time draw() is called! You could use currentImage.get(x, y) to get the pixel at x, y, but this is very slow. A faster way is to access currentImage.pixels[] directly as an array of numbers. We have provided the function getPixel() to implement this method based on information in the p5.js reference manual. Please use this function. [UPDATE: it seems that image.get() has been optimized and now there is little if any advantage to using getPixel() in this case, but please use getPixel() anyway.]
The code template is provided below. Detailed instructions can be found below the code.
|
1 2 3 4 5 6 7 8 9 10 11 12 13 14 15 16 17 18 19 20 21 22 23 24 25 26 27 28 29 30 31 32 33 34 35 36 37 38 39 40 41 42 43 44 45 46 47 48 49 50 51 52 53 54 55 56 57 58 59 60 61 62 63 64 65 66 67 68 69 70 71 72 73 74 75 76 77 78 79 80 81 82 83 84 85 86 87 88 89 90 91 92 93 94 95 96 97 98 |
// This Assignment presents a simple image analysis scenario // in which you must search for the brightest pixel in an image. // In this scenario, you will search for the "1st Purkinje Image", // a corneal reflection which forms the basis for eye-tracking. // This is commonly known as the specular "highlight" in your eye. // // This sketch loads 3 infrared photographs of eyes from imgur.com. // Whenever the user clicks the mouse, a different image is selected. // You must compute and indicate the location of the brightest pixel // in that image, corresponding to the Purkinje reflection. // // Here are the three images that your app will load. Note: // It's the exception, not the rule, that cross-domain fetching works. // var eye0url = "http://i.imgur.com/qR0I6iF.png"; var eye1url = "http://i.imgur.com/amIPKEs.png"; var eye2url = "http://i.imgur.com/ia6RZXL.png"; // getPixel: fast access to pixel at location x, y from image // function getPixel(image, x, y) { var i = 4 * (y * image.width + x); return color(image.pixels[i], image.pixels[i + 1], image.pixels[i + 2]); } function draw() { // Render the current image to the canvas. image(currentImage, 0, 0); // Initialize important variables. var currentImageW = currentImage.width; var currentImageH = currentImage.height; var brightestPixelX = width/2; // provisional - fix me! var brightestPixelY = height/2; // provisional - fix me! // Search for the brightest pixel in currentImage. // Store its (x,y) location in brightestPixelX and brightestPixelY. // Note: You might find the brightness() function to be helpful. // // WRITE YOUR CODE HERE: // ... // Draw a crosshair to indicate the brightest pixel. stroke(255,255,0, 128); line(brightestPixelX, 0, brightestPixelX, height); line(0, brightestPixelY, width, brightestPixelY); } //================================================ // DO NOT MODIFY ANYTHING BELOW THIS LINE. /* // As an alternative to the above, you may fetch copies of these images from // imgur.com (full URLs appear above) and place them in the same directory // as sketch.js. (I've used the names generated by imgur.com. You can rename // them as eye0.png, eye1.png, eye2.png if you also change the strings below.) // After doing so, you can use the following for local deveopment: var eye0url = "qR0I6iF.png"; var eye1url = "amIPKEs.png"; var eye2url = "ia6RZXL.png"; */ var eyeImage0; var eyeImage1; var eyeImage2; var currentImageIndex; function preload() { // Preload our images. eyeImage0 = loadImage(eye0url); eyeImage1 = loadImage(eye1url); eyeImage2 = loadImage(eye2url); currentImageIndex = 0; } function setup() { // Create the canvas; make the pixels of the first image readable. createCanvas(192, 143); // This "constant" can vary with the browser implementation and relates to // how images are converted to pixel arrays. We need it in getPixel() pixelDensity(1); currentImage = eyeImage0; currentImage.loadPixels(); } function mousePressed(){ // Select the next image; make its pixels readable. currentImageIndex = (currentImageIndex+1)%3; if (currentImageIndex === 0){ currentImage = eyeImage0; } else if (currentImageIndex === 1){ currentImage = eyeImage1; } else if (currentImageIndex === 2){ currentImage = eyeImage2; } currentImage.loadPixels(); } |
-
-
- Don’t forget to comment your code, and please give attention to the style guide.
-
Then, as per usual for all Assignments uploaded to Autolab:
-
-
- Put the following information into comments at the top of your code: Your name; Your class section or time; Your email address, including @andrew.cmu.edu; and Assignment-08-A.
- Name your project folder UserID
-08-a.For example, if your Andrew ID isplacebo, then your project folder should beplacebo-08-a. - Zip and upload your code to Autolab, using the provided instructions. Zip a directory (folder) containing this and also Assignment-08-B.
-
4. Assignment-08-B: Mixies
In this Assignment, you will create an interactive Exquisite Corpse sketch. The purpose of this assignment is to give you experience developing a simple visual game, and to reinforce your understanding of the while() structure.
Background
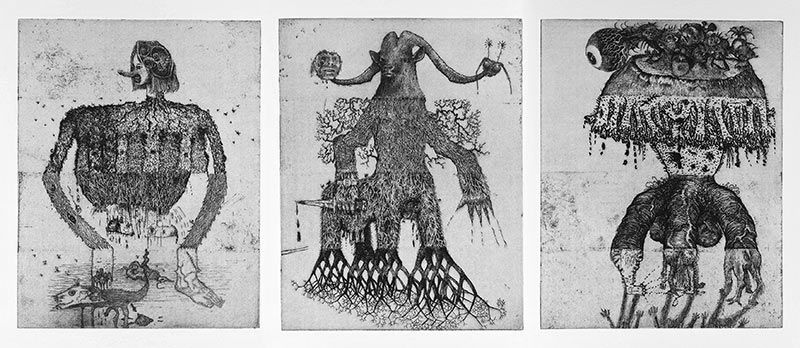
An “Exquisite Corpse“, also known as an exquisite cadaver (from the original French term cadavre exquis), is a method by which an image is collectively assembled. Often, a simple set of rules is devised that allows each contributor to add his or her contribution without knowledge about how the final composition will appear. For example, one person might draw the head of a creature, while someone else would draw the body, while a third person might add the feet. The Exquisite Corpse was a popular parlor game in the Victorian era, and was rediscovered by Surrealist and Dadaist artists in the early 20th century as a quasi-algorithmic generative technique for creating surprising new forms. Below is a set of recent exquisite corpse artworks by artists (and brothers) Jake and Dinos Chapman, from the collection of the Tate Museum, London.

And here’s an interactive exquisite corpse (2007) by Professor Levin:
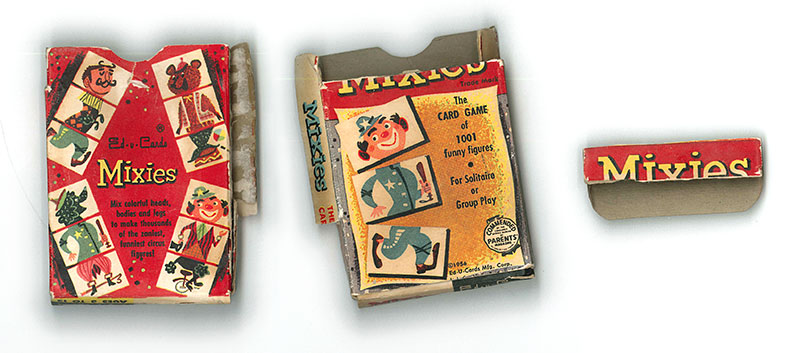
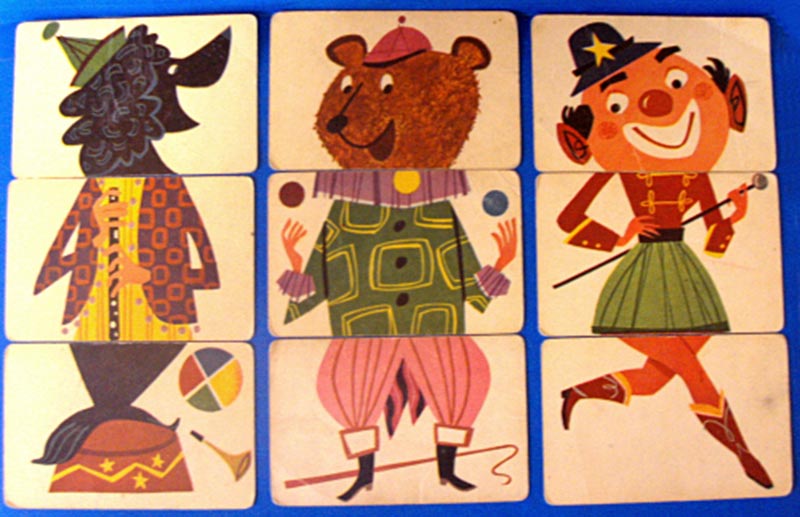
In this assignment, you will create an interactive exquisite corpse software, using the circus characters from a set of “Mixies” cards from 1956:

Courtesy of CMU HCII student Meg Richards, we have been generously provided with scans of her collection of Mixies cards, which were produced in 1956 by the Ed-u-Cards Manufacturing Company. In these cards, a figure of a person or animal was cut into three pieces and each placed on a card. The deck consisted of 12 heads, 12 middles, and 12 feet, which players could mix up in different ways. The box states that the game can generate “1001 funny figures,” but in fact, there are 12x12x12 = 1728 unique combinations. (Perhaps 727 of them are less funny than the others.)

You can find all of the image assets for this Assignment in mixies-assets.zip OR, I have put the images on imgur.com. Here are the links in the form of JavaScript arrays. You can paste this into your sketch:
|
1 2 3 4 5 6 7 8 9 10 11 12 13 14 15 16 17 18 19 20 21 22 23 24 25 26 27 28 29 30 31 32 33 34 35 36 37 38 39 40 41 42 43 |
// these three arrays, bodyLinks, feetLinks, and headLinks can be // used to access images for Assignment 8B var bodyLinks = [ "http://i.imgur.com/5YM2aPE.jpg", "http://i.imgur.com/oKtGXfd.jpg", "http://i.imgur.com/Kvg75bG.jpg", "http://i.imgur.com/0FGzErn.jpg", "http://i.imgur.com/MJmlPt5.jpg", "http://i.imgur.com/VvX0k8e.jpg", "http://i.imgur.com/rLIOBoG.jpg", "http://i.imgur.com/q03Gko3.jpg", "http://i.imgur.com/BWpN5SP.jpg", "http://i.imgur.com/ft10TV3.jpg", "http://i.imgur.com/CGCZliN.jpg", "http://i.imgur.com/qrlc4dK.jpg"] var feetLinks = [ "http://i.imgur.com/oNSO0T6.jpg", "http://i.imgur.com/OWGETX7.jpg", "http://i.imgur.com/Zp29aVg.jpg", "http://i.imgur.com/AXLWZRR.jpg", "http://i.imgur.com/wgZq717.jpg", "http://i.imgur.com/sGVMEMw.jpg", "http://i.imgur.com/hfbrynH.jpg", "http://i.imgur.com/OOASUMM.jpg", "http://i.imgur.com/aqtIXi0.jpg", "http://i.imgur.com/Eu6ruPo.jpg", "http://i.imgur.com/mTSipwg.jpg", "http://i.imgur.com/1GzC4Zz.jpg"] var headLinks = [ "http://i.imgur.com/gBCZVuM.jpg", "http://i.imgur.com/YLOXAdH.jpg", "http://i.imgur.com/my3TqY7.jpg", "http://i.imgur.com/lvtIB9s.jpg", "http://i.imgur.com/gvDBfhO.jpg", "http://i.imgur.com/JEuJ2ER.jpg", "http://i.imgur.com/SbBOG1V.jpg", "http://i.imgur.com/cuJ5Ao1.jpg", "http://i.imgur.com/dqHjjig.jpg", "http://i.imgur.com/mcFUcHf.jpg", "http://i.imgur.com/0XKU9Dx.jpg", "http://i.imgur.com/sD1ArAR.jpg"] |
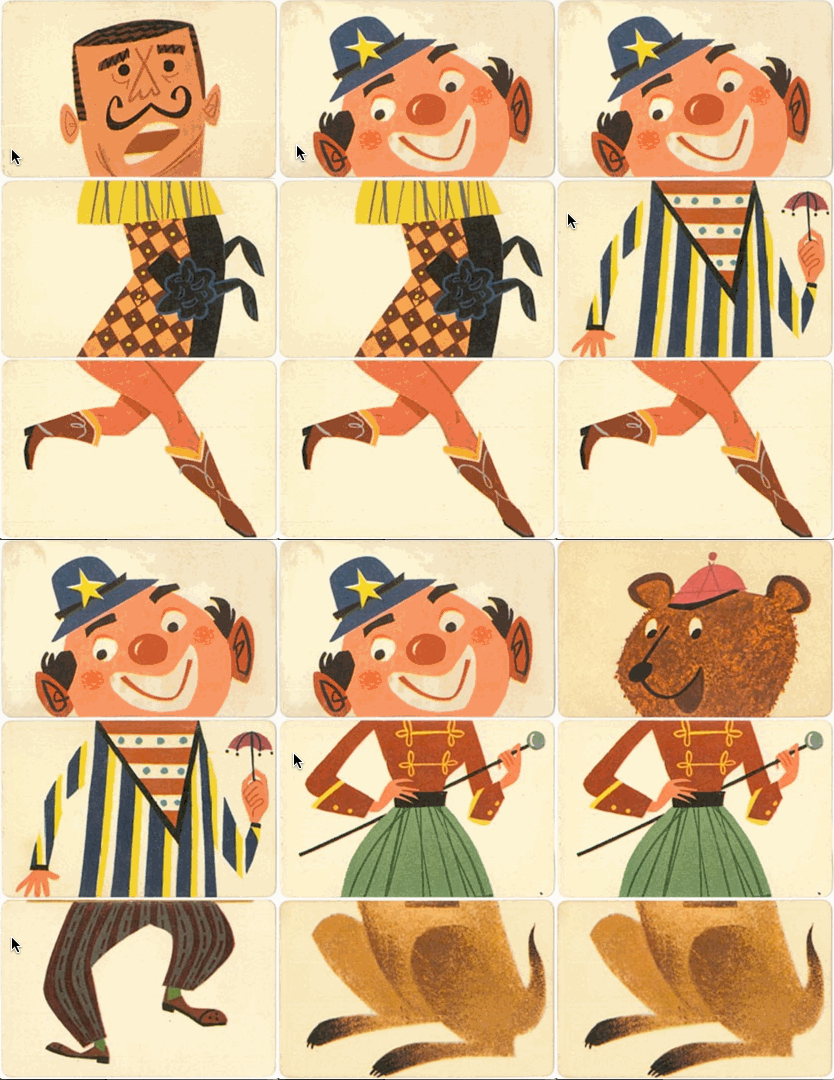
When you have finished your submission, it should look and behave similar to the following screen-grabbed recording:

Requirements
There are three levels of accomplishment (and corresponding credit) for this Assignment. It will make sense to attempt each of them in turn.
-
-
- For the lowest credit (a maximum grade of 90%), make your sketch simply select a new card at random, whenever the user clicks in that section of the canvas. For example, if the user clicks in the middle third of the canvas, your code would randomly select a new mid-section card. If you click on the bottom third, you get new randomly-selected feet.
- For intermediate credit (a maximum grade of 100%), write code which guarantees that a particular card is never displayed twice in a row. In other words, a freshly displayed card, though randomly selected, should never be the same as the one which was in that spot just previously. For example, suppose the head section is currently from the kangaroo (#8). If the user clicks on the head, then the next head presented to the user will be random – except that it is guaranteed not to be the kangaroo. (If the system does happen to select the kangaroo a second time, then it must continue hunting for a different random head until a non-kangaroo has been found.) To achieve this requirement, your code must use a while() loop, (i.e. keep searching for a different card so long as [i.e. while] the one you’ve just randomly picked is the same as the one you previously displayed).
- For bonus credit (a maximum bonus of 10%), your code should further guarantee that new, randomly selected cards are different from all four of the cards which were most recently used in that slot. For example, suppose the currently-displayed feet belong to the lion tamer (#11). When the user clicks on the feet, your code will guarantee that the lion tamer’s feet do not reappear for at least four clicks. Put another way, each of the next four newly selected feet are guaranteed to be something other than the lion tamer’s. To achieve this requirement, your code must use a while() loop, and it should also store the indices of the previous four feet images (or heads, etc.) in an array. You may find the Javascript Array.indexOf() function to be particularly helpful in doing this. Solutions that do not use array(s) to record the recent selections will not receive full credit.
-
As you can see, we are challenging you to design a well-crafted randomization system that makes perpetually “fresh-seeming” choices.
So, to develop your solution:
-
-
- Create a canvas which is 280 by 540. (The cards are all 280 by 180.)
- Download the bundle of images from mixies-assets.zip. You will note that these images are logically named and numbered. Unzip this bundle and place its contents into a folder called “
assets” inside your sketch folder. - Assuming you have a directory (folder) named
assetsfull of images, andassetsis in the folder with yoursketch.jsandindex.htmlfiles, then the file names for the images will be something likeassets/0-body.jpg,assets/0-feet.jpg, etc. - We recommend that you create 3 arrays in your code, to store the images of the heads, bodies, and feet, respectively.
- We ask you to populate these arrays of images computationally. By this we mean that you should generate or access a string to represent the filename of the image or URL you want to load, and load that file or URL into its respective array, inside a for() loop. In other words, do not call
loadImage36 times! (3 is OK if it makes your code simpler.) Fortunately, in the case of files, all of the images are numbered. - We recommend you do all of your image loading in preload(). Remember, you should only need to load an image once. If your preload() function is longer than a dozen lines of code, you’re probably not doing this right.
- We recommend you use floor() when generating a random number that you intend to use as an index into an array.
- Go ahead and include your images in your .zip file submitted to Autolab.
-
Then, as per usual for all Assignments uploaded to Autolab:
-
-
- Put the following information into comments at the top of your code: Your name; Your class section or time; Your email address, including @andrew.cmu.edu; and Assignment-08-B
- Name your project folder UserID
-08-b.For example, if your Andrew ID isplacebo, then your project folder should beplacebo-08-b. - Zip and upload your code to Autolab, using the provided instructions. Zip a directory (folder) containing this and also Assignment-08-A.
-
![[OLD FALL 2019] 15-104 • Introduction to Computing for Creative Practice](wp-content/uploads/2020/08/stop-banner.png)

