![[OLD FALL 2020] 15-104 • Introduction to Computing for Creative Practice](../../../../wp-content/uploads/2021/09/stop-banner.png)
I thought it would be an interesting exercise to simplify the intricate orchid flower with code. It was a fun challenge determining the most essential shapes out of the organic form. After getting the basic shapes down on paper, I made a sketch in Illustrator, then translated it into p5.js coordinates to create a “tile.” I then used loops to create a wallpaper out of the original tile design.
orchid et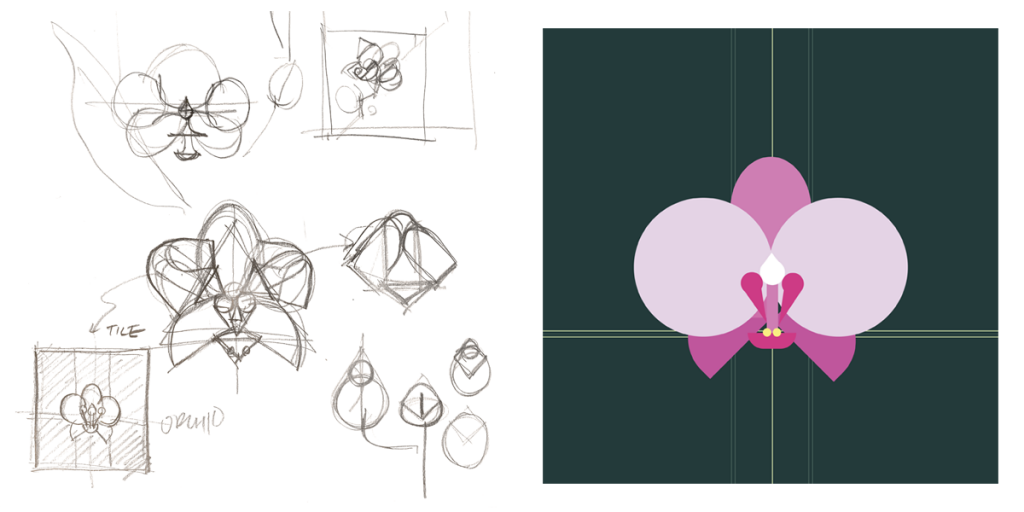
function setup() {
  createCanvas(600, 600);
}

function draw() {
  background(200);
  scale(.2);//scale down coordinates based on 600x600 canvas
  for (var x = 0; x <= 5*width; x += 600) {
    for (var y = 0; y <= 5*height; y += 600) {
      push();
      translate(x, y);
      tile();
      pop();
       }

  noLoop(0);
  //}


}
}
function tile() { //use repeating tile to simplify loop function

  noStroke();
  fill(35, 58, 58);//bg dark green color
  rect(0, 0, 600, 600);
  //decorative lines
  stroke(227, 239, 177); //yellow line
  line(0, 399, 600, 399);
  line(0, 407, 600, 407);
  line(300, 0, 300, 600);
  stroke(115, 140, 127); //green line
  strokeWeight(0.5);
  line(0, 403, 600, 403);
  line(250, 0, 250, 600);
  line(255, 0, 255, 600);
  line(350, 0, 350, 600);
  line(355, 0, 355, 600);
  push();
  orchid();
  pop();
}

function orchid() {

  noStroke();
  push();
  fill(206, 126, 179);  //midtone magenta
  ellipse(300, 240, 107, 142); //back petal
  fill(191, 86, 156);  //darker magenta
  translate(-165, 310);
  rotate(radians(-45));
  rect(180, 312, 115, 76, 60, 0, 0, 0);
  pop();
  push();
  fill(191, 86, 156);  //midtone magenta
  translate(340,-115);
  rotate(radians(45));
  rect(305, 312, 115, 76, 0, 60, 0, 0);
  pop();

  push();
  fill(228, 211, 229); //light magenta
  ellipse(212, 315, 183);//large petal1
  ellipse(388, 315, 183);//large petal2
  pop();
  push();
  fill(206, 126, 179);  //midtone magenta
  rect(292, 329, 16, 80);//center rectangle
  pop();

  push(); //top "sandle"
  fill(255); //white
  ellipse(300, 320, 33);
  triangle (300, 295, 317, 315, 283, 315);
  fill(205, 59, 113); //true magenta
  ellipse(273, 335, 24);
  triangle(264, 343, 278, 343, 295, 387);
  ellipse(327, 335, 24);
  triangle(336, 343, 322, 343, 305, 387);
  rect(268, 401, 64, 21, 0, 0, 21, 21);
  fill(249, 239, 130);//yellow
  ellipse(293, 400, 11);
  ellipse(307, 400, 11);
  pop();


}