Project 05: Wallpaper

project-05-wallpaper
/*
Lauren Kenny
lkenny
Section A

This program draws a repeating geometric pattern.

*/

var x;
var y;
var circleX;
var circleY;
var circleX2;
var circleY2;

function setup() {
    noLoop();
    createCanvas(600, 600);
    background(0);
    noStroke();
    x=50;
    y=50;
    w=100;
    h=100;
    circleX=20;
    circleY=20;
    circleX2=80;
    circleY2=80;
}

function draw() {
    drawGrid();
}

//////////////////////////////
// THIS CREATES THE CIRCLES
/////////////////////////////
function drawBottomLeft() {
    fill(255, 0, 0);
    arc(x, y, w, h, HALF_PI, PI);
    fill(255, 255, 0);
    arc(x, y, w-50, h-50, HALF_PI, PI);
}

function drawBottomRight() {
    fill(0, 255, 0);
    arc(x, y, w, h, 0, HALF_PI);
    fill(0, 0, 255);
    arc(x, y, w-50, h-50, 0, HALF_PI);
}

function drawTopLeft() {
    fill(0, 0, 255);
    arc(x, y, w, h, PI, PI+HALF_PI);
    fill(0, 255, 0);
    arc(x, y, w-50, h-50, PI, PI+HALF_PI);
}

function drawTopRight() {
    fill(255, 255, 0);
    arc(x, y, w, h, PI+HALF_PI, 0);
    fill(255, 0, 0);
    arc(x, y, w-50, h-50, PI+HALF_PI, 0);
}

//////////////////////////////
// THIS CREATES THE TINY DOTS
/////////////////////////////
function drawTopCircles() {
    fill(0, 255, 0);
    circle(circleX, circleY, 5);
    circle(circleX+5, circleY-5, 5);
    circle(circleX-5, circleY+5, 5);
}

function drawBottomCircles() {
    fill(0, 0, 255);
    circle(circleX2, circleY2, 5);
    circle(circleX2+5, circleY2-5, 5);
    circle(circleX2-5, circleY2+5, 5);
}

//////////////////////////////
// THIS DRAWS THE REPEATING PATTERN
/////////////////////////////
function drawGrid() {
    //PURPLE DOTS IN BACKGROUND
    var d=5;
    var e=5;
    for (var o=0; o<width; o+=10) {
        for (var p=0; p<height; p+=10) {
            fill(80, 0, 195);
            ellipse(d, e, 8);
            e+=10;
        }
        e=5;
        d+=10;
    }

    //LARGE CIRCLES
    for (var i=0; i<width; i+=100) {
        for (var j=0; j<height; j+=100) {
            drawBottomRight();
            drawBottomLeft();
            drawTopLeft();
            drawTopRight();
            y+=100;
        }
        y=50;
        x+=100;
    }

    //WHITE OUTLINED CIRCLES IN FRONT
    var f=5;
    var g=5;
    for (var q=0; q<width; q+=10) {
        for (var r=0; r<height; r+=10) {
            noFill();
            stroke(255);
            strokeWeight(.35);
            ellipse(f, g, 10);
            g+=10;
        }
        g=5;
        f+=10;
    }

    //TINY GREEN DOTS
    var greenCounter=0;
    for (var k=0; k<width; k+=100) {
        greenCounter+=1;
        if (greenCounter%2==0) {
           circleY=120; 
        } 
        else {
            circleY=20;
        }
        for (var l=0; l<height; l+=200) {
            drawTopCircles();
            circleY+=200;
        }
        circleX+=100;
    }

    //TINY BLUE DOTS
    var blueCounter=0;
    for (var m=0; m<width; m+=100) {
        blueCounter+=1;
        if (blueCounter%2==0) {
            circleY2=80;
        }
        else {
            circleY2=180;
        }
        for (var n=0; n<height; n+=200) {
            drawBottomCircles();
            circleY2+=200;
        }
        circleX2+=100;
    }
}


I wanted to experiment with a geometric pattern and the arc() function we learned this week. I’ve been trying to get myself back up to speed with the unit circle, so I challenged myself to try and get the angles right on the first try rather than trial and error like I normally do. I found that when I really thought through the math and logic first, it was easier to write the program. I also wanted to experiment with some conditionals in my loops. After making my intended pattern, I added some extra loops just to give the visual more dimension.

Looking Outwards-05

https://alteredqualia.com/three/examples/webgl_pasta.html

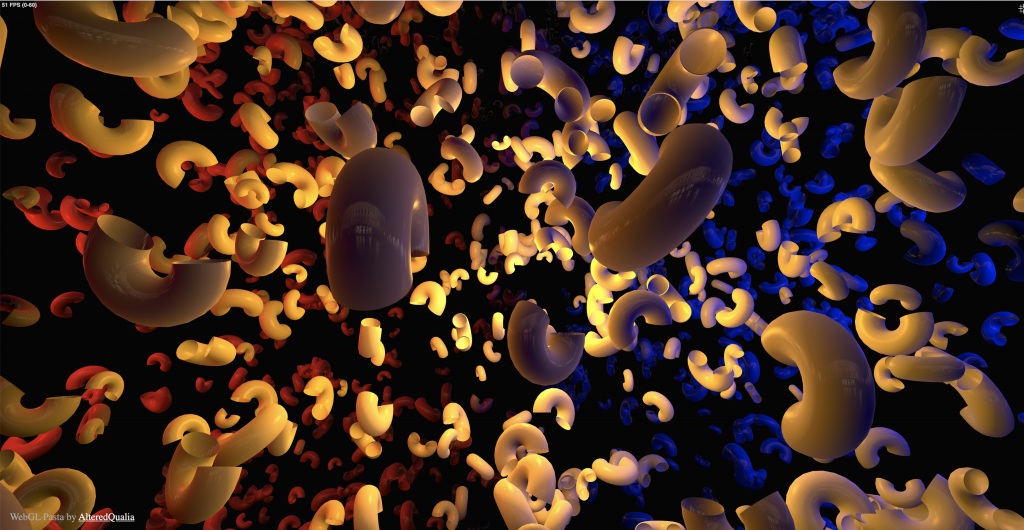
When looking for examples of 3D computer graphics, I found AlteredQualia’s website. This one project called WebGL Pasta caught my attention. It is a 3D rendering of pasta floating through space. The site is interactive, so if you move your mouse, you can explore the space and get it to move in different directions. What I find fascinating about this project, is the amount of depth they were able to achieve through the use of shadow, color, and movement. They were able to create this vast looking environment on a two-dimensional computer screen.

This project was built using WebGL (Web Graphics Library) which is a javascript API. WebGL allows for graphics to be rendered on the web, and it is something I’ve been quite interested in. This WebGL Pasta project seems to have been a creative exploration. I can see the artist’s attention to detail and ability to imagine vast environments. In a lot of their work they use this contrast of red and blue. I’m not quite sure why, but I would love to know their reasoning behind it.

Project 04: String Art

project-04-stringArt
/*
Lauren Kenny
lkenny
Section A

This is a program that creates an abstract string art piece.
*/

function setup() {
    createCanvas(400, 300);
}

function draw() {
    background(0);
    strokeWeight(.2);
    //yellow center
    for(let i=1; i<50; i+=.5) {
        stroke(220, 220, 0);
        line(width/2+10*i, height/2, width/2, 10*i);
    }
    //red center
    for(let i=1; i<50; i+=.5) {
        stroke(220, 0, 0);
        line(width/2-10*i, height/2, width/2, 10*i);
    }
    //blue center
    for(let i=1; i<50; i+=.5) {
        stroke(0, 0, 220);
        line(width/2-10*i, height/2, width/2, height-10*i);
    }
    //green center
    for(let i=1; i<50; i+=.5) {
        stroke(0, 220, 0);
        line(width/2+10*i, height/2, width/2, height-10*i);
    }
    //yellow outside
    for(let i=1; i<50; i+=.5) {
        stroke(220, 220, 0);
        line(10*i, height, 0, (height/2)+(10*i));
    }
    //red outside
    for(let i=1; i<50; i+=.5) {
        stroke(220, 0, 0);
        line(width-10*i, height, width, (height/2)+(10*i));
    }
    //blue outside
    for(let i=1; i<50; i+=.5) {
        stroke(0, 0, 220);
        line(width-10*i, 0, width, (height/2)-(10*i));
    }
    //green outside
    for(let i=1; i<50; i+=.5) {
        stroke(0, 220, 0);
        line(10*i, 0, 0, (height/2)-(10*i));
    }
}

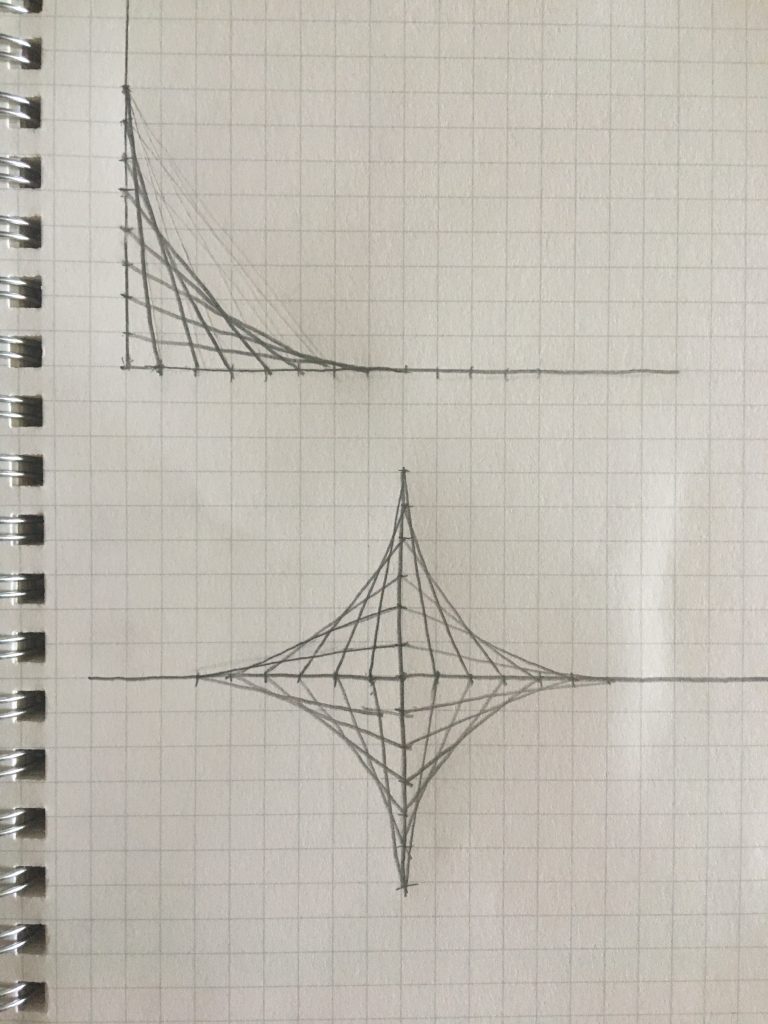
For this project, I wanted to experiment with the illusion of curved lines through looped string art. I focused on repeating shapes and simple colors to create a geometric piece.

Looking Outwards-04

The SoundShirt is a project created by CuteCircuit, a company co-founded by Francesca Rosella and Ryan Genz. This company was founded on the desire to use technology to amplify haptic senses and interactions. In 2002, they made the HugShirt which is a shirt with sensors that recreate the sensation of touch. 14 years later in 2016, they branched off this concept to develop the SoundShirt. The SoundShirt contains even more sensors that connect to different sound frequencies and instruments to deliver a specialized haptic experience designed to allow people who cannot hear to experience music. The shirt is designed to work in different music scenarios including live orchestras, concerts, raves, listening to music on your phone, and even playing video games. The shirt is able to adapt to the different scenarios to provide an experience that allows you to feel the music in the most authentic way possible.

I first learned about this shirt when I saw it in the Access+Ability show at the CMOA in 2019. I instantly fell in love with the project the first time I saw it. I admire the focus on accessibly and utilization of technology and computation to transform sound for a community heavily left behind. Although different than what we might be doing in this class, the similarities are clearly evident. While we might be taking sound and finding a way to convert the experience to something visual, this project takes that same idea and theory of computation to translate sound into something tactile. In both scenarios we are using computation to visualize senses in different ways which I find beautiful. While I believe this project is currently only available for select testing and presentations, I hope it finds a way into the public market because I think it is something really important for people who are deaf to have the chance to experience.

Project-03: Dynamic Drawing

project-03-dynamicDrawing
// Lauren Kenny (lkenny)
// Project 3 - Dynamic Drawing
// Section A

var xpos = 10;
var ypos = 10;
var xstep = 30;
var ystep = 30;
var r = 200;
var g = 10;
var b = 10;
var d = 5;

function setup() {
    createCanvas(450, 600);
    frameRate(35);
    background(220);
}

function draw() {
    //background gets lighter as you move your mouse down
    background(0+mouseY*0.1);
    //color changes with mouse position
    r = .5*mouseX;
    g = .5*mouseY;
    b = 75;
    //creates grid of circles
    //color and size change with mouse position
    noStroke();
    fill(r, g, b);
    for (let j = 0; j < width; j++) {
        for (let i = 0; i < height; i++) {
            ellipse(xpos+(xstep*j), ypos+(ystep*i), (d+mouseY*0.02), (d+mouseY*0.02));
        }
    }
    //ellipse moves with mouse
    stroke(r, g, b);
    noFill();
    ellipse(mouseX, mouseY, 150, 150);
    //changes the horizontal spacing between the circles
    if (xstep > 40) {
        xstep = 30
    }
    if (30<xstep<40) {
        xstep = xstep + 1
    }      
}

Looking Outwards-03

https://n-e-r-v-o-u-s.com/projects/albums/kinematics-dress-1/

https://n-e-r-v-o-u-s.com/projects/albums/kinematics-cloth/

Kinematic Dress

This project was created by Nervous System (Jessica Rosenkrantz and Jesse Louis-Rosenberg) in 2014. They created and used a parametric body modeling software along with another digital tool to digitally create the pattern for this dress and then used a complex physics algorithm to digitally “fold” the dress to print in one piece. The result is a 3D printed dress that can move and flow with you. Somehow they were able to take a material so rigid and structured and transform it into something fluid and soft. It reminded me of looking at a marble statue that was carved to show soft flowing fabric. This is not only a huge achievement for design, but also an achievement for physical objects/materials and the ways that we can use them in the future. I admire their focus on materials and passion for taking a material and transforming it into something totally different. This project inspires me to rethink materials and the possibilities for what they can do. I don’t fully understand the algorithms and computation they used to create this project, but I appreciate their user focused approach through the parametric body modeling application. They are both inspired by patterns found in nature and that shines through the patterning in the dress and the algorithm for how each of the pieces hinge on one another. Patterning in nature can teach us a lot and I admire how they utilized that in this piece.

Project-02: Variable Faces

project-02-variableFaces-lkenny
// Lauren Kenny (lkenny)
// Project 2 - Variable Faces
// Section A

var r = 220;
var g = 220;
var b = 220;
var faceWidth  = 100;
var faceHeight  = 100;
var leftEyeSize = 10;
var rightEyeSize = 10;

function setup() {
    createCanvas(640, 480);
    r = random(256);
    g = random(256);
    b = random(256);
}

function draw() {
    background(r, g, b);
    //ears
    fill(r+50, g+50, b+50);
    stroke(r-50, g-50, b-50);
    ellipse(((width/2)-(faceWidth/2)), (height/2), faceWidth/6, faceHeight/6);
    ellipse(((width/2)+(faceWidth/2)), (height/2), faceWidth/6, faceHeight/6);
    //face
    fill(r+50, g+50, b+50);
    stroke(r-50, g-50, b-50);
    strokeWeight(2);
    ellipse(width/2, height/2, faceWidth, faceHeight);
    //eyes
    ellipse(width/2-20, height/2-20, leftEyeSize, leftEyeSize);
    ellipse(width/2+20, height/2-20, rightEyeSize, rightEyeSize);
    //pupils
    fill(r-50, g-50, b-50);
    noStroke();
    ellipse(width/2-20, height/2-20, leftEyeSize/5, leftEyeSize/5);
    ellipse(width/2+20, height/2-20, rightEyeSize/5, rightEyeSize/5);
    //body
    fill(r+50, g+50, b+50,)
    stroke(r-50, g-50, b-50);
    rect((width/2)-(faceWidth/2), (height/2)+(faceHeight/2)+15, faceWidth, ((height)-(faceHeight)-15), 50, 50);
    //lips
    fill(r+75, 20, 20);
    noStroke();
    arc((width/2-(faceWidth/10)/3), height/2+25, faceWidth/8, faceHeight/10, PI, TWO_PI);
    arc((width/2+(faceWidth/10)/3), height/2+25, faceWidth/8, faceHeight/10, PI, TWO_PI);
    fill(r+95, 50, 50);
    arc((width/2), (height/2+25), faceWidth/6, faceHeight/12, 0, PI);
    //nose
    noFill();
    stroke(r-50, g-50, b-50);
    arc(width/2, height/2, faceWidth/6, 10, 0, PI, OPEN);
}

function mousePressed(){
    r = random(5, 256);
    g = random(5, 256);
    b = random(5, 256);
    faceWidth = random(75, 165);
    faceHeight = random(75, 200);
    leftEyeSize = random(5, 30);
    rightEyeSize = random(5, 30);
}


Looking Outwards-02

See Project Here: http://www.generative-gestaltung.de/2/sketches/?01_P/P_3_1_3_05

See Code Here: https://editor.p5js.org/generative-design/sketches/P_3_1_3_05

This project was made by Niels Poldervaart!

This project is particularly inspiring to me because it uses generative design to explore the relationships between a full text and the individual words which compose it. This project uses visual and interaction design to help people understand the connections between words and the grammar that is behind it all. Understanding the code libraries used to decipher these parts of speech could be really useful for education purposes of teaching grammar and parts of speech.

The algorithm was written in p5.js and used RiTa to analyze the text for parts of speech. The code is based off of for loops, some conditionals, and a lot of variables yet is quite easy to understand. I was shocked to see that something so intricate and complex (to me) was written in only 215 lines of code.

In this work you can see the artist’s love for type and linguistics show through (which aligns with my interests as well!). There are a couple other versions of this concept where they do similar explorations of discourse and individual letters/words shown with different visual configurations. You can really see their understanding and love of visualizing data with simple yet effective methods of type and color.

Project 01: Self-Portrait

project-01-selfPortrait
function setup() {
    createCanvas(400, 450);
    background(255);
    text("p5.js vers 0.9.0 test.", 10, 15);
}

function draw() {
    //background
    fill(244, 203, 195);
    noStroke();
    rect(0, 0, 400, 400);

    //shirt (bottom)
    fill(0);
    rect(100, 380, 200, 20);

    //arms
    fill(214, 179, 161);
    beginShape();
    vertex(108, 320);
    vertex(108, 360);
    vertex(85, 390);
    vertex(250, 410);
    vertex(240, 435);
    vertex(55, 410);
    vertex(50, 395);
    endShape(); //left

    fill(214, 179, 161);
    beginShape();
    vertex(300, 320);
    vertex(300, 360);
    vertex(300, 390);
    vertex(150, 410);
    vertex(155, 435);
    vertex(310, 410);
    vertex(320, 395);
    endShape(); //right
    
    //shirt (top)
    fill(0);
    rect(100, 280, 200, 100, 80, 80, 0, 0);


    //neck
    fill(214, 179, 161);
    rect(180, 220, 40, 80, 20);

    //hair
    fill(51, 26, 16);
    rect(120, 95, 160, 140, 80, 80, 0, 0);

    //face
    fill(214, 179, 161);
    ellipse(200, 180, 130, 150);    //background for face
    fill(193, 154, 138);
    ellipse(200, 230, 40, 10);  //mouth
    fill(51, 26, 16)
    rect(157, 165, 30, 3);
    rect(213, 165, 30, 3);  //eyebrows
    fill(255);
    rect(162, 175, 25, 8, 10);
    rect(213, 175, 25, 8, 10);  //eyes
    if (mouseX <= 200) {
        noStroke();
        fill(51, 26, 16);
        ellipse(165, 180, 6, 6);
        ellipse(215, 180, 6, 6);
    }
        else if (mouseX >= 200) {
            noStroke();
            fill(51, 26, 16);
            ellipse(185, 180, 6, 6);
            ellipse(235, 180, 6, 6);    //pupils
    }

    fill(193, 154, 138);
    quad(192, 205, 197, 180, 203, 180, 208, 205);
    ellipse(200, 205, 16, 10);
    ellipse(192, 203, 8, 8);
    ellipse(208, 203, 8, 8);    //nose
    stroke(255);
    strokeWeight(1);
    line(208, 203, 208, 208);   //nosering
    fill(51, 26, 16);
    noStroke();
    ellipse(225, 220, 2, 2);    //mole
    fill(214, 179, 161);
    ellipse(142, 195, 30, 30);
    ellipse(258, 195, 30, 30);  //ears

    //bangs
    noStroke();
    fill(51, 26, 16);
    arc(200, 155, 110, 120, PI, TWO_PI);


    //earrings
    stroke(255);
    strokeWeight(1);
    noFill();
    ellipse(140, 230, 30, 50);
    ellipse(260, 230, 30, 50);

}

Looking Outwards-01

https://wals.info/feature/1A#2/19.3/152.9

A computational project that I admire is the WALS database. It uses GeoJSON and a lot of linguistic data to compile an interactive map where you are able to see languages plotted on said map. I use this website almost daily to look up different features of languages and compare them to other languages around the world, and I am constantly in awe with how much information they have readily available about thousands of languages. As far as I know, the software for this project utilized existing libraries; however, I am not positive about this. The way this map was designed feels very influenced by paper maps and the experience of physically putting pins on them to note a location. Something that I appreciate is that their code is open source, so anyone can go in there and utilize what they have. This website is an extensive resource for any linguist, but I also think it has the opportunity to be even better. This map interaction is functional, but not the best design-wise. I’ve spent many hours thinking through ways to make this map even better (and I even tried it for a term project!), and I would love to learn more about GeoJSON to make this happen.

Dryer, Matthew S. & Haspelmath, Martin (eds.) 2013.
The World Atlas of Language Structures Online.
Leipzig: Max Planck Institute for Evolutionary Anthropology.
(Available online at http://wals.info, Accessed on 2020-09-06.)