Alessandra Fleck – Project 09 – Portrait

sketch

//Name: Alessandra Fleck 
//Class Section : B
//Email: afleck@andrew.cmu.edu
//Project-09


var photo; //variable to hold image

function preload(){ //load photo being used off of Imgur
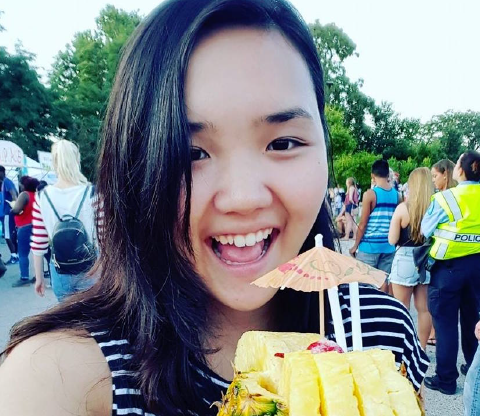
    var myImageURL = "https://i.imgur.com/vCkP5dD.jpg";
    photo = loadImage(myImageURL);
}

function setup(){
    createCanvas(480,480);
    background(0); //sets background to black
    photo.loadPixels();
    frameRate(100000000000000); //load photo pixels quicker
}

function draw() {
    var px = random(width);
    var py = random(height);
    var ix = constrain(floor(px), 0, width-1);
    var iy = constrain(floor(py), 0, height-1);
    var theColorAtLocationXY = photo.get(ix, iy);

    noStroke();
    fill(theColorAtLocationXY);
    ellipse(px, py, 50, 5); //create flat ellipses
}

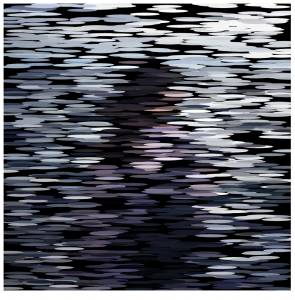
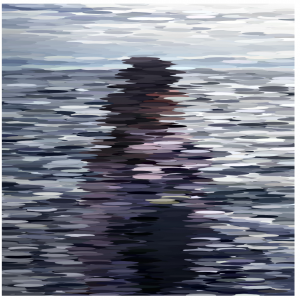
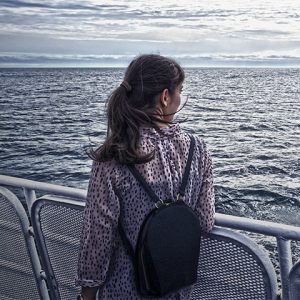
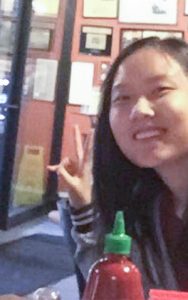
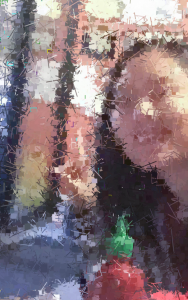
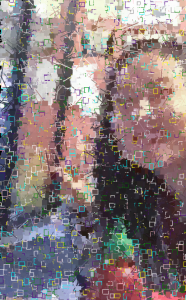
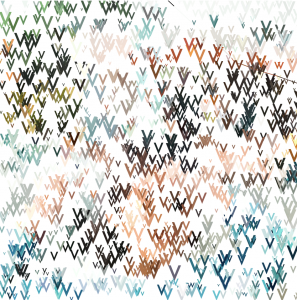
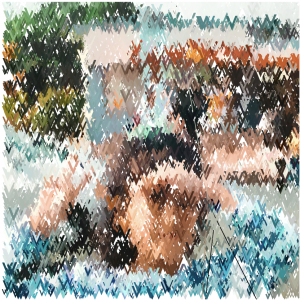
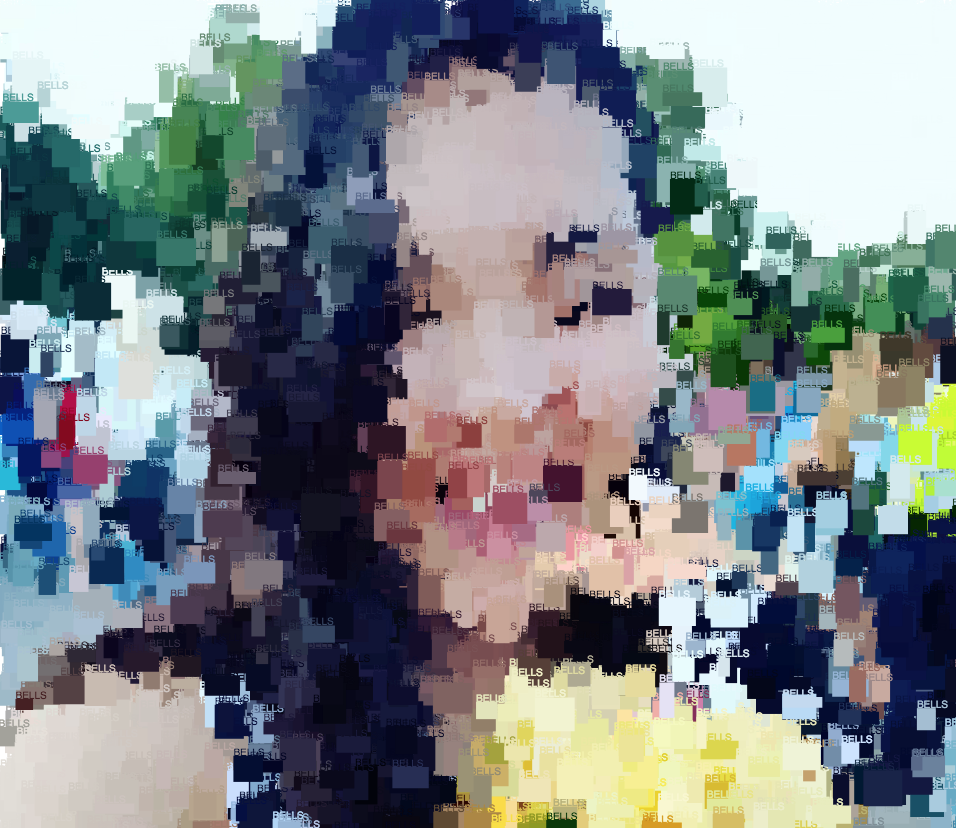
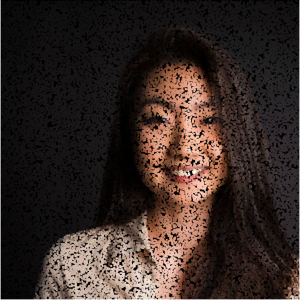
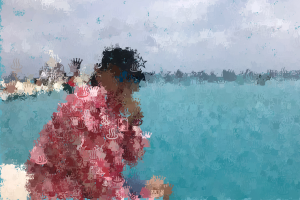
For this assignment I wanted to do a portrait of my sister. I chose this image because of the painting like qualities of it, despite it being an unedited photo. To capture a more oil painting-like stroke, I played with the ellipse height and width. As noted from the process, the wider the ellipse was, the more difficult it was to get the colors to lay and create the image so I kept it relatively shorter in the end.

Xindi Lyu-Project 09-Portrait-Section A

sketch

 
/*
Project 09
Xindi Lyu
Section A
xindil@andrew.cmu.edu
*/

var x
var y
var me;
var Color=["indigo","cyan","grey","yellow","white","pink","claret","green"]
var numbers=[0,1,2,3,4,5,6,7]
var a

function preload() {
    //load in my self portrait
    var URL = "https://i.imgur.com/pjDKzf3.jpg";
    me = loadImage(URL);
}

function setup() {
    //drawing the image
    createCanvas(300, 480);
   frameRate(150);
    me.loadPixels();
    
}

function draw() {
    //Get the colors of the pixels
    x = random(width);
    y = random(height);
    var mx = constrain(floor(x), 0, width-3);
    var my = constrain(floor(y), 0, height-3);
    var theColorAtLocationXY = me.get(mx, my);

    //Enable mouse interactions to gerate stroke elements
    var mousecolor = me.get(mouseX, mouseY);
    //Using lines as pixels
    stroke(theColorAtLocationXY);
    strokeWeight(1);
    line(x+random(-20,20),y+random(-20,20),x+random(-20,20),y+random(-20,20));
     
noStroke();
fill(theColorAtLocationXY)
    //Use rectangles as pixels along with the lines
    rect(x,y, random(5,10),random(5,10));
    a=random(numbers);
    //Create mosaica effect with mouse
fill(mousecolor);
     strokeWeight(0.7);
        stroke(Color[a]);
        rect(mouseX,mouseY,random(5,10),random(5,10));
    }

I used a photo of myself as the base image of this project and experimented with two different strokes to generate a dynamic effect in the result portrait. Also I incorporated an interactive element into the program for the viewers to create “mosaic” effects on the drawing.

(Original Image)

(Stroke effects)

Mosaic effects

Project 09: Portrait

sketch

var underlyingImage;

function preload() {
    var myImageURL = "https://i.imgur.com/24gq2P9.jpg"
    underlyingImage = loadImage(myImageURL);
}

function setup() {
    createCanvas(480, 480);
    background(0);
    underlyingImage.loadPixels();
    frameRate(10);
}

function draw() {
    var px = random(width);
    var py = random(height);
    var ix = constrain(floor(px), 0, width-1);
    var iy = constrain(floor(py), 0, height-1);
    var theColorAtLocationXY = underlyingImage.get(ix, iy);

    noFill();
    stroke(theColorAtLocationXY);
    line(px, py, px, py+24);
    
    var theColorAtTheMouse = underlyingImage.get(mouseX, mouseY);
    fill(theColorAtTheMouse);
    ellipse(pmouseX, pmouseY, 6, 6);

}

So like the code below wasn’t showing up and I literally did not understand what was wrong. I straight up have tried multiple methods of coding this, even duplicated the sample code(which should’ve worked) and it is still not returning the correct image. After a long period of troubleshooting I had to relent. I tried essentially the same code on a mac using the p5.js text editor and it finally worked. Still don’t really know what was wrong.

sketch try 2

// Samantha Ho
// sch1
// Project-09
// Section E

var underlyingImage;

function preload() {
    var myImageURL = "http://saho.studio/img/2018-06-28%2017_41_16.194.jpg";
    underlyingImage = loadImage(myImageURL);
}

function setup() {
    createCanvas(480   , 480);
    background(0);
    underlyingImage.loadPixels();
    frameRate(10);
}

function draw() {
    var px = random(width);
    var py = random(height);
    var ix = constrain(floor(px), 0, width-1);
    var iy = constrain(floor(py), 0, height-1);
    var theColorAtLocationXY = underlyingImage.get(ix, iy);

    noStroke();
    fill(theColorAtLocationXY);
    ellipse(px, py, 6, 6);

   
}

Jisoo Geum – 09 – Portrait

sketch

// Jisoo Geum
// Section B
// jgeum@andrew.cmu.edu 
// Project-09
var underlyingImage;

function preload() {
    var myImageURL = "https://i.imgur.com/B1NyNfc.jpg";
    underlyingImage = loadImage(myImageURL);
}

function setup() {
    createCanvas(480, 480);
    background(255);
    underlyingImage.loadPixels();
    frameRate(5000);
}

function draw() {
    var px = random(width);
    var py = random(height);
    var ix = constrain(floor(px), 0, width-1);
    var iy = constrain(floor(py), 0, height-1);
    var theColorAtLocationXY = underlyingImage.get(ix, iy);

    noStroke();
    fill(theColorAtLocationXY);
    textSize(random(5,30));
    textFont('Futura');
    text( "V", px, py);

    var theColorAtTheMouse = underlyingImage.get(mouseX, mouseY);
    stroke(theColorAtTheMouse);
    line(pmouseX, pmouseY, mouseX, mouseY);
}

I figured that the color palette of the image would be more important than the details so I chose a photo that has all my favorite colors – green, orange, and blue. The girl in the picture is me when I was 8. I changed the ellipse shape into ‘V’ letter simply because I am making a V shape with my fingers. I had fun choosing the photos for this project!

Original image.

Yoo Jin Shin-Project-09-Portrait

Project-09

// Yoo Jin Shin
// Section D
// yoojins@andrew.cmu.edu
// Project-09-Portrait

var underlyingImage;

function preload() {
    var myImageURL = "https://i.imgur.com/P9QQAmA.png";
    underlyingImage = loadImage(myImageURL);
}

function setup() {
    createCanvas(480, 416);
    background(255);
    underlyingImage.loadPixels();
    frameRate(500);
}

function draw() {
    var px = random(width);
    var py = random(height);
    var ix = constrain(floor(px), 0, width-1);
    var iy = constrain(floor(py), 0, height-1);
    var theColorAtLocationXY = underlyingImage.get(ix, iy);

    // drawing rectangles
    noStroke();
    fill(theColorAtLocationXY, random(0, 255));
    rect(px, py, random(5, 20), random(5, 20));

    // writing Bells
    noStroke();
    fill(theColorAtLocationXY);
    textFont('Helvetica');
    textSize(5);
    text("BELLS", px, py);
}

// resets with blank canvas once mouse pressed
function mousePressed() {
    clear();
}

For this project, I used a photo of my friend, Bella. I think this was especially fun and meaningful because it felt as if the final product had a specific recipient. I initially had larger end bounds for the dimensions of the rectangles, but realized that if the rectangles are too big, the end stage seems a bit too abstract to the point that you can hardly recognize the person.


Original photo
Early stage
Near the final stage

Portrait 9 rrandell

sketch

/* Rani Randell
rrandell@andrew.cmu.edu
Section A
Project 9 */

var underImage;

function preload() {
    var ImageURL = "https://i.imgur.com/lmhDtNm.jpg?3";
    underImage = loadImage(ImageURL);
}

function setup() {
    createCanvas(480, 480);
    background(0);
    underImage.loadPixels();
    frameRate(1000);
}

function draw() {
    var px = random(width);
    var py = random(height);
    var ix = constrain(floor(px), 0, width-1);
    var iy = constrain(floor(py), 0, height-1);
    var theColorAtLocationXY = underImage.get(ix, iy);

    noStroke();
    fill(theColorAtLocationXY);
    //text('bff', px, py); part of my experimentation
    
    rect(px, py, 5, 5); 
    ellipse(px, py, 10, 10);
    //ellipse(px + 6, py, 5, 5)
}

Although Georges Seurat’s paintings were not provided as examples for this project I immediately thought of his work, that I am sure is familiar to many of you. I was really inspired by the painterly quality of his work and tried to include that in my portrait using teardrop shapes to stimulate paint blobs. I included one of Seurat’s paintings below:

This is the original underlying picture

This image was me playing around with shapes

Rjpark – Project 08 – Computational Portrait

computationalportrait

var image;

function preload() {
	// directly loading image through website (no URL variable)
    image = loadImage("https://scontent.fagc2-1.fna.fbcdn.net/v/t31.0-8/c87.61.576.576/p720x720/27788553_1801115783266418_6212879640355992453_o.jpg?_nc_cat=110&_nc_ht=scontent.fagc2-1.fna&oh=cc9c38dd3d5a14dcb13a012cd0973bd2&oe=5C7EA0C1");
}

function setup() {
    createCanvas(480, 480);
    background(0);

    image.loadPixels();
    // makes the pixels load faster
    frameRate(500000000000000);
}

function draw() {
    var px = random(width);
    var py = random(height);
    var ix = constrain(floor(px), 0, width-1);
    var iy = constrain(floor(py), 0, height-1);
    var color = image.get(ix, iy);

    noStroke();
    fill(color);
    // pixels are smaller to make the portrait more detailed
    rect(px, py, 3, 3);
}

At first, I had trouble finding a photo that would fit well into the 480 by 480 canvas so I had to look through multiple photos on different websites to find a photo that would be the perfect size. However, once I found that photo, it was easy to make a computational portrait out of it. I used 3 by 3 rectangles as my surface treatment. Because I made my rectangles so small, I had to increase frame rate to 500 trillion for the portrait to be drawn faster. The final result is below!!

project 9

sketch.js

/*
Arden Wolf
ardenw@andrew.cmu.edu
Section B
project 09

*/


var underlyingImage;

function preload() {
    var myImageURL = "https://i.imgur.com/JSqV6vs.jpg?2";
    underlyingImage = loadImage(myImageURL);
}

function setup() {
    createCanvas(413, 480);
    background(0);
    underlyingImage.loadPixels();
    frameRate(1000);
}

function draw() {
    var px = random(width);
    var py = random(height);
    var ix = constrain(floor(px), 0, width-1);
    var iy = constrain(floor(py), 0, height-1);
    var theColorAtLocationXY = underlyingImage.get(ix, iy);
    var size = random(7,20);
    var pie = random(HALF_PI, QUARTER_PI, TWO_PI,PI)

    noStroke();
    fill(theColorAtLocationXY);
    //ellipse(px, py, size, size);
    arc(px, py, size, size, size, pie);


    var theColorAtTheMouse = underlyingImage.get(mouseX, mouseY);
    fill(theColorAtTheMouse);
    arc(pmouseX, pmouseY, size, size, size, pie);
}

I randomized the size and the arc degrees as the shapes that make up the image and also made the color at mouse the same shapes so that the viewer can interact and contribute to the creation of the image.

Han Yu Project 09 Portrait

sketch

// Han Yu
// Section D
// hyu1@andrew.cmu.edu
// Project 09 Portrait

var poolpic; //image variable
var pattern=["♛","♨","☆","♞","✌︎","🀧"]; //stores patterns to be drawn later

function preload() {
    var myImageURL = "https://i.imgur.com/f4kVoqD.jpg";
    poolpic = loadImage(myImageURL);
}

function setup() {
    createCanvas(600,400);
    background(95,171,188);
    poolpic.loadPixels();    
}

function draw() {
    scale(0.333,0.333); //makes the original image smaller

    //location and color variable of each pattern
    var x = random(width*3);
    var y = random(height*3);
    var c = poolpic.get(x, y);
    var randomly = floor(random(0,5.9)); //pattern to be drawn
    var p = pattern[randomly];  //randmly picks an item from pattern

    noStroke();
    fill(c);
    textSize(random(30,80));
    text(p, x, y);
}


In this project I used a picture of my bf. I was inspired by cool symbols and characters used in other people’s projects so I decided to use an array of symbols that describes my bf in my project.

After running three minutes…
The original photo.

Nina Yoo- Project 09- Portrait

sketch


var underlyingImage;
var words = ['bee','key','lee','see','me','knee','allie','nina','i','love'];

function preload() {
    var myImageURL ="https://i.imgur.com/3K9LA06.png"
    underlyingImage = loadImage(myImageURL);
}

function setup() {
    createCanvas(500, 500);
    background(0);
    underlyingImage.loadPixels();
    frameRate(100);
}

var x = -5;

function draw() {
	x += 5;
	for (y = 0; y <height; y+= 10) {
		var theColorAtLocationXY = underlyingImage.get(x,y);
		fill(theColorAtLocationXY);
		rect(x,y,10,10);

	}
    var px = random(width);
    var py = random(height);
    var ix = constrain(floor(px), 0, width-1);
    var iy = constrain(floor(py), 0, height-1);
    var theColorAtLocationXY = underlyingImage.get(ix, iy);

    noStroke();
    fill(theColorAtLocationXY);

    var randomwor = words[round(random(0,words.length))];
    print(randomwor);
    text(randomwor,ix,iy);
  
}

This project was super fun in playing with different ways to load an image. I loved to figure out how to put on the words and create a sweeping image. It was cool to upload an image, but also see the process of developing the pixels.