Jina Lee – Final Project

Here is a video to see how the maze works. 

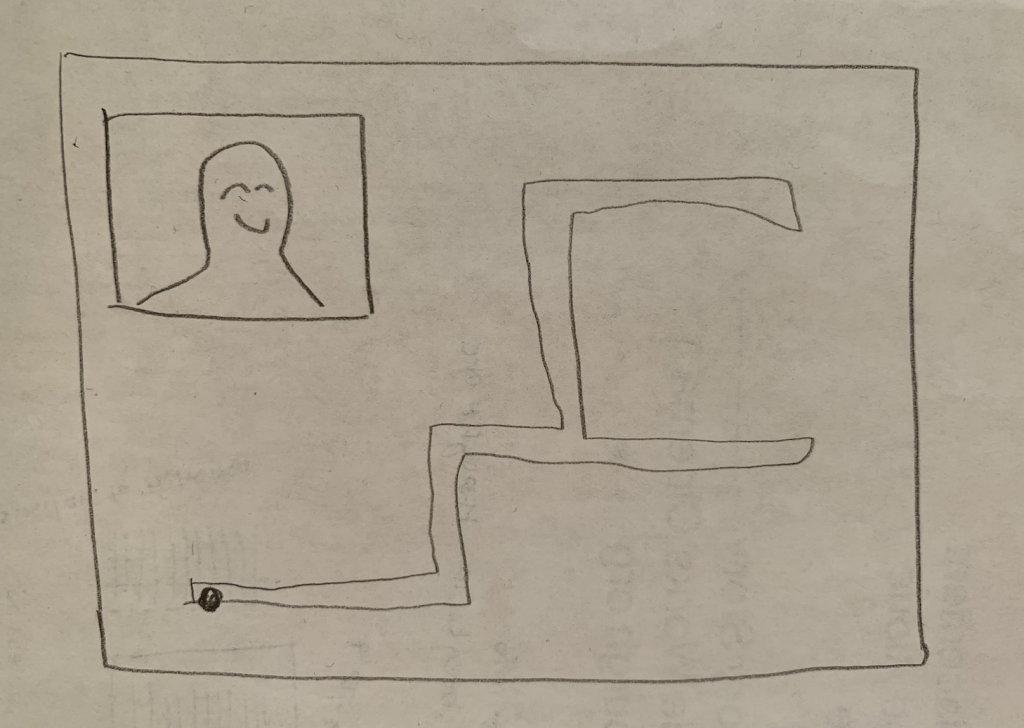
Word Press doesn’t show you the camera screen so it is difficult to navigate the dots because of the file being so big.  Please download this html to play the maze with the camera if you want to see where your tracker is: jinal2-final project. It works best on Chrome. Thank you!

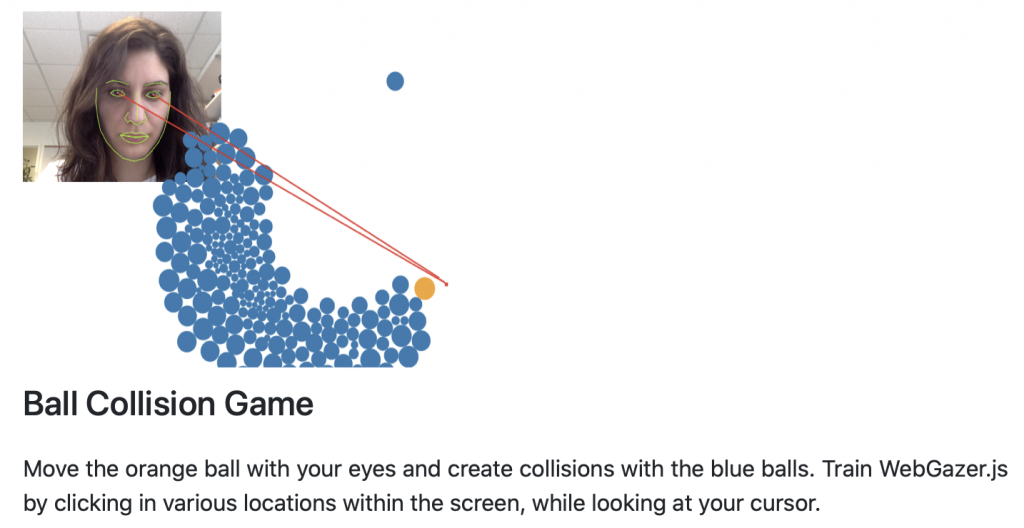
What is it? I know that we did not have much experience with using our webcam into our code, but I really wanted to implement an interactive game that used it. For my project, I wanted to create a camera censored maze game that was moved through your pupils. Before creating the final result, I researched how to sensor your pupils so that the dots follow wherever you look when you are playing the game. However, that was way too ambitious as I struggled to understand how to implement that concept into my code. In the end, I made the camera sensor for any objects that are red so that it will create dots on them.

Due to me not being able to make the game restart when you hit the maze lines, I made the dots go back to the start position when the red tracker is out of the webcam frame. I know that this class is over now, but there are things that I would like to add to my project.  Because it took so much longer to try to get the pupil sensors to work, I did not get to work more on other things that I wanted to get to. First, I want to make an “ERROR” sign when the dots hit the white lines of the maze. In addition, I would want to create an intro that would help people calibrate their red object with the screen so that it is easier to control. I had a lot of fun with this project while also pushing myself to try to create something that was way out of my comfort zone.

sketch

// Jina Lee
// jinal2@andrew.cmu.edu
// Section E
// 15-104 Final Project

// This codes uses the webcam to create red dots that will
// follow any red color on the camera.

var myCaptureDevice;
// This array stores the x value of the red positions
var xarray = [];
// This array stores the y value of the red positions
var yarray = [];
// Limits of x and y arrays
var sizeLimit = 10;
var redCircle = 1;

function setup() {
    createCanvas(500, 500);
    // Camera
    myCaptureDevice = createCapture(VIDEO);
    myCaptureDevice.size(500, 500);
}

function isColor(c) {
    // Tests the colors
    return (c instanceof Array);
}


function draw() {
    // Background
    fill(0);
    rect(0, 0, 500, 500);
    // Maze
    stroke(255);
    strokeWeight(10);
    line(250, 250, 250, 320);
    line(250, 250, 250, 320);
    line(250, 320, 320, 320);
    line(320, 320, 320, 190);
    line(320, 320, 320, 180);
    line(320, 180, 180, 180);
    line(180, 180, 180, 370);
    line(180, 370, 380, 370);
    line(380, 370, 380, 130);
    line(380, 130, 135, 130);
    line(135, 130, 135, 420);
    line(135, 420, 430, 420);
    line(430, 420, 430, 70);
    line(430, 70, 70, 70);
    //boxes
    fill(255);
    noStroke();
    rect(65, 65, 50, 50, 10);
    rect(-5, 150, 100, 100, 10);
    rect(60, 300, 80, 80, 10);
    rect(-10, 430, 70, 70, 10);
    // Starting Spot
    fill(255);
    rect(225, 230, 50, 50, 10);
    textSize(10);
    textFont('Helvetica');
    fill('green');
    text("START", 235, 260);
    // Exit Spot
    fill(255);
    rect(440, 470, 50, 50, 10);
    textSize(10);
    textFont('Helvetica');
    fill('red');
    text("END", 455, 495);

    // Red dots are created because of camera sensor
    var xMin = 0;
    var xMax = 500;
    var yMin = 0;
    var yMax = 500;
    // For loop that draws the dots
    for (var a = 0; a < xarray.length; a++){
        // Ellipse
        if (redCircle === 1){
            noStroke();
            fill('red');
            ellipse(xarray[a], yarray[a], 5, 5);
        }
    }
    for (var i = 0; i < width; i += 5){
        for (var q = 0; q < height; q += 5) {
            var currentColor = myCaptureDevice.get(i, q);
            var r = red(currentColor) - 255;
            var g = green(currentColor) - 0;
            var b =  blue(currentColor) - 0;
            // If rbg matches criteria
            // than get the center point of the red area
            // and put it in an array
            if (isColor(currentColor)){
                var dist = sqrt(sq(r) + sq(g) + sq(b));
                if (dist < 120) {
                    // Finds the location of the red areas on the web cam
                    // Finds the smallest x location
                    if (i > xMin){
                        xMin = i;
                    }
                    // Find the biggest x location
                    if (i < xMax){
                        xMax = i;
                    }
                    // Finds the smallest y loctaion
                    if (q > yMin){
                        yMin = q;
                    }
                    // Finds the biggest y location
                    if (q < yMax){
                        yMax = q;
                    }
                }
    		    }
    	  }
    }
    // Push the new x of red from camera into the array
    xarray.push((xMin + xMax) / 1.9);
    // Push the new y of red from camera into the array
    yarray.push((yMin + yMax) / 1.7);
    // When array is full, it will pop something out from the beginning
    while (xarray.length > sizeLimit) {
        xarray.shift();
        yarray.shift();
    }
}

Jina Lee – Looking Outwards 12

Before starting our final project, I was extremely worried. I was unsure what to do.  When I read the prompt for the final project, I knew I wanted to do something with the webcam. I really enjoyed the assignment where we played with the webcam to create texts that rained on to the screen. I was unsure if I wanted to create just a filter that can be used on webcam. While doing research, I decided that I wanted to use the webcam element and create a game. I found a game called ball strike. It uses the webcam to seem as if you are actually playing. It first senses for your body and then you start playing. The objective of the game is to “touch” as many balls as possible.

The second game that I look at was called Ball Collision Game. I thought this was interesting because you moved the orange ball with your eyes and create collisions with the blue balls. I think it is cool that both games are very interactive with the actual user. In the future, I would like to do something similar. 

This game uses a webcam for people to act as if they are playing soccer.
This game uses the webcam to have your eyes move the orange ball.

Jina Lee – Project 12 Proposal

For my final project, I knew I wanted to use the webcam. I want to create a series of generative mazes that is played through the webcam following your eyes. One of my favorite projects from this past semester was creating text to rain down and turtle patterns. My plan is to expand upon those methods and use new skills I have learned to create fun and interesting mazes. Using primarily loops and turtles, I want to experiment with color, shape, repetition, and other visual characteristics to make the screen look interesting. In addition, I would like to integrate the webcam into game. I would like the game to be played by following the users eyes. Overall, I am looking to have fun with creating images generated by the programming skills and practices that I have learned this semester.

Here is what the screen would look like.
These were types of maps that I was looking at.

Jina Lee – Looking Outwards 11

Here is a photo of Mimus interacting with someone.

Mimus is an industrial robot coded to explore and respond to her surrounding environment from data collected through sensors. Typically industrial robots follow instructive movements, but she is different. She is in a glass room, so that she can interact with people walking around her by approaching them and moving along with their movements. Madeline Gannon is the designer. Gannon created Mimus to help people that fear that robots are taking work away from humans. She believes in “a more optimistic future, where robots do not replace our humanity, but instead amplify and expand it.” In her works, robots are treated as living creatures with emotions rather than objects, and she works towards a relationship of empathy and companionship between man and machine.

For you to better understand what Mimus is, here is a video.

Gannon graduated from Carnegie Mellon University with a Ph.D. in Computational Design. After graduating, she has been developing projects with natural gesture interfaces and digital fabrication. Her work intends to blur the line between man and machine and to break the stereotypical idea of dominance, and to prove that co-existence and collaboration can better amplify our human capabilities. I think it is really cool how she tries to bring together man and machine, because it seems like many people are trying to divide them as much as possible. In addition, as a design major who is interested in computational design, it is interesting to see what she does.

This is a clear sketch model of how Mimus can interact with people.

Jina Lee – Project 11

sketch

// Jina Lee
// jinal2@andrew.cmu.edu
// Project 11
// Section E

var sushi = [];
var count = 0;
var riceSize = 70;

function setup() {
    createCanvas(480, 280);
    // for loop to create the sushi
    for (var i = 0; i < 5; i += 20){
        sushi[i] = makeSushi(width);
    }
    frameRate(120);
}


function draw() {
    count += 1;
    // beige
    background(207, 185, 151);
    sushiText();
    sushiConveyorBelt();
    updateAndDisplaySushi();
    removeSushiThatHaveSlippedOutOfView();
    addNewSushiConstantly();
}

function sushiText(){
    // frame for sign
    fill(150, 0, 0);
    rect(340, 22, 120, 48, 5);
    // white sign
    fill(255);
    rect(350, 28, 100, 35, 5);
    // turned on open sign
    fill(150, 0, 0);
    textSize(18);
    text("OPEN", 370, 52);
    // menu
    fill(255);
    rect(50, 22, 250, 150);
    fill(0);
    textSize(30);
    text("menu", 70, 60);
    stroke(0);
    strokeWeight(3);
    line(75, 100, 240, 100);
    line(75, 80, 280, 80);
    line(75, 90, 280, 90);
    line(75, 110, 280, 110);
    line(75, 120, 100, 120);
    line(75, 130, 240, 130);
    line(75, 140, 240, 140);
    line(75, 150, 280, 150);
}

function updateAndDisplaySushi(){
    for (var i = 0; i < sushi.length; i++){
        sushi[i].move();
        sushi[i].display();
    }
}


function removeSushiThatHaveSlippedOutOfView(){
    var sushiToKeep = [];
    for (var i = 0; i < sushi.length; i++){
        if (sushi[i].x + sushi[i].breadth > -200) {
            sushiToKeep.push(sushi[i]);
        }
    }
    sushi = sushiToKeep;
}

// keeps adding sushi to the end
function addNewSushiConstantly() {
    if (count > 270) {
        sushi.push(makeSushi(width));
        count = 0;
    }
}

// update sushi position every frame
function sushiMove() {
    this.x += this.speed;
}

// draw the sushi
function sushiDisplay() {
    var Height = 30;
    fill(255);
    noStroke();
    push();
    translate(this.x, height - 40);
    // plate
    fill(161, 206, 94);
    ellipse(35, -Height/7, 110, 30)
    rect(5, 5, 60, 10);
    // rice
    fill(255);
    rect(0, -Height, riceSize, 30);
    // eel
    fill(139,69,19);
    rect(0, -Height - 20, riceSize, 20);
    // seaweed
    fill(0);
    rect(25, -Height - 20, riceSize/4, 20);
    // plate
    fill(16, 52, 166);
    ellipse(175, -Height/7, 110, 30);
    rect(145, 5, 60, 10);
    // rice
    fill(255);
    rect(140, -Height, riceSize, 30);
    // tuna
    fill(234, 60, 83);
    rect(140, -Height - 20, riceSize, 20);
    pop();
}

function makeSushi(birthLocationX) {
    var sushi = {x: birthLocationX,
                breadth: 60,
                speed: -1.0,
                move: sushiMove,
                display: sushiDisplay}
    return sushi;
}

function sushiConveyorBelt() {
    // grey
    stroke(200);
    strokeWeight(30);
    line (0, height - 10, width, height - 10);
}

Here is the sketch of what I envisioned.

For this project, I am creating a sushi conveyor belt. I was inspired because back home, there is an all you can eat sushi restaurant that has sushi on a conveyor belt. The sushi is what moves. I made the signs static so it seems as if you are sitting at the table watching the sushi pass through. I created eel and tuna sushi.

Jina Lee – Project 10

sketch

// Jina Lee
// jinal2@andrew.cmu.edu
// Section E
// Project 10
var x = 0;
var cloudmove = 1;
var boathorn;
var seagulls;
var wave;
var help;

function preload() {
    help = loadSound("https://courses.ideate.cmu.edu/15-104/f2019/wp-content/uploads/2019/11/help.wav");
    boathorn = loadSound("https://courses.ideate.cmu.edu/15-104/f2019/wp-content/uploads/2019/11/boathorn.wav");
    seagulls = loadSound("https://courses.ideate.cmu.edu/15-104/f2019/wp-content/uploads/2019/11/seagulls.wav");
    waves = loadSound("https://courses.ideate.cmu.edu/15-104/f2019/wp-content/uploads/2019/11/waves.wav");
}


function setup() {
    createCanvas(480, 480);
    background(173, 216, 230);
}

function draw() {

    cloudDraw();
    //person
    noStroke();
    fill(226, 63, 41);
    ellipse(300, 200, 15, 40);
    fill(229, 194, 152);
    ellipse(300, 170, 20, 20);
    //flag
    fill(255);
    triangle(200, 100, 200, 130, 250, 115);
    stroke(0);
    strokeWeight(5);
    line(200, 100, 200, 300);
    //boat
    noStroke();
    fill(101, 67, 33);
    arc(250, 200, 350, 400, 0, PI, TWO_PI);
    fill(150);
    rect(150, 170, 30, 30);
    arc(165, 160, 50, 50, 0, PI, TWO_PI);
    //waterwaves
    fill(0, 143, 198);
    rect(0, 320, width, 160);
    for (var i = 0; i < 700; i += 30) {
        push();
        translate(-200 * 1, 0);
        fill(0, 143, 198);
        triangle(i, 320, i + 20, 290, i + 40, 320);
        pop();
    }
}

function cloudDraw() {
    noStroke();
    //sky color
    fill(173, 216, 230);
    rect(0, 0, width, height/2);
    //cloud color
    fill(230);
    //cloud move
    x = x + cloudmove;
    if(x >= width + 10){
        x = 0;
    }
    //cloud parts and drawing multiple clouds in sky section
    for (i = 0; i <= 10; i++) {
        push();
        translate(-200 * i, 0);
        ellipse(x + 10, height / 4, 50, 50);
        ellipse(x + 50, height / 4 + 5, 50, 50);
        ellipse(x + 90, height / 4, 50, 40);
        ellipse(x + 30, height / 4 - 20, 40, 40);
        ellipse(x + 70, height / 4 - 20, 40, 35);
        pop();
    }
}


function mousePressed(){
    // when you press the grey horn
    // then a boat horn will start playing
    var b = dist(mouseX, mouseY, 150, 170);
    if (b < 50) {
        boathorn.play();
    }
    // when you press the person
    // the person shouts for help
    var d = dist(mouseX, mouseY, 300, 170);
    if (d < 20) {
        help.play();
    }
    // when you press the ocean
    // the waves start playing
    if (mouseX > 0 & mouseX < width && mouseY > 320 && mouseY < height) {
        waves.play();
    }
    // when you press the sky
    // seagulls will start chirpping
    if (mouseX > 0 & mouseX < width && mouseY > 0 && mouseY < 320) {
        seagulls.play();
    }
}

For this week, I wanted to create a person lost at sea. When you press the sky, you will hear seagulls everywhere. When you click on the person’s head, you can hear him saying “help, help.” When you press the water, you will hear the ocean waves. When you press the grey horn, you will hear a boat horn go off.

Jina Lee – Looking Outwards 10

This is an image of what The Cycling Wheel is.

This week I decided to look at Keith Lam, Seth Hon and Alex Lai’s The Cycling Wheel. This project utilized Arduino as well as other processing softwares to make the bicycle an instrument of light and sound. I was drawn to this project, because I am currently taking an Introduction to Arduino class. I was intrigued with how they use this application because I can barely make an LED light turn on and off. When you turn the wheel of the bicycle, it turns different aspects such as the music and light bean and color of the light would be altered. The bike itself becomes an instrument and the controllers of the wheel become the musician. This concept is something I have never seen and thought it was so extremely creative.

With this project I admire how it allows anyone to become a musician. From my limited experience with Arduino, I am assuming that they were able to alter the color of the LED strip though the influence of the motion of the wheel. I am still unsure how they were able to connect the motion of lights with sound. I think this is a great example of how someone can incorporate sound with computational lights.

This is another image of The Cycling Wheel.

Jina Lee – Looking Outwards 09

Puppet Parade

For this weeks looking outwards, I was able to go back and look through all the other projects that my classmates looked at. I found Margot Gersing’s Looking Outwards week 8 to be extremely interesting. She watched a lecture by Theo and Emily of  Design I/O from Eyeo 2012. I was intrigued with what this studio does particularly their interactive shadow hand puppets project: Puppet Parade. 

They used Kinect to do arm tracking for the Puppet Parade.

I thought it was cool that the reason they create these projects is to encourage children to explore and openly play. One of their projects is a game about sharing resources and sustainability and the children not only have to interact with the program but also each other in order to keep up the simulation. They use the Kinect tracking device quite a lot in their projects and hack it different ways to do what they want, like make giant animated. While looking at this project, even though it is for children, for me it seems fun and a design that I would like to interact with.

Jina Lee – Project 09

sketch

//Jina Lee
//jinal2@andrew.cmu.edu
//Section E
//Project-09-Portrait

var myImage;

// preloads photo of my dogs and I
function preload() {
    var myImgURL = "https://i.imgur.com/Ux0KKiz.jpg";
    myImage = loadImage(myImgURL);
}


function setup() {
    createCanvas(640, 480);
    background('black');
    // the image is too big so have to shrink it to fit canvas
    myImage.resize(640, 480);
    myImage.loadPixels();
}

function draw() {
    // chooses a random x value located near the cursor
    var randomX = floor(random(mouseX - 15, mouseX + 15));
    // chooses a random y value located near the cursor
    var randomY = floor(random(mouseY - 15, mouseY + 15));
    // selects the color from a pixel at a random point near the cursor
    fill(myImage.get(randomX, randomY));
    // draws a circle
    dot(randomX, randomY);
}

// creates dot shape
function dot(x, y) {
    push();
    noStroke();
    translate(x, y);
    ellipse(0, 2, 5, 5);
    pop();
}

For this weeks assignment, I had a lot of fun playing with the image. I used dots to create the photo of my dogs and I when I was younger. It was interesting when I was able to change the circle sizes. I stuck with size 5 because it made the design seem easy to comprehend while also not being extremely clear. I tried size 10 and it seemed too blurry.

This is a reference of what photo I used for this project.

Jina Lee – Looking Outwards 08

This video is of Mario Klingemann’s speech at the 2015 Eyeo Festival.

Mario Klingemann is a German artist who is known for being one of the first people to utilize computer programming with arts. His works and studies involve researching the connections between creativity, culture and perception through the perspectives of artificial intelligence and mechanical learning. He told his speech the 2015 Eyeo Festival. He discusses about his approaches towards the concept of “order” from the perspectives of a programmer and an artist. I was interested in his work with the image collections of the British Library Labs. In this work, Klingemann classified 1 million images from the British Library Lab. He did this by using machines learning techniques to define different index for each image. He created an artwork with the information he obtained. Through the assignment we just did that involves locating the brightest pixel of the image, I admire this project so much for his skills of being able to sort through such a gigantic array of information. In his presentation, Klingemann uses various images and diagrams to help people better understand and visualize the information that he is trying to communicate. As a student who is interested in communication design, I am studying how to ease the process of transfer of information between different types of people. His method of coordinately visual graphical information through data maps with his presentation really made the data-grasping task of mine as an audience a lot smoother and this is what I am trying to learn from in design too.

Mario Klingemann’s collection.