Yoo Jin Shin-Project-07-Curves

Place mouse on canvas!

// Yoo Jin Shin
// Section D
// yoojins@andrew.cmu.edu
// Project-07-Curves


function setup() {
    createCanvas(480, 480);
}

function draw() {
	background(255);

	// Stroke color and weight based on mouseX
	var R = map(mouseX, 0, width, 170, 250);
	var W = map(mouseX, 0, width, 0.3, 1.5);

	push();
	translate(mouseX, mouseY);

	// Gray shadow curve properties
	stroke(240);
	strokeWeight(4); 
	drawCurve2();

	// Colored curve properties
	stroke(R, 200, 200);
	strokeWeight(W);
	drawCurve1();

	pop();
}

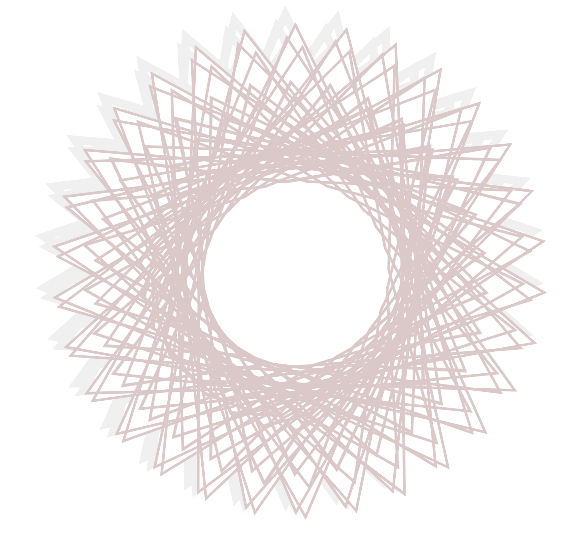
// Hypocycloid Pedal Curve (HPC)
function drawCurve1() { 
	var x;
	var y;
	var t = PI;
	var a = map(mouseX, 0, width, 0, 200);
	var n = map(mouseY, 0, height, 0, 10);

	beginShape();
		for(var i = 0; i < width; i++) {
			// HPC equations from Wolfram
			x = a * ((n - 1) * cos(t) + cos((n - 1) * t)) / n
			y = a * ((n - 1) * sin(t) - sin((n - 1) * t)) / n
			vertex(x, y);
			t += 1.3;
		}
	endShape();
}

// HPC Gray Shadow
function drawCurve2() { 
	var x;
	var y;
	var t = PI;
	var a = map(mouseX, 0, width, 0, 200);
	var n = map(mouseY, 0, height, 0, 10);

	beginShape();
		for(var i = 0; i < width; i++) {
			// Same as Curve1, but shifted slightly left/down
			x = a * ((n - 1) * cos(t) + cos((n - 1) * t)) / n - 5;
			y = a * ((n - 1) * sin(t) - sin((n - 1) * t)) / n - 5;
			vertex(x, y);
			t += 1.3;
		}
	endShape();
}

I looked through several different curves on the Wolfram website and ended up choosing the Hypocycloid Pedal Curve. I really liked the range of patterns that it produced when I mapped its properties to the mouse position. I decided to also gradually alter the color and stroke weight (based on the position) for more variety. I tried creating more depth by adding a slightly shifted and faded duplicate of the colored curve, similar to a shadow. Few of the different curves are shown below: 

Yoo Jin Shin-LookingOutwards-07

eCloud

eCloud (2010), San Jose International Airport

ECloud (2010) is “a dynamic sculpture inspired by the volume and behavior of an idealized cloud.” It was designed by Aaron Koblin, Dan Goods, and Niki Hafermaas and is currently handing above in the San Jose International Airport. The tiles’ opacity updates periodically by real time weather data from around the world. The algorithm seems to take in values like sky weather, temperature, wind speed, direction, humidity, and visibility to produce the tile patterns and opacities. I love the simplicity of this installation and how it almost resembles indoor clouds. I think it’s a cool way to abstractly depict clouds and would be looking above if I were to come across this on my way around the airport.

Yoo Jin Shin-Project-06-Abstract-Clock

Project-05

// Yoo Jin Shin
// Section D
// yoojins@andrew.cmu.edu
// Project-06-Abstract-Clock

var prevSec;
var millisRolloverTime;
var x = [50, 61, 83, 69, 71, 50, 29, 31, 17, 39];
var y = [358, 377, 383, 400, 422, 413, 422, 400, 383, 377];

function setup() {
    createCanvas(480, 480);
    millisRolloverTime = 0;
    frameRate(10);
}

function draw() {
    background(0); 
    fill(255);
    noStroke(0);
    
    // Fetch the current time
    var H = hour();
    var M = minute();
    var S = second();
    
    if (prevSec != S) {
        millisRolloverTime = millis();
    }
    prevSec = S;
    var mils = floor(millis() - millisRolloverTime);
   
    var hourW = map(H, 0, 23, 0, width);
    var minuteW = map(M, 0, 59, 0, width);
    
    var secondsWithFraction = S + (mils / 1000.0);
    var secondsWithNoFraction = S;
    var secondBarWChunky = map(secondsWithNoFraction, 0, 60, 0, width);
    var secondBarWSmooth = map(secondsWithFraction, 0, 60, 0, width);

    // Hour yellow ellipse
    noStroke();
    fill(255, 237, 101, 255);
    ellipse(width / 4, height / 4, hourW, hourW);

    // Minute green ellipse
    fill(92, 220, 82, 230);
    ellipse(width - 30, height / 3 + 40, minuteW, minuteW);

    // Second blue ellipse
    fill(171, 213, 255, 200);
    ellipse(width / 2, height / 2, secondBarWChunky, secondBarWChunky);

    // Millisecond red ellipse
    fill(240, 32, 32, 200);
    ellipse(width - 50, height - 50, secondBarWSmooth, secondBarWSmooth);

    // Text of the current time
    fill(255);
    textFont("Futura");
    textSize(12);
    text("HOUR: " + H, 10, 22);
    text("MINUTE: " + M, width - 80, height / 3 + 40);
    text("SECOND: " + S, width / 2 - 30, height / 2 + 3);
    text("MILLISECOND: " + mils, width - 120, height - 50);


    // Big star 
    var nPoints = x.length;
    fill(255);
    
    beginShape();
    for (var i = 0; i < nPoints; i++) {
        var px = x[i] + random(-1, 1);
        var py = y[i] + random(-1, 1);
        vertex(px,py);
    }
    endShape(CLOSE);
    
    // Small star
    beginShape();
    for (var i = 0; i < nPoints; i++) {
        var px = x[i] + random(-1, 1);
        var py = y[i] + random(-1, 1);
        vertex(px,py);
    }
    scale(0.5, 0.5);
    endShape(CLOSE);
}

I tend to associate time with space, probably because they’re both used when describing dimensions. So when I thought of space, I thought of outer space— the sun, stars, moons, and various planets floating about in darkness. For this project, I tried to abstractly visualize time in an outer space setting, with each element of time (hour, min, sec, ms) represented with an element in outer space. My original idea was to animate a story of a comet approaching and causing an explosion, but it was difficult to time the movements that I pictured accordingly.

Rough sketch of design

Yoo Jin Shin-LookingOutwards-06

Randomness

ffttfftt by Manolo Gamboa Naon

The generative art above is one of six pieces in the series, ffttfftt by creative coder Manolo Gamboa Naon from Argentina. Naon uses programming and randomness in geometric patterns (in this case, circles and rectangles), textures, and overloading to create series of generative art that share similar vibes, but differ in the specific position, size, and color of each element. I think it’s cool how despite being random, this piece seems fairly ordered and in harmony. If you don’t look carefully, the six pieces in the series look almost identical! I also like the color palette of this piece and how Naon uses mostly the three primary colors in higher saturation for the larger top-layer elements, and more pale colors for the background layer.

Yoo Jin Shin-Project-05-Wallpaper

Project-05

// Yoo Jin Shin
// Section D
// yoojins@andrew.cmu.edu
// Project-05-Wallpaper

var ellipseSize = 8;
var rectSize = 8;
var R = 120;
var G = 50;

function setup() {
    createCanvas(392, 500);
    noLoop();
}

function draw() {
	background(191, 166, 149);
	for (var y = height / 2.4; y < height; y+=35) {
		for (var x = 20; x < width; x += 50) {

			// rectangles
			fill (R, G, 50);
			noStroke();
			rectMode(CENTER);
			rect(x, y, rectSize, rectSize);

			// circles
			fill(230, 212, 200);
			stroke(R, 52, 52);
			strokeWeight(2);
			ellipse(x, y, ellipseSize, ellipseSize);

			// lines
			stroke(255);
			strokeWeight(0.5);
			line(x, 0, x, height);

			stroke(255);
			strokeWeight(0.5);
			line(x - 3, 0, x - 3, height);

			stroke(255);
			strokeWeight(0.5);
			line(x + 3, 0, x + 3, height);

			ellipseSize += 0.15;
			rectSize += 0.3;
			R -= 0.7;
			G += 0.8;
		}
	}
}

I was looking at the plain, default curtains in my dorm room and was inspired to create this design. I used the original taupe color as the base and tried to make it more interesting by adding geometric shapes (circles and squares) with gradient color changes. I tried to prevent making the design seem too congested so I started the shapes from around mid-height. I stuck with a more, toned down, deep color palette to match with the upcoming fall season. Throughout this process, I thought it was really difficult to create a design that I would actually purchase. Even though my intention was to amp up my plain curtains, I’m unsure whether I would choose this over the original. Perhaps this will be more suitable for another purpose, not curtains.

Yoo Jin Shin-LookingOutwards-05

Tentacle Tower

Tenacle Tower (2005) by Yoichiro Kawaguchi

Tenacle Tower by Yoichiro Kawaguchi is a mixed-reality work that “represents the growing visual impact of lenticular 3D imaging.” The dimensions of this work is 1 m x 1 m x 1.8 m and was displayed along the wall in Kawaguchi exhibition, SIGGRAPH 2005: Threading Time. This image seems to play with people’s abilities to shift perspectives when viewing images—at times it seems like there is movement downwards, but at other times it seems to draw you into the image. It also seems futuristic due to the chrome-like theme, and looks like something one may encounter in a sci-fi movie. This image is composed of repeating elements (like pattern and color), but also varying ones (like size and angles) that were probably incorporated into the algorithm to produce this piece.

Yoo Jin Shin-Project-04-String-Art

Project-04

// Yoo Jin Shin
// Section D
// yoojins@andrew.cmu.edu
// Project-04


function setup() {
    createCanvas(400, 300);
}

function draw() {
    background(0);

    // two white-ish rectangles in background
    fill(235);
    noStroke();
    rect(0, 220, width, 80);
    rect(0, 0, width, 80);

    var x1;
    var x2;
    var y1;
    var y2;

    var stepSize1 = 7.5;
    var stepSize2 = 10;
    var stepSize3 = 7;
    var stepSize4 = 3;

    // dark grey lines
    for (x2 = 0; x2 < width; x2 += stepSize2) {
        x1 = 0;
        y1 = 0;
        y2 = height;
        stroke(70);
        strokeWeight(1);
        line(x1, y1, x2, y2);
    }

    // dark blue lines 
    for (x1 = 0; x1 < width; x1 += stepSize1) {
        stroke(0, 0, 255);
        strokeWeight(1.5);
        line(x1, y1 += 2, x2 -= 10, y2 -= 1);
    }

    // dark pink lines 
    for (x1 = 0; x1 < width; x1 += stepSize1) {
        stroke(255, 200, 255);
        strokeWeight(2);
        line(x1, y1 += 4.5, x2 += 14.9, y2 -= 1.2);
    }

    // white lines
    for (x2 = 0; x2 < width; x2 += stepSize3) {
        x1 = width;
        stroke(255);
        strokeWeight(1.5);
        line(x1 -= 10, y1 -= 80, x2, y2 += 10);
    }

    // black circle in center background
    fill(0);
    noStroke();
    ellipse(width / 2, height / 2, 180, 180);

    // purple lines
    for (y2 = 0; y2 < height; y2 += stepSize4) {
        stroke(160, 50, 255);
        strokeWeight(1.5);
        line(x1 += 100, y1 += 30.5, x2 -= 5.6, y2);
    }

    noLoop();
}

It was interesting to experiment with the different types of lines and curves to create this string art. I think the sound-art article that I read recently about the Multiverse and black holes subconsciously influenced my design.

Yoo Jin Shin-LookingOutwards-04

Multiverse

The video above captures “Multiverse,” an audio-visual installation by fuse* that attempts to create the “eternal birth and death of infinite parallel universes.” This project is inspired by the multiverse theory by Lee Smolin. “According to this theory, our universe is only one in a much larger cosmos (the Multiverse), a member of a growing community of universes, each one being born from the collapse following the formation of a black hole.”

The various, unique scenes are generated by an application developed in openFrameworks, while the sounds are produced using a generative sound system in Ableton Live and Max/MSP. I think the eerie sounds fading in and out match really well with the visuals and play a significant part in creating this space-like experience.

Overall, I think the the visuals and sounds in this installation are truly mesmerizing. Simply looking at it through the screen has this powerful effect so I wonder how it would feel like if I were that person in the video, being immersed in the Multiverse. I think it’s interesting that the creators used a theory proposed in the science community to physically conceptualize it through this audio-visual installation.

Yoo Jin Shin-Project-03-Dynamic-Drawing

Project-03

// Yoo Jin Shin
// Section D
// yoojins@andrew.cmu.edu
// Project-03

var eyeSize = 50;

// top pupil
var pupilSizeL = 5;
var pupilSizeR = 6;

// bottom pupil
var pupilSize2L = 10;
var pupilSize2R = 10;
var pupilLeftX2 = 128;
var pupilLeftY2 = 164;
var pupilRightX2 = 210;
var pupilRightY2 = 166;

var faceHeight = 300;
var faceR = 244;
var faceG = 240;
var faceB = 132;

function setup() {
    createCanvas(640, 480);
}
 
function draw() {
    // gradient background that changes with mouse position
    var backgroundR = mouseX * 0.39;
    var backgroundG = mouseY * 0.53;
    var backgroundB = 255;
    background(backgroundR, backgroundG, backgroundB);
    noStroke();

    // face width that enlarges from 10 to width as mouseX moves right
    fill(faceR, faceG, faceB);
    ellipse(180, 180, constrain(mouseX, 10, width), faceHeight);

    // left eye
    fill(0);
    ellipse(140, 160, eyeSize, eyeSize);

    // left pupil that follow mouse within left eye boundary
    fill(255);
    ellipse(constrain(mouseX, 125, 153), constrain(mouseY, 150, 168), pupilSizeL, pupilSizeL);
    ellipse(pupilLeftX2, pupilLeftY2, pupilSize2L, pupilSize2L);

    // left eyebrow
    fill(backgroundR, backgroundG, backgroundB);
    rect(125, 123, 25, 7, 3);

    // right eye
    fill(0);
    ellipse(220, 160, eyeSize, eyeSize);

    // right pupil that follow mouse within right eye boundary
    fill(255);
    ellipse(constrain(mouseX, 207, 230), constrain(mouseY, 150, 168), pupilSizeR, pupilSizeR);
    ellipse(pupilRightX2, pupilRightY2, pupilSize2R, pupilSize2R);

    // right eyebrow
    fill(backgroundR, backgroundG, backgroundB);
    rect(210, 123, 25, 7, 3);

    // mouth
    fill(backgroundR, backgroundG, backgroundB);
    arc(180, 180, 20, 40, TWO_PI, PI);

    // "SNOW" text that enlarges from 20 to mouseX as mouse moves right
    fill(255);
    noStroke();
    textSize(20 + mouseX / 4);
    textFont('Helvetica');
    text('SNOW', constrain(mouseX, 0, width), 390);

    // background snow that follows mouse position
    push();
    translate(mouseX + 1, mouseY + 1);
    rotate(radians(20));
    fill(255);
    noStroke(255);
    ellipse(mouseX + 5, mouseY + 5, 8, 8);
    ellipse(mouseX + 10, mouseY + 50, 3, 3);
    ellipse(mouseX + 80, mouseY + 50, 10, 10);
    ellipse(mouseX + 50, mouseY + 200, 20, 20);
    ellipse(mouseX + 20, mouseY + 100, 8, 8);
    ellipse(mouseX + 100, mouseY + 90, 14, 14);
    ellipse(mouseX + 52, mouseY + 100, 8, 8);
    ellipse(mouseX + 102, mouseY + 200, 3, 3);
    ellipse(mouseX + 88, mouseY + 300, 10, 10);
    ellipse(mouseX + 502, mouseY + 400, 20, 20);
    ellipse(mouseX + 202, mouseY + 430, 8, 8);
    ellipse(mouseX + 102, mouseY + 240, 14, 14);
    ellipse(mouseX - 5, mouseY - 5, 8, 8);
    ellipse(mouseX - 10, mouseY - 50, 3, 3);
    ellipse(mouseX - 80, mouseY - 50, 10, 10);
    ellipse(mouseX - 50, mouseY - 200, 20, 20);
    ellipse(mouseX - 20, mouseY - 100, 8, 8);
    ellipse(mouseX - 100, mouseY - 90, 14, 14);
    pop();
}

I modified my variable face to make it more interactive by adding features like face shape, color, text, and snow that change as the mouse position changes. I think it’s interesting how depending on the face width, the face can range from looking like a fish to a pancake.

Yoo Jin Shin-LookingOutwards-03

Meshu: 3D-Printed Custom Jewelry

Process diagram and example Meshu earrings

In 2012, Rachel Binx and Sha Hwang launched their 3D-printed custom jewelry business, Meshu. Binx and Hwang found a way to materialize and share their expertise in design technology and love for travel. A customer simply needs to enter locations of personally significant cities and a “Meshu” is generated and fabricated. “The data for Meshu comes from OpenStreetMap, and is served from Mapzen.”

I think the whole concept of Meshu is unique and very personal. It goes beyond capturing memories through photos or buying a souvenir magnet from the places you’ve traveled. The custom jewelry seem bold, but their special significance is not explicit— many would assume the piece is simply a random geometric shape. However, since the algorithm uses the meaningful locations specified by each customer, it always creates a unique piece.