Project-04- String Art

sketchDownload

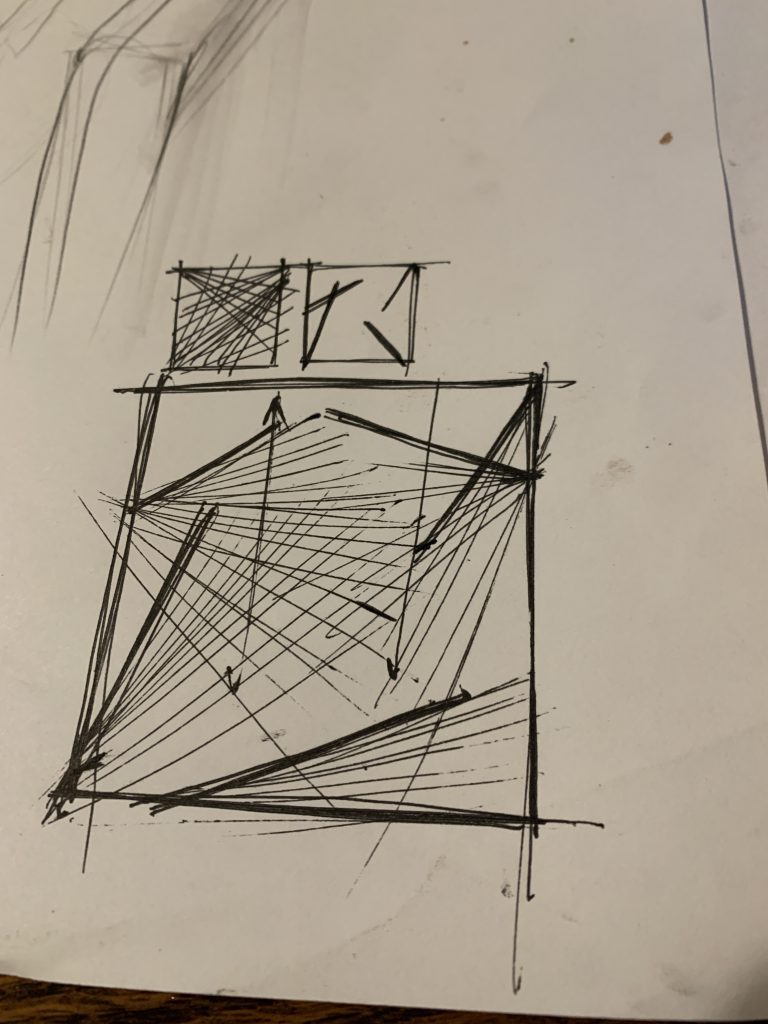
//Project 4 - String Art Mail Envelope Drawing
//sp17
//Section C

var dx1;
var dy1;
var dx2;
var dy2;
var numLines = 50;

var dx3;
var dy3;
var dx4;
var dy4;

var dx5;
var dy5;
var dx6;
var dy6;


function setup() {
    createCanvas(400, 300);
    background(200);

//envelope flap
    line(40, 40, 150, 200);
    line(360, 40, 250, 200);
    dx1 = (150-40)/numLines;
    dy1 = (200-40)/numLines;
    dx2 = (250-360)/numLines;
    dy2 = (200-40)/numLines;

//horizontal body
    fill(255,0,0);
    line(40,40,40,250);
    line(360,40, 360,250);
    dx3 = (40-40)/numLines;
    dy3 = (250-40)/numLines;
    dx4 = (360-360)/numLines;
    dy4 = (250-40)/numLines;


//black bottom triangle set
    line(40,250, 200, 200);
    line(360,250, 200, 200);
    dx5 = (200-40)/numLines;
    dy5 = (200-250)/numLines;
    dx6 = (200-360)/numLines;
    dy6 = (200-250)/numLines;


}

function draw() {

//flap
    var x1 = 40;
    var y1 = 40;
    var x2 = 360;
    var y2 = 40;
    for (var i = 0; i <= numLines; i += 1) {
        line(x1, y1, x2, y2);
        x1 += dx1;
        y1 += dy1;
        x2 += dx2;
        y2 += dy2;
    }
    noLoop();


//body
    var x3 = 40;
    var y3 = 40;
    var x4 = 360;
    var y4 = 40;
    for (var i = 0; i<= numLines; i+= 1) {
        line(x3,y3, x4,y4);
        x3 += dx3;
        y3 += dy3;
        x4 += dy4;
        y4 += dy4;
    }
    noLoop();


//black bottom triangle set
    var x5 = 40;
    var y5 = 250;
    var x6 = 360;
    var y6 = 250;
    for (var i = 0; i <= numLines; i += 1) {
        line(x5, y5, x6, y6);
        x5 += dx5;
        y5 += dy5;
        x6 += dx6;
        y6 += dy6;
    }
    noLoop();


}

LO-04 (sound art)

The Weather Thingy created by Adrien Kaeser is an instrument modifier that is controlled through variables generated by the weather. It is a simple idea that can be manipulated in a highly flexible way. I find this to be extremely compelling due to the fact that it can actually be seen as a way to translate a feeling or ambiance into musical composition. The ability to transform external feelings into parameters that affect the outcome of one’s creative works, which offers a kind of push and pull dichotomy between creator and the created. Kaeser uses a series of arduino modules and weather sensors and codes the whole project with arduino, C++, and MIDI. Although the code isn’t demonstrated, I assume each weather input (wind, direction, rain, sun) controls/limits the sound that the original instrument can create to result in the total output. What’s pretty clever is that he also added a range modifier which allows for this project to be utilized in calm (amplify) or violent (limit) situations.

https://www.ecal.ch/en/3843/studies/bachelor/media-interaction-design/presentation/weather-thingy

LookingOutwards- 04

Shore Scene Soundtrack by Cevdet Erek

One work of computational sound art that I found interesting while researching was the Shore Scene Soundtrack, (https://www.artsy.net/artwork/cevdet-erek-sss-shore-scene-soundtrack), by artist Cevdet Erek. It is an interactive project that simulates the sounds and waves of the ocean when hands move across a carpeted material. I found this work of art inspiring because it taps into people’s memories and brings back their experiences of hearing the sea, while directly interacting with a physical material. In terms of the algorithms that generated the work, I think that the artist would have used loops and repetitions to simulate the ripples of the sounds of the sea. A cascading effect also would have been created through the use of gradual or incremental decreasing and increasing the aspect of the volume variable. The way that the artist envisioned the ocean and was inspired from it reflects in the final work because of the realness of the feeling of the sound, which to many people is nostalgic. This work was installed in Sydney Biennal, and also won the Nam June Paik award in 2012.

Project 04 – String Art

sketchDownload
// Se A Kim
// seak
// Section D

var numLines = 100;

function setup() {
    createCanvas(400, 300);
    background(200);
    dx1 = (0-0)/numLines;
    dy1 = (100-0)/numLines;
    dx2 = (200-0)/numLines;
    dy2 = (400-0)/numLines;
}

function draw() {
    strokeWeight(.5);
    background(255);

    var x1 = 0;
    var y1 = 0;
    var x2 = 0;
    var y2 = 200;

    for (var i = 0; i <= numLines; i += 1) {
        stroke(0, 100, 200);
        line(0, i*3, 400, 0);
        line(100, i*3, 400, 0);   
        line(200, i*3, 400, 0);   
        line(300, i*3, 400, 0); 
        stroke(0, 200, 300); 
        line(i*4, 100, 0, 0);
        line(i*4, 200, 0, 0);
        line(i*4, 300, 0, 0);
        line(i*4, 400, 0, 0);
        stroke(300, 200, 300);
        line(400, 300, i*3, 100);
        line(400, 300, i*3, 200);
        line(400, 300, i*3, 300);
        line(400, 300, i*3, 400);
        stroke(300, 200, 100);
        line(0, 300, i*4, 100);
        line(0, 300, i*4, 200);
        line(0, 300, i*4, 300);
        line(0, 300, i*4, 400);

        x1 += dx1;
        y1 += dy1;
        x2 += dx2;
        y2 += dy2;
    
    }
}

I decided to create multiple lines coming out of the four corners of the canvas to get a better understanding of drawing string lines.

Project 4: String Art

Keep your mouse pressed to see the magic! (not actually that cool but I tried.. lol..)

sketch
idea sketches

var x = 250;
var y = 25;
var x2 = 300;
var y2 = 250;

function setup() {
    createCanvas(300,300);
    background('blue');
}

function draw() {
  
  //setting up colors and background to help lines stand out
    background(255,5);
    stroke(255);
    if (mouseIsPressed){
     var R = random(200,255);
     var B = random(200,255);
     strokeWeight(random(0,3));
     stroke(R,0,B,random(50,100));
    }else{
     strokeWeight(random(0,10));
     stroke(255);
     background(0,random(0,50),random(0,50));

    }
    line(x,250,100,y);
    line(250,height - y,width - x,100);
    line(width - x,300,50,height - y);
    line(250,y,x,0);

    // top left and bottom right corner curves
    line(100,y2,x,50);
    line(300,height - y2,width - x,300);

    //string animation
    x += 5;
    y += 1;
    x2 -= 5;
    y2 -= 1;

    //trying to set parameters for the line movements
    x = constrain(x,100,300);
    y = constrain(y,0,300);
    x2 = constrain(x2,50,300);
    y2 = constrain(y2,25,250);

    //loop and reset 
    if (x == 300 & y == 300 && x2 == 50 && y2 == 25) {
        x = x2;
        y = y2;
        y2 = 250;
    }
}

LO 4 – Sound Art

“Multiverse” by fuse works is a real time audiovisual installation that explores the evolution of universes through generative graphics and sounds. A multiverse is a system of infinite number of universes that exist outside our space-time. I admire the artists visual take on the cosmos and their choice of presenting it in a 7.5 meter high vertical projection that is specifically placed inside a deconsecrated church. Interacting with this piece immediately draws the viewer in and one may feel encapsulated by its hypnotic visuals. They used openFrameworks that generates various scenes which interacts with Ableton Live and Max/MSP for the production of the generative sound system. The gravitational collapse of matter theorized by Lee Smolin describes that matter does not end in a singular black hole but through a, “child – universe”. This idea is captured by the simulation’s generative nature that allows the creation of infinite variation of ephemeral images.

Project 04 – String Art

For this project, I wanted to create something in 3D space. I was mainly inspired by the MS-DOS screensavers and the Tron aesthetic that’s popular with vaporwave artists.
There are some actions the user can perform in this. Use the WASD keys to control the size and x position of the left ring, and use the arrow keys to control the right ring.
Note: The wireframe scrolling background acts a little weird when the rings change size.

sketch

// predefine canvas width and height for use in other functions
var w = 600;
var h = 600;

// define variables
var angleCtr = 0;
var circleRX = 200;
var circleLX = -200;
var radRX = 200;
var radLX = 200;
var degOfSymmetry = 36;
var rainbowCtr = 0;
var freq = 0.1;
var zCtr = 0;

function setup() {
    createCanvas(w, h);
    background(220);
    text("p5.js vers 0.9.0 test.", 10, 15);
}

function draw() {
    background(0);
    // get rainbow function
    var rr = sin(rainbowCtr) * 127 + 128;
    var rg = sin(rainbowCtr + (2*PI/3)) * 127 + 128;
    var rb = sin(rainbowCtr + (4*PI/3)) * 127 + 128;
    c = color(rr, rg, rb);
    strokeWeight(2);

    // 3d projection effectively doubles canvas size, 0, 0, z is now the center
    // of the canvas

    // make ring 1 in xyz coords
    var centerY = 0; // canvas centers now different
    var centerZ = 1000; // z == 0 is in the camera's "face"
    var distX = circleRX - circleLX;
    let ringOne = [];

    for (i = 0; i < degOfSymmetry; i++) {
        var loopAngle = radians(angleCtr) - (i * 2*PI / degOfSymmetry)
        var tZ = centerZ + radLX * cos(loopAngle);
        var tY = centerY + radLX * sin(loopAngle);
        ringOne.push([circleLX, tY, tZ]);
    }

    // make ring 2 in xyz coords
    let ringTwo = [];

    for (i = 0; i < degOfSymmetry; i++) {
        var loopAngle = radians(-angleCtr) + (i * 2*PI / degOfSymmetry)
        var tZ = centerZ + radRX * cos(loopAngle);
        var tY = centerY + radRX * sin(loopAngle);
        ringTwo.push([circleRX, tY, tZ]);
    }

    // project to xy
    let rOProj = [];
    let rTProj = [];

    for (let i = 0; i < ringOne.length; i++) {
        rOProj.push(projMatrixMult(ringOne[i]));
    }
    for (let i = 0; i < ringTwo.length; i++) {
        rTProj.push(projMatrixMult(ringTwo[i]));
    }

    // this scales the image to be on screen
    for (let i = 0; i < rOProj.length; i++) {
        rOProj[i][0] += 1;
        rOProj[i][1] += 1;

        rOProj[i][0] *= w / 2;
        rOProj[i][1] *= h / 2;
    }
    for (let i = 0; i < rTProj.length; i++) {
        rTProj[i][0] += 1;
        rTProj[i][1] += 1;

        rTProj[i][0] *= w / 2;
        rTProj[i][1] *= h / 2;
    }

    // draw squares for perspective reference
    dLX = radLX * 2;
    dRX = radRX * 2;
    for (let i = 0; i < 50; i++) {
        stroke("purple");
        drawTestCube(circleLX, -radLX, (i * dLX) - zCtr, 0, dLX, dLX);
        drawTestCube(circleRX, -radRX, (i * dRX) - zCtr, 0, dRX, dRX);
        drawTestCube(circleLX, -radLX - dLX, (i * dLX) - zCtr, 0, dLX, dLX);
        drawTestCube(circleRX, -radRX - dRX, (i * dRX) - zCtr, 0, dRX, dRX);
        drawTestCube(circleLX, radLX, (i * dLX) - zCtr, 0, dRX, dLX);
        drawTestCube(circleRX, radRX, (i * dRX) - zCtr, 0, dRX, dRX);
        drawTestCube(circleLX, -radLX - dLX, (i * dLX) - zCtr, distX, 0, dLX);
        drawTestCube(circleLX, radLX + dLX, (i * dRX) - zCtr, distX, 0, dRX);
    }

    // draw line between top-bottom, left-right pairs
    for (let i = 0; i < (rOProj.length + rTProj.length) / 2; i++) {
        fill(c);
        stroke(c);
        circle(rOProj[i][0], rOProj[i][1], 5);
        circle(rTProj[i][0], rTProj[i][1], 5);
        line(rOProj[i][0], rOProj[i][1], rTProj[i][0], rTProj[i][1]);
    } 

    // allow user to control ring shape and size
    if (keyIsPressed) {
        // left ring
        if (key == "w") {
            radLX++;
        }
        if (key == "s") {
            radLX--;
        }
        if (key == "a") {
            circleLX--;
        }
        if (key == "d") {
            circleLX++;
        }
        
        // right ring
        if (keyCode == UP_ARROW) {
            radRX++;
        }
        if (keyCode == DOWN_ARROW) {
            radRX--;
        }
        if (keyCode == LEFT_ARROW) {
            circleRX--;
        }
        if (keyCode == RIGHT_ARROW) {
            circleRX++;
        }
    }
    
    // increment any counters
    angleCtr = (angleCtr + 1) % 360;
    rainbowCtr = (rainbowCtr + freq) % (2*PI); 
    zCtr = (zCtr + 5) % max(dLX, dRX);
}

// disable normal browser key functions when focused
function keyPressed() {
    return false;
}

// uses projection matrix seen in this video:
// https://www.youtube.com/watch?v=ih20l3pJoeU
// the video is mostly math about projecting 3d coordinates to 2d coordinates
function projMatrixMult(coords) {
    // aspect ratio
    var a = w / h;

    // field of view
    var fov = QUARTER_PI;
    f = 1 / tan(fov / 2);

    // range of view
    var zNear = 0.1;
    var zFar = 1000;

    var q = zFar / (zFar - zNear);

    if (coords.length != 3) {
        print("Improper array size.");
        return coords;
    } else {
        // this calculates the result of multiplying [x, y, z, 1]
        // with a 4x4 projection matrix (not shown for lack of use without
        // the math.js extension)
        let projMat = [a * f * coords[0], f * coords[1], 
                       coords[2] * q - zNear * q, coords[2]];
        
        if (coords[2] != 0) {
            projMat[0] /= projMat[3];
            projMat[1] /= projMat[3];
            projMat[2] /= projMat[3];
            projMat[3] /= projMat[3];
            return projMat;
        } else {
            print("z is equal to 0");
            return coords;
        }
    }
}

// self explanatory
function drawTestCube(x, y, z, wid, hei, d) {
    // push 3d coords to an array
    let cubePoints3D = [];
    cubePoints3D.push([x, y + hei, z]); // front bottom left
    cubePoints3D.push([x, y, z]); // front top left
    cubePoints3D.push([x + wid, y + hei, z]); // front bottom right
    cubePoints3D.push([x + wid, y, z]); // front top right
    cubePoints3D.push([x, y + hei, z + d]); // back bottom left
    cubePoints3D.push([x, y, z + d]); // back top left
    cubePoints3D.push([x + wid, y + hei, z + d]); // back bottom right
    cubePoints3D.push([x + wid, y, z + d]); // back top right

    // get projection and add to list of points
    let cubeProj = [];
    for (let i = 0; i < cubePoints3D.length; i++) {
        cubeProj.push(projMatrixMult(cubePoints3D[i]));
    }

    // this scales the image to be on screen
    for (let i = 0; i < cubeProj.length; i++) {
        cubeProj[i][0] += 1;
        cubeProj[i][1] += 1;

        cubeProj[i][0] *= w / 2;
        cubeProj[i][1] *= h / 2;
    }

    // i'm almost certain there's a way this can be done with a for loop
    // but this is fine for a small project
    line(cubeProj[0][0], cubeProj[0][1], cubeProj[1][0], cubeProj[1][1]);
    line(cubeProj[6][0], cubeProj[6][1], cubeProj[7][0], cubeProj[7][1]);
    line(cubeProj[0][0], cubeProj[0][1], cubeProj[2][0], cubeProj[2][1]);
    line(cubeProj[0][0], cubeProj[0][1], cubeProj[4][0], cubeProj[4][1]);
    line(cubeProj[1][0], cubeProj[1][1], cubeProj[5][0], cubeProj[5][1]);
    line(cubeProj[1][0], cubeProj[1][1], cubeProj[3][0], cubeProj[3][1]);
    line(cubeProj[2][0], cubeProj[2][1], cubeProj[3][0], cubeProj[3][1]);
    line(cubeProj[2][0], cubeProj[2][1], cubeProj[6][0], cubeProj[6][1]);
    line(cubeProj[3][0], cubeProj[3][1], cubeProj[7][0], cubeProj[7][1]);
    line(cubeProj[4][0], cubeProj[4][1], cubeProj[5][0], cubeProj[5][1]);
    line(cubeProj[4][0], cubeProj[4][1], cubeProj[6][0], cubeProj[6][1]);
    line(cubeProj[5][0], cubeProj[5][1], cubeProj[7][0], cubeProj[7][1]);
}

Project 04: String Art

sketch
//Jessie Chen
//D
//String Art

function setup() {
    createCanvas(400, 300);
}

function draw() {
    background(0);
    var x1 = width/2;
    var y1 = height/2;
    //center white
    stroke(255);
    strokeWeight(0.1);
    radius = mouseX;
    for (angle = 0; angle <360; angle=angle+ 5) {
        x = cos(radians(angle)) * radius + 200; 
        y = sin(radians(angle)) * radius + 150;
        line(x1, y1, x , y);
    }
    //bottom right green
    stroke(24, 200, 90);
    strokeWeight(0.3)
    radius = mouseY;
    for (angle = 0; angle <360; angle=angle+ 3) {
        x = cos(radians(angle)) * radius + 300;
        y = sin(radians(angle)) * radius + 200;
        line(x1, y1, x , y);
    }
    //top left yellow
    stroke(240, 200, 90);
    strokeWeight(0.3)
    radius = mouseY;
    for (angle = 0; angle <360; angle=angle+ 3) {
        x = cos(radians(angle)) * radius + 100;
        y = sin(radians(angle)) * radius + 100;
        line(x1, y1, x , y);
    }
    //top right red
    stroke(200, 40, 90);
    strokeWeight(0.3)
    radius = mouseX;
    for (angle = 0; angle <360; angle=angle+ 5) {
        x = cos(radians(angle)) * radius + 300;
        y = sin(radians(angle)) * radius + 100;
        line(x1, y1, x , y);
    }
    //bottom left blue
    stroke(10, 40, 190);
    strokeWeight(0.3)
    radius = mouseX;
    for (angle = 0; angle <360; angle=angle+ 5) {
        x = cos(radians(angle)) * radius + 100;
        y = sin(radians(angle)) * radius + 200;
        line(x1, y1, x , y);
    }
    //top center pink
    stroke(255, 138, 200);
    strokeWeight(0.3)
    radius = mouseX;
    for (angle = 0; angle <360; angle=angle+ 20) {
        x = cos(radians(angle)) * radius + 200;
        y = sin(radians(angle)) * radius + 100;
        line(x1, y1, x , y);
    }
    //bottom center purple
    stroke(160, 0, 255);
    strokeWeight(0.3)
    radius = mouseY;
    for (angle = 0; angle <360; angle=angle+ 20) {
        x = cos(radians(angle)) * radius + 200;
        y = sin(radians(angle)) * radius + 200;
        line(x1, y1, x , y);
    }
}

This was inspired by lasers and how they look when they are projected.

LO: Sound Art

Meandering River (2018) by onformative

One particular sound art project I find interesting is the Meandering River, created from a collaboration between onformative and Funkhaus Berlin. Meandering River is an audiovisual art installation made from real-time generated visuals and music composed by an A.I. The Meandering River is a captivating and vibrant landscape that imitates the flow of rivers and how they shape the natural landscape. Based on a custom-made code, the music constantly reinterprets river patterns and changes into sound. The installation brings awareness to the beauty of nature and its complexity in how impactful small changes can be over time. The music and visuals are engaging, pulling the audience into an emotional experience.

Meandering River (2018) by onformative: https://onformative.com/work/meandering-river

LO4 – Sound Art

As a musician who plays music for fun, I have an interest in the production of music as well as DAWs and loop creators. When I saw The Prouduct’s project, “Soundmachines, Creative Sound Production Device,” I was immediately fascinated. It’s a live loop creator that uses three turntables to create musical loops. It seems that it operates based on reflective input at the turntable’s “needle.” When a specific light intensity, or possibly color is reflected back into the needle, a program will play an expected sound. For example, the middle turntable manages bass kicks and hi hats, possibly a snare drum as well but the blue strip was never explicitly shown. The right handles an electronic clicking in a certain rhythm, while the left handles a filter effect on some wave function. I think that the final result of a modern-esque turntable was created more for the creator’s aesthetics than the practicality of the piece, as any loop generator can simply use button toggles. However, I appreciate the turntable design, as it gives a visualization to the loop that is being created.

Video of the project in use.