Jinhee Lee; Looking Outwards 04

Mesa Musical Shadows from Daily tous les jours on Vimeo, published in 2016 by Greg J. Smith.

This project causes speakers to play various melodic and percussive sounds when sensors in the ground detect shadows over them. The sounds vary depending on the length of the shadows overlooking the sensors. e.g., morning would cast longer shadows, resulting in slower more ethereal music, while midday with its shorter shadows would result in more percussive and dynamic sounds.

From a computational standpoint, it seems that the system is built to respond to the shadows exclusively instead of the time of day. It is mentioned that each sensor unit has a custom PCB with a light sensor on top and an LED on its bottom, for nighttime illumination. I believe that the sounds could be organized in a library, chosen depending on the intensity of light reaching the sensors and how long the shadow stays (assuming the people keep the shadow in constant motion).

This assumption makes sense for a variety of reasons. Weather could affect the Sun’s visibility and the shadows to be cast, which might break the immersion if the sounds were calculated using time. And having the system respond to fluxes in the intensity of light reaching the sensors means that people could manipulate shadows to tailor the sounds to their liking.

Jinhee Lee; Project-04

jinheel1_project-04

//Jinhee Lee
//Section C
//jinheel1@andrew.cmu.edu
//Project-04

function setup() {
    createCanvas(640,480);
}

function draw() {
	background (0);

	//violin strings
	var neckX = 100; //starting position for neck of violin
	var bridgeX = 100; //starting position for bridge of violin
	var stringY = 0;
	var stringX1 = 10; //spacing for string near neck
	var stringX2 = 50; //spacing for string near bridge

	for (i = 0; i < 4; i += 1) { //draw four strings
		if (i == 0) {
			stroke("#87CEFA"); //sky blue "G" string
		} else if (i == 1) {
			stroke("#ADFF2F"); //light green "D" string
		} else if (i == 2) {
			stroke("#FFFF00"); //yellow "A" string
		} else if (i == 3) {
			stroke("#FFA500"); //orange "E" string
		}
		line(neckX,stringY,bridgeX+stringX2,height);
		stringX2 += stringX2; //spacing near bridge grows
		neckX += stringX1; //spacing near neck is constant
		//the difference in spacing creates a "zoom" effect
	}

	//violin bow
	var bowX = width;
	var bowY1 = 240; //y position at right edge
	var bowY2 = 280; //y position at left edge
	var bowY1step = 0.25; //smaller spacing for right edge
	var bowY2step = 0.75; //larger spacing for left edge

	stroke("#D2691E"); //brownish color for bow

	for (i = 0; i < 50; i += 1) { //relatively small spacing makes "solid" object
		line(bowX,bowY1,0,bowY2);
		bowY1 += bowY1step; //difference in spacing makes "zoom" effect
		bowY2 += bowY2step;
	}

	//violin bow hairs
	//same as bow, on slightly smaller scale
	var hairX = width; 
	var hairY1 = 265; 
	var hairY2 = 350; 
	var hairY1step = 0.15; 
	var hairY2step = 0.5; 

	stroke("#FFEBCD"); //almond color for bow hairs

	for (i = 0; i < 50; i += 1) {
		line(hairX,hairY1,0,hairY2);
		hairY1 += hairY1step;
		hairY2 += hairY2step;
	}
}

Originally I had planned to make two branching clusters of branching lines to simulate puppeteer strings, but felt that it lacked variety.

In the end, I opted to create a violin (which I played from elementary to high school) using the same technique I had in mind, but varying the spacing and positions of the “curves” to: a) draw the individual strings and overall bow and b) create a slanted perspective using an artificial “zoom” effect.

Jinhee Lee; Project-03

jinheel1_project-03

var sqCenterX = 240; //dimensions of yellowing square
var sqCenterY = 240;
var sqW = 0;
var sqH = 0;
var sqMin = 0; //sets min and max size of square
var sqMax = 200;

var ellCenterX = 240; //dimensions of doorknob within square
var ellCenterY = 240;
var ellPlace = 0; //placeholder variable for placing doorknob after translate()
var ellW = 0;
var ellH = 0;
var ellMin = 0; //min size of doorknob set at 0
var ellXMax = 80; //max horizontal size of doorknob
var ellYMax = 150; //max vertical size of doorknob
var ellAngle = 0; //initiates doorknob angle
var ellAngleMin = 0;
var ellAngleMax = 360;

var lnTopX = 440; //dimensions of purple borderlines
var lnTopY = 40;
var lnTopX2 = 440;

var lnLeftX = 40;
var lnLeftY = 40;
var lnLeftY2 = 40;

var lnBottomX = 40;
var lnBottomY = 440;
var lnBottomX2 = 40;

var lnRightX = 440;
var lnRightY = 440;
var lnRightY2 = 440;

function setup() {
    createCanvas(640, 480);
}

function draw() {
    background(0);
    rectMode(CENTER);
    
    var masterHand = map(mouseX, 0, width, 0, 1); //used in lerp functions to change picture
    var fromCol = color(255); //white when square is smallest
    var toCol = color(255,255,0); //yellow when square is largest
    var col = lerpColor(fromCol, toCol, masterHand); //changes color with mouseX position

    strokeWeight(0);
    fill(col); //color for square
    rect(sqCenterX, sqCenterY, sqW, sqH); //square gets yellower with size

    fill("red"); //color for rotating "doorknob"
    push();
    translate(ellCenterX,ellCenterY); //"translates" origin, doorknob rotates on center
    rotate(radians(ellAngle)); //rotates the doorknob
    ellipse(ellPlace, ellPlace, ellW, ellH); //changes size and angle with mouseX position
    pop();

    stroke(255,0,255); //purple color for lines
    strokeWeight(5); //below are the purple lines that grow
    line(lnTopX, lnTopY, lnTopX2, lnTopY);
    line(lnLeftX, lnLeftY, lnLeftX, lnLeftY2);
    line(lnBottomX, lnBottomY, lnBottomX2, lnBottomY);
    line(lnRightX, lnRightY, lnRightX, lnRightY2);

    if (mouseX <= width & mouseY <= height) { //changes only when mouse is in canvas
        sqW = lerp(sqMin, sqMax, masterHand); //changes square width
        sqH = lerp(sqMin, sqMax, masterHand); //changes square height

        ellW = lerp(ellMin, ellXMax, masterHand); //changes doorknob width
        ellH = lerp(ellMin, ellYMax, masterHand); //changes doorknob height
        ellAngle = lerp(ellAngleMin, ellAngleMax, masterHand); //changes doorknob angle

        lnTopX2 = lerp(lnTopX, height - lnTopX, masterHand); //changes the purple line length
        lnLeftY2 = lerp(lnLeftY, height - lnLeftY, masterHand);
        lnBottomX2 = lerp(lnBottomX, height - lnBottomX, masterHand);
        lnRightY2 = lerp(lnRightY, height - lnRightY, masterHand);
    }
}

For this project, it seemed more important than ever to build a rough template (the shapes, colors, lines, etc.) and expand upon it later (making global/local variables to avoid magic numbers, creating several of the same type of object with slight differences, etc.).

I was afraid I wouldn’t be able to get the rotate() functions to do what I wanted; thank goodness I attended lecture when they mentioned push(), pop(), and translate().

P.S., regarding the visual not “completing” when the mouse is put all the way to the right, I believe it’s simply a limitation of the site. Even when I put data-width=1000 during embedding, the actual amount of canvas shown doesn’t change. Also, when opened using the html file, the visual does complete when the mouse is dragged all the way to the right.

Jinhee Lee – Looking Outwards 03

27976639182_3661b68824_z

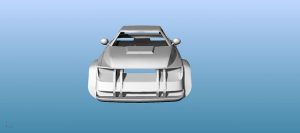
“SUV,” by Dot San, uploaded in 2016.

The author, dubbed Dot San, used an online 3D modeler software called “Rhino 3D.” Based on the look of this particular image, as well as some of his other scale models being covered with white grid patterns, I guessed that the technique at work was polygon mesh, a technique in 3D animation where character models’ textures are composed of massive numbers of polygons (the vertices of which can be repositioned) that round out to give an organic shape. To my surprise, this was not the case.

Rhino 3D actually uses what’s called the NURBS (Non-uniform rational Basis spline) mathematical model, which calculates precise representation of curves and other freeform surfaces. To be more specific, according to its info page, surfaces generated by NURBS are “functions of two parameters mapping to a surface in three-dimensional space,” the shape of which is “determined by control points” computed by taking a weighted sum of the control points.

For some of his works, Dot San has scaled down their size by a selected factor and sent the model into a 3D printer. I imagine he does this so that, with a zoomed in perspective, he can afford more detail to the model which would translate into the printed object. I appreciate this touch of subtlety.

Link to specific model in blog post.
Link to a Photostream of author’s work.

Jinhee Lee; Project-02: Variable Faces

Biggest thing I noticed afterwards – didn’t draw any sketches. Using variables didn’t serve to just compact the code and make it easier to manipulate the visual with just a few changes, but also allowed me to make relative measurements as opposed to exact measurements for every conceivable feature.

jinheel1_project-02

//Jinhee Lee
//Section C
//jinheel1@andrew.cmu.edu
//Project-02

//beginning template for face
var eyeSize = 10;
var eyeColor = "white";
var faceWidth = 200;
var faceHeight = 300;
var faceColor = "white";
var noseColor = "white";
var smileWidth = 50;
//beginning face mostly white for a blank canvas

function setup() {
    createCanvas(640, 480);
}

function draw() {
    background('purple');

    fill(faceColor); //changing face/skin color
    ellipse(width/2,height/2,faceWidth,faceHeight); //changing face size

    var eyeLX = width/2 - faceWidth/4; //varying eyes' position
    var eyeRX = width/2 + faceWidth/4;

    fill(255); //white color for eyeball
    ellipse(eyeLX,height/2,3*eyeSize,2*eyeSize); //drawing eyeballs
    ellipse(eyeRX,height/2,3*eyeSize,2*eyeSize);
    strokeWeight(5); //drawing iris
    stroke(eyeColor); //changing iris color
    fill(0); //making the black pupil
    ellipse(eyeLX,height/2,eyeSize,eyeSize); //varying eye size for pupil and iris
    ellipse(eyeRX,height/2,eyeSize,eyeSize);
    strokeWeight(1);
    stroke(0); 
    //above two functions reset to default

    var noseTY = height/2 - faceWidth/8; //varying nose length
    var noseBY = height/2 + faceWidth/5;

    fill(noseColor); //changing nose color
    triangle(width/2,noseTY,width/2 - faceWidth/10,noseBY,width/2 + faceWidth/10,noseBY);

    fill(135,45,45); //default color for mouth
    arc(width/2,height/2 + faceHeight/3,smileWidth,faceWidth/6,0,PI,CHORD); //draws mouth with varied width
}

function mousePressed() {

	faceWidth = random(150,300);
	faceHeight = random(200,400);

	eyeSize = random(10,20);
	eyeColor = random(["#00CED1","#20B2AA","#CD853F","#8B4513","#C0C0C0","#FF0000"]);

	faceColor = random(["#FFE4C4","#DEB887","#DAA520","#FFDAB9","#8B4513",]);

	noseColor = random(["orange","yellow","green","blue","purple"]);
    //meanwhile, in a parallel universe where people's noses are a random color from OY G. BIV
    //and Rudolph, the only red-nose is their ruler
}

Disregard those two last comments in the code.

Jinhee Lee; Looking Outwards 02

Above this text is a video project titled “Sun,” made and published by Robert Hodgin in 2015. Among several other animation projects he’s done, this video was made using Cinder, which is a “C++ library for programming with aesthetic intent – the sort of development often called creative coding,” encompassing various domains like “graphics, audio, video, and computational geometry,” as described on its homepage.

This coding service is peer-reviewed and apparently free, which compounds with my surprise that sophisticated coding purely for the sake of artistic visuals, rather than the application of such, existed. From the looks of Hodgin’s other projects, Cinder is vastly diverse in its aesthetic capabilities, ranging from displaying – in Hodgin’s case – a school of fish, taxi routes in a city, spectacles in space, and particles flowing in space as if carried by an air current.

Hodgin’s “Sun” project caught my eye in particular, for its theme and because, with my current knowledge of coding, its animation is the one I find simplest to understand. Two celestial bodies, one (presumably the Earth) orbiting its gargantuan counterpart spinning in place, and that’s all.

Aesthetically speaking, I appreciate all the small details added to the Sun to make it feel organic rather than procedurally generated, as well as the fact that, being the largest thing on the screen, it takes up the vast majority of the viewer’s attention. Additionally, the comparatively tiny and featureless Earth revolving around the Sun add to the overwhelming presence of the latter body. An effect the author achieved with naught but a tiny moving black circle.


Below is a link to additional projects that Robert Hodgin has done:

https://vimeo.com/flight404/videos

Jinhee Lee; Looking Outwards 01

devilmaycry4playstation3us

Devil May Cry 4. The fourth installment in a video game franchise – developed and published by Capcom in 2008 – famous for revolutionizing the action genre in gaming, priding itself in its extensive combat mechanics, and bringing us some of the greatest moments in gaming history.

Devil May Cry 4 is one of those special gems that encourage me to possibly pursue a minor in Game Design, and what impresses me in particular is the engine on which the game runs, called MT Framework. Reverse-engineered from what was originally a PC engine, MT Framework has astounded me with just how much Devil May Cry 4 had going for it. Specifically its frame-rate of 60fps, complete in-game graphics, and solid performance, to name a few. For a game released 8 years ago, this was incredible production quality, and still is even by today’s standards. I commend the developers for prioritizing those aspects of the game, which are so important to get right in gaming that even current developers still struggle with or just flat-out neglect.

If anything, I see this as a shining example of polishing a computational project for maximum performance, as well as a standard to uphold, negating modern triple-A game developers excuses of sub-par performance in some of their games, despite multi million-dollar budgets and large development teams.

Link to a review of the game (link will take you to specific timestamp):

If you’re interested, here are links to combo videos that showcase the sheer potential of the combat:

Jinhee Lee; Project-01

jinheel1_Project-01

//Jinhee Lee
//Section C
//jinheel1@andrew.cmu.edu
//Project-01

function setup() {
    createCanvas(600, 600);
}

function draw() {
	background('blue');	//blue colored background
	strokeWeight(3);	//thicker outlines
	fill(255);	//white color for shirt
	triangle(0,600,600,600,300,537);
	fill(237,221,116);	//yellowish color for neck and face
	rectMode(CENTER);
	rect(300,525,160,60);	//neck
	ellipse(300,300,400,450);	//face
	fill(255);	//white color for eyeballs
	ellipse(210,230,65,45);
	ellipse(390,230,65,45);
	fill(89,65,12);		//brown color for outline of eyes
	ellipse(210,230,40,40);
	ellipse(390,230,40,40);
	fill(0);	//black color for eyes, hair features, and simplistic lips
	ellipse(210,230,25,25);	//eyes
	ellipse(390,230,25,25);
	quad(150,160,150,200,250,220,250,200);	//eyebrows
	quad(450,160,450,200,350,220,350,200);
	triangle(400,140,30,170,380,10);	//hair
	triangle(380,130,400,30,550,170);
	line(250,390,380,420);	//lips
	fill(247,181,195);	//pinkish color for nose
	triangle(260,340,340,340,300,240);
	fill('red');	//red color for that anger mark you see in Japanese anime
	rectMode(CORNER);
	strokeWeight(0);	//eliminate outlines for this shape
	rect(170,30,20,50);	//drawing the anger mark
	rect(140,60,50,20);
	rect(210,30,20,50);
	rect(210,60,50,20);
	rect(140,100,50,20);
	rect(170,100,20,50);
	rect(210,100,50,20);
	rect(210,100,20,50);
}

Not quite as frustrating as other coding projects (only took me 1.5 hours to type up the code) I’ve done, but I certainly had to think it through. Word of advice kiddies, draw your picture on paper and note the coordinates. Makes your life so much easier.