ChristineSeo-LookingOutwards-05

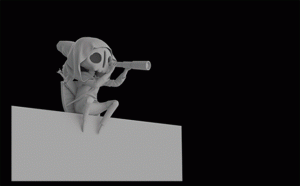
First stage of the process of when Julien Crochet created the work
3D rendering of Yoii’s character
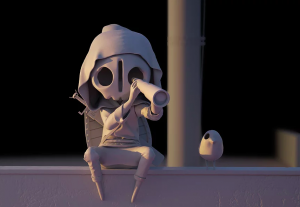
The original “The Observer” 3D illustration

Julien Crochet is a 3D generalist that worked on “The Observer.” For this 3D artwork, he focused on modeling, texturing, shading, rendering, and compositing of the character that was inspired by the unique mood of an early morning. The character was inspired by Yoii’s character and rooftops. Since Crochet is a 3D Graphist, he has high proficiency in VRay, 2DS Max, Photoshop, and Maya. I was really intrigued by this artwork because his attention to detail for reflections and shadows really help to render a 3 dimensional space within the character’s surroundings. His use of shallow depth of field also was interesting because I am personally an art student and always work with rendering 3 dimensional spaces in 2D drawings.

I have not worked with a lot of rendering digitally, and it definitely captured my attention that he used a narrative illustration to show not only 3D rendering of the character, but also the space in the background. I wish Crochet worked in a series, where the character is portrayed in different locations, instead of one specific rooftop in Japan. However, the overall aesthetics of the piece as well as the color palette really captured my attention and gave a sense of reality in a digital world through 3D rendering.

http://juliencrochet.wixsite.com/portfolio/3d-observer

KadeStewart-LookingOutwards-05

The Barcelona-based artist Nuria creates 3d graphics for various publications and organizations. The top graphic was created for Ueno (a design company), and the bottom graphic was created for a workshop on Domestika, a website that hosts courses for creative practices. Their work utilizes a computer program that can arrange what appears to be glossy, “sticky” objects on a plane.

I love that the illustrations are always so lifelike. The pieces that Nuria creates always look like they are photos taken in a studio, even though they are really just virtual objects. The attention to detail to make the illustrations feel cohesive and real makes the 2d art feel 3d.

Nuria Madrid

Sophia Kim Project-04 String Art- Sec C

sketch

// Sophia S Kim
// Section C 1:30
// sophiaki@andrew.cmu.edu 
// Project-04-StringArt

var x1
var y1 
var x2
var y2 

function setup() {
	createCanvas(400, 300); 
	var x1 = 400;
	var y1 = 100;
	var x2 = 50; 
	var y2 = 300;
}

function draw() {
	background(0);
	//white line
	x1 = 600;
	y1 = 0;
	x2 = 500;
	y2 = 200;

	for (var i = 0; i < 150; i += 1) {
		stroke(255)
		line(x1, y1, x2, y2)
		x1 -= 10
		y2 += 10
	}
	//white 2 line
	x1 = 0;
	y1 = 0;
	x2 = 600;
	y2 = 5;

	for (var i = 0; i < 150; i += 1) {
		stroke(90)
		line(x1, y1, x2, y2)
		x2 -= 10
		y1 += 50
	}
		// light yellow curve line
	x1 = 200;
	y1 = 600;
	x2 = 400;
	y2 = 0;

	for (var i = 0; i < 100; i += 1) {
		stroke(251, 255, 132)
		line(x1, y1, x2, y2)
		x1 -= 30
		y2 += 7
	}
	// light blue curve line
	x1 = 0;
	y1 = 0;
	x2 = 400;
	y2 = 0;
	for (var i = 0; i < 50; i += 1) {
		stroke(148, 191, 255)
		line(x1, y1, x2, y2)
		x1 += 13
		y2 += 10
	}
	// light green curve line
	x1 = 350;
	y1 = 0;
	x2 = 0;
	y2 = 0;

	for (var i = 0; i < 70; i += 1) {
		stroke(155, 255, 124)
		line(x1, y1, x2, y2)
		x1 -= 8
		y2 += 10
	}
	//light red curve line
	x1 = 500;
	y1 = 300;
	x2 = 0;
	y2 = 400;

	for (var i = 0; i < 100; i += 1) {
		stroke(255, 124, 124)
		line(x1, y1, x2, y2)
		x1 -= 8
		y2 -= 7
	}
	//blue curve line
	x1 = 0;
	y1 = 0;
	x2 = 500;
	y2 = 0;
	for (var i = 0; i < 50; i += 1) {
		stroke(11, 34, 255)
		line(x1, y1, x2, y2)
		x1 += 13
		y2 += 10
	}
	//green curve line
	x1 = 250;
	y1 = 0;
	x2 = 0;
	y2 = 0;

	for (var i = 0; i < 70; i += 1) {
		stroke(60, 239, 5)
		line(x1, y1, x2, y2)
		x1 -= 8
		y2 += 10
	}
	//red curve line
	x1 = 400;
	y1 = 300;
	x2 = 0;
	y2 = 400;

	for (var i = 0; i < 100; i += 1) {
		stroke(255, 63, 11)
		line(x1, y1, x2, y2)
		x1 -= 8
		y2 -= 7
	}
	//yellow curve line
	x1 = 400;
	y1 = 600;
	x2 = 400;
	y2 = 0;

	for (var i = 0; i < 100; i += 1) {
		stroke(255, 252, 11)
		line(x1, y1, x2, y2)
		x1 -= 30
		y2 += 7
	}
}

For this project, I focused on using tones of green, blue, yellow, and red. At first, I had trouble with organizing how to make the curves and how to align it to the edges of the canvas, but after many trials, I was able to understand how each line point worked. I had a lot of fun making string art with code, and I hope to make more complex and creative works like this.

Audrey Zheng – Project 04

I am using one of my autolab grace days for this project.

sketch

// Audrey Zheng
// Section A
// audreyz@andrew.cmu.edu
// Project 04

var cwidth = 300;
var cheight = 400;

var listPoints1 = new Array();
var listPoints2 = new Array();

function setup() {
    createCanvas(cwidth, cheight);
}

function strings() {

	stroke(0);


	var x = 10;
	var y = cheight/2;
	//var listPoints1 = new Array();

	for (var i = 0; i <21; i++) {

		point(x,y);

		var p = new Array(x,y);
		listPoints1.push(p);

		x += 14;

	}

	var x2 = cwidth/2;
	var y2 = 60;
	//var listPoints2 = new Array();

	for (var j = 0; j<21; j++) {

		point(x2,y2);

		var point2 = new Array(x2,y2);
		listPoints2.push(point2);

		y2 += 14;
	}

	noLoop();

	var start = 0;
	var end = 9;

	var start2 = 20;

	var end2 = 11;


	for (var k = 0; k<10; k++) {
		line(listPoints1[start][0], listPoints1[start][1], listPoints2[end][0], listPoints2[end][1]);
		line(listPoints1[start2][0], listPoints1[start2][1], listPoints2[end][0], listPoints2[end][1]);
		line(listPoints1[start2][0], listPoints1[start2][1], listPoints2[end2][0], listPoints2[end2][1]);
		line(listPoints1[start][0], listPoints1[start][1], listPoints2[end2][0], listPoints2[end2][1]);

		start += 1;
		end -= 1;

		start2 -= 1;
		end2 += 1;


	}

}


function draw() {
	background(220);

	stroke(255);
	line(10,cheight/2, 290, cheight/2);
	line(cwidth/2, 60, cwidth/2, cheight-60);

	strings();
    
}

function mousePressed() {
	print(listPoints2.length);
	print(listPoints1.length);
	print("5");

}

Yiran Xuan – LookingOutwards – 04

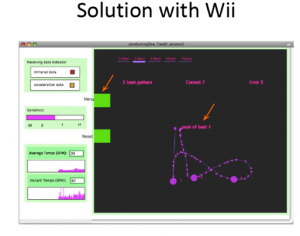
Robots can play instruments now; automatons have had the ability to do so for hundreds of years. And they can read music too; combine a scanning software with reading software, and a robot can interpret sheet music on a stand. Together, with a consistent internal tempo, instant communication, robots could be the perfect orchestral musician…if they could be led by a conductor.

Interpreting a conductor presents a few challenges and decisions. First, is how to detect the motions? Computer vision or accelerators? Also, what universal motions between many different conducting styles communicate a timing, an volume, or an emotion? Musicians, when being conducted, usually anticipate a move on part of the conductor; would robots be able to do the same? Musicians also try to keep a consistent internal tempo according to the sheet music, and adjust to the conductor once the motions become evident. Would robots be able to adjust similarly?

A similar project focused around building a program to detect and correct conducting form: https://drive.google.com/file/d/1DDeeQezbasnELFeGOyKGwGF2jq_IXTDG/view?usp=sharing

Robert Oh- Looking Outward-04

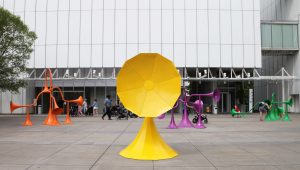
Sonic Playground, created by Yuri Suzuki Design

For this week’s Looking Outward, I chose to read up on the Sonic Playground, created by Yuri Suzuki Design. In a nutshell, the playground is a collection of 6 different interactive sound sculptures that carry sound waves to nearby sculptures.

I really admire this project, because one of its main goals is to introduce art to regular people walking outside. I love the fact that this playground is geared towards children, so that they are able to experience how sound waves travel and to enjoy playing outside. Personally, I have experienced a similar contraption at a science museum once that allowed people on opposite sides of a wide room to hear each other using similar sculptures. And so, I really do love the fact that a person has carried on that idea to make it accessible to the public.

The software used to develop and optimize the pieces in the sculptures was designed by Luca Dellatorre using Grasshopper which is a parametric design plug-in in Rhinoceros. The article states that Luca  simulated sound wave behavior using ray tracing techniques.

Clearly, we are able to see the fun-loving, colorful side of the creator’s artistic sensibilities that show in the Sonic Playground. I am very excited for future playgrounds and public attractions like these that bring people together through science and fun!

link to the article:

Sonic Playground – Playful acoustics by Yuri Suzuki Design

Joanne Lee – Looking Outward 04

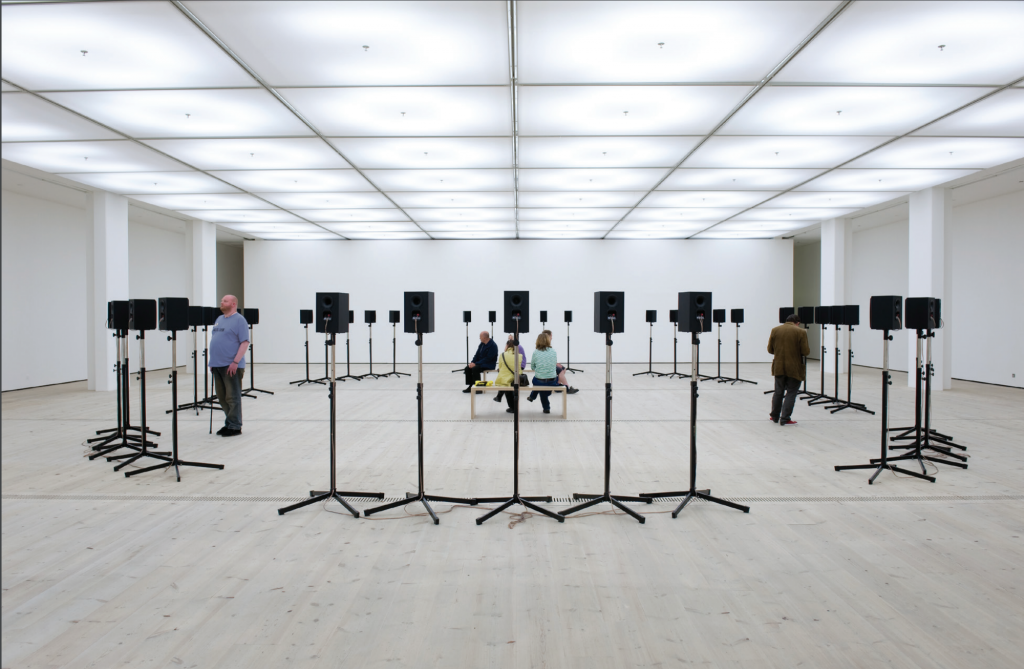
Janet Cardiff’s The Forty Part Motet, 2001 plays a 40-track 14-minute recording on 40 speakers.

At The Scottsdale Museum of Contemporary Art, an exhibit called “The Five Senses” was displayed from Feb 1- May 4, 2014. Naturally, one of the senses that was explored was sound. Janet Cardiff’s The Forty Part Motet was displayed in an empty room on 40 speakers. The congregational choir of the Gothic Salisbury Cathedral were asked to record a choral arrangement of Thomas Tallis’s Spem in alium (The Forty Part Motet). This is an a capella piece, meaning that there is no instrumental accompaniment.

Cardiff’s installation is not only a technically complex recording, but also has many details to give a unique sensory experience. The most important is that each of the 40 speakers are synchronized to play 1  track in the recording (each singer has their own individual channel). These speakers are placed at eye level in an oval, in groups of 5 (just like in the original chorus). I really admire this installation because I love choral music. There is something unique about the way all of the voices travel to the audience and mesh together to hit you at once, and that can only be experienced live. This installation seems to emulate that experience despite using speakers by giving each voice a different speaker channel. I wish I had gotten to experience this exhibit.

A video showing a glimpse of The Forty Part Motet with a voiceover by Janet Cardiff.

Alexandra Kaplan – Looking Outwards -04


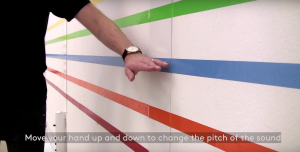
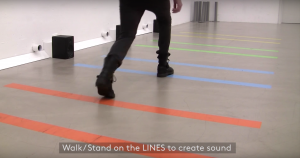
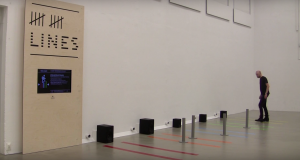
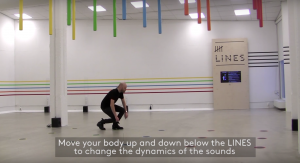
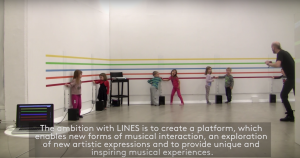
A piece of sound art that stood out to me was Lines which was created in 2016 by composer Anders Lind. The installation is a series of lines on the floor, walls, and hanging down from the ceiling that can be interacted with by the audience to make different pitched sounds. I was really drawn to how participatory the piece is, I love it when art is accessible to its audience and promotes discovery in its viewers. It is also great in how it can be a group experience with people creating music together as well as a solo one.

I would think that the algorithm for this piece would use motion sensors to determine how far away an obstruction is and to play a certain pitch/tempo per distance.


Demonstrating part of the installation


Another part of the installation, this time activated by walking
Posts can be put down to make multiple notes at once even with just one person
This part of the installation is activated by how far up and down you are from the sensors.
A group of children plays with the installation


Yoo Jin Shin-Project-04-String-Art

Project-04

// Yoo Jin Shin
// Section D
// yoojins@andrew.cmu.edu
// Project-04


function setup() {
    createCanvas(400, 300);
}

function draw() {
    background(0);

    // two white-ish rectangles in background
    fill(235);
    noStroke();
    rect(0, 220, width, 80);
    rect(0, 0, width, 80);

    var x1;
    var x2;
    var y1;
    var y2;

    var stepSize1 = 7.5;
    var stepSize2 = 10;
    var stepSize3 = 7;
    var stepSize4 = 3;

    // dark grey lines
    for (x2 = 0; x2 < width; x2 += stepSize2) {
        x1 = 0;
        y1 = 0;
        y2 = height;
        stroke(70);
        strokeWeight(1);
        line(x1, y1, x2, y2);
    }

    // dark blue lines 
    for (x1 = 0; x1 < width; x1 += stepSize1) {
        stroke(0, 0, 255);
        strokeWeight(1.5);
        line(x1, y1 += 2, x2 -= 10, y2 -= 1);
    }

    // dark pink lines 
    for (x1 = 0; x1 < width; x1 += stepSize1) {
        stroke(255, 200, 255);
        strokeWeight(2);
        line(x1, y1 += 4.5, x2 += 14.9, y2 -= 1.2);
    }

    // white lines
    for (x2 = 0; x2 < width; x2 += stepSize3) {
        x1 = width;
        stroke(255);
        strokeWeight(1.5);
        line(x1 -= 10, y1 -= 80, x2, y2 += 10);
    }

    // black circle in center background
    fill(0);
    noStroke();
    ellipse(width / 2, height / 2, 180, 180);

    // purple lines
    for (y2 = 0; y2 < height; y2 += stepSize4) {
        stroke(160, 50, 255);
        strokeWeight(1.5);
        line(x1 += 100, y1 += 30.5, x2 -= 5.6, y2);
    }

    noLoop();
}

It was interesting to experiment with the different types of lines and curves to create this string art. I think the sound-art article that I read recently about the Multiverse and black holes subconsciously influenced my design.

Sean Meng – Project 04

sketch

//Sean(Han) Meng
//Section B
//hmeng@andrew.cmu.edu
//Project 4

function setup() {
    createCanvas(400, 300);

}


function draw() {
    
    background(0);

    //First upper eyelip
    stroke(87, 250, 255)
    for (var i = 0; i < 100; i +=1)
        line(width/20 + i*10, 0, 0, height + i*(-10))
    //Second upper eyelip
    stroke(153, 50, 204)
    for (var i = 0; i < 100; i +=1)
        line(width/5 + i*10, 0, 0, height + i*(-10))
    //First lower eyelip
    stroke(0, 0, 205)
    for (var i = 0; i < 100; i +=1)
        line(width/20 + i*10, height, width, height + i*(-10))
    //Second lower eyelip    
    stroke(255, 128, 128)
    for (var i = 0; i < 100; i +=1)
        line(width/5 + i*10, height, width, height + i*(-10))

    //Pupil
    fill(75, 0, 130)
    ellipse(200, 150, 150, 150)
    
    fill(0, 0, 128)
    ellipse(200, 150, 100, 100)


}

In this project, I explore the coding method that I learned to draw complex shape. This “eye” was consisted of for eyelips that are drew with straight lines. But the way they overlapped create a delusion that there is a curve at the very end of them. And I use the bold colors to add aesthetic value to it.