Alexandra Kaplan – Looking Outwards – 03

3D printed seashells

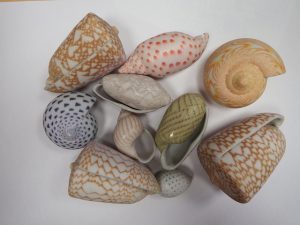
One project I found while looking on the Digital Fabrication Flicker that is linked to on the course website really stood out to me. It is a project created by flickr user fdecomite who 3D prints seashells. These seashells seem to be so much like the real thing that at first I couldn’t believe they were 3D printed.
I am not sure how the different code and algorithms helped to make the seashells but I think it could use some sort of random pattern generator for the color and an algorithm for the ratios for the different parts of the shell. The art really shines through in the patterns on the shells and just how natural they seem. I can imagine it must have taken hours of studying seashells to understand the complex patterns that appear upon them.

Note: I tried to find a website for the artist but was unable to.

Yingyang Zhou-LookingOutwards-3

Strand Garden/ Matsys/ 2016

Inspired by the organic curves of Art Nouveau and translated through Matsys’s unique approach to digital craftsmanship, these four new pieces explore the champagne-making process and its emblematic materials.

Strand Garden’s three screens of curved strands, evoking tree trunks or vines, mark out a central area: “You’re in a small clearing,” Andrew Kudless explains. “You get hints of what lies beyond, but it’s an inward-looking, reflective space.”

Strand Garden, Matsys for Perrier-Jouët, DesignMiami/ 2016, Photo © Perrier-Jouët.​

Strand Garden

chiars in organic form

Details of the table

prototype/ 2014

Strand Garden

Strand Screen

Stand Table

Strand Tower Prototype


This project prototype explores the capacity of lightweight tubular structures to create an immersive experience for a lighting festival. Due to the short duration of the festival, the structure needs to be both lightweight as well as quickly deployable. Each tube is made from three planar pieces of CNC-cut HDPE. These parts are riveted together causing the planar material to slightly bend which also results in local stiffening of the material. Globally, each tube is twisting along its central axis which also adds a general rigidity to the tube.

In order to create an experience for the festival visitors that is engaging, playful, and innovative, the tubes transition from a bundled network at the top to individual strands at the base that allow visitors to walk between. A LED light strand is positioned at the centre of each tube and reacts to visitors’ movement as well as ambient conditions such as wind. This network of strands resonates with the complexity of local mangrove forests and provides a space for interaction, exploration, and play.


what I admire about this project is that it create a great atmosphere and subtly react to people passing through. My guess about the technology is using Arduino programmed to react to the movement of people and wind

Sean Meng-Looking Outwards 3

Silk Pavilion

The final form of Silk Pavilion

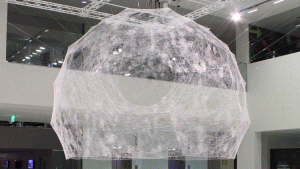
The Silk Pavilion is a project designed by Mediated Matter Research Group at MIT Lab. For me the most amazing part of this project is it creates a breathtakingly beautiful installation with not only digital fabrication but also biological fabrication. It is really hard to tell whether the researchers or the silkworm is the author of this project. The primary structure was a system of 26 polygonal panels made of silk threads laid down by a CNC(Computer-Numerically-Controlled)machine. Inspired by the silkworm’s ability to generate a 3D cocoon out of a single multi-property silk thread, the overall geometry of the pavilion was created using an algorithm that assigns a single continuous thread across patches providing various degrees of density. The algorithm enables designers to engage such a sophisticated pattern combined with natural fabrication. As a result, the final work has both artificial designed overall shape and natural fabricated surfaces. 

Link: http://matter.media.mit.edu/environments/details/silk-pavillion


Kevin Thies – Dynamic Drawing

sketch


var deg = 0; // Degrees to Rotate
var x = 0; // Offset from origin
var r = 255; // Rgb Code
var b = 0; // rgB  Code
var dim = 10; // Circle Dimension

function setup() {
  createCanvas(640,480);
}

function draw() {

    angleMode(DEGREES); // This makes things easier for later
    background(220, 220, 220, 90);

    push();
    fill(r, 0, b); // changes fill color as mouse moves
    noStroke();

    translate(320, 240); // moving origin to center of screen
    rotate(-deg); // 6 Counter Clockwise circles
    ellipse (0 + x, 0, dim, dim);

    rotate(60);
    ellipse (0 + x, 0, dim, dim);

    rotate(60);
    ellipse (0 + x, 0, dim, dim);

    rotate(60);
    ellipse (0 + x, 0, dim, dim);

    rotate(60);
    ellipse (0 + x, 0, dim, dim);

    rotate(60);
    ellipse (0 + x, 0, dim, dim);


    rotate(deg * 2); // 6 Clockwise Circles
    ellipse (0 + x, 0, dim, dim);

    rotate(-60);
    ellipse (0 + x, 0, dim, dim);

    rotate(-60);
    ellipse (0 + x, 0, dim, dim);

    rotate(-60);
    ellipse (0 + x, 0, dim, dim);

    rotate(-60);
    ellipse (0 + x, 0, dim, dim);

    rotate(-60);
    ellipse (0 + x, 0, dim, dim);

    rotate(-60);
    ellipse (0 + x, 0, dim, dim);

    pop();

    /* As mouseX Increases, make the circles
        - Rotate CW and CCW
        - Move further away from origin
        - Change Color
        - Grow larger
        All of these don't want to go completely offscreen
        255 is a convienient number as it's used for standard rgb
        To make something change slower, mouseX needed to be
            ivided by a larger numbers
    */

    deg = constrain (mouseX/3, 10, 255);
    x = constrain (mouseX/3, 10, 255);
    r = constrain (mouseX/3, 10, 255);
    b = constrain (mouseX/3, 10, 255);
    dim = constrain (mouseX/6, 10, 50);
}

I really liked the image shown on the project page, and it made me think about loading icons. We’d just covered a lot of rotation, and a lot of loading icons are rotations, so I just followed those ideas and took a stab at it.
Eliza Pratt – Project-03

sketch

/* 
Eliza Pratt
Section E
elpratt@andrew.cmu.edu
Project-03
*/

function setup() {
    createCanvas(640, 480); 
}

function draw() {
    
    noStroke();

    //creates color variables for background based on mouse position
    var bG = (mouseX/width) * 255;
    var bB = (mouseY/height) * 255;
    background(100, bG, bB);

    //block of color that moves with mouseX
    fill(200, bG, bB);
    rect(0, 0, mouseX, 480);

    //starting positions for vertical and horizontal lines
    var y1 = 45;
    var x1 = 0;

    //variables for line weight and angle based on mouse position
    var hWidth = (mouseY/width) * 45 
    var angle = (mouseX/width) * 360
    fill(255);


    ////////ROTATING LINES///////
    push();
    //transforms vertical lines to rotate about the center
    translate(width/2, height/2);
    rotate(radians(angle));
    //draws vertical lines
    for(var i = 0; i < 20; i++) {
        fill(0);
        rect(x1 -50 - width/2, 0, hWidth, 800);
        x1+=50;
    } 
    pop();

    /////////HORIZONTAL LINES////////
    for(var i = 0; i < 9; i++) {    
        rect(width/2, y1, width, hWidth);
        y1+=50;
    } 

    
}

Compared to the last two weeks, I found this project to be the most challenging since it was so open ended. While this sketch was originally intended to be a grid with fixed horizontal and rotating vertical lines, I ended up with this just by commenting out the “recMode(CENTER) and letting the black lines do as they please! This turned out way cooler than I expected and I was pleasantly surprised with how the colors go together.

John Legelis – Looking Outwards 3 – Computational Fabrication

Meta-Mesh is a project that employes a biomimetics design philosophy (meaning to mimic nature) to create body armor that functions in a similar way to the exoskeleton of an ancient fish. The implementation of this project is cutting edge and uses state of the art tools such as additive manufacturing and algorithmic computational fabrication to execute the desired manufacturing process.


The design process, stems from fish scale armor

Due to this project’s copycat nature, the creator’s artistic touch is simply an effort to mimic the original artistic touch of nature. The algorithms that synthesize this project are likely complex, but due to the finite number of “links” in the armor, the bits can be treated as module. This allows finite element analysis (FEA) to be very useful in digital trial and error before the forms are even physicalized.

Jessica Timczyk – Looking Outwards 03

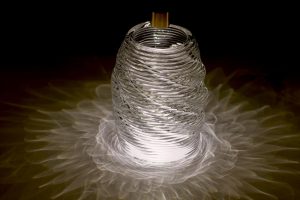
The photo above depicts a 3D printed  glass vase.

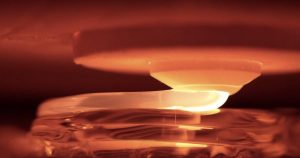
A project of the MIT Media Lab, MIT Glass Lab and Mediated Matter Group,  including researchers: John Klein, Michael Stern, Markus Kayser, Chikara Inamura, Giorgia Franchin, Shreya Dave, James Weaver, Peter Houk and Prof. Neri Oxman,  the G3DP project was created in 2014 to 3D print translucent glass into different shapes and sculptures. This project is excessively interesting because it takes an ancient art, like glass blowing, and translates it into modern technology. Many ancient arts like this have been kept to traditional methods of creation, so glass making and blowing’s introduction to 3D printing marks a milestone in the digital art world. Although the algorithm used to create these glass sculptures can only be inferred, it would make sense for an algorithm to be made to digitally construct the design and execution of each layer for each of the glass sculptures, before being sent to the 3D printer. While glass is usually seen in the form of vases, bowls, cups and etc, this project allows the creator to manifest their artistic style in the form and pattern in which the translucent glass sculptures are created, resulting in many varying and interesting shapes and forms.


A close up shot of translucent glass being printed into a vase form.

The video above shows an in depth look into how the sculptures are printed and the algorithms behind them.

Daniel Teague – Project02 – Variable Faces

Project02

var eyeSize = 30;
var faceWidth = 120;
var faceHeight = 230;
var noseHeight = 40;
var eyeHL = 4;
var eyeHR = 3;

function setup() {
    createCanvas(640, 480);
    background(20);
}

function draw() {
    /*creating face structure*/
    ellipse(width / 2, height / 2, faceWidth, faceHeight);
    /*creating variables for eye location*/
    var eyeLX = width / 2 - faceWidth / 4
    var eyeLY = height / 2 + faceHeight / eyeHL
    var eyeRX = width / 2 + faceWidth / 4
    var eyeRY = height / 2 + faceHeight / eyeHR
    /*creating eyes*/
    ellipse(eyeLX, eyeLY, eyeSize, eyeSize);
    ellipse(eyeRX, eyeRY, eyeSize, eyeSize);
    /*creating nose*/
    triangle(width / 2 - noseHeight / 2, height /2, width /2 + noseHeight / 2, width / 2, height / 2 + noseHeight);
}
    
function mousePressed(){
    var eyeSize = random(20, 50);
    var faceWidth = random(100, 300);
    var faceHeight = random(200, 400);
    var noseHeight = random(30, 60);
    var eyeHL = random(3, 5);
    var eyeHR = random(3, 5);
}

This is a late turn in, but I had fun with this so I’m putting this up for others to see.

The variable creation was both harder and easier than I had originally thought (not the reason this is late). I wanted to create a mouth as well, but found that too difficult to create variables for. However, the nose felt like it turned out well.

Jenny Hu — Looking Outwards 03

 Dio (Consummation) is a sculpture by Ben Snell, an artist based in Queens and a recent graduate of Carnegie Mellon. What I admire most about this work is actually the poetic process and perspective Ben takes. The first paragraph really says it all:

“Dio is the name of my computer. I trained it to study classical sculpture, then asked it to close its eyes and dream of a new sculpture—one which has never before been seen. Then, I ground Dio to dust and re-formed it into its dream. This sculpture is both the computer and the computer’s dream.”

This piece was generated by an algorithm, but he doesn’t go into its specifics. Instead, we’re asked to think about the algorithm as the computer’s dream, thoughts that it owns.

Jenny Hu — Dynamic Drawing

jenny’s dynamic drawing

//Jenny Hu
//Section E
//jjh1@andrew.cmu.edu
//Project 03 — Dynamic Drawing


var x1 = 320; //center of first ellipse
var y1 = 240;

var x2 = 50; 
var y2 = 240;

var x3 = 590; 
var y3 = 240;

var maxEllipse = 50;

var startD = 10; // starting diameter 
var R = 255; 
var G = 0; 
var B = 110; 

var bR = 0;
var bB = 0;

var rippleHappening = false;
var whereIsRipple = 0;//this is the number that controls where 
//the ripple is relative to the center
function setup() {
    createCanvas(640, 480);
    ellipseMode(CENTER); 
}


function draw() {
    //making background color variable
    bR = mouseX;
    bB = mouseY;
    background(bR,bB,100); 

    //Draw the ellipses
    for ( var i=0; i<maxEllipse; i++){
      noFill();

      //ellipse positions
      var x2 = mouseY - 10;
      var x3 = (width/2) - (x2-(width/2)); //make x3 move opposite of x2
      var y2 = mouseX + 10;
      var y3 = (height/2) - (y2-(height/2)); //mover y3 opposite of y2
      
      //making a ripple
      if(rippleHappening){
        //print("in the for loop?");
        if(i == int(whereIsRipple)){
          strokeWeight(6);
        }else{
          strokeWeight(2.25);
        }
      }else{
        strokeWeight(2.25);
      }


      var scale1 = (width/2-mouseX)/10; //all scale variables are to scale the space between ellipses
      var scale2 = (width/2-mouseX)/10;
      var scale3 = (width/2-mouseX)/10;

      R = mouseX;
      G = mouseX - (mouseX/2);
      B = mouseY - (mouseX/2);

      stroke(R, G, B);

      ellipse(x1,y1, startD+(i*scale1), startD+(i*scale1)); //center ellipse 
      ellipse(x2,y2, startD+(i*scale2), startD+(i*scale2)); //starting left ellipse
      ellipse(x3,y3, startD+(i*scale3), startD+(i*scale3)); //starting right ellipse

    }
    //whereIsRipple determines the ripple ellipse per set of rings 
    //if we mod the ripple, we limit it to how far the ripple goes
    whereIsRipple = (whereIsRipple+0.5)%maxEllipse;
    if(int(whereIsRipple) == (maxEllipse)){
      print("is rippleHappening turned false?");
      //turn boolean to false 
      rippleHappening = false;
    }

}
function mousePressed(){
  rippleHappening = !rippleHappening;
  whereIsRipple = 0; //start ripple at 0

}


I started this project with the intention to play with moire patterns, which is essentially patterns that come about when you overlap striped elements on top of one another (made by the gaps between the stripes). I think this was the most fun project so far because I was generated outputs I couldn’t have made without a lot more effort in other programs. It was a result that was more easily achievable via programming.

Originally, I planned the ellipsis in sketch, just to see the starting pattern, but everything else resulted from playing with the program.

You can click anywhere on the canvas to cause a continuous ripple across the ellipsis. I imagine that this can go with music one day to make a great audio visualizer! (perhaps my final project?)

special thanks to Marisa Lu, and Gautam Bose for the help.