Judy Li-Project-07-Curves

judyli: Curve Project 07

/*
Judy Li
Section A
judyli@andrew.cmu.edu
Project-07
*/

var nPoints = 100;
var EPITROCHOID = 0; // Cartesian Parametric Form  [x=f(t), y=g(t)]
var EPITROCHOIDTWO = 1; // Cartesian Parametric Form  [x=f(t), y=g(t)]

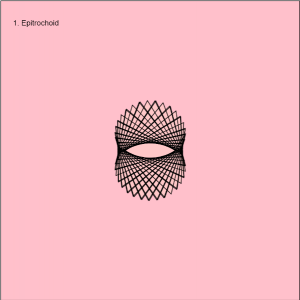
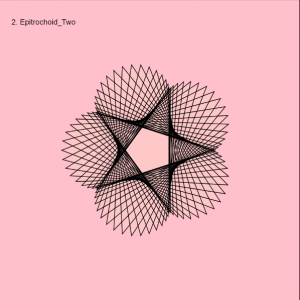
var titles = ["1. Epitrochoid", "2. Epitrochoid_Two"];
var curveMode = EPITROCHOID;


function setup() {
    createCanvas(480, 480);
}


function draw() {
    background("pink");
    
    // draw the frame
    fill(0); 
    noStroke();
    text(titles[curveMode], 20, 40);
    stroke(0);
    noFill(); 
    rect(0, 0, width-1, height-1); 
    
    // draw the curve
    push();
    translate(width / 2, height / 2);
    switch (curveMode) {
    case EPITROCHOID:
        drawEpitrochoidCurve();
        break;
    case EPITROCHOIDTWO:
        drawEpitrochoidTwo();
        break;
    }
    pop();
}

//--------------------------------------------------
function drawEpitrochoidCurve() {
    // Circle Orthotomic:
    // http://mathworld.wolfram.com/Epicycloid.html
    
    var x;
    var y;
    var a = 40.0;
    var b = 20;
    var ph = mouseX / 10.0;
    
    fill(255, 200, 200);
    beginShape();
    for (var i = 0; i < nPoints; i++) {
        var t = map(i, 0, nPoints, 0, TWO_PI);
        x = ((a + b) * (cos(ph * t))) - (b* cos(((a + b) / b) * (ph * t)));
        y = ((a + b) * (sin(ph * t))) - (b* sin(((a + b) / b) * (ph * t)));
        vertex(x, y);
    }
    endShape(CLOSE);
    
}

//--------------------------------------------------
function drawEpitrochoidTwo() {
    // Circle Orthotomic:
    // http://mathworld.wolfram.com/Epicycloid.html
    
    var x;
    var y;
    var a = 100.0;
    var b = 20;
    var ph = mouseX / 20.0;
    
    fill(255, 200, 200);
    beginShape();
    for (var i = 0; i < nPoints; i++) {
        var t = map(i, 0, nPoints, 0, TWO_PI);
        x = ((a + b) * (cos(ph * t))) - (b* cos(((a + b) / b) * (ph * t)));
        y = ((a + b) * (sin(ph * t))) - (b* sin(((a + b) / b) * (ph * t)));
        vertex(x, y);
    }
    endShape(CLOSE);
    
}

//--------------------------------------------------
function mousePressed() {
    curveMode = 1 - curveMode;
}

This project was a little bit challenging at first because I wasn’t sure which curve to choose and introduce it to the given code example. In the end, I choose to go with the epitrochoid curve because it resembles a shape I like and it’s almost like a flower/star. I like this curve because it seems like it’s being weaved into a different shape as you move your mouse from left to right. For this project, I included the two curves I liked the most, the asymmetrical shaped one, which looks like asymmetric reproduction and the other one with 5 outer petals/vertices.

Epitrochoid Curve: Link to curve

Curve 01
Curve 02


Looking Outwards – 07

Using Botanicus’s visualization to hem out an orchid

With this project, humans and other living plants can now interact with each other. I thought that this is incredible because it can be a start to next visualize a different data set for human interaction between each other through similar modes. In the making of this project, there had been a development of a touch sensor that is capacitive. It was able to create an electromagnetic field from a medium; which in turn, measures small disturbances surrounding and in the field. The program, SIGGRAPH 2012, was able to express contact between the two, visually through the use of sensors. An aurora-like interactive visual is triggered through gestures, both physically tangible and intangible through proximity, made from the engager to the plant. And the reason for this project was to create a space/tool in which interactive technologies are not manufactured, but living and real throughout the experiences with one’s senses.

Botanicus Interacticus: Interactive Plant Technology: Disney Research Pittsburgh | Dr. Ivan Poupyrev | 2012

Judy Li-Project-06-Abstract-Clock

judyli: Abstract Clock Project 06

/*
Judy Li
Section A
judyli@andrew.cmu.edu
Project-06
*/

var prevSec;
var millisRolloverTime;

//--------------------------
function setup() {
    createCanvas(300, 300);
    millisRolloverTime = 0;
}

//--------------------------
function draw() {
    background(255,255,255);

    noStroke();
    fill(253, 185,200);
    rect(0, 65, 300, 57.5);
    noStroke();
    fill(252, 163, 183);
    rect(0, 122.5, 300, 60);
    noStroke();
    fill(254, 127, 156);
    rect(0, 182.5, 300, 60);
    noStroke();
    fill(251, 96, 127);
    rect(0, 242.5, 300, 60);
    for (var i = 0; i < width; i = i + 5) {
        stroke(255);
        strokeWeight(1);
        line(i + 5, 0, i + 5, 242.5);
    }
    for (var i = 0; i < width; i = i + 12.5) {
        stroke(255);
        strokeWeight(1);
        line(i + 12.5, 242.5, i + 12.5, height);
    }
    // Fetch the current time
    var H = hour();
    var M = minute();
    var S = second();
    
    // Reckon the current millisecond, 
    // particularly if the second has rolled over.
    // Note that this is more correct than using millis()%1000;
    if (prevSec != S) {
        millisRolloverTime = millis();
    }
    prevSec = S;
    var mils = floor(millis() - millisRolloverTime);

    strokeWeight(1);
    stroke("pink");
    text("M I L L I S : " + mils, 5, 15);
    text("S E C O N D : " + S, 5, 30);
    text("M I N U T E : " + M, 5, 45);
    text("H O U R : "   + H, 5, 60);
    
    var hourBarWidth   = map(H, 0, 23, 0, width);
    var minuteBarWidth = map(M, 0, 59, 0, width);
    var secondBarWidth = map(S, 0, 59, 0, width);
    
    // Make a bar which *smoothly* interpolates across 1 minute.
    // We calculate a version that goes from 0...60, 
    // but with a fractional remainder:
    var secondsWithFraction   = S + (mils / 1000.0);
    var secondsWithNoFraction = S;
    var secondBarWidthChunky  = map(secondsWithNoFraction, 0, 59, 0, width);
    var secondBarWidthSmooth  = map(secondsWithFraction, 0, 59, 0, width);
    
    strokeWeight(5);
    stroke(254, 220, 86);
    line(300, 300, hourBarWidth, 250);
    stroke(248, 228, 115);
    line(300, 240, minuteBarWidth, 190);
    stroke(248, 222, 126)
    line(300, 180, secondBarWidthChunky, 130);
    stroke(252, 244, 163)
    line(300, 120, secondBarWidthSmooth, 70);
}

For this project, I think I wanted to start out with a grid system that shows the count of the milliseconds, seconds, minutes, and hours including the real time text of those times. I think that adding a darker tone as the metrics of time increased added a visual value to the graphics. I had fun with this project, but what I would do to make it better, would change the lines to ellipses because I think that it wouldn’t be as skewed as the line when it moves towards the right side.

Clock Sketch

Looking Outwards – 06

Exterior of the Israel Pavilion showcasing LifeObject

LifeObject, is an innovative installation that exhibits the linear and structural properties of a bird’s nest. LifeObject was initially designed based off of the visuals of a nest through 3D scanning. With scientific analysis through architecture, it is made with over 1500 components, resembling twigs. These twigs rely on tension and are light weight, opaque, and sturdy. In addition, the presence of living bodies triggers a variety of unique biological elements.

There is a system of hierarchy reflected through the process, from design to fabrication to assembly. The entire form is made by the use of gravity and that is where randomness comes into the design.  With the analysis of the bird’s nest, twig-like structures were produced and arranged/bent randomly with a preset value, which means that the form of LifeObject is adaptable. The core is simple, the inner array is varied slightly, and the edges are diverse in static movement.

The introduction and practice of new materials blurred the line between digital fabrication processes and design. And this sort of architectural exploration – properties of materials and modes of transformation – came from the architect’s palette of expression.

LifeObject Article: Inside Israel’s Pavilion at the 2016 Venice Biennale by Arielle Blonder, 2016

Judy Li-Project-05-Wallpaper

judyli: Wallpaper Project 05

/*
Judy Li
Section A
judyli@andrew.cmu.edu
Project-05
*/

function setup() {
    createCanvas(480, 480);
    background("pink");
    noStroke();
}

function draw() {
    var tw = 60;
    var th = 60;
    var oy = 60;
    var ox = 60;
    for (var i = 0; i < width; i = i + 5) {
		stroke(255);
		line(i, 0, i, height);
    }
    for (var y = 0; y < 8; y++) {
    	noStroke();
        for (var x = 0; x < 7; x++) {
            var py = oy + y * (sqrt(3) * (th / 2));
            var px = ox + x * tw;
            for (var x = 0; x < 6; x++) {
                var py = oy + y * (sqrt(3) * (th / 2));
                var px = ox + x * tw;
                if (y % 2 != 0) {
                    py = oy + y * (sqrt(3) * (th / 2));
                    px = ox + x * tw;
                    fill(128, 206, 214);
                    arc(px + (tw / 2), py, 50, 50, PI - QUARTER_PI, TWO_PI - QUARTER_PI);
                    fill(213, 244, 230);
                    arc(px + (tw / 2), py, 50, 50, TWO_PI - QUARTER_PI, PI - QUARTER_PI);
                }
                else {
                	fill (97, 134, 133);
	                arc(px, py, 50, 50, QUARTER_PI, PI + QUARTER_PI);
	                fill (254, 251, 216);
	                arc(px, py, 50, 50, PI + QUARTER_PI, QUARTER_PI);
	            }
            }
            if (y % 2 == 0) {
            	fill(97, 134, 133);
                arc(px + tw, py, 50, 50, QUARTER_PI, PI + QUARTER_PI);
                fill (254, 251, 216);
	            arc(px + tw, py, 50, 50, PI + QUARTER_PI, QUARTER_PI);
            }
        }
    }
    noLoop();
}

I found two wallpapers from Pinterest that I really liked. But, the goals of this project was to create one static wallpaper. So, I wanted to combine the two I found to create my own wallpaper. I think that the base of my project can serve to be useful for adding more details to the wallpaper such as making the arcs divide into different rings so that it’s more intricate. I also referred to the code from the assignment to help me with this project. I attached the two inspirations I got from Pinterest below.

Photo Inspiration 1
Photo Inspiration 2

Looking Outwards – 05

Article

Designer: Alexey Zakharov

This is a project designed by Alexey Zakharov. This project showcases a macro vision world full of spiders, caterpillars, dragonflies, and ladybugs surrounded by dew drops that are lively, but animated for that effervescent effect. In my opinion, what makes this project so successful is the way that Zakharov plays with light and how he makes it reflects off of the water droplets and onto the plants and insects/bugs. His attention to that detail is exquisite and thus, makes the scene vibrant and real. For the algorithm that he used, I believed that each droplet is made from a surface subdivided into smaller surfaces. And that allows him to make them so detailed. He also uses a lot of repetition in quantity to make the object/thing more full/rich to look at.

Water Drops: Animation of the project.

Illustrations: Other pictures of the project.

Process: Some behind the scene works leading to the finale.


Judy Li-Project-04-String-Art

judyli: String Project 04

/*
Judy Li
Section A
judyli@andrew.cmu.edu
Project-04
*/

function setup() {
    createCanvas(400, 300);
    background(218,175,32);
}

function draw() {
	var x = 0;
	var x1 = 0;
	var x2 = 0;
	var x3 = 0;
	var x4 = 0;
	var x5 = 0;
	var y2 = 0;
	var y3 = 0;
	var y4 = 0;
	var y5 = 0;

	for (var i = 0; i < 50; i++) {
		x += 10;
		stroke(255, 0, 0);
		line(300, 300, x, 0);
	}
	for (var e = 0; e < 50; e++) {
		x1 += 10;
		stroke(0,255,255);
		line(300, 0, x1, 300);
	}
	for (var c = 0; c < 1; c += 0.1) {
		x2 = lerp(300, 400, c);
		y2 = lerp(150, 0, c);
		stroke(0, 0, 255);
		line(400, 150, x2, y3);
	}
	for (var d = 0; d < 1; d += 0.1) {
		x3 = lerp(300, 400, d);
		y3 = lerp(300, 300, d);
		stroke(255, 0, 255);
		line(400, 150, x3, y3);
	}
    for (var h = 0; h < 30; h++) {
        x4 += 10;
        y4 += 10;
        stroke(255, 255, 255);
        line(0, y4, x4, 300);
    }
    for (var s = 0; s < 30; s++) {
        x5 += 10;
        y5 += 10;
        stroke(100, 100, 100);
        line(300 - x5, 0, 0, y5);
    }
	for (var f = 0; f < 6; f++) {
		ellipse(450 - (f * 75), 150, 20 * (f / 1.5), 20 * (f / 1.5));
		ellipse(450 - (f * 75), 150, 18 * (f / 1.5), 18 * (f / 1.5));
		ellipse(450 - (f * 75), 150, 16 * (f / 1.5), 16 * (f / 1.5));
		ellipse(450 - (f * 75), 150, 14 * (f / 1.5), 14 * (f / 1.5));
		ellipse(450 - (f * 75), 150, 12 * (f / 1.5), 12 * (f / 1.5));
		ellipse(450 - (f * 75), 150, 10 * (f / 1.5), 10 * (f / 1.5));
		ellipse(450 - (f * 75), 150, 8 * (f / 1.5), 8 * (f / 1.5));
		ellipse(450 - (f * 75), 150, 6 * (f / 1.5), 6 * (f / 1.5));
		ellipse(450 - (f * 75), 150, 4 * (f / 1.5), 4 * (f / 1.5));
		ellipse(450 - (f * 75), 150, 2 * (f / 1.5), 2 * (f / 1.5)); 
		stroke(0);
		noFill();
	}
	strokeWeight(0.5);
}

This project was a super fun one because it was easier for me to take control of the direction of my lines/curves. The only thing I had a little trouble with was the ‘lerp’ command. I had to test around with the x and y values so that I was able to get a sense of what I had to tweak to get a specific string pattern.

Looking Outwards – 04

Using textiles as electroacoustic transducers Author: Filip Visnjic

I thought this work was really interesting because I’ve see clothing that incorporates lighting, but not sound. This is a project by Esteban and Judit of EJTECH. The reason why they wanted to create pieces like this was to enhance and explore the possibilities of multi-sensory experiences through textiles. This soft sound acts as a provocative new instrument for human expression. The main piece, would be a metal surface that emits audio and sonic vibrations because it is embedded onto the fabric. The intent of this project was that it was to be used as an innovation to material. And because of this, there can be so many different possibilities to implement this application.

Soft Sounds – Registry Phase 1

Project Page – Prototypes and Different Iterations

Judy Li-Project-03-Dynamic-Drawing

judyli:Face Project 03

/*
Judy Li
Section A
judyli@andrew.cmu.edu
Project-03
*/

var angle = 0;
var x = 1;

function setup() {
    createCanvas(640, 480);
    x = random(1,5);
}

function draw() {
    background(0,0,0);
    //otherobjects
    fill(255,255,102);
    noStroke();
    var m = max(min(mouseX, 640), 0);
    var size = m * 200.0 / 640.0;
    //foreground
    if (mouseX < width/2) {
        background(153,204,255);
        ellipse(175, 200.0, 200, 200);
    }
    else background(0,76,153);
    fill(224,224,200);
    ellipse(350 + m * 120.0/640.0, 200.0, size, size);
    if (mouseX < width/2) {
        noFill();
    }
    else fill (255,255,155);
    push();
    translate(100, 50);
    scale(x/.5);
    rotate(radians(angle));
    triangle(10, 7.5, 2.5, 20, 17.5, 20);
    triangle(10, 25, 2.5, 12.5, 17.5, 12.5);
    pop();
    push();
    translate(250, 100);
    scale(x/2);
    rotate(radians(angle));
    triangle(10, 7.5, 2.5, 20, 17.5, 20);
    triangle(10, 25, 2.5, 12.5, 17.5, 12.5);
    pop();
    push();
    translate(400, 150);
    scale(x);
    rotate(radians(angle));
    triangle(10, 7.5, 2.5, 20, 17.5, 20);
    triangle(10, 25, 2.5, 12.5, 17.5, 12.5);
    pop();
    push();
    translate(550, 200);
    scale(x/3);
    rotate(radians(angle));
    triangle(10, 7.5, 2.5, 20, 17.5, 20);
    triangle(10, 25, 2.5, 12.5, 17.5, 12.5);
    pop();
    push();
    translate(100, 150);
    scale(x/1.5);
    rotate(radians(angle));
    triangle(10, 7.5, 2.5, 20, 17.5, 20);
    triangle(10, 25, 2.5, 12.5, 17.5, 12.5);
    pop();
    push();
    translate(250, 200);
    scale(x/.5);
    rotate(radians(angle));
    triangle(10, 7.5, 2.5, 20, 17.5, 20);
    triangle(10, 25, 2.5, 12.5, 17.5, 12.5);
    pop();
    push();
    translate(400, 250);
    scale(x/2);
    rotate(radians(angle));
    triangle(10, 7.5, 2.5, 20, 17.5, 20);
    triangle(10, 25, 2.5, 12.5, 17.5, 12.5);
    pop();
    push();
    translate(550, 300);
    scale(x);
    rotate(radians(angle));
    triangle(10, 7.5, 2.5, 20, 17.5, 20);
    triangle(10, 25, 2.5, 12.5, 17.5, 12.5);
    pop();
    push();
    translate(100, 250);
    scale(x/3);
    rotate(radians(angle));
    triangle(10, 7.5, 2.5, 20, 17.5, 20);
    triangle(10, 25, 2.5, 12.5, 17.5, 12.5);
    pop();
    push();
    translate(250, 300);
    scale(x/1.5);
    rotate(radians(angle));
    triangle(10, 7.5, 2.5, 20, 17.5, 20);
    triangle(10, 25, 2.5, 12.5, 17.5, 12.5);
    pop();
    push();
    translate(400, 350);
    scale(x/.5);
    rotate(radians(angle));
    triangle(10, 7.5, 2.5, 20, 17.5, 20);
    triangle(10, 25, 2.5, 12.5, 17.5, 12.5);
    pop();
    push();
    translate(550, 400);
    scale(x/2.5);
    rotate(radians(angle));
    triangle(10, 7.5, 2.5, 20, 17.5, 20);
    triangle(10, 25, 2.5, 12.5, 17.5, 12.5);
    pop();
    angle = angle + 5;
}

I didn’t know where to begin with this project because there’s so much you can do. I liked the idea of day transitioning into night. So, I played with background and the foreground to create this. I wanted it to be a bit more playful and when you refresh the page, the sizes of the stars change with it!

Looking Outwards – 03

Syntopia | Behind the scenes | Iris van Herpen | Photo by Molly SJ Lowe.

Syntopia is a collection by Iris van Herpen that was inspired by the organic and inorganic, in which biology comes together with technology. She collaborated with other artists from Studio Drift to create life-like immersive sculptures through the use of movement. I believe that she was inspired to slow down time through chronophotography to capture the different layers. This new perspective helped change her style of work because she found a unique way of the usual draping of garments. She studied bird flight and avian motion carefully to get to her final results. Using the bird’s sound wave patterns, she was able to use a layering of acrylic and silk to mimic the architecture of a feather, and you can visually see that from the photo above.  I was really fascinated by her collections and the processes she and others go through to achieve their end results.

Syntopia – Behind the scenes
Couture of Syntopia – About the collection