Ghalya Alsanea – LO-03 – ArboSkin

“Thermoformable sheets of bioplastics will represent a resource-efficient alternative [to oil-based plastics, glass, or metal] in the future, as they combine the high malleability and recyclability of plastics with the environmental benefits of materials consisting primarily of renewable resources.” explained the project team.

The Project Team

Overview

Stuttgart University’s ITKE Institute has designed and built the ArboSkin pavilion out of 388 bioplastic pyramids. A 140-square foot digitally fabricated mock-up composed of recyclable components that can be freely shaped and manufactured as 3D façade elements, the project was created within the Institute’s Bioplastic Façade Research Program to demonstrate the aesthetic and structural potentials of bioplastics.

Full Mock Up – Photograph by Roland Halbe

About the Creators

ITKE is the Institute of Building Structures and Structural Design in Stuttgart, Germany. Bioplastics are plastics made from renewable biomass sources such as starches, cellulose or other biopolymers, that offer sustainable alternatives to plastics derived from fossil fuels. The bioplastic used in the ArboSkin project is called Arboblend and is produced by German firm, Tecnaro, by combining different biopolymers such as lignin – a by-product of the wood pulping process – with natural reinforcing fibres.

Collaborating materials scientists, architects, product designers, manufacturing technicians, and environmental experts were able to develop a new material for facade cladding which is thermoformable and made primarily (>90%) from renewable resources. I admire the interdisciplinary approach to this project.

Process and Project Details

The blueprint of the shell structure is based on a network of triangular shapes of different sizes. The double curved skin is made of 3.5 mm thick bioplastic pyramids that are mechanically assembled to create the free form surface. The bioplastic sheets can be freely shaped and adapted to fit any requirement for building exteriors.

Personally, what really inspired me is the fact that waste produced during the CNC milling process can be regranulated and reused to create more of these façade elements in 3D format.

concept sketch. source: ITKE

The double-curved skin is formed by linking the pyramids together, with bracing rings and joists helping to create load-bearing walls. CNC-milling was used to remove sections from some of the modules, creating apertures in the facade, which I believe can be really cool if it is done based on sun data allowing for shading/sunlight during certain times of the day.

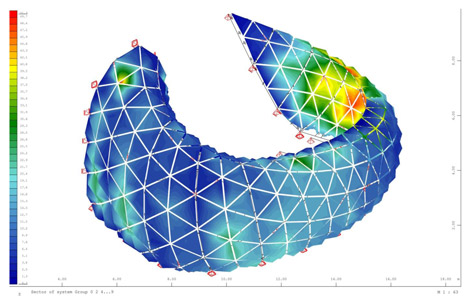
FE-Model Wind and snow loads. This shows how they used weather data to figure out where to put apertures and how to structurally reinforce it. Source: ITKE


Notes:

Duration of the project:  December 20, 2011 – October 31, 2013

Mock-Up: The bioplastics facade mock-up was created within the framework of the Bioplastic Facade Research Project, a project supported by EFRE (Europäischer Fonds für Regionale Entwicklung / European Fund for Regional Development). It demonstrates one of the possible architectural and constructional applications of bioplastic materials developed during the course of the project. The blueprint is based on a triangular net composed by mesh elements of varying sizes.

Links:

ITKE Constructs New ArboSkin Pavilion with 388 Recyclable Bioplastic Pyramids

ArboSkin pavilion made from bioplastic by ITKE

ArboSkin: Durable and Recyclable Bioplastics Facade Mock-Up

Jai Sawkar Project 03 – Dynamic Drawing

Portrait_Jai

//Jai Sawkar
//Section C
//jsawkar@andrew.cmu.edu
//Project-03: Generative Drawing 

var whiteFade = 255;


function setup() {
    createCanvas(640, 480);
}

function draw() {

    background(whiteFade);
    noStroke();
  
    //setting variables for the blue rectangle
    var tangleW2 = (width / 2);
    var tangle1H = constrain(mouseY, 20, height - 40);
  
    //rectblue
    fill(141, 194, 255);
    rect(10, 10, tangleW2, tangle1H);

    
    //rectgreen
    fill(255, 185, 141);
    // variable for x origin
    var basept2x = 10;
    var tangle2Y = constrain(mouseY, 40, height - 20)
    var tangle2H = constrain(mouseY, height / 2 - 40, height - 20)
  
    rect(basept2x, tangle2Y, tangleW2, tangle2H);


  //yellow rectangle
    fill(255, 242, 141);
  
    //rectangle variables for x & y
    var tangle3X = width / 2 + 20;
    var tangle3Y = constrain(mouseY, 30, 100);
  
    rect(tangle3X, tangle3Y, 480, 100);


    //rectangle dark purple
    fill(228, 141, 255);
  
    // variables for X, Y, Height & Width
    var tangle4X = constrain(mouseY, 10, width / 2 + 20)
    var tangle4Y = height / 2 + 10
    var tangle4H = (height / 2 - 20);
    var tangle4W = constrain(mouseY, width / 2, width / 2)
  
    rect(tangle4X, tangle4Y, tangle4W, tangle4H);


    //rectangle light purple
    var tangle5H = constrain(mouseY, 10, height / 2 - 20);
    var tangle5Y = 10;
    var tangle6y = height / 2 - 100;

    fill(171, 141, 255);
    rect(width / 2 + 20, 10, width, tangle5H);

    //green rectangle
    fill(168, 255, 141);
    rect(constrain(mouseX, width / 2, 640) + 20, tangle6y, width, constrain(mouseY, 400, 400));
    fill(whiteFade);
    rect(constrain(mouseX, width / 2, 640) + 20, tangle6y - 10, width, 10)
    rect(constrain(mouseX, width / 2, 640) + 20, tangle6y -10, -10, 480);


    //rectangle white
    fill(whiteFade);
    rect(0, height - 10, 640, 640);

    //rectangle white 2
    rect(630, 0, 10, 480);

    // background fade based on mouse position
    if (mouseX > width / 2 + 20) {
    whiteFade = whiteFade - 5;
    } else {
    whiteFade = whiteFade + 5;
    }
}

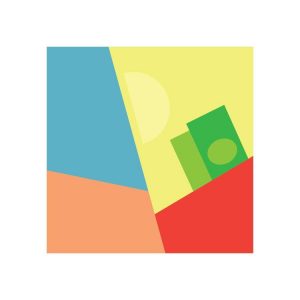
Cover for 65th and Ingleside by Chance the Rapper (July, 2019)

For this project, I wanted to make a drawing that is simple in message but more complex as the mouse moves. I created a series of rectangles that either grows from the sides of the canvas or decrease in size as the mouse moves across it. I took inspiration from a Cover of a single I liked last summer by Chance the Rapper and made my dynamic drawing.

Janet Peng Project 02 – Variable Face

jjpeng assignment 2

var faceWidth = 120;
var faceHeight = 100;
var earRotation = 20;
var eyeSize = 10;
var cheekSize = 10;
var r = 244;
var g = 235;
var b = 130;

function setup() {
    createCanvas(480, 640);
}

function draw() {
	background (255, 255, 220);

	// face
	fill(r, g, b);
	stroke(r, g, b);
	ellipse(width / 2, height / 2, faceWidth, faceHeight);

	// right ear
	push();
	translate(width / 2 + faceWidth / 3, height / 2 - faceHeight / 2);
	rotate(radians(earRotation));
	fill(r, g, b);
	stroke(r, g, b);
	ellipse(0, 0, 20, 70)
	fill(60);
	stroke(60);
	arc(0, 0, 20, 70, PI + 1.2, 2 * PI - 1.2, OPEN)
	pop();

	// left ear
	push();
	translate(width / 2 - faceWidth / 3, height / 2 - faceHeight / 2);
	rotate(radians(-earRotation));
	fill(r, g, b);
	stroke(r, g, b);
	ellipse(0, 0, 20, 70)
	fill(60);
	stroke(60);
	arc(0, 0, 20, 70, PI + 1.2, 2 * PI - 1.2, OPEN)
	pop();

	// eyes
	fill(60);
	stroke(60);
	ellipse(width / 2 - faceWidth / 4, height / 2, eyeSize, eyeSize)
	ellipse(width / 2 + faceWidth / 4, height / 2, eyeSize, eyeSize)

	// nose
	fill(60);
	stroke(60);
	triangle(width / 2 - faceWidth / 35, height / 2 + faceHeight / 20,
			 width / 2 + faceWidth / 35, height / 2 + faceHeight / 20,
			 width / 2, height / 2 + faceHeight / 12,);

	// cheeks
	fill(247, 98, 52);
	stroke(247, 98, 52);
	ellipse(width / 2 - faceWidth / 2.8, height / 2 + faceHeight / 6, cheekSize, cheekSize)
	ellipse(width / 2 + faceWidth / 2.8, height / 2 + faceHeight / 6, cheekSize, cheekSize)

	// hat
	fill(58, 53, 50);
	stroke(58, 53, 50);
	arc(width / 2, height / 2 - faceHeight / 2.3, 45, 40, PI, 0);
	ellipse(width / 2, height / 2 - faceHeight / 1.6, 6, 4);
	fill(84, 79, 74);
	stroke(84, 79, 74);
	ellipse(width / 2, height / 2 - faceHeight / 2.3, 40, 10);
}

function mousePressed() {
    // on click variables are randomly reassigned
    faceWidth = random(100, 150);
    faceHeight = random(100, 120);
    earRotation = random (5, 60);
    eyeSize = random(5, 20);
    cheekSize = random(5, 20);
    r = random (230, 255);
    g = random (215, 235);
    b = random (110, 130);
}

Alec Albright – Looking Outwards 04

Dave Young’s exhibition of Radius Music in 2010.

Dave Young’s “Radius Music”, released in 2010, is an audiovisual device that reads the ultrasonic distance from those that are in the room to the device itself, conducting additive synthesis to create audio and placing light beams on the floor in response to that distance. This project is admirable because of its ability to conduct complicated audio synthesis techniques on the fly, based on feedback it may have never dealt with before. I would imagine that the algorithm maps distance to pitch in some way, but I’m not sure what affects timbre, tempo, or anything else for that matter. Regardless, it seems super cool!

Timothy Liu — Project 03 — Dynamic Drawing

Move the mouse to bring Pikachu near the pokéballs, and watch them converge and grow!

Also, click the mouse to change the berry floating around Pikachu’s head!

tcliu-openproject-03

// Timothy Liu
// 15104 Section C
// tcliu@andrew.cmu.edu
// OpenProject-03

// variables that determine the original/default sizing of Pikachu and pokeballs.
var pokeWidth = 50;
var buttonW = pokeWidth - 40;
var yStart = 350;
var pikachuW = 100;
var pikachuH = 80;
var pikachuX = 300;
var pikachuY = 200;
var eyeW = 15;
var eyeHighlight = 5;
var noseW = 10;
var mouthW = 15;
var mouthH = 30;
var cheekW = 17;

// variables determining the berry's size and color
var berryW = 25;
var berryH = 20;
var berryStem = 20;
var berryDist = 70;

// variables that allow berry color to be changed with mouse clicks
var berryR = 224;
var berryG = 78;
var berryB = 58;

// variables that determine background color; this allows the background to change color later as mouseY changes.
var colorR = 51;
var colorG = 91;
var colorB = 0;

// angle variable used to make the pokeballs spin. Later, the angle = angle + 1 command makes the angle change!
var angle = 0;

// function time!
function setup() {
    // canvas is 600, 480 instead of 640, 480 because a 640 width doesn't fit on WordPress.
    createCanvas(600, 480);
}

function draw() {

    // variables that make the pokeballs expand as the mouse moves down.
    // subtracting pokeWidth makes the pokeballs start at their default size when the mouse is at the top of screen.
    var mouseA = height - mouseY - pokeWidth;
    var pbWidth = height - mouseA;

    // variables to make the color of the background change as the mouse moves.
    var colorR1 = min(mouseY + colorR, 252);
    var colorG1 = min(mouseY + colorG, 194);
    var colorB1 = min(mouseY + colorB, 0);

    // setting the background color to start at green, and making it change to gold as the mouse moves down.
    background(colorR1, colorG1, colorB1);

    // if statement to limit size of the pokeballs. The pokeballs expand up to 200 pixels.
    if (pbWidth >= 200) {
        pbWidth = 200;
    }

    // pokeball 1: white part rotation. The push and pop functions ensure the pokeball spins.
    push();
    fill("white");
    noStroke();
    // this translate command makes the pokeballs converge to the center as mouseY increase.
    translate(width / 6 + min(max(mouseY, 0), width / 3), yStart);
    rotate(radians(angle));
    ellipseMode(CENTER);
    ellipse(0, 0, pbWidth, pbWidth);
    pop();
    angle = angle + 0.5;

    // pokeball 1: red half rotation
    push();
    fill("red");
    noStroke();
    translate(width / 6 + min(max(mouseY, 0), width / 3), yStart)
    rotate(radians(angle));
    arc(0, 0, pbWidth, pbWidth, PI, TWO_PI);
    pop();
    angle = angle + 0.5;

    // pokeball 1: button + outline
    push();
    fill("white");
    strokeWeight(3);
    translate(width / 6 + min(max(mouseY, 0), width / 3), yStart);
    rotate(radians(angle));
    ellipseMode(CENTER);
    ellipse(0, 0, pbWidth / 6, pbWidth / 6);
    pop();
    angle = angle + 0.5;

    // pokeball 2: white part rotation
    push();
    fill("white");
    noStroke();
    translate(width / 2, yStart);
    rotate(radians(angle));
    ellipseMode(CENTER);
    ellipse(0, 0, pbWidth, pbWidth);
    pop();
    angle = angle + 0.5;

    // pokeball 2: red part rotation
    push();
    fill("red");
    noStroke();
    translate(width / 2, yStart);
    rotate(radians(angle));
    arc(0, 0, pbWidth, pbWidth, PI, TWO_PI);
    pop();
    angle = angle + 0.5;

    // pokeball 2: button + outline
    push();
    fill("white");
    strokeWeight(3);
    translate(width / 2, yStart);
    rotate(radians(angle));
    ellipseMode(CENTER);
    ellipse(0, 0, pbWidth / 6, pbWidth / 6);
    pop();
    angle = angle + 0.5;

    // pokeball 3: white part rotation
    push();
    fill("white");
    noStroke();
    translate(5 * width / 6 - min(max(mouseY, 0), width / 3), yStart);
    rotate(radians(angle));
    ellipseMode(CENTER);
    ellipse(0, 0, pbWidth, pbWidth);
    pop();
    angle = angle + 0.5;

    // pokeball 3: red part rotation
    push();
    fill("red");
    noStroke();
    translate(5 * width / 6 - min(max(mouseY, 0), width / 3), yStart);
    rotate(radians(angle));
    arc(0, 0, pbWidth, pbWidth, PI, TWO_PI);
    pop();
    angle = angle + 0.5;

    // pokeball 3: button + outline
    push();
    fill("white");
    strokeWeight(3);
    translate(5 * width / 6 - min(max(mouseY, 0), width / 3), yStart);
    rotate(radians(angle));
    ellipseMode(CENTER);
    ellipse(0, 0, pbWidth / 6, pbWidth / 6);
    pop();
    angle = angle + 0.5;

    // beginning of push command to make the Pikachu follow the mouse using translate(mouseX, mouseY)
    push();
    translate(mouseX - pikachuX, mouseY - pikachuY);

    // head and ears 
    fill(252, 239, 0);
    noStroke();
    ellipse(pikachuX, pikachuY, pikachuW, pikachuH);
    triangle(pikachuX - 5 * pikachuW / 8, pikachuY - pikachuH, pikachuX - pikachuW / 4, pikachuY - pikachuH / 2.5,
        pikachuX - pikachuW / 2.2, pikachuY - pikachuH / 5);
    triangle(pikachuX + 5 * pikachuW / 8, pikachuY - pikachuH, pikachuX + pikachuW / 4, pikachuY - pikachuH / 2.5,
        pikachuX + pikachuW / 2.2, pikachuY - pikachuH / 5);

    // tips of the ears
    fill("black");
    triangle(pikachuX - 5 * pikachuW / 8, pikachuY - pikachuH, pikachuX - pikachuW * 0.5, pikachuY - pikachuH * 0.8,
        pikachuX - pikachuW * 0.56, pikachuY - pikachuH * 0.7);
    triangle(pikachuX + 5 * pikachuW / 8, pikachuY - pikachuH, pikachuX + pikachuW * 0.5, pikachuY - pikachuH * 0.8,
        pikachuX + pikachuW * 0.56, pikachuY - pikachuH * 0.7);

    // eyes
    ellipse(pikachuX - pikachuW / 5, pikachuY, eyeW, eyeW);
    ellipse(pikachuX + pikachuW / 5, pikachuY, eyeW, eyeW);
    fill("white");
    ellipse(pikachuX - pikachuW / 5, pikachuY - pikachuH * 0.05, eyeHighlight, eyeHighlight);
    ellipse(pikachuX + pikachuW / 5, pikachuY - pikachuH * 0.05, eyeHighlight, eyeHighlight);

    //red cheeks
    fill(227, 45, 25);
    ellipse(pikachuX - pikachuW / 3, pikachuY + pikachuH / 5, cheekW, cheekW);
    ellipse(pikachuX + pikachuW / 3, pikachuY + pikachuH / 5, cheekW, cheekW);

    // nose and mouth
    fill("black");
    arc(pikachuX, pikachuY + pikachuH / 8, noseW, noseW / 2, TWO_PI, PI);
    fill("pink");
    arc(pikachuX, pikachuY + pikachuH / 5, mouthW, mouthH, TWO_PI, PI);

    // pop command to enclose Pikachu commands. This ensures that only the Pikachu follows the mouse.
    pop();

    // this creates the berry floating/rotating around Pikachu's head.
    push();
    fill(berryR, berryG, berryB);
    noStroke();

    // this makes the berry float around Pikachu by adding some distance from the mouseX, mouseY origin
    translate(mouseX, mouseY);
    rotate(radians(angle));
    ellipse(berryDist, berryDist, berryW, berryH);
    fill(16, 196, 0);
    arc(berryDist, berryDist * 1.25, berryStem, berryStem / 1.1, PI, TWO_PI);
    pop();
    angle = angle + 1 / 100;

}

function mousePressed() {

    // when the mouse is pressed, the berry floating around Pikachu's head changes color!
    berryR = random(0, 255);
    berryG = random(0, 255);
    berryB = random(0, 255);
}

I grew up watching and playing Pokémon, and one of the random tidbits about the original cartoon that stuck with me was how pokéballs expand when they’re removed from the trainer’s belt. I built my program to mimic this dynamic movement; when you move the Pikachu (set to follow the mouse around) towards the pokeballs, they expand while rotating. They also converge into one as an inverse function of the mouse movement to represent Pikachu’s singular pokéball. In addition, the background changes color from a forest green to a warm gold as the mouse moves downward. I was very happy with how my project turned out, as its fun, lighthearted, meaningful, and engagingly dynamic.

The 5 dynamic elements I utilized are having Pikachu follow the mouse, making the pokéballs expand, having them converge, making the background change color, and the rotation of the pokéballs and berry. As an added interactive component, clicking on the berry causes it to change color.

YouieCho-Project-03-Dynamic-Drawing

sketch

/*Youie Cho
  Section E
  minyounc@andrew.cmu.edu
  Project-03-Dynamic-Drawing*/

function setup() {
    createCanvas(480, 640);
    rectMode(CENTER);
}

function draw() {
    //background changes color based on mouse movement
    background(mouseX, mouseY, 180);
    //gray boundary frames background
    noFill();
    stroke(150);
    strokeWeight(5);
    rect(width / 2, height / 2, width, height);
    // mouseX is limited to 70-350
    var m = max(min(mouseX, 350), 70);
    var size = m * 350.0 / 480.0;
    strokeWeight(2);
    //purple square (rectangle)
    fill(210, 171, 255);
    rect(50 + m * 190.0 / 480.0, 200.0, size, size);
    //pink square
    fill(255, 207, 236);
    size = 350 - size;
    rect(150 + m * 190.0 / 480.0, 200.0, size, size);
    //blue square
    fill(179, 255, 255);
    size = 350 - size;
    rect(200 + m * 190.0 / 480.0, 200.0, size, size);

    /*yellow squares translate and rotate based on mouse movement
      color warmth changes based on mouseY*/
    stroke(200);
    strokeWeight(1);
    fill(255, mouseY + 150, 100);
    //yellow square 1
    push();
    translate(mouseX * 2.1, mouseY * 2.1);
    rotate(radians(mouseX / 10));
    rect(100, 250, 20, 20);
    pop();
    //yellow square 2
    push();
    translate(mouseX * 1.3, mouseY * 1.3);
    rotate(radians(mouseX / 10));
    rect(150, 290, 20, 20);
    pop();
    //yellow square 3
    push();
    translate(mouseX * 0.7, mouseY * 0.7);
    rotate(radians(mouseX / 10));
    rect(210, 340, 20, 20);
    pop();
    //yellow square 4
    push();
    translate(mouseX * 0.3, mouseY * 0.3);
    rotate(radians(mouseX / 10));
    rect(280, 400, 20, 20);
    pop();
    //yellow square 5
    push();
    translate(mouseX * 0.1, mouseY * 0.1);
    rotate(radians(mouseX / 10));
    rect(360, 470, 20, 20);
    pop();


    /*pink circles translate based on mouse movement
      they vary in size and rate of rotation*/
    fill(255, 110, 131);
    stroke(100);
    //pink circle 1
    push();
    translate(p5.Vector.fromAngle(millis() / 1000, 150));
    rotate(radians(mouseX / 10));
    ellipse(250, 400, 20, 20);
    pop();
    //pink circle 2
    push();
    translate(p5.Vector.fromAngle(millis() / 950, 150));
    rotate(radians(mouseX / 10));
    ellipse(255, 395, 30, 30);
    pop();
    //pink circle 3
    push();
    translate(p5.Vector.fromAngle(millis() / 900, 150));
    rotate(radians(mouseX / 10));
    ellipse(260, 390, 40, 40);
    pop();
    //pink circle 4
    push();
    translate(p5.Vector.fromAngle(millis() / 850, 150));
    rotate(radians(mouseX / 10));
    ellipse(265, 385, 50, 50);
    pop();
    //pink circle 5
    push();
    translate(p5.Vector.fromAngle(millis() / 800, 150));
    rotate(radians(mouseX / 10));
    ellipse(270, 380, 60, 60);
    pop();
    //pink circle 6
    push();
    translate(p5.Vector.fromAngle(millis() / 750, 150));
    rotate(radians(mouseX / 10));
    ellipse(275, 375, 70, 70);
    pop();
    //pink circle 7
    push();
    translate(p5.Vector.fromAngle(millis() / 700, 150));
    rotate(radians(mouseX / 10));
    ellipse(280, 370, 80, 80);
    pop();
}

It was fun to try controlling range of colors and creating movements that can change over time based on mouse movement.

Jina Lee – Looking Outwards 03

https://n-e-r-v-o-u-s.com/projects/albums/hyphae/

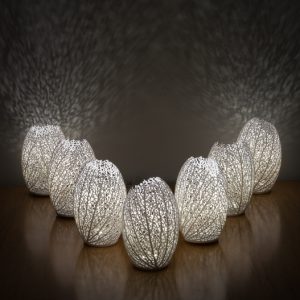
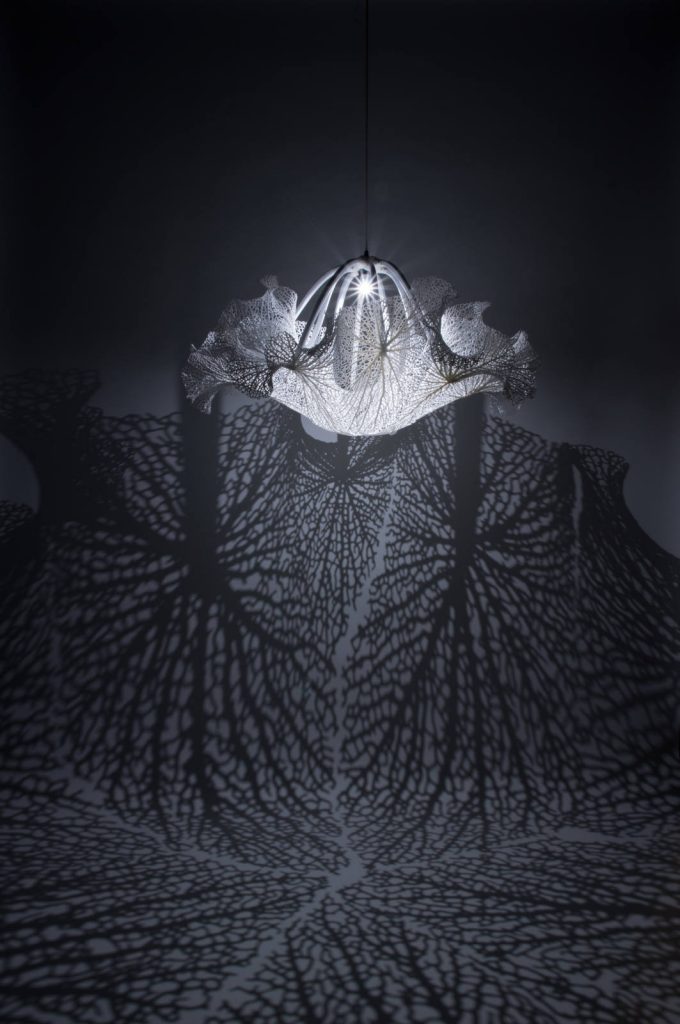
As I was looking up computational fabrication, I stumbled upon the Hyphae Lamp. The co-founders are Jess Louise-Rosenberg and Jessica Rosenkrantz. In the science world, hyphae performs a variety of functions in fungi. In this context, Hyphae is a series of 3D-printed lamps that were inspired by the “vein structures that carry fluids through organisms from the leaves of plants to our own circulatory systems.” They were able to build it by looking at the stages of leaves, starting from when they were seeds to when they were fully grown. Each lamp is unique because it is completely one of a kind. They are 3D-printed in nylon plastic. They are run by eco-friendly LEDS.

This is a photo of lights.

As I was looking up computational fabrication, I stumbled upon the Hyphae Lamp. In the science world, hyphae performs a variety of functions in fungi. In this context, Hyphae is a series of 3D-printed lamps that were inspired by the “vein structures that carry fluids through organisms from the leaves of plants to our own circulatory systems.” They were able to build it by looking at the stages of leaves, starting from when they were seeds to when they were fully grown. Each lamp is unique because it is completely one of a kind. They are 3D-printed in nylon plastic. They are run by eco-friendly LEDS. It was made with c++ using CGAL.

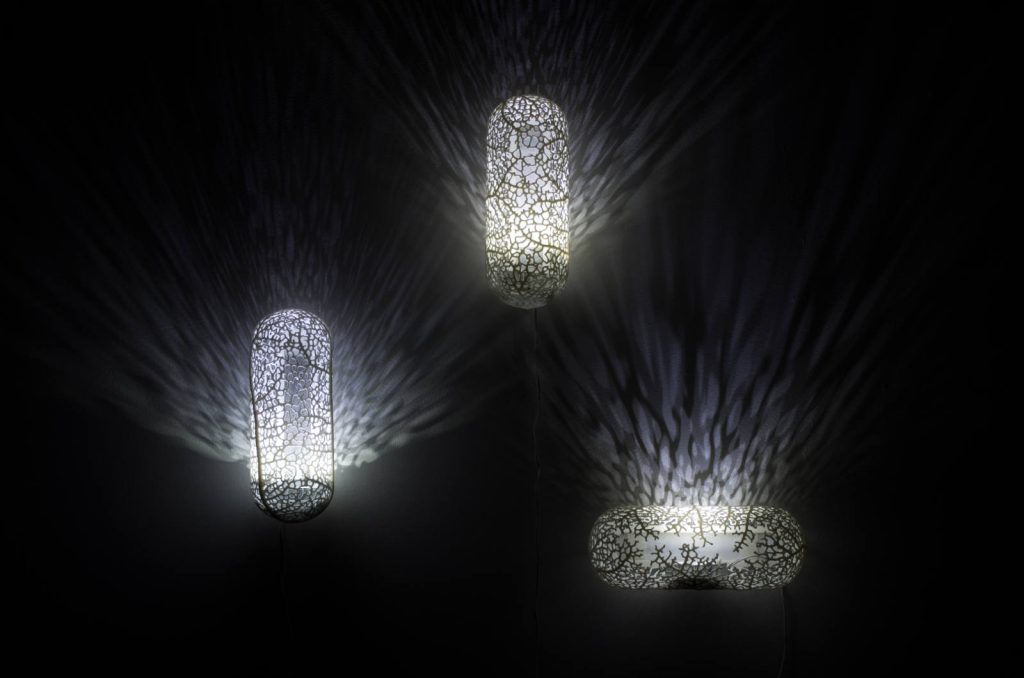
The lamps do not all posses the same shape. Some are chandeliers while others are just wall lights or lamps.

I thought that this project was interesting because I usually don’t see designs being influenced by science. I felt more connected to this project since last semester, in design, we created lamps out of paper. Being able to see the designer’s process and inspiration allowed me to better understand the purpose of the idea.  In the video, you are able to see the process of the lamp being built and it made me feel like I was watching the actual process of a leaf growing its veins. I enjoyed how the lamps do not posses the same body shape. Some are more circular while others are more natural and not a certain shape. There were even jewelry that followed the same algorithm and material. Overall, I really enjoyed researching this project because it is not just an aesthetic design. It educates people on hyphae while also acting as a lamp.

This lamp is the chandelier.
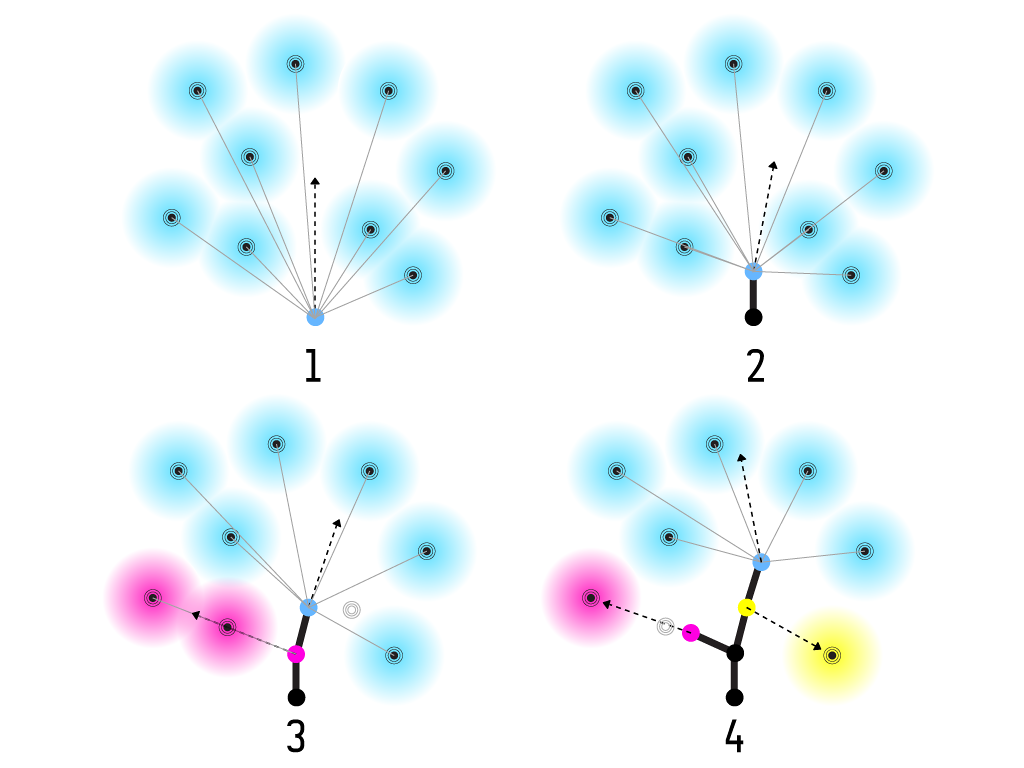
This is the algorithm diagram used to produce the lamps.

Ian Kaneko Project – 03 – Dynamic Drawing

For this project I made something resembling a solar system. I think the different rotation rates of the circles is my favorite part about this.

ikaneko dynamic drawing

var canvasWidth = 640;
var canvasHeight = 480;
var angle = 0;
var r = 0;
var g = 0;
var b = 0;
var angle = 0;
var star = 0;


function setup() {
    createCanvas(canvasWidth, canvasHeight);
    
} 

// I used canvasWidth and height / 2 for the coordinates of the center of the canvas.

function draw() {
    background(220);
    noStroke();

    // Background made of blue rectangles

    fill(180, 180, 230);
    rect(0, canvasHeight * 0.75, canvasWidth, canvasHeight / 4);
    fill(160, 160, 200);
    rect(0, canvasHeight / 2, canvasWidth, canvasHeight / 4);
    fill(140, 140, 180);
    rect(0, canvasHeight / 4, canvasWidth, canvasHeight / 4);
    fill(120, 120, 160);
    rect(0, 0, canvasWidth, canvasHeight / 4);

    // Big yellow circle in the middle

    fill(240, 200, 160);
    circle(canvasWidth / 2, canvasHeight / 2, mouseX / 2);
    fill(240, 220, 220);
    circle(canvasWidth / 2, canvasHeight / 2, mouseY / 2);

    // Moving brown rectangles that change with the mouseX

    fill(80, 30, 30);
    rect((canvasWidth / 2) - mouseX, canvasHeight * 0.75, canvasWidth, canvasHeight / 8);
    fill(120, 70, 70);
    rect((canvasWidth / 2) - mouseX, canvasHeight / 4, canvasWidth, canvasHeight / 8);
    fill(140, 90, 90);
    rect(mouseX - (canvasWidth / 2), 0, canvasWidth, canvasHeight / 8);

    // Orbiting ball

    fill(160, 60, 60);
    push();
    translate(canvasWidth / 2, canvasHeight / 2);
    rotate(radians(angle / 2)); // This one should rotate at a slower rate than the other one
    circle(canvasHeight / 4, 0, 100);
    pop();

    fill(240, 150, 150);
    push();
    translate(canvasWidth /2, canvasHeight / 2);
    rotate(radians(angle));
    circle(canvasHeight / 4, 0, 50);
    pop();
    angle = angle + 1;

    // Ball orbits the faster the mouse is to the center of the screen

    var far = (dist(mouseX, mouseY, canvasWidth / 2, canvasHeight / 2));
    
    fill(80, 40, 80);
    push();
    translate(canvasWidth / 2, canvasHeight / 2);
    rotate(radians(star));
    circle(canvasHeight / 4, 0, 70);
    pop();

    star = star + 5 -(far / 100); // It is /100 because the true distance made it spin way too fast.


    // The ball will pass under this bar
   
    fill(100, 50, 50);
    rect(mouseX - (canvasWidth / 2), canvasHeight / 2, canvasWidth, canvasHeight / 8);

    // Slanted bar that changes color (Using arbitrary large numbers to make sure they go off the canvas)

    fill(r, g, b);
    push();
    rotate(radians(35));
    rect(0, 0, 1000, 10);
    rect(0, 200, 1000, 10);
    rect(0, -200, 1000, 10);
    pop();

    r = mouseX
    g = mouseY
    b = mouseX / 2


}


Alec Albright – Project 03 – Dynamic Drawing

sketch

// Alec Albright
// Section B
// Project 3

var margin = 150;
var radius = 30;
var r = 0;
var g = 0;
var b = 0;
var rotation = 0;

function setup(){
    createCanvas(640, 480);
    angleMode(DEGREES);
}

function draw(){
    background("white");
    fill(r, g, b);

    // mapping angle of rotation to mouseY
    // as mouse moves up and down, shapes rotate
    rotation = map(mouseY, 0, height, 0, 360);

    // drawing hexagons with specified margin and rotation
    // center
    push();
    translate(width / 2, height / 2);
    rotate(rotation);
    hexagon(0, 0, radius);
    pop();
    // circle around center hexagon
    for(let i = 0; i < nvertex; i +=1){
        // finding exactly where the hexagon at hand is located
        // sin tells us where the y coordinate is
        var centerY = sin(angle) * margin;
        // cos tells us where the x coordinate is
        var centerX = cos(angle) * margin;
        // now draw the vertex at hand
        // setting up rotation for each individual hexagon
        push();
        translate(width / 2 + centerX, height / 2 + centerY);
        rotate(rotation);
        hexagon(centerX, centerY, radius);
        pop();
        // add the next portion of the angle
        angle = angle + (360 / 6)
    }
    
    // scaling mouseX to use the whole screen for size
    // as mouse moves right, shapes get bigger
    radius = map(mouseX, 0, width, 20, 70);
    
    // scaling color using whole screen
    // as mouse moves right, more red
    r = map(mouseX, 0, width, 0, 255);
    // as mouse moves down, more blue
    b = map(mouseY, 0, height, 0, 255);
    // as mouse moves left, more green
    g = 255 - map(mouseX, 0, width, 0, 255);

    // margin depends on mouseX, keeping same distance throughout
    margin = map(mouseX, 0, width, 50, 150);
}

// 6 vertices, as a hexagon has
var nvertex = 6;
// angle we're working at (when we get to TWO_PI, we're done)
var angle = 0;

function hexagon(x, y, radius){
    // draw a hexagon at (x, y) using beginShape()
    beginShape();
    // find each vertex's specific location
    for(let i = 0; i < nvertex; i += 1){
        // finding exactly where the vertex at hand is located
        // sin tells us where the y coordinate is
        var vertexY = y + sin(angle) * radius;
        // cos tells us where the x coordinate is
        var vertexX = x + cos(angle) * radius;
        // now draw the vertex at hand
        vertex(vertexX, vertexY)
        // add the next portion of the angle
        angle += (360 / 6)
    }
    // connect beginning and end points
    endShape(CLOSE)
}

My process for creating this visualization was most difficult in implementing a rotational element. The colors were fairly easily scaled, the size and distance were a bit more difficult, but adding the rotation was a long experiment that I eventually figured out, resulting in this very cool kaleidoscope effect!

Min Ji Kim Kim – Project 03 – Dynamic-Drawing


sketch

I tried playing with a lot of different shapes, sizes and colors to create an abstract design. I had so much fun using mouseX and mouseY and manipulating them to get different effects.

/*
Min Ji Kim Kim
Section A
mkimkim@andrew.cmu.edu
Project-03
*/
var angle = 0; //angle used to rotate rectangle

function setup() {
    createCanvas(480, 640);
}

function draw() {
    noStroke();

    //change background color depending on mouseX position
    background(204, 255, 200);
    if (mouseX > width / 2) {
        background(170, 170, 230);
    }

    //navy rectangle
    fill(0, 76, 152);
    rectMode(CENTER);
    rect(width / 2, height / 2, mouseX, 200); //change rectangle width according to mouseX position

    //turquoise circle
    fill(0, 180, 159);
    circle(mouseY, mouseX, 80); //circle moves inversely to mouse

    //light blue circle
    fill(176, 211, 234);
    circle(300, 500, mouseY / 2); //expand or shrink circle by a factor of 1/2 depending on mouseY position 

    //light pink rectangle
    fill(245, 199, 231);
    rectMode(CENTER);
    rect(249, mouseY, 50, 100); //rectangle follows mouseY

    //salmon color rectangle translation and rotation
    push();
    translate(width / 3, 200);
    rotate(radians(angle));
    fill(250, 152, 167);
    rectMode(CENTER);
    rect(0, 0, 90, 90);
    pop();

    //mouseX controls salmon colored rectangle's rotation direction
    if (mouseX < width / 3) { //if mouseX is on the left 1/3 of the canvas, rotate anticlockwise
        angle = angle - 3;
    } else { //if mouseX is on the right 2/3 of the canvas, rotate clockwise
        angle += 3;
    }

    //small magenta circle 
    fill(110, 0, 70);
    ellipseMode(CENTER);
    ellipse(mouseX, mouseY, 35); //circle follows the mouse

    //orange rectangle
    fill(255, 178, 149);
    rect(mouseX, 380, 170, 25); //rectangle follows mouseX
}