Timothy Liu — Project 07 — Curves

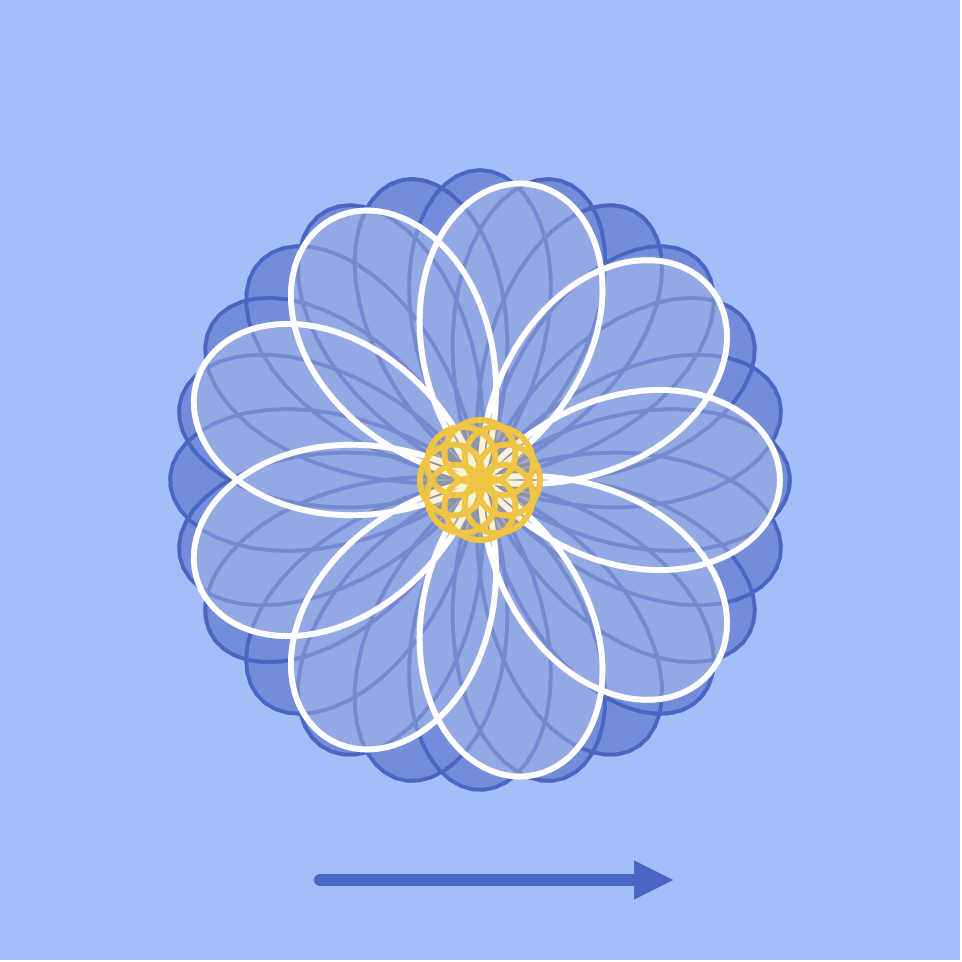
Slowly move the mouse across the canvas (from L to R) to watch the circle transform into a flower!

tcliu-openproject-07

// Timothy Liu
// 15-104, Section C
// tcliu@andrew.cmu.edu
// OpenProject-07

var nPoints = 1000; // number of points in each function. The more points, the smoother the function is.

// variables for white quadrifolium
var k;
var n;
var d;

// variables for blue quadrifolium
var k2;
var n2;
var d2;

// variables for flower center
var k3;
var n3;
var d3;

function setup() {
    createCanvas(480, 480);
    frameRate(30);
}

function draw() {
    background(160, 190, 255); // light blue background

    k = n / d; // k constant determines the number of petals on the white quadrifolium
    k2 = n2 / d2; // k constant determines the number of petals on the blue quadrifolium
    k3 = n3 / d3; // k constant determines the number of petals on the flower center

    arrow(); // drawing in the arrow function
    quadrifolium2(); // drawing in the blue flower underneath first
    quadrifolium(); // drawing in the white flower on top
    flowerCenter(); // drawing in the yellow center on top of the other two flowers
}

// the white flower/quadrifolium
function quadrifolium() {
    
    // these variables/constraints hold mouseX to the width of the canvas
    // mouseX1 slows down the speed of mouseX
    var mouseX1 = mouseX / 5;
    var mouseMove = constrain(mouseX1, 0, width / 5);

    // these variables/constants help determine the location of the flower via the equation and vertex
    var r;
    var x;
    var y;

    // n and d help determine the k constant, or the number of petals on the flower
    n = map(mouseMove, 0, width, 0, 36);
    d = 4;

    // a determines the size of the white petals
    var a = 150;

    // white flower colors
    stroke(255, 255, 255);
    strokeWeight(3);
    fill(255, 255, 255, 60);

    // drawing the white quadrifolium!
    beginShape();
    for (var i = 0; i < nPoints; i++) {

        var t = map(i, 0, nPoints, 0, TWO_PI * d); // determines theta (the angle)
       
        r = a * cos(k * t); // the equation that draws the quadrifolium

        x = r * cos(t) + width / 2; // these help compute the vertex (x, y) using the circular identity
        y = r * sin(t) + width / 2;
        vertex(x, y);
    }
    endShape();
    
}

// the blue flower/quadrifolium
function quadrifolium2() {

    // these variables/constraints hold mouseX to the width of the canvas
    // mouseX2 slows down the speed of mouseX
    var mouseX2 = mouseX / 5;
    var mouseMove2 = constrain(mouseX2, 0, width / 5);

    // these variables/constants help determine the location of the flower via the equation and vertex
    var r2;
    var x2;
    var y2;

    // n2 and d2 help determine the k2 constant, or the number of petals on the flower
    n2 = map(mouseMove2, 0, width, 0, 72);
    d2 = 6;

    // a2 determines the size of the blue petals (slightly longer than the white)
    var a2 = 155;

    // blue flower colors
    stroke(71, 99, 201);
    strokeWeight(2);
    fill(71, 99, 201, 140);

    // drawing the blue quadrifolium!
    beginShape();
    for (var u = 0; u < nPoints; u++) {
        var h = map(u, 0, nPoints, 0, TWO_PI * d2); // determine theta (the angle)

        r2 = a2 * cos(k2 * h); // the equation that draws the quadrifolium

        x2 = r2 * cos(h) + width / 2; // these help compute the vertex (x2, y2) using the circular identity
        y2 = r2 * sin(h) + width / 2;
        vertex(x2, y2);
    }
    endShape();
    
}

// the yellow center of the flower (also a smaller quadrifolium)
function flowerCenter() {

    // these variables/constraints hold mouseX to the width of the canvas
    // mouseX3 slows down the speed of mouseX
    var mouseX3 = mouseX / 5;
    var mouseMove3 = constrain(mouseX3, 0, width / 5);

    // these variables/constants help determine the location of the flower via the equation and vertex
    var r3;
    var x3;
    var y3;

    // n3 and d3 help determine the k3 constant, or the number of petals on the yellow center
    n3 = map(mouseMove3, 0, width, 0, 20);
    d3 = 5;

    // a3 determines the size of the yellow center quadrifolium
    var a3 = 30;

    // yellow center color
    stroke(247, 196, 12);
    strokeWeight(3);
    fill(247, 196, 12, 50);

    // drawing the yellow center quadrifolium!
    beginShape();
    for (var c = 0; c < nPoints; c++) {
        var e = map(c, 0, nPoints, 0, TWO_PI * d3); // determine theta (the angle)

        r3 = a3 * cos(k3 * e); // the equation that draws the quadrifolium

        x3 = r3 * cos(e) + width / 2; // these help compute the vertex (x3, y3) using the circular identity
        y3 = r3 * sin(e) + width / 2;
        vertex(x3, y3);
    }
    endShape();
    
}

// the blue arrow on the bottom that indicates which way to move the mouse... toward the right!
function arrow() {

    // variables for the line part of the arrow
    var lineH = height - 40;
    var lineS = width / 3;
    var lineE = 2 * width / 3;

    // variables for the arrowhead part of the arrow
    var arrowH1 = lineH - 5;
    var arrowHT = lineE + 10;
    var arrowH2 = lineH + 5;

    // the arrow!
    stroke(71, 99, 201);
    fill(71, 99, 201);
    strokeWeight(6);
    line(lineS, lineH, lineE, lineH);
    triangle(lineE, arrowH1, arrowHT, lineH, lineE, arrowH2);

}

I struggled initially with this project because it had been so long since I mapped parametric curves in any class, let alone in a programming class. However, as I pored through Wolfram Alpha’s libraries, the Quadrifolium, or Rose Curve, immediately jumped out at me for its simplicity and elegance. I really loved how much it looked like a flower, and I thought it was really neat how the number of petals could be manipulated based on a simple constant k before the θ in the equation:

r = a * cos(kθ)

I knew that I wanted to make my quadrifolium feel like an actual flower, so I modeled my design after the blue Chrysanthemum flower.

Blue chrysanthemums, the inspiration for my flower design.

After I had drawn out the basic flower using multiple layers of quadrifolia, I decided to make my piece interactive by having the mouseX control the amount of petals on the flower. By doing so, I was able to make my design/curve “transform” from a basic circle into a beautiful flower!

The starting point of my flower…
…to the ending point, with petals!

Timothy Liu — Looking Outwards — 07

This is Professor Harrison’s “Wikipedia Top 50” from 2006-2007.

For this week’s Looking Outward on informational visualization, I looked at a chart developed by CMU professor Chris Harrison on Wikipedia article popularities over a 10-month span. Wikipedia has long been an infamous news source, but the influence it’s had on information gathering and research is undeniable. Thus, Professor Harrison saw Wikipedia as a way to better understand how users browsed the internet in 2006. As he described it, visualizing this information allowed us to get a better read on the internet’s “pulse” and what activity was trending at the time. 

The graph is organized by month for every month from August 2006 to May 2007. Each month is organized into its top 50 search categories/results, sorted by descending order of frequency. In total, each of these bars represents all the traffic to Wikipedia for top 50 pages. For example, in September 2006, the top Wikipedia search result was “Steve Irwin” (the Crocodile Hunter sadly passed away during this month), while the 50th most popular result was “Podcasting” (huh!).

Prof Harrison’s information visualization does an excellent job utilizing design principles to convey meaning. He uses visual hierarchy, both through font size and bar size, to show which search results were prominent each month. He uses color to help differentiate “blips” from “mid-life,” “new,” and “end.” He also uses gray trend-lines to showcase which search results are common across months to show changes in activity. And finally, he utilizes a consistent scale with clear labels and axes to indicate the magnitude of the different search results. Overall, Prof Harrison’s information visualization display utilizes both design principles and data-management strategies that make it a compelling and power piece of information.

SOURCE:

http://www.chrisharrison.net/index.php/Visualizations/WikiTop50

Timothy Liu — Project 06 — Abstract Clock

tcliu-openended-06

// Timothy Liu
// 15-104 Section C
// tcliu@andrew.cmu.edu
// OpenEnded-06

// variables defining the sapling + base characteristics
var leaf = 12;
var stem = 50;
var stemW = 4;
var base = 30;
var leafMax = 16;
var leafMin = 11;
var leafChange = 0.1;
var leafH;

function setup() {
	createCanvas(480, 200);
    frameRate(20);
}

function draw() {

    noStroke();

    // time variables; militaryH uses a 24 hr scale, and H uses a 12 hr scale with the modular
    var militaryH = hour();
    var H = hour() % 12;
    var M = minute();
    var S = second();
    var mM = map(M, 0, 59, 0, 50); // mapping mM so it's constrained between 0 and 50, the height of each sapling

    // these variables are used later when determining sky color and when it should change
    var mH1 = militaryH + 1;
    var H3 = H - 3;
    
    // defining where leafH is
    leafH = height / 2;

    // the following if statements make the sky change color based on the time, indicating am vs. pm:
    // ex: if there are 2.5 saplings grown, and the sky is dark blue, it must be 2.5am because it's still dark outside.
    
    // if it's from 12am - 8am, the sky slowly gets brighter every hour
    if (militaryH < 8) {
        fill(0 + (15 * mH1), 15 + (20 * mH1), 100 + (15 * mH1));
        rect(0, 0, width, 2 * height / 3); 

    // if it's 8am - 4pm, the sky stays consistently bright out
    } else if (militaryH >= 8 & militaryH < 16) {
        fill(120, 175, 220);
        rect(0, 0, width, 2 * height / 3); 

    // if it's 4pm - 12pm, the sky slowly gets darker every hour
    } else {
        fill(120 - (15 * H3), 171 - (20 * H3), 220 - (15 * H3));
        rect(0, 0, width, 2 * height / 3); 
    }

    // base ground color
    fill(191, 148, 115);
    rect(0, 2 * height / 3, width, height / 3);

    // this for loop draws all of the 12 saplings and the mounds of dirt they grow out of
    for (var a = 0; a < 12; a++) {

        // dirt mounds around base of saplings
        fill(171, 125, 91);
        ellipse((a + 1) * width / 13 + (stemW / 2), height / 2 + stem, base, base / 2);   

        // this if statement draws all the saplings that are already fully grown
        if (a < H) {
            fill(84, 61, 40);
            ellipse((a + 1) * width / 13 + (stemW / 2), height / 2 + stem, 8, 4); // shadow at base of sapling
            fill(63, 209, 0); // sapling color
            rect((a + 1) * width / 13, height / 2, stemW, stem);
            arc(((a + 1) * width / 13) - (stemW), leafH, leaf, leaf / 2, 0, 5 * PI / 4, CHORD); 
            arc(((a + 1) * width / 13) + (2 * stemW), leafH, leaf, leaf / 2, 7 * PI / 4, PI, CHORD);
        }

        // this if statement draws the sapling that is currently growing
        if (a == H) {
            fill(84, 61, 40);
            ellipse((a + 1) * width / 13 + (stemW / 2), height / 2 + stem, 8, 4); // shadow at base of sapling
            fill(63, 209, 0); // sapling color            
            rect((a + 1) * width / 13, leafH + stem, stemW, -mM);
            arc(((a + 1) * width / 13) - (stemW), leafH + stem - mM, leaf, leaf / 2, 0, 5 * PI / 4, CHORD); 
            arc(((a + 1) * width / 13) + (2 * stemW), leafH + stem - mM, leaf, leaf / 2, 7 * PI / 4, PI, CHORD); 
        }
        
        // this if statement makes the leaves flutter/pulsate once every second, serving as a measure of S (seconds)
        if (S % 2 == 0) {
            leaf = min(leaf + leafChange, leafMax);
        } else {
            leaf = max(leaf - leafChange, leafMin);
        }
    
    }

}

I really enjoyed the concept of envisioning an abstract clock. Time in itself is such an abstract construct, so it was a fun challenge trying to represent it in an unconventional way. One of my first ideas about showing time was through plants, like bamboo, that grow at a rapid rate. I realized that I could play with this concept using plant saplings, so my abstract clock portrays a series of 12 saplings that grow and sway in the wind with the seconds, minutes, and hours in the day.

A few key things to note about my clock:

  1. I decided to only show 12 saplings to represent the two 12-hour halves in the day because I felt that 24 saplings would cause my clock to lose meaning and groundedness. To help represent AM vs. PM time, I made the sky change color as a function of what hour is. From 12AM — 8AM, the sky slowly changes from dark blue to light blue each hour. At 8AM, the sky is light blue, and it stays that way until 4PM. Then, from 4PM — 12AM, the sky slowly gets darker again every hour. Using this logic, the user can deduce what time it is in the day; for example, if I see that there are 3.5 saplings and the sky is dark, that means it must be 3:30AM and it’s not light out yet. If there are 3.5 saplings and it’s light out, it must be 3:30PM in the early afternoon.
  2. My program has the leaves of the saplings pulsating/fluttering once every second. They serve as a good way to track the number of seconds in my clock, as even though there’s no counter, it’s an easy metric to count and follow.

Below are some sketches from my ideation phase.

Some of the sketches from my notebook. I started with a two-row concept, but switched to one because it was easier to follow.

Timothy Liu — Looking Outwards — 06

Spectrum Colors Arranged by Chance I,” as created by Ellsworth Kelly in 1951. Kelly used colored squares and wove them into his tapestries.

For this week’s Looking Outwards, I observed Spectrum Colors Arranged by Chance I, a work by Ellsworth Kelly from 1951. At first glance, the piece seems playful yet confusing; it’s essentially a two-panel collage of coated and uncoated colored squares with no discernible pattern. But when you stop to break down Kelly’s genius, it’s clear that there isn’t meant to be any pattern. That’s why the piece is proclaimed to be “arranged by chance”: Kelly literally cut up individual colored squares and sorted them as randomly as possible based on the grid he defined underneath.

Kelly at the time was undergoing a stylistic shift in his art style, moving from figuration to abstraction. To Kelly, “abstraction” meant randomness, which is why he set about making this collage of cut-up pieces from his colored drawings. To the naked eye, he seems to have been immensely successful, as it’s almost impossible to pick out any color pattern in his work. However, it’s important to note that Kelly was human, which meant that his work could not have been truly random. According to the Philadelphia Museum of Art, Kelly simply placed the colored squares “quickly and intuitively” on the grid without much thought. That said, humans are inherently subject to cognitive influences that cause us to act in certain ways; it’s very likely that Kelly placed a few squares in spots he thought were random, but were actually influenced by the presence of other color squares.

Only a computer program can get close to pure randomness; many functions, including random(), allow a user to call a random value from a range. But even computers can’t be fully random, as they are built from human models of information and randomness! Unless we feed computers all of the information in the world to use as data, they’ll never be truly random. That said, this is slowly changing with the rise of AI/ML, and it’s likely much more possible now for a machine to draw a random work of art on its own. I would love to see a random, computerized version of “Spectrum Colors Arranged by Chance I.” It seems like it would be difficult to identify differences between Kelly’s work and a computer’s, but perhaps there’s an algorithm or program that could determine that too!

Sources:

https://www.philamuseum.org/collections/permanent/295539.html

Timothy Liu — Project 05 — Wallpaper

tcliu-openended-05

// Timothy Liu
// 15-104 Section C
// tcliu@andrew.cmu.edu
// OpenEnded-05

var yStart = 60; // y coord of first flower's origin; a reference spot for other petals
var xStart = 60; // x coord of first flower's origin; a reference spot for other petals

function setup() {
    createCanvas(600, 600);
    noLoop(); // making the image static
}

function draw() {

    noStroke(); // no strokes for a cleaner, more geometric feel

    for (var dx = 0; dx < width; dx++) {
        for (var dy = 0; dy < height; dy += 60) { // setting the spacing between lines to 60; 10 total stripes on canvas
            
            if (dy % (60 * 2) === 0) { // odd # stripes
                fill(235, 251, 255); 
                rect(dx, dy, width, 60); // stripes are a pale pastel blue

            } else { // for even # stripes
                fill(210, 239, 247);
                rect(dx, dy, width, 60); // stripes are a slightly darker pastel blue
            }
        }
    }

    fill(171, 215, 235); // making the flowers dark blue
    for (var y = 0; y < 10; y++) { // this for statement dictates the 5 rows of flowers that appear on the canvas
        if (y % 2 === 0 || y === 0) { // this conditional ensures that a blank row is left between rows of flowers
           
            for (var x = 0; x < 10; x += 2) { // the upper left petal on each flower
                var py = (yStart - 10) + y * yStart; // variable that determines starting y coord of this petal
                var px = (xStart - 10) + x * xStart; // variable that determines tarting x coord of this petal
                quad(px - 10, py - 10, px + 10, py, px, py - 20, px - 20, py - 30); // actual petal shape (quadrilateral)
            }
           
            for (var a = 0; a < 10; a += 2) { // the upper right petal on each flower
                var py2 = (yStart - 10) + y * yStart;
                var pa = (xStart - 10) + a * xStart;
                quad(pa + 20, py2, pa + 40, py2 - 10, pa + 50, py2 - 30, pa + 30, py2 - 20);
            }
           
            for (var b = 0; b < 10; b += 2) { // the lower right petal on each flower
                var py3 = (yStart - 10) + y * yStart;
                var pb = (xStart - 10) + b * xStart;
                quad(pb + 20, py3 + 10, pb + 30, py3 + 30, pb + 50, py3 + 40, pb + 40, py3 + 20);
            }
           
            for (var c = 0; c < 10; c += 2) { // the lower left petal on each flower
                var py4 = (yStart - 10) + y * yStart;
                var pc = (xStart - 10) + c * xStart;
                quad(pc - 20, py4 + 40, pc, py4 + 30, pc + 10, py4 + 10, pc - 10, py4 + 20);
            }
            
            for (var d = 0; d < 10; d += 2) { // the center of each flower
                var py5 = (yStart - 10) + y * yStart;
                var pd = (xStart - 10) + d * xStart;
                ellipse(pd + 15, py5 + 5, 5, 5);
            }
        }
    }
}

I enjoyed this project because it allowed me to work with tessellations and arrays, patterns I don’t usually utilize often in my design work. My piece is meant to offer a geometric interpretation of the classic floral wallpaper found in homes. To me, wallpaper should feel warm, inviting, and interesting — all foundations of a fun home environment. In my piece, each flower is comprised of quadrilateral petals and an ellipse center, giving the wallpaper the desired modernistic yet comforting feeling. I also utilized a pastel blue analogous color scheme; I personally really like pastel colors (similar to the ones utilized in the Pixas movie Up), and I think my color scheme added to the feeling of comfort. Interestingly, although blue is typically a “cold” color, I think the pastel nature makes it feel more cozy than cold.

In terms of actual designing, it took me a long time to figure out the exact coordinate needed for each petal. The quad() function in p5.js requires all 4 endpoints to be mapped out, so that took me ample time and trial-and-error to nail down. As seen in my sketchbook below, I actually mapped out the coordinate plane to make sure all my petals were symmetrical and congruent. In the end, it was worth it and I was very happy with my piece.

Some of the ideation sketches I did in my notebook. The bottom section depicts the slope calculations and mapping I had to do to place the endpoints of quad() in the right place in each for loop!

Timothy Liu — LookingOutwards — 05

PKTS_09, a sci-fi-esque artwork by Ukranian artist Eugene Golovanchuk. Golovanchuk utilizes incredibly lifelike texture, reflection, and colors to create his masterpiece.

For this week’s Looking Outwards, I looked at PKTS_09, one of the works of the Ukranian artist Eugene Golovanchuk (aka “Skeeva”). His works all involve bold, daring colors and shapes, but this one in particular caught my eye because of its flashy lighting and garish colors.

PKTS_09 is the 9th piece in a self-proclaimed “series of personal artworks executed in surreal, abstract & sci-fi 3d style.” It portrays a man in a spacesuit similar to the ones worn by Daft Punk as he stands proudly with his shimmering sequined bodysuit. The colors in PKTS_09 are marvelous, and they feature both an analogous and complementary color scheme. The purple and pink tones (analogous) create a warm yet mysterious atmosphere, and the yellow glinting of the sequins complements the purple background well (complementary). Many of Skeeva’s design choices make the whole piece cohesive and fun; the floating disco balls fill negative space well, and the fact that so many of the elements have a similar shimmer makes the canvas feel unified.

Skeeva gives a great quote that reminded me a lot of the way p5.js drawing works:

“I usually use the viewport as an empty canvas, combining different silhouettes and textures into one composition to see how objects ‘feel’ inside the scene.”

p5.js, of course, also uses a canvas to draw in shapes. I also try to utilize this mentality when creating my code and designs, as I’m always looking to compose my canvas so that different objects balance each other out inside the scene. Skeeva mentions that he primarily uses Cinema 4D for rendering and drawing, so I decided to look up the software to see how it works. Sure enough, Cinema 4D uses a coordinate system to render objects, just like p5.js! These similarities are very motivating; although p5.js obviously can’t render objects at the fidelity that Cinema 4D can, it’s exciting to see that utilizing a coordinate system to render and place objects can lead to remarkable artwork and results.

Sources:

https://www.creativebloq.com/3d/inspiring-examples-3d-art-12121523

https://theskeeva.com/pkts

Timothy Liu — Project 04 — String Art

tcliu-openended-04

// Timothy Liu
// 15-104 Section C
// tcliu@andrew.cmu.edu
// Openended-04

// initializing variables!
var x1;
var y1;
var x2;
var y2;

var x3;
var y3;
var x4;
var y4;

var x5;
var y5;
var x6;
var y6;

var x7;
var y7;
var x8;
var y8;

var x;
var y;

var sx1;
var sy1;
var sx2;
var sy2;

var angle = 0;

function setup() {

    createCanvas(400, 300);

    // initial coordinates for star
    sx1 = -5;
    sy1 = -5;
    sx2 = 5;
    sy2 = 5;

    // initial coordinates for lower left dark blue lines
    x1 = 0;
    y1 = -250;
    x2 = 0;
    y2 = height;

    // initial coordinates for upper right cyan lines
    x3 = -150;
    y3 = 0;
    x4 = width;
    y4 = 0;

    // initial coordinates for upper left gold lines
    x5 = 0;
    y5 = height + 250;
    x6 = 0;
    y6 = 0;

    // initial coordinates for lower right light teal lines
    x7 = -150;
    y7 = height;
    x8 = width;
    y8 = height;

}

function draw() {

    // variables that make sure the mouse is constrained within the canvas
    x = max(min(mouseX, 400), 0);
    y = max(min(mouseY, 300), 0);

    // background color
    background("#010a43");
    
    // dark blue lines in the lower left. This for loop makes the lines flare out to form a convex curve
    // facing up and right; x and y (variables with mouseX and mouseY) allow the lines to ripple as the mouse moves.
    for (var a = 0; a < 900; a += 8) {
        stroke("#394a6d");
        line(x1, y1 + a - y / 2, x2 + a - x / 2, y2);
    }

    // cyan lines in the upper right. This for loop makes the lines flare out to form a convex curve
    // facing down and left; mouseX and mouseY allow the lines to ripple as the mouse moves.
    for (var b = 0; b < 900; b += 8) {
        stroke("#216583");
        line(x3 + b - y / 2, y3, x4, y4 + b - x / 2);
    }

    // gold lines in the upper left. This for loop makes the lines flare out to form a convex curve
    // facing down and right; x and y allow the lines to ripple as the mouse moves.
    for (var c = 0; c < 900; c += 8) {
        stroke("#f7be16");
        line(x5, y5 - c - x / 2, x6 + c - y / 2, y6);
    }   

    // light teal lines in the lower right. This for loop makes the lines flare out to form a convex curve
    // facing up and left; x and y allow the lines to ripple as the mouse moves.
    for (var d = 0; d < 900; d += 8) {
        stroke("#00818a");
        line(x7 + d + x / 2, y7, x8, y8 - d + y / 2);
    }

    // star that follows the mouse. The rotating star is meant to convey the dynamic nature of my piece,
    // as well as imply the fact that the user can move the mouse to alter the piece.
    push();
    translate(mouseX, mouseY);
    rotate(radians(angle));
    for (var s = 0; s < 16; s += 15) {
        stroke("#f7be16");
        line(sx1, sy1 + s / 4, sx2, sy2 - s / 4);
    }
    for (var s = 0; s < 16; s += 15) {
        stroke("#f7be16");
        line(sx1 + s / 4, sy1, sx2 - s / 4, sy2);
    }
    for (var s = 0; s < 16; s += 15) {
        stroke("#f7be16");
        line(sx1, sy1 + s / 2, sx2, sy2 - s / 2);
    }
    for (var s = 0; s < 16; s += 15) {
        stroke("#f7be16");
        line(sx1 + s / 2, sy1, sx2 - s / 2, sy2);
    }
    pop();
    angle = angle + 1;

}

My project this week was inspired by the color palette from Van Gogh’s “Starry Night.” I wanted my string art to feel both clean and dynamic, and I immediately knew I wanted to have multiple convex curves framing the center of my piece. I was also inspired by my Looking Outward piece from last week; I looked at a piece of wood that had a rippling effect, and I wanted to convey that sense of dynamic motion as well. In order to do that, I chose to have my strings be responsive to the mouse’s motion, and I created a spinning yellow star that follows the mouse to further imply motion.

Van Gogh’s “Starry Night,” which is comprised of similar blue, teal, and yellow colors as the ones in my piece.
A wooden-ripple work by Christoph Hermann that I reviewed for my Looking Outwards 03.

Timothy Liu — Looking Outwards — 04

This is Weather Thingy, a “Real-Time Climate Sound Controller.”

For this week’s Looking Outwards on Sound Art, I examined a work called “Weather Thingy” by Adrien Kaeser at ECAL’s Media and Interaction Design Unit. At first glance, the piece seems whimsical, fun, and even a bit weird. But upon further inspection, Kaeser’s work has a striking level of complexity that allows it to interact with its surrounding environment and produce sound and art.

Another photo of Weather Thingy in a different setting.

At its most basic core, Weather Thingy is designed to convert weather signals into musical sound. Three climate sensors detect rain, precipitation, and wind speed and translate those into parameters using an interface equipped with a brightness sensor. Using Arduinos and other computational components, Kaesar fitted Weather Thingy with the ability to react to climate changes in real time with different types of sounds. This is one of the things that really stood out to me; most sound art reacts to sound and produces a visual effect, but Weather Thingy reacts to the climate and produces sound. In other words, the piece is a real-time, reactionary piece of art.

Kaesar mentions that he hopes Weather Thingy can serve as an inspiring tool to help musicians come up with song ideas. It seems that the sheer randomness of wind, precipitation, and climate can lead to some pretty incredible and unique sound effects. In reading about the mechanics of Weather Thingy that are mentioned in the article, I noticed a few clear connections to programming languages. The conversion of weather cues to parameters allows them to be called by Arduinos in Weather Thingy, essentially serving as a function that generates sound. It’s amazing what computational art can create with sound!

Sources:

This is the article I referenced for my Looking Outwards this week.

Timothy Liu — Looking Outwards — 03

This work is by Christoph Hermann, an artist focused on natural, generative design.

For my Looking Outwards this week, I picked a work by Christoph Hermann from 2012. It’s a piece of wood mathematically and generatively designed to appear flowy, soft, and organic; as shown here, the ripples are so natural it almost appears to be a piece of cloth. This piece really stood out to me because it’s remarkable how natural a computer-generated algorithm was able to make wood, a very stiff material, appear. It’s a testament to how much work the artists must have put into their algorithm to make sure it didn’t appear mechanical or robotic. Hermann worked with the computational design firm Biot(h)ing in order to create code that could emulate the natural flow of rippling fabric. As Biot(h)ing explains on their website, their primary mission is to utilize algorithms to “mimic the process of autopoiesis through intricate entanglements” — in other words, they seek to build code that can create, reproduce, and maintain itself through natural forms.

Hermann’s work was shown at the “Lasvit Liquidkristal (LLK) Pavilion” at Milan Design Week in 2012, an exhibit specifically designed to showcase parametric architecture and organically flowing patterns. Each piece had a smooth exterior with interiors comprising of dips and pockets; presumably, the interior is the portion that was generated with an algorithm. Although it isn’t specified how the code was written, my guess would be that it might have involved using a command that “pushes” shapes toward a certain direction or side. For instance, if we were to write code that could cause shapes to contort to the direction a mouse moves in, it’d be possible to mimic a natural curve or ripple. I’m not exactly sure how to do this, but perhaps it involves easing or other contortion.

Sources:

BIOTHING

Timothy Liu — Project 03 — Dynamic Drawing

Move the mouse to bring Pikachu near the pokéballs, and watch them converge and grow!

Also, click the mouse to change the berry floating around Pikachu’s head!

tcliu-openproject-03

// Timothy Liu
// 15104 Section C
// tcliu@andrew.cmu.edu
// OpenProject-03

// variables that determine the original/default sizing of Pikachu and pokeballs.
var pokeWidth = 50;
var buttonW = pokeWidth - 40;
var yStart = 350;
var pikachuW = 100;
var pikachuH = 80;
var pikachuX = 300;
var pikachuY = 200;
var eyeW = 15;
var eyeHighlight = 5;
var noseW = 10;
var mouthW = 15;
var mouthH = 30;
var cheekW = 17;

// variables determining the berry's size and color
var berryW = 25;
var berryH = 20;
var berryStem = 20;
var berryDist = 70;

// variables that allow berry color to be changed with mouse clicks
var berryR = 224;
var berryG = 78;
var berryB = 58;

// variables that determine background color; this allows the background to change color later as mouseY changes.
var colorR = 51;
var colorG = 91;
var colorB = 0;

// angle variable used to make the pokeballs spin. Later, the angle = angle + 1 command makes the angle change!
var angle = 0;

// function time!
function setup() {
    // canvas is 600, 480 instead of 640, 480 because a 640 width doesn't fit on WordPress.
    createCanvas(600, 480);
}

function draw() {

    // variables that make the pokeballs expand as the mouse moves down.
    // subtracting pokeWidth makes the pokeballs start at their default size when the mouse is at the top of screen.
    var mouseA = height - mouseY - pokeWidth;
    var pbWidth = height - mouseA;

    // variables to make the color of the background change as the mouse moves.
    var colorR1 = min(mouseY + colorR, 252);
    var colorG1 = min(mouseY + colorG, 194);
    var colorB1 = min(mouseY + colorB, 0);

    // setting the background color to start at green, and making it change to gold as the mouse moves down.
    background(colorR1, colorG1, colorB1);

    // if statement to limit size of the pokeballs. The pokeballs expand up to 200 pixels.
    if (pbWidth >= 200) {
        pbWidth = 200;
    }

    // pokeball 1: white part rotation. The push and pop functions ensure the pokeball spins.
    push();
    fill("white");
    noStroke();
    // this translate command makes the pokeballs converge to the center as mouseY increase.
    translate(width / 6 + min(max(mouseY, 0), width / 3), yStart);
    rotate(radians(angle));
    ellipseMode(CENTER);
    ellipse(0, 0, pbWidth, pbWidth);
    pop();
    angle = angle + 0.5;

    // pokeball 1: red half rotation
    push();
    fill("red");
    noStroke();
    translate(width / 6 + min(max(mouseY, 0), width / 3), yStart)
    rotate(radians(angle));
    arc(0, 0, pbWidth, pbWidth, PI, TWO_PI);
    pop();
    angle = angle + 0.5;

    // pokeball 1: button + outline
    push();
    fill("white");
    strokeWeight(3);
    translate(width / 6 + min(max(mouseY, 0), width / 3), yStart);
    rotate(radians(angle));
    ellipseMode(CENTER);
    ellipse(0, 0, pbWidth / 6, pbWidth / 6);
    pop();
    angle = angle + 0.5;

    // pokeball 2: white part rotation
    push();
    fill("white");
    noStroke();
    translate(width / 2, yStart);
    rotate(radians(angle));
    ellipseMode(CENTER);
    ellipse(0, 0, pbWidth, pbWidth);
    pop();
    angle = angle + 0.5;

    // pokeball 2: red part rotation
    push();
    fill("red");
    noStroke();
    translate(width / 2, yStart);
    rotate(radians(angle));
    arc(0, 0, pbWidth, pbWidth, PI, TWO_PI);
    pop();
    angle = angle + 0.5;

    // pokeball 2: button + outline
    push();
    fill("white");
    strokeWeight(3);
    translate(width / 2, yStart);
    rotate(radians(angle));
    ellipseMode(CENTER);
    ellipse(0, 0, pbWidth / 6, pbWidth / 6);
    pop();
    angle = angle + 0.5;

    // pokeball 3: white part rotation
    push();
    fill("white");
    noStroke();
    translate(5 * width / 6 - min(max(mouseY, 0), width / 3), yStart);
    rotate(radians(angle));
    ellipseMode(CENTER);
    ellipse(0, 0, pbWidth, pbWidth);
    pop();
    angle = angle + 0.5;

    // pokeball 3: red part rotation
    push();
    fill("red");
    noStroke();
    translate(5 * width / 6 - min(max(mouseY, 0), width / 3), yStart);
    rotate(radians(angle));
    arc(0, 0, pbWidth, pbWidth, PI, TWO_PI);
    pop();
    angle = angle + 0.5;

    // pokeball 3: button + outline
    push();
    fill("white");
    strokeWeight(3);
    translate(5 * width / 6 - min(max(mouseY, 0), width / 3), yStart);
    rotate(radians(angle));
    ellipseMode(CENTER);
    ellipse(0, 0, pbWidth / 6, pbWidth / 6);
    pop();
    angle = angle + 0.5;

    // beginning of push command to make the Pikachu follow the mouse using translate(mouseX, mouseY)
    push();
    translate(mouseX - pikachuX, mouseY - pikachuY);

    // head and ears 
    fill(252, 239, 0);
    noStroke();
    ellipse(pikachuX, pikachuY, pikachuW, pikachuH);
    triangle(pikachuX - 5 * pikachuW / 8, pikachuY - pikachuH, pikachuX - pikachuW / 4, pikachuY - pikachuH / 2.5,
        pikachuX - pikachuW / 2.2, pikachuY - pikachuH / 5);
    triangle(pikachuX + 5 * pikachuW / 8, pikachuY - pikachuH, pikachuX + pikachuW / 4, pikachuY - pikachuH / 2.5,
        pikachuX + pikachuW / 2.2, pikachuY - pikachuH / 5);

    // tips of the ears
    fill("black");
    triangle(pikachuX - 5 * pikachuW / 8, pikachuY - pikachuH, pikachuX - pikachuW * 0.5, pikachuY - pikachuH * 0.8,
        pikachuX - pikachuW * 0.56, pikachuY - pikachuH * 0.7);
    triangle(pikachuX + 5 * pikachuW / 8, pikachuY - pikachuH, pikachuX + pikachuW * 0.5, pikachuY - pikachuH * 0.8,
        pikachuX + pikachuW * 0.56, pikachuY - pikachuH * 0.7);

    // eyes
    ellipse(pikachuX - pikachuW / 5, pikachuY, eyeW, eyeW);
    ellipse(pikachuX + pikachuW / 5, pikachuY, eyeW, eyeW);
    fill("white");
    ellipse(pikachuX - pikachuW / 5, pikachuY - pikachuH * 0.05, eyeHighlight, eyeHighlight);
    ellipse(pikachuX + pikachuW / 5, pikachuY - pikachuH * 0.05, eyeHighlight, eyeHighlight);

    //red cheeks
    fill(227, 45, 25);
    ellipse(pikachuX - pikachuW / 3, pikachuY + pikachuH / 5, cheekW, cheekW);
    ellipse(pikachuX + pikachuW / 3, pikachuY + pikachuH / 5, cheekW, cheekW);

    // nose and mouth
    fill("black");
    arc(pikachuX, pikachuY + pikachuH / 8, noseW, noseW / 2, TWO_PI, PI);
    fill("pink");
    arc(pikachuX, pikachuY + pikachuH / 5, mouthW, mouthH, TWO_PI, PI);

    // pop command to enclose Pikachu commands. This ensures that only the Pikachu follows the mouse.
    pop();

    // this creates the berry floating/rotating around Pikachu's head.
    push();
    fill(berryR, berryG, berryB);
    noStroke();

    // this makes the berry float around Pikachu by adding some distance from the mouseX, mouseY origin
    translate(mouseX, mouseY);
    rotate(radians(angle));
    ellipse(berryDist, berryDist, berryW, berryH);
    fill(16, 196, 0);
    arc(berryDist, berryDist * 1.25, berryStem, berryStem / 1.1, PI, TWO_PI);
    pop();
    angle = angle + 1 / 100;

}

function mousePressed() {

    // when the mouse is pressed, the berry floating around Pikachu's head changes color!
    berryR = random(0, 255);
    berryG = random(0, 255);
    berryB = random(0, 255);
}

I grew up watching and playing Pokémon, and one of the random tidbits about the original cartoon that stuck with me was how pokéballs expand when they’re removed from the trainer’s belt. I built my program to mimic this dynamic movement; when you move the Pikachu (set to follow the mouse around) towards the pokeballs, they expand while rotating. They also converge into one as an inverse function of the mouse movement to represent Pikachu’s singular pokéball. In addition, the background changes color from a forest green to a warm gold as the mouse moves downward. I was very happy with how my project turned out, as its fun, lighthearted, meaningful, and engagingly dynamic.

The 5 dynamic elements I utilized are having Pikachu follow the mouse, making the pokéballs expand, having them converge, making the background change color, and the rotation of the pokéballs and berry. As an added interactive component, clicking on the berry causes it to change color.