/*Katrina Hu
15104-C
kfh@andrew.cmu.edu
Project-05-Wallpaper*/

function setup() {
    createCanvas(570, 570);
    //background(255, 203, 196);
    background(0);
}

function draw() {
    //flower
    noStroke();
    for (var y = 0.5; y < 7; y++) {
        for (var x = 0.5; x < 7; x++) {
            fill(255);
            ellipse(y * 80, x * 80, 40, 10);
            ellipse(y * 80, x * 80, 10, 40);
            fill(255, 245, 173);
            ellipse(y * 80, x * 80, 25, 25);
            fill(186, 209, 255);
            ellipse(y * 80, x * 80, 10, 10);
        }

    }
    //small polka dots
    for (var y = 0.5; y < 6; y++) {
        for (var x = 0.5; x < 6; x++) {
            fill(255);
            ellipse(y * 80 + 40, x * 80 + 40, 5, 5);
        }
    }
}
This was a fun project to experiment with various shapes and how to create a design from them. I enjoyed seeing how the for loop would change the design.
/* Ammar Hassonjee
   Section C
   ahassonj@andrew.cmu.edu
   Project 05 - Wallpaper
   */

function setup() {
    createCanvas(600, 600);
    background(0, 0 , 100);
}

function draw() {
    // First for loop that sets the y grid of elements
    for (var y = 0; y < 7; y++) {
        for (var x = 0; x < 7; x++) {
            //variables declared to alter shapes generated for wallpaper
            var ax = x * 100;
            var ay = y * 100;

            noStroke();
            // making sure the wallpaper is mirrored every other to create
            // continuous art effect
            if (x % 2 == 0) {
                // Making the quarter circle shapes
                fill(200);
                arc(ax, ay, 80, 80, radians(0), radians(90));
                arc(ax + 100, ay + 100, 80, 80, radians(180), radians(270));
                // Making triangle shape
                fill(255);
                triangle(ax + 90, ay + 10, ax + 25, ay + 60, ax + 35, ay + 70);
                // Making the circle shape
                fill(0);
                ellipse(ax + 30, ay + 65, 20, 20);
              }
            else {
                // Making the quarter circle shapes again but a different color
                fill(255, 245, 76);
                arc(ax + 100, ay, 80, 80, radians(90), radians(180));
                arc(ax, ay + 100, 80, 80, radians(270), radians(360));
                fill(0);
                triangle(ax + 10, ay + 10, ax + 75, ay + 60, ax + 65, ay + 70);
                // Making the circle shape but a different color
                fill(255);
                ellipse(ax + 70, ay + 65, 20, 20);
              }
            }
          }
}
My inspiration for this sketch came from trying to replicate a starry night. In my initial coding where I started to draw shapes and mirror them, I found that through alternating panel directions and by changing the colors of the same elements in each iteration of the loops, I could create an interesting drawing.
Human skin complexion and overall face animation has always been difficult to emulate through a computer. The amount of wrinkles and pores, along with the elastic, organic properties of skin make it nearly impossible to capture and record these movements. Because of this, many computer-generated people in games and movies tend to look really close to human, but no quite, resulting in a sensation called the uncanny valley. New researchers at USC have developed new techniques to more accurately replicate skin movement on artificial skin. With this relatively new and seemingly unexplored possibility of recreating anything through a computer now, future media may become much more deceiving and immersive than before.
// Timothy Liu
// 15-104 Section C
// tcliu@andrew.cmu.edu
// OpenEnded-05

var yStart = 60; // y coord of first flower's origin; a reference spot for other petals
var xStart = 60; // x coord of first flower's origin; a reference spot for other petals

function setup() {
    createCanvas(600, 600);
    noLoop(); // making the image static
}

function draw() {

    noStroke(); // no strokes for a cleaner, more geometric feel

    for (var dx = 0; dx < width; dx++) {
        for (var dy = 0; dy < height; dy += 60) { // setting the spacing between lines to 60; 10 total stripes on canvas

            if (dy % (60 * 2) === 0) { // odd # stripes
                fill(235, 251, 255);
                rect(dx, dy, width, 60); // stripes are a pale pastel blue

            } else { // for even # stripes
                fill(210, 239, 247);
                rect(dx, dy, width, 60); // stripes are a slightly darker pastel blue
            }
        }
    }

    fill(171, 215, 235); // making the flowers dark blue
    for (var y = 0; y < 10; y++) { // this for statement dictates the 5 rows of flowers that appear on the canvas
        if (y % 2 === 0 || y === 0) { // this conditional ensures that a blank row is left between rows of flowers

            for (var x = 0; x < 10; x += 2) { // the upper left petal on each flower
                var py = (yStart - 10) + y * yStart; // variable that determines starting y coord of this petal
                var px = (xStart - 10) + x * xStart; // variable that determines tarting x coord of this petal
                quad(px - 10, py - 10, px + 10, py, px, py - 20, px - 20, py - 30); // actual petal shape (quadrilateral)
            }

            for (var a = 0; a < 10; a += 2) { // the upper right petal on each flower
                var py2 = (yStart - 10) + y * yStart;
                var pa = (xStart - 10) + a * xStart;
                quad(pa + 20, py2, pa + 40, py2 - 10, pa + 50, py2 - 30, pa + 30, py2 - 20);
            }

            for (var b = 0; b < 10; b += 2) { // the lower right petal on each flower
                var py3 = (yStart - 10) + y * yStart;
                var pb = (xStart - 10) + b * xStart;
                quad(pb + 20, py3 + 10, pb + 30, py3 + 30, pb + 50, py3 + 40, pb + 40, py3 + 20);
            }

            for (var c = 0; c < 10; c += 2) { // the lower left petal on each flower
                var py4 = (yStart - 10) + y * yStart;
                var pc = (xStart - 10) + c * xStart;
                quad(pc - 20, py4 + 40, pc, py4 + 30, pc + 10, py4 + 10, pc - 10, py4 + 20);
            }

            for (var d = 0; d < 10; d += 2) { // the center of each flower
                var py5 = (yStart - 10) + y * yStart;
                var pd = (xStart - 10) + d * xStart;
                ellipse(pd + 15, py5 + 5, 5, 5);
            }
        }
    }
}
I enjoyed this project because it allowed me to work with tessellations and arrays, patterns I don’t usually utilize often in my design work. My piece is meant to offer a geometric interpretation of the classic floral wallpaper found in homes. To me, wallpaper should feel warm, inviting, and interesting — all foundations of a fun home environment. In my piece, each flower is comprised of quadrilateral petals and an ellipse center, giving the wallpaper the desired modernistic yet comforting feeling. I also utilized a pastel blue analogous color scheme; I personally really like pastel colors (similar to the ones utilized in the Pixas movie Up), and I think my color scheme added to the feeling of comfort. Interestingly, although blue is typically a “cold” color, I think the pastel nature makes it feel more cozy than cold.
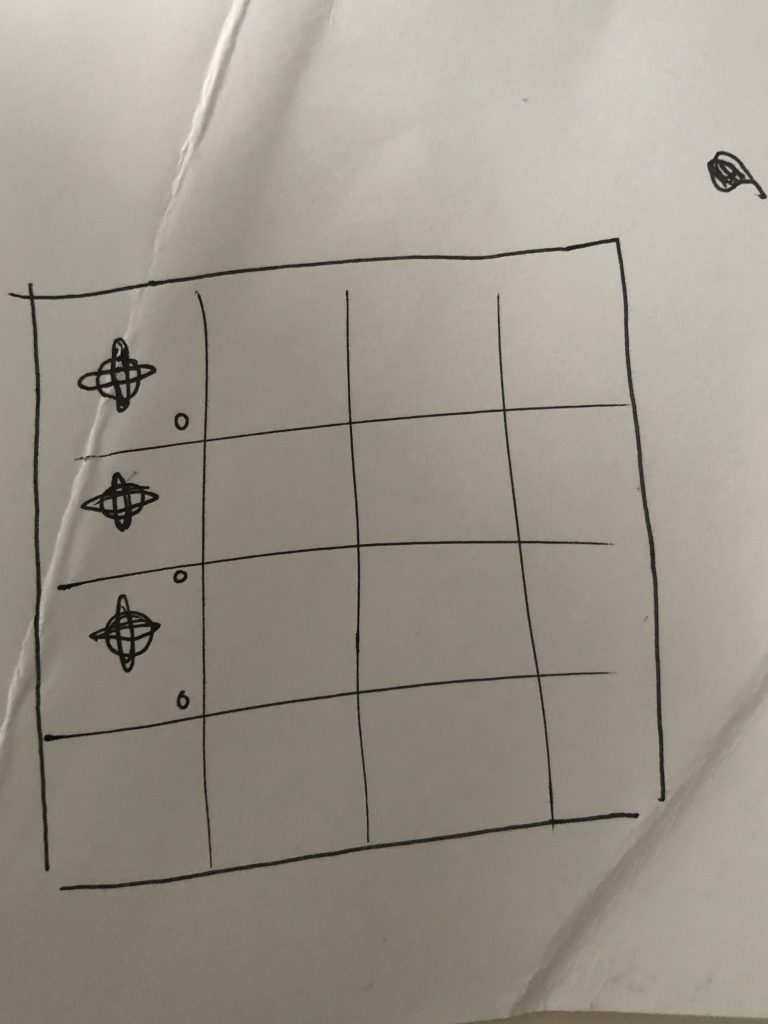
In terms of actual designing, it took me a long time to figure out the exact coordinate needed for each petal. The quad() function in p5.js requires all 4 endpoints to be mapped out, so that took me ample time and trial-and-error to nail down. As seen in my sketchbook below, I actually mapped out the coordinate plane to make sure all my petals were symmetrical and congruent. In the end, it was worth it and I was very happy with my piece.
Some of the ideation sketches I did in my notebook. The bottom section depicts the slope calculations and mapping I had to do to place the endpoints of quad() in the right place in each for loop!
I really like the way computer graphics were used here in this magazine. The vibrant and playful colors are not just limited to the image, but also extend beyond to the area where text is placed. This enhances the “3-dimensional” concept by the way the graphic elements are placed beyond the edge of the main image.
The artist probably used 3D graphics software to create the models of the image before adding the details and vibrant colors. Typically, there is also a rendering algorithm that makes the image look 3-dimensional.
The artist(s) have a unique style throughout their work, which is also reflected in this work. Their style is playful, colorful, and bold with a consistent smooth 3d texture throughout the images.
The computer-generated Gollum (above, seen in 2012’s The Hobbit: An Unexpected Journey) CG Gollum is based on performances by actor Andy Serkis (below). Image: NEW LINE PRODUCTIONS
I chose Joe Letteri who is the senior visual effects supervisor at Weta Digital in New Zealand and the Oscar-winning co-creator of Gollum on screen The Hobbit. I admire films where actors interact with CG characters because the process incorporates using motion capture on the actor, that will be playing the computer generated character, and uses VFX techniques to bring the character into life. Since the Lord of the Rings trilogy in 2002, the CG looks of Gollum’s character has been constantly analyzed and applied with more technical progression on CG tools, as in the Hobbit, 2012, Gollum looks more realistic in terms of his skin texture and muscle movement. To achieve more realistic CG character that is no different to a real actor, Joe Letteri and Weta Digital focused in depth on how muscles and skeleton joints work in an actual human body. One of the techniques that they developed was a tissue simulation and subsurface-scattering technique to render Gollum’s skin texture to give more translucency.
//Sean Meng
//Section C
//hmeng@andrew.cmu.edu
//Project-05-Wall paper

var xS = 55;//define x spacing for each feather
var yS = 65;//define y spacing for each feather

function setup() {
    createCanvas(600, 600);

}

function draw() {
	background(0);

    for(var x = 1; x <= 8; x += 1){
        for(var y = 1; y <= 7; y += 1){
            //draw feathers on the even number rows
            if(y % 2 == 0){
                stroke(255);
                strokeWeight(0.5);
                //the branches of the feather
                line(x * xS, y * yS + 30, x * xS, y * yS + 500)
                //outter green part of the feather
                fill(31, y * 30, 111);//color gradiant from blue to green
                ellipse(x * xS, y * yS, 30, 60);
                //inner yellow layer of the feather
                fill(242, 250, 130);
                ellipse(x * xS, y * yS + 8, 20, 40);
                //inner orange layer of the feather
                fill(255, 163, 51);
                ellipse(x * xS, y * yS + 8, 15, 30);
                //inner light blue layer of the feather
                fill(51, 228, 255);
                ellipse(x * xS, y * yS + 14, 10, 10);
                //inner dark blue layer of the feather
                fill(17, 24, 214);
                ellipse(x * xS, y * yS + 12, 7, 7);

            }
            //draw feathers on the odd number rows
            else if(x <= 9){
                stroke(255);
                strokeWeight(0.5);
                //the branches of the feather
                line(x * xS + xS / 2, y * yS - 20, x * xS + xS / 2, y * yS - 500)
                fill(y * 50, 196, 111);//color gradiant from green to orange
                ellipse(x * xS + xS / 2, y * yS, 20, 40);
            }
        }
    }


}
The drawing is inspired by the repeating pattern of peacock feather. By adding layers of color, gradient and shape, the form of the feather can be abstracted as wall paper
/* Kimberlyn Cho
Section C
ycho2@andrew.cmu.edu
Project 5 */

function setup() {
    createCanvas(500, 400);
    background(255);
    noLoop();
}

function draw() {
    var ex = 50 // x position of first pupil
    var ey = 40 // y position of first pupil
    var ew = 15 // size of pupil

    for (var y = 0; y < 8; y++) {
        for (var x = 0; x < 6; x++) {
            var eyex = ex + x * 80 // x position of arrayed pupils
            var eyey = ey + y * 45 // y position of arrayed pupils

            //eyeballs
            fill(0, x * 50 + 50, y * 30 + 100);
            strokeWeight(0);
            ellipse(eyex, eyey, ew * 2, ew * 2);

            //pupils
            fill(0);
            ellipse(eyex, eyey, ew, ew);

            //reflection on pupils
            fill(255);
            ellipse(eyex + 3, eyey - 3, ew / 2, ew / 2);

            //eye
            noFill();
            stroke(0, x * 30 + 50, y * 50 + 100);
            strokeWeight(3);
            arc(eyex, eyey + 22, ew * 5, ew * 5, PI + QUARTER_PI, -QUARTER_PI, OPEN);
            arc(eyex, eyey - 22, ew * 5, ew * 5, QUARTER_PI, PI - QUARTER_PI, OPEN);
        };
    };
};
I was inspired by the static yet varied nature of human eyes for this project. While every eye in the pattern has the same elements (pupil, reflection, etc.), each eye has its own combination of colors that make it unique, as do humans.
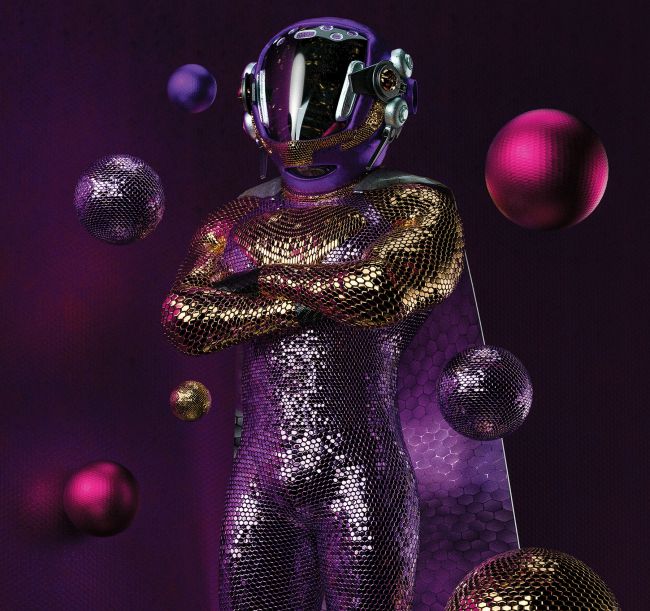
PKTS_09, a sci-fi-esque artwork by Ukranian artist Eugene Golovanchuk. Golovanchuk utilizes incredibly lifelike texture, reflection, and colors to create his masterpiece.
For this week’s Looking Outwards, I looked at PKTS_09, one of the works of the Ukranian artist Eugene Golovanchuk (aka “Skeeva”). His works all involve bold, daring colors and shapes, but this one in particular caught my eye because of its flashy lighting and garish colors.
PKTS_09 is the 9th piece in a self-proclaimed “series of personal artworks executed in surreal, abstract & sci-fi 3d style.” It portrays a man in a spacesuit similar to the ones worn by Daft Punk as he stands proudly with his shimmering sequined bodysuit. The colors in PKTS_09 are marvelous, and they feature both an analogous and complementary color scheme. The purple and pink tones (analogous) create a warm yet mysterious atmosphere, and the yellow glinting of the sequins complements the purple background well (complementary). Many of Skeeva’s design choices make the whole piece cohesive and fun; the floating disco balls fill negative space well, and the fact that so many of the elements have a similar shimmer makes the canvas feel unified.
Skeeva gives a great quote that reminded me a lot of the way p5.js drawing works:
“I usually use the viewport as an empty canvas, combining different silhouettes and textures into one composition to see how objects ‘feel’ inside the scene.”
p5.js, of course, also uses a canvas to draw in shapes. I also try to utilize this mentality when creating my code and designs, as I’m always looking to compose my canvas so that different objects balance each other out inside the scene. Skeeva mentions that he primarily uses Cinema 4D for rendering and drawing, so I decided to look up the software to see how it works. Sure enough, Cinema 4D uses a coordinate system to render objects, just like p5.js! These similarities are very motivating; although p5.js obviously can’t render objects at the fidelity that Cinema 4D can, it’s exciting to see that utilizing a coordinate system to render and place objects can lead to remarkable artwork and results.
![[OLD FALL 2019] 15-104 • Introduction to Computing for Creative Practice](../../../../wp-content/uploads/2020/08/stop-banner.png)