Sarah Choi – Looking Outwards – 03

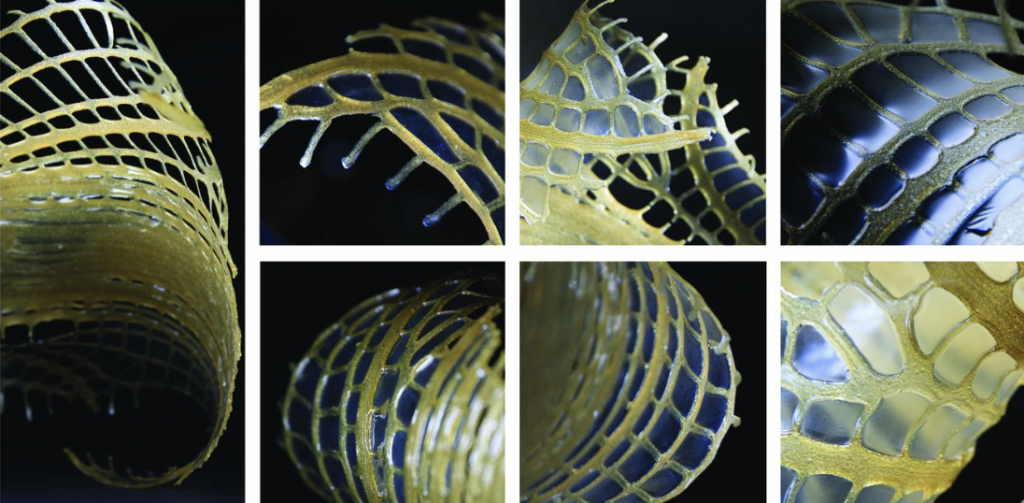
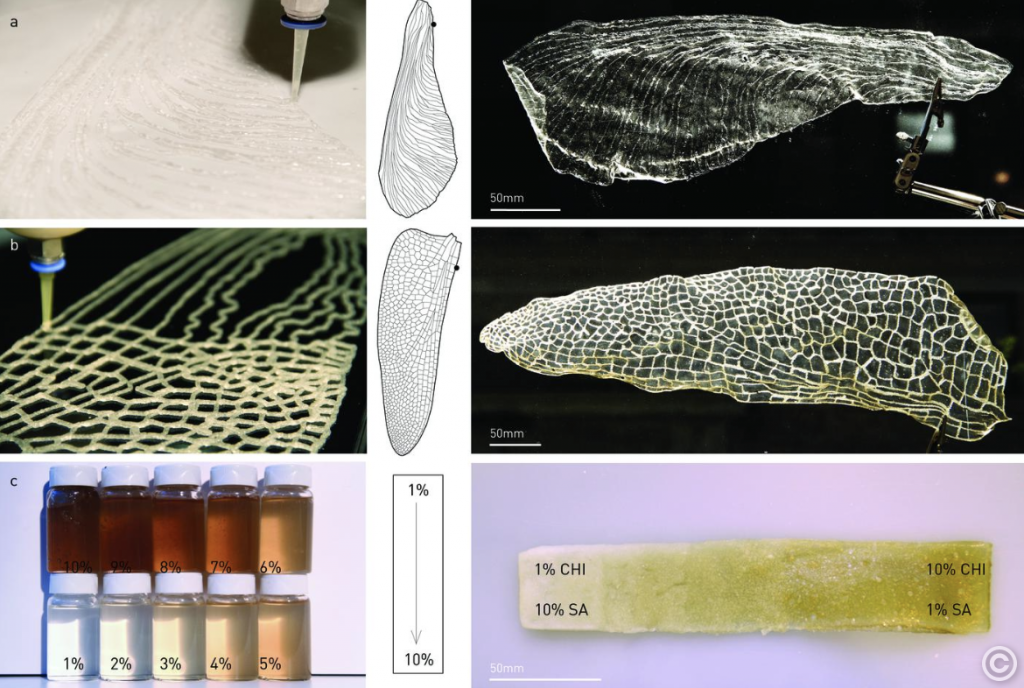
This form of generated art interested me because the inspiration came from water. The MIT Media Lab showed “Water-Based Additive Manufacturing”, portraying the design approach of water-based robotic fabrication and technology for additive manufacturing. The entire project used biodegradable hydrogel composites.

Looking at dimensions, the project develops structural materials for additive deposition. They used different types of materials all around incorporating technology for biodegradable composite objects. The technological aspect to shape the objects created a basis for the algorithms that fully generated the work. This project combined art and nature, using natural hydrogels and further made different scaled objects. The fabricated objects were then dissolved in water and recycled. The final forms produced beautiful and radiant architectural structures.

The creator’s artistic sensibilities showed a unique variety of art, producing what people term “generative art”. The final forms produced beautiful and radiant architectural structures, reminding me of natural forms in our world which aren’t normally seen through the naked eye on a day to day basis.

https://www.media.mit.edu/projects/water-based-additive-manufacturing/overview/

Shannon Ha – Project 03 – Dynamic Drawing

sketch

//Shannon Ha
//Section D
//sha2@andrew.cmu.edu
//Project - 03: Interactive Drawing

var diam1 = 50; //diameter of
var diam1a = 70;//
var speedcircle = 1;//speed of circle
var dir = 1;// direction of pulsing circle
var angle = 0; // angle of rotation
var speedangle = 0.2
var lineAX = 200;
var lineAX2 = 100
var lineAY = 175;
var diam2 = 135;
var diam3 = 200

function setup() {
  createCanvas(640, 480);

}

//top-right ellipse
function draw() {
  background(0);
  fill(220, mouseX/2, mouseY/2);
  ellipse(70, 70, diam1, diam1);
    diam1 += dir * speedcircle/2;
    if(diam1 > 150){
      dir = -dir;
      diam1 = 150;
    }
    else if(diam1 < 0){
      dir = -dir;
      diam1 = 0;
    }

//mouse ellipse
  fill(0);
  push();
  ellipse(mouseX, mouseY, mouseX+1, mouseX+1);
    fill(246,mouseX,mouseY);

  //middle ellipse
  ellipse(200,240,diam2,diam2);

  diam2 += dir * (speedcircle + 2);

  if(diam2 > 300){
    dir = -dir;
    diam2 = 300;
  }
  else if(diam2 < 0){
    dir = -dir;
    diam2 = 0;
  }

//left-most ellipse
  ellipse(470,190,mouseX/2,mouseY/2);
  noStroke();
  fill(200,0,mouseX/2);
  if (mouseX/2 <= diam3/2){
    mouseX = 30;
  }

  if (mouseY/2 <= diam3/2){
    mouseY = 30;
  }

//spinning lines
  stroke(0,250,mouseY);
  strokeWeight(5);
  push();

  translate(mouseX, mouseY);
  rotate(mouseX/2 || mouseY/2);
  line(lineAX,lineAY,lineAX2,lineAY);
  line(lineAX+40,lineAY+40,lineAX2+40,lineAY+40);
  line(lineAX-50,lineAY-50,lineAX2-50,lineAY-50);
  line(lineAX-20,lineAY-20,lineAX2-20,lineAY-20);

  pop();


}

For this weeks project, I wanted to create a dynamic drawing that resembled fireworks, however, I struggled a lot to make the lines move, so I decided to simplify it to just ellipses instead.

Sarah Choi – Project 03 – Dynamic Drawing

project-03

//Sarah Choi 
//Section D
//sychoi@andrew.cmu.edu
//Project-03-Dynamic-Drawing

//spiral
var angle = 0;
var bright = 255;
var n = 0;
var m = 0;
var x = 8 * n;
var y = 8 * m;

function setup() {
    createCanvas(640, 480);
    rectMode(CENTER);
}

function draw() {
    noStroke();
    if (mouseIsPressed) {
        bright = 255;
    }
    background(bright);
    bright = bright - 5;

    fill(255, 0, 0);
    var m = max(min(mouseX, 200), 20);
    var size = m * 200.0 / 250.0;
    rect(10 + m * 150.0 / 350.0, 400.0,
         size, size);
    fill(0, 0, 255);
    size = 200 + size;
    circle(150, 50 + m * 150 / 250.0,
         size / 2, size / 2);

    push();
    fill(0, 255, 0);
    ellipseMode(CORNER);
    var n = max(min(mouseX, 300), 200);
    var size2 = n * 200.0 / 400.0;
    ellipse(400 , size2, size2 * 2, size2 * 4);
    pop();
    
    if (mouseIsPressed) {
        fill(255, 255, 0);
        noStroke();
        strokeWeight(5);
        translate(mouseX, mouseY);
        rotate(radians(10));
        triangle(100, 0, 150, 150, 175, 150);
        quad(175, 150, 150, 150, 200, 200, 250, 200);
        triangle(200, 200, 250, 200, 150, 450);
        angle = angle + 5;

        push();
        translate(mouseX, mouseY);
        rotate(radians(10));
        triangle(300, 0, 275, 150, 250, 150);
        quad(275, 150, 250, 150, 300, 200, 350, 200);
        triangle(300, 200, 350, 200, 250, 450);
        pop();
        angle = angle + 5;

        push();
        translate(mouseX, mouseY);
        rotate(radians(10));
        triangle(25, 0, 0, 50, -25, 50);
        quad(0, 50, -25, 50, 45, 100, 75, 100);
        triangle(45, 100, 75, 100, 25, 250);
        pop();
        angle = angle + 5;
    }

    if (x <= width) {
        n += 1;
        bezier(x+2, y+2, x, y+6, x+2, y+8, x+4, y+6, x+2, y+2);
    }
    else { 
        m += 1;
        bezier(x+2, y+2, x, y+6, x+2, y+8, x+4, y+6, x+2, y+2);
    }
}

I was inspired by the weather. After playing around, I was able to come up with the code where when the mouse is pressed, the background inversed and slowly went back to normal. This reminded me of a flash of lightning, which is what I wanted to convey in my project.

Mari Kubota- Looking Outwards- 03

The Digital Construction Environment (2016) by Neri Oxman’s Mediated Matter Group at MIT is an open dome structure, with a diameter of 14.6 m and a height of 3.7 m, fabricated using the The Digital Construction Platform (DCP). The Digital Construction Platform is an experimental large robotic arm system that can rapidly 3D print large scale structures on site.

The Digital Construction Platform creating the Digital Construction Environment

The robotic arm consists of two systems, a large arm made for reach and the small “hand” used for more precise positioning. The Digital Construction Environment was made using digitally controlled mathematical calculations in order to make the curvature for the dome structure. This project drew my interest because it reminded me of a large scale 3D printer. It is an interesting new way of building a structure using computers and mathematical equations.

Video of DCP

Sammie Kim-Project-03-Dynamic-Drawing

sketch

//Sammie Kim
//sammiek@andrew.cmu.edu
//Section D
//Project 3

//Global variables for default
var colorR = 0;
var colorG = 9;
var colorB = 48;
var angle1 = 0;
var angle2 = 0;

function setup() {
    createCanvas(640, 480);
}

function draw() {
    //Changing background colorR as my mouse moves in the Y direction
    var colorR1 = min(colorR + mouseY, 173);
    var colorG1 = min(colorG + mouseY, 48);
    var colorB1 = min(colorB + mouseY, 63);
    background(colorR1, colorG1, colorB1);

    //Limit the mouse range, so the images don't go off the canvas
    mouseX = max(min(mouseX, 500), 0);

    //Y coordinates of the rectangle behind the circle
    var rectY = 480 - mouseY;
    var rect2Y = 0 + mouseY;

    fill("black");
    rectMode(CENTER);
    rect(320,rectY,140,300); //center rectangle
    rect(110,rect2Y,50,400); //left rectangle
    rect(530,rect2Y,50,400); //right rectangle

    //X locations of the circles
    var circAx = mouseX
    var circBx = mouseX - 40
    var circCx = mouseX - 20
    var circDx = mouseX-50

    //Changing the widths of the circles
    var circAw = mouseX - 80;
    var circBw = mouseX - 150;
    var circCw = mouseX * 0.5 - 30;
    var circDw = mouseX * 0.4;

    //Series of circles
    fill(mouseX, mouseY, 100);
    circAw = constrain(circAw, 90, 350); //constrain main circle size
    circle(circAx,240,circAw);//Big visible circle
    fill(colorR1, colorG1, colorB1);
    circle(circBx, 240, circBw); //Big hidden circle
    fill(mouseX, 200, mouseY);
    circle(circCx,240, circCw);//Small visible circle
    fill(colorR1, colorG1, colorB1);
    circle(circDx,240, circDw); //Small hidden circle

    //Changing size of the rotating squares
    var rectSize = mouseY * 0.2;
    var rectSize2 = mouseY * 0.1

    //Rotating square
    fill(253, 242, 216);
    noStroke();
    push();
    translate(mouseX,240);
    rotate(radians(angle1));
    rectMode(CENTER);
    rect(100,100,rectSize,rectSize);
    pop();
    angle1= angle1 + 2;

    //Second rotating square
    fill(126, 211, 216);
    push();
    translate(mouseX,300)
    rotate(radians(angle2));
    rectMode(CENTER);
    rect(120,100,rectSize2,rectSize2);
    pop();
    angle2 = angle2 + 2
  }

This project was challenging in many aspects; I had to think about the shape’s coordinates in relation to the mouse location and constrain them so that they don’t leave the canvas. I was able to apply a lot of the knowledge I gained from the lab exercises with rotating squares and the lecture about creating movement. Overall, this project prompted me to be both creative and logical.

Ian Kaneko Project – 03 – Dynamic Drawing

For this project I made something resembling a solar system. I think the different rotation rates of the circles is my favorite part about this.

ikaneko dynamic drawing

var canvasWidth = 640;
var canvasHeight = 480;
var angle = 0;
var r = 0;
var g = 0;
var b = 0;
var angle = 0;
var star = 0;


function setup() {
    createCanvas(canvasWidth, canvasHeight);
    
} 

// I used canvasWidth and height / 2 for the coordinates of the center of the canvas.

function draw() {
    background(220);
    noStroke();

    // Background made of blue rectangles

    fill(180, 180, 230);
    rect(0, canvasHeight * 0.75, canvasWidth, canvasHeight / 4);
    fill(160, 160, 200);
    rect(0, canvasHeight / 2, canvasWidth, canvasHeight / 4);
    fill(140, 140, 180);
    rect(0, canvasHeight / 4, canvasWidth, canvasHeight / 4);
    fill(120, 120, 160);
    rect(0, 0, canvasWidth, canvasHeight / 4);

    // Big yellow circle in the middle

    fill(240, 200, 160);
    circle(canvasWidth / 2, canvasHeight / 2, mouseX / 2);
    fill(240, 220, 220);
    circle(canvasWidth / 2, canvasHeight / 2, mouseY / 2);

    // Moving brown rectangles that change with the mouseX

    fill(80, 30, 30);
    rect((canvasWidth / 2) - mouseX, canvasHeight * 0.75, canvasWidth, canvasHeight / 8);
    fill(120, 70, 70);
    rect((canvasWidth / 2) - mouseX, canvasHeight / 4, canvasWidth, canvasHeight / 8);
    fill(140, 90, 90);
    rect(mouseX - (canvasWidth / 2), 0, canvasWidth, canvasHeight / 8);

    // Orbiting ball

    fill(160, 60, 60);
    push();
    translate(canvasWidth / 2, canvasHeight / 2);
    rotate(radians(angle / 2)); // This one should rotate at a slower rate than the other one
    circle(canvasHeight / 4, 0, 100);
    pop();

    fill(240, 150, 150);
    push();
    translate(canvasWidth /2, canvasHeight / 2);
    rotate(radians(angle));
    circle(canvasHeight / 4, 0, 50);
    pop();
    angle = angle + 1;

    // Ball orbits the faster the mouse is to the center of the screen

    var far = (dist(mouseX, mouseY, canvasWidth / 2, canvasHeight / 2));
    
    fill(80, 40, 80);
    push();
    translate(canvasWidth / 2, canvasHeight / 2);
    rotate(radians(star));
    circle(canvasHeight / 4, 0, 70);
    pop();

    star = star + 5 -(far / 100); // It is /100 because the true distance made it spin way too fast.


    // The ball will pass under this bar
   
    fill(100, 50, 50);
    rect(mouseX - (canvasWidth / 2), canvasHeight / 2, canvasWidth, canvasHeight / 8);

    // Slanted bar that changes color (Using arbitrary large numbers to make sure they go off the canvas)

    fill(r, g, b);
    push();
    rotate(radians(35));
    rect(0, 0, 1000, 10);
    rect(0, 200, 1000, 10);
    rect(0, -200, 1000, 10);
    pop();

    r = mouseX
    g = mouseY
    b = mouseX / 2


}


Monica Chang – Project 03 – Dynamic Drawing

Suggestion: move cursor in circular motions around the canvas.

sketch

//Monica Chang
//Section D
//mjchang@andrew.cmu.edu
//Project-03

var angle = 0;
var x = 0;

function setup() {
  createCanvas(640, 480);
  noStroke();
  rectMode(CENTER);

  
}
function draw() {


// changing color of background as mouse moves around canvas.
  background(mouseX, mouseY, 245); 
  
//mouseX controls x location
  fill(255, 150);
  ellipse(mouseX, mouseY, mouseY, mouseY);
// mouseY controls y location AND size
  fill(0, 159);
  ellipse(width - mouseX, mouseY, height - mouseY, height - mouseY);

//spiraling circle meant to indicate how to move your mouse around and play with it.
  print(x);
  push();
  translate(width/2,height/2);
  rotate(radians(angle));
  fill("red");
  ellipse (x ,0,50,50);
  pop();
  angle = angle +5;
  x = x + 0.5;
  //sending spiral circle return to center and then draw again>

  if (x == 300){
    x = 0;
  }


}

I wanted to explore the use of depth perception within this piece by playing with the size and position. I also integrated what we learned in recitation where we created a spiral; however, I wanted to take it to another level by drawing it continuously while it redraws in a different position. Once it hits the edge of the canvas I wanted the spiral movement to continue again from the center. I struggled to get it to move smoothly but I am still happy with the results.

Raymond Pai-Project-03

Random shapes and colors in each quadrant. Center circle shows the color pallet of the shapes.

sketch

//Raymond Pai
//Section D
//rpai@andrew.cmu.edu
//Project-03
var angle = 0;
var r = 200
var g = 200
var b = 200

function setup() {
    createCanvas(600, 600);
    background(0);
}

function draw() {
      //Q1
      if (mouseX > 300 & mouseY < 300){
        r = random(100, 200);
        g = random(200, 300);
        b = random(0, 105);
        fill(r, g, b); // control rect color explicitly
        stroke(0);
        strokeWeight(6);
        push();
        translate(mouseX, mouseY);
        rotate(radians(angle));
        ellipseMode(CENTER); // center rect around 0,0
        ellipse(0, 0, 1000, 200);
        pop();
        angle = angle + 5;
      }
      //Q2
      if (mouseX < 300 & mouseY < 300){
        r = random(200, 255);
        g = random(10, 25);
        b = random(200, 255);
        fill(r, g, b); // control rect color explicitly
        stroke(0);
        strokeWeight(6);
        push();
        translate(mouseX, mouseY);
        rotate(radians(angle));
        ellipseMode(CENTER); // center rect around 0,0
        ellipse(0, 0, 40, 200);
        pop();
        angle = angle + 5;
      }
      //Q3
      if (mouseX < 300 & mouseY > 300){
        r = random(100, 255);
        g = random(200, 255);
        b = random(200, 255);
        fill(r, g, b); // control rect color explicitly
        stroke(0);
        strokeWeight(6);
        push();
        translate(mouseX, mouseY);
        rotate(radians(angle));
        ellipseMode(CENTER); // center rect around 0,0
        ellipse(0, 0, 300, 20);
        pop();
        angle = angle + 5;
      }
      //Q4
      if (mouseX > 300 & mouseY > 300){
        r = random(10, 25);
        g = random(10, 250);
        b = random(200, 255);
        fill(r, g, b); // control rect color explicitly
        stroke(0);
        strokeWeight(6);
        push();
        translate(mouseX, mouseY);
        rotate(radians(angle));
        ellipseMode(CENTER); // center rect around 0,0
        ellipse(0, 0, 10, 2000);
        pop();
        angle = angle + 5;
      }
      //Secret Center
      if (mouseX < 600){
        ellipse(300, 300, 200, 200);
      }
    }

Raymond Pai-Looking Outwards-03

Randomized forms of polygons

Marius Watz is a New York-based artist who works with visual abstraction fabrication with software. This piece is called ‘Probability Lattice’ which is appealing to me because it randomly creates interesting geometric forms. I don’t know the process, but there is probably 3D printing and randomization of the lengths of the sides of polygons involved. The artist’s style of sharp and jagged forms is clearly present in this example of his work. The name ‘Probability Lattice’ gave me the impression that the forms could visualize some form of probability data, but the artist does not elaborate on this explicitly. I’m curious about how this could be used to reflect ourselves, such as shapes based on how many steps we take through the day or how much we sleep through the week.

Link to the page:

http://mariuswatz.com/2012/05/09/probability-lattice/

Lanna Lang – Project 03 – Dynamic Drawing

lanna_project3_sketch

//Lanna Lang
//Section D
//lannal@andrew.cmu.edu
//Project 03 Dyanamic Drawing

var circW;
var angle1 = 0;
var angle2 = 0;

function setup() {
    createCanvas(640, 480);
}

function draw() {
    background(0);
   
//rotating white rectangle
    push();
    translate(200, 200);
    rotate(radians(angle2));
    noStroke();
    fill(255);
    rectMode(CENTER);
    //the size will increase/decrease as the mouse moves
    rect(0, 0, mouseX + 200, mouseY + 150);
    pop();
    //rotating counter clockwise
    angle2 = angle2 - 5;
  
//rotating colorful rectangle
    push();
    translate(200, 200);
    rotate(radians(angle1));
    noStroke();
    //as the mouse moves around, the color of the rect changes
    fill(170, mouseX, mouseY);
    rectMode(CENTER);
    //the size of the rect will increase/decrease as the mouse moves
    rect(0, 0, mouseX, mouseY + 50);
    pop();
    //rotating clockwise
    angle1 = angle1 + 5;

//as the mouse goes right, the size of the circle increases  
    if (mouseX > width/2) {
      circW = (width/2 + 50);
    } else {
      circW = (mouseX);
    }
 
//as the mouse moves around, the color of the circles change 
    stroke(0);
    fill(mouseX, 170, mouseY);
    circle(mouseX, mouseY, circW);
    
}

I really wanted to play around with gradient colors and seeing the after-effects of each shape’s fast movements. At first, I wanted to experiment with having my background(…); line of code in my function setup() and how that would change my drawing, but it wouldn’t work with my rotating rectangles, so maybe I’ll experiment in a future project.