//Jinhee Lee
//Section C
//jinheel1@andrew.cmu.edu
//Final-Project
//dimensions for keys
var keyY = 100;
var whiteWidth = 40;
var whiteHeight = 250;
var whiteOffset = 120;
var blackWidth = 20;
var blackHeight = 160;
var blackOffset = 30;
var whiteKeyArray = [];
var blackKeyArray = [];
//password specification and intializations
var password = "determination";
var passwordArray = [];
var numPresses = 0;
var display = "";
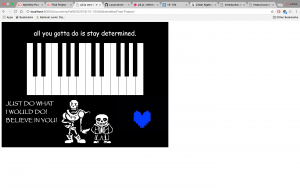
var messageSans = "all you gotta do is stay determined.";
var messagePapyrus1 = "JUST DO WHAT";
var messagePapyrus2 = "I WOULD DO!";
var messagePapyrus3 = "BELIEVE IN YOU!";
var brothersLink = "http://i.imgur.com/n33OgDM.png";
var brothers;
var blueSoulLink = "http://i.imgur.com/SVAUjD8.jpg";
var blueSoul;
//for the easter egg
var easterEgg = "legs";
var easterEggArray = [];
var numLegs = 0;
var displayLegs = "";
var messageMettaton1 = "That's right, legs was the correct answer!";
var messageMettaton2 = "Lights!";
var messageMettaton3 = "Camera!";
var messageMettaton4 = "Action!";
var mettatonLink = "http://i.imgur.com/T4XxnZr.png";
var mettaton;
var yellowSoulLink = "http://i.imgur.com/Xo6GCyb.jpg";
var yellowSoul;
function setup() {
createCanvas(800,600);
//making white key objects
for (var i = 0; i < 14; i++) {
wKey = new makeWhiteKey(whiteWidth*i + whiteOffset, keyY,
whiteWidth, whiteHeight);
whiteKeyArray.push(wKey);
}
//making black key objects
for (var i = 0; i < 14; i++) {
if ((i % 7) !== 2 && (i % 7) !== 6) {
bKey = new makeBlackKey(whiteWidth*i + whiteOffset + blackOffset, keyY,
blackWidth, blackHeight);
blackKeyArray.push(bKey);
}
}
//loading pixels of preloaded images
brothers.loadPixels();
blueSoul.loadPixels();
mettaton.loadPixels();
yellowSoul.loadPixels();
}
function draw() {
background(0);
//building white keys
for (var i = 0; i < whiteKeyArray.length; i++) {
whiteKeyArray[i].drawWhite();
}
//building black keys
for (var i = 0; i < blackKeyArray.length; i++) {
blackKeyArray[i].drawBlack();
}
//font details
textFont("Comic Sans MS");
textSize(30);
textAlign(CENTER);
fill(255);
//what to display depending on the array length
if (passwordArray.length == password.length) {
text(messageSans, width/2, 65);
textFont("Papyrus");
textAlign(LEFT);
text(messagePapyrus1,20,400);
text(messagePapyrus2,20,440);
text(messagePapyrus3,20,480);
image(brothers, 280, 370);
scale(0.5);
image(blueSoul, 1100, 700);
} else if (passwordArray.length < password.length) {
text(display, width/2, 65);
}
//for the easter egg
if (easterEggArray.length == easterEgg.length) {
textFont("Lucida Handwriting");
text(messageMettaton1, width/2, 65);
text(messageMettaton2,140,400);
text(messageMettaton3,140,440);
text(messageMettaton4,140,480);
scale(0.4);
image(mettaton, 670, 900);
scale(1.25)
image(yellowSoul,1090,700);
} else if (easterEggArray.length < easterEgg.length) {
textFont("Lucida Handwriting");
text(displayLegs, width/2, 65);
}
}
// Helper functions to make piano key objects ////////////////////////
//white keys
function makeWhiteKey(whiteX,whiteY,whiteW,whiteH) {
return {wx: whiteX, wy: whiteY, ww: whiteW, wh: whiteH, drawWhite: drawWhiteKey};
}
function drawWhiteKey() {
fill(255);
rect(this.wx, this.wy, this.ww, this.wh);
}
//black keys
function makeBlackKey(blackX,blackY,blackW,blackH) {
return {bx: blackX, by: blackY, bw: blackW, bh: blackH, drawBlack: drawBlackKey};
}
function drawBlackKey() {
fill(0);
rect(this.bx, this.by, this.bw, this.bh);
}
// Keeping track of the typed password ////////////////////////
function keyTyped() {
//affects the array
if (key == password.charAt(numPresses)) {
sansTalk.play();
display += password[numPresses];
numPresses += 1;
passwordArray.push(key);
numLegs = 0;
displayLegs = "";
} else if (key !== password.charAt(numPresses)) {
display = "";
numPresses = 0;
passwordArray = [];
}
//for the easter egg
if (key == easterEgg.charAt(numLegs)) {
displayLegs += easterEgg[numLegs];
numLegs += 1;
easterEggArray.push(key);
numPresses = 0;
display = "";
} else if (key !== easterEgg.charAt(numLegs)) {
displayLegs = "";
numLegs = 0;
easterEggArray = [];
}
//determines what melody to play and stops previous melody
if (numPresses == password.length) { //plays determination
glamour.stop();
determination.stop();
papyrusTalk.play();
determination.play();
}
if (numLegs == easterEgg.length) { //plays glamour
determination.stop();
glamour.stop();
glamour.play();
}
}
// Playing individual piano keys
function mousePressed() {
//play notes for black keys
if (mouseY > keyY && mouseY < keyY + blackHeight) {
if (mouseX > whiteOffset + 12*whiteWidth + blackOffset
&& mouseX < whiteOffset + 12*whiteWidth + blackOffset + blackWidth) { //high Asharp
highAsharp.play();
} else if (mouseX > whiteOffset + 11*whiteWidth + blackOffset
&& mouseX < whiteOffset + 11*whiteWidth + blackOffset + blackWidth) { //high Gsharp
highGsharp.play();
} else if (mouseX > whiteOffset + 10*whiteWidth + blackOffset
&& mouseX < whiteOffset + 10*whiteWidth + blackOffset + blackWidth) { //high Fsharp
highFsharp.play();
} else if (mouseX > whiteOffset + 8*whiteWidth + blackOffset
&& mouseX < whiteOffset + 8*whiteWidth + blackOffset + blackWidth) { //high Dsharp
highDsharp.play();
} else if (mouseX > whiteOffset + 7*whiteWidth + blackOffset
&& mouseX < whiteOffset + 7*whiteWidth + blackOffset + blackWidth) { //high Csharp
highCsharp.play();
} else if (mouseX > whiteOffset + 5*whiteWidth + blackOffset
&& mouseX < whiteOffset + 5*whiteWidth + blackOffset + blackWidth) { //low Asharp
lowAsharp.play();
} else if (mouseX > whiteOffset + 4*whiteWidth + blackOffset
&& mouseX < whiteOffset + 4*whiteWidth + blackOffset + blackWidth) { //low Gsharp
lowGsharp.play();
} else if (mouseX > whiteOffset + 3*whiteWidth + blackOffset
&& mouseX < whiteOffset + 3*whiteWidth + blackOffset + blackWidth) { //low Fsharp
lowFsharp.play();
} else if (mouseX > whiteOffset + 1*whiteWidth + blackOffset
&& mouseX < whiteOffset + 1*whiteWidth + blackOffset + blackWidth) { //low Dsharp
lowDsharp.play();
} else if (mouseX > whiteOffset + blackOffset
&& mouseX < whiteOffset + blackOffset + blackWidth) { //low Csharp
lowCsharp.play();
}
}
//play notes for white keys
else if (mouseY > keyY && mouseY < keyY + whiteHeight) {
if (mouseX > whiteOffset + 13*whiteWidth) { //high B
highB.play();
} else if (mouseX > whiteOffset + 12*whiteWidth) { //high A
highA.play();
} else if (mouseX > whiteOffset + 11*whiteWidth) { //high G
highG.play();
} else if (mouseX > whiteOffset + 10*whiteWidth) { //high F
highF.play();
} else if (mouseX > whiteOffset + 9*whiteWidth) { //high E
highE.play();
} else if (mouseX > whiteOffset + 8*whiteWidth) { //high D
highD.play();
} else if (mouseX > whiteOffset + 7*whiteWidth) { //high C
highC.play();
} else if (mouseX > whiteOffset + 6*whiteWidth) { //low B
lowB.play();
} else if (mouseX > whiteOffset + 5*whiteWidth) { //low A
lowA.play();
} else if (mouseX > whiteOffset + 4*whiteWidth) { //low G
lowG.play();
} else if (mouseX > whiteOffset + 3*whiteWidth) { //low F
lowF.play();
} else if (mouseX > whiteOffset + 2*whiteWidth) { //low E
lowE.play();
} else if (mouseX > whiteOffset + whiteWidth) { //low D
lowD.play();
} else if (mouseX > whiteOffset) { //low C
lowC.play();
}
}
}
// Preloading the music files and images ////////////////////////
function preload() {
//meloadies and sound effects
determination = loadSound("determination.wav");
sansTalk = loadSound("sansTalk.wav");
papyrusTalk = loadSound("papyrusTalk.wav");
glamour = loadSound("glamour.wav");
//white key sounds
highB = loadSound("highB.wav");
highA = loadSound("highA.wav");
highG = loadSound("highG.wav");
highF = loadSound("highF.wav");
highE = loadSound("highE.wav");
highD = loadSound("highD.wav");
highC = loadSound("highC.wav");
lowB = loadSound("lowB.wav");
lowA = loadSound("lowA.wav");
lowG = loadSound("lowG.wav");
lowF = loadSound("lowF.wav");
lowE = loadSound("lowE.wav");
lowD = loadSound("lowD.wav");
lowC = loadSound("lowC.wav");
//black key sounds
highAsharp = loadSound("highAsharp.wav");
highGsharp = loadSound("highGsharp.wav");
highFsharp = loadSound("highFsharp.wav");
highDsharp = loadSound("highDsharp.wav");
highCsharp = loadSound("highCsharp.wav");
lowAsharp = loadSound("lowAsharp.wav");
lowGsharp = loadSound("lowGsharp.wav");
lowFsharp = loadSound("lowFsharp.wav");
lowDsharp = loadSound("lowDsharp.wav");
lowCsharp = loadSound("lowCsharp.wav");
//images
brothers = loadImage(brothersLink);
mettaton = loadImage(mettatonLink);
blueSoul = loadImage(blueSoulLink);
yellowSoul = loadImage(yellowSoulLink);
}
![[OLD – FALL 2016] 15-104 • COMPUTING for CREATIVE PRACTICE](../../wp-content/uploads/2020/08/stop-banner.png)