This project was not one of my favorites, as I missed a few of the classes on for() function and had to do more in depth learn-by-doing. I also just don’t think string art is super attractive. HOWEVER, now that I know the for() function I can definitely think of other uses for it, as incrementation is really helpful and can also simplify some tedious coding.
/*Sharon Yang
Section C
junginny
Project-04
*/

function setup() {
    createCanvas(400, 300);
}

function draw() {
    background(255);
    var x1;
    var x2;
    var y1;
    var y2;
    var colorLR = 20;
    var colorLG = 45;
    var colorLB = 80;
    //Left curve
    x1 = 0;
    x2 = 0;
    y1 = 0;
    y2 = 0;
    push();
    for (var jL = 1;jL <= 100; jL+=1) {
        translate(jL,jL);
        strokeWeight(1-(jL/20));
        stroke(colorLR,colorLG,colorLB);
        for (var iL = 1;iL <= 50; iL+=2.8) {
            x2 = iL*8;
            y1 = iL*6;
            line(x1-jL,height-y1-jL,x2-jL,y2-jL);
        }
    //Change color value - gradient
    colorLR+=10;
    colorLG+=10;
    colorLB+=10;
    }
    pop();
    //Right curve - resetting variables
    x1 = 0;
    x2 = 0;
    y1 = 0;
    y2 = 0;
    colorLR = 25;
    colorLG = 50;
    colorLB = 90;
    push();
    for (var jR = 1;jR <= 100; jR+=1) {
        translate(-jR,jR);
        strokeWeight(1-(jR/20));
        stroke(colorLR,colorLG,colorLB);
        for (var iR = 1;iR <= 50; iR+=2.8) {
            x1 = iR*8;
            y2 = iR*6;
            line(x1,0,width,y2);
        }
    //Change color value - gradient
    colorLR+=10;
    colorLG+=10;
    colorLB+=10;
    }
    pop();
}
Using for loops to create various lines to put them together into a harmonious art piece helped me explore the order in for loops and/or nested for loops. I played with the stroke weights as well as the colors to create an effect of a gradient.
Vapor-Space creates an interactive Soundscape that reacts to data collected from the human body
People place their fingers on sensors to collect biological data from their skin
Vapor-Space is an interactive soundspace installation, whose name reflects how the data which feeds the soundscape is collected. Soundscape collects data on the humidity of the room, the temperature of the participant’s skin which touches the sensor, and calculates a vaporization rate which is translated into sound.
The creators at Vapor-Space highlight that the micro-workings of the body are themselves “an orchestra,” so in a way their soundscape seeks to amplify this symphony to a degree audible to the human ear.
What interests me about this project is how it brings together two seemingly opposing elements– electronics and water (hahaha if you ever drop your phone in the toilet or drop a hairdryer in the bathtub while you’re in it you’d understand)– and makes them collaborate together to create the sound.
/* Jaclyn Saik
Section E
jsaik@andrew.cmu.edu
Project-04
*/
var x1; //global values for all points that create curves
var y1;
var x2;
var y2;
var increment;
var rectW;
var rectH;

function setup() {
    createCanvas(400, 300);
    background("RosyBrown");
    strokeWeight(2);
    increment = 15;
    increment = random(5, 9); //resets spacing everytime you refresh the page


}

function draw() {
    stroke("Pink");

//top right swoop
    for(var i = 0; i < width; i+= increment) { //increment variable set so I can randomize it
        x1 = width; //starting points incrementing along right edge
        y1 = i; //increments
        x2 = i; //paired with fized width to create curves
        y2 = 0; //i is paired with zero to create curves
        line(x1, y1, x2, y2);
    }
//bottom left swoop
    for(var i = 0; i < height; i+= increment) {
        x1 = i; //values flipped in order to create different curve location
        y1 = height;
        x2 = 0;
        y2 = i;
        line(x1, y1, x2, y2);
    }
//purple rectangle
    noFill(); //created a rectangle in front of the background pink curves
    stroke("DarkMagenta");
    rectW = 280;
    rectH = 220;
    rect(60, 40, rectW, rectH);

    //rectangle swoop bottom right
    push();
    translate(60, 40); //new axis for creatign curves
    for(var i = 0; i <= rectH; i+= increment) {
        x1 = i;
        y1 = rectH;
        x2 = rectW;
        y2 = rectH-i; //new curve position, so increments work opposite based on starting height
        //another option would have been to rotate the origin
        line(x1, y1, x2, y2);
    }
    pop(); //push pop used because I translated the origin

    //rectangle swoop upper left
    push();
    translate(60, 40);
    for(var i = 0; i <= rectH; i+= increment) {
        x1 = rectW-i;
        y1 = 0;
        x2 = 0;
        y2 = i;
        line(x1, y1, x2, y2);
    }
    pop();


    //blue rectangle

    noFill();
    stroke("DarkTurquoise");
    rectW = rectW-40
    rectH = rectH-40
    rect(60, 40, rectW, rectH);

    //rectangle swoop bottom right
    push();
    translate(60, 40);
    for(var i = 0; i <= rectH; i+= increment) {
        x1 = i;
        y1 = rectH;
        x2 = rectW;
        y2 = rectH-i;
        line(x1, y1, x2, y2);
    }
    pop();

    //rectangle swoop upper left
    push();
    translate(60, 40);
    for(var i = 0; i <= rectH; i+= increment) {
        x1 = rectW-i;
        y1 = 0;
        x2 = 0;
        y2 = i;
        line(x1, y1, x2, y2);
    }
    pop();

    //design lines
    stroke("AliceBlue");
    line(0,0, width/2, height)
    line(0, 0, width, height/2);
    line(width, height, 0, height/2);
    line(width, height, width/2, 0);

    //gold rectangle

    noFill();
    stroke("Gold");
    rectW = rectW-40
    rectH = rectH-40
    rect(60, 40, rectW, rectH);

    //rectangle swoop bottom right
    push();
    translate(60, 40);
    for(var i = 0; i <= rectH; i+= increment) {
        x1 = i;
        y1 = rectH;
        x2 = rectW;
        y2 = rectH-i;
        line(x1, y1, x2, y2);
    }
    pop();

    //rectangle swoop upper left
    push();
    translate(60, 40);
    for(var i = 0; i <= rectH; i+= increment) {
        x1 = rectW-i;
        y1 = 0;
        x2 = 0;
        y2 = i;
        line(x1, y1, x2, y2);
    }
    pop();


}
Creating string art was a challenging process, especially after translating the origin of my piece around a couple times to experiment. This was definitely an exercise in understanding the coordinate system enough to assign opposing values to the ends of points. I liked playing with the foreground and background of my curves, and I thought it was definitely one the prettiest projects we have made so far.
A MaxMSP patch that turns weather data into music – January 2016
I’ve looked at weather data before as a part of site analysis. I can’t see the connection to this.
Algorithmic Composition is, as the username suggests, an algorithmic composer. Since 2009, they’ve been blogging and posting tutorials on just that. They made the MaxMSP (Max being a visual programming language focused on media) patch above that translates weather data into sound. What’s impressive to me is how much more it does; the patch has options for changing instruments, octaves, pitch, and tempo for the four tracks that can be mixed. As a result, it can do so much with just a single data set, although just by listening to it I can’t see how someone could trace it back to its origins.
Algorithmic Composition says
“You don’t have to be a programmer to make algorithmic music, just an interest in creating music in new ways”
and I think that shows through in their work. It’s making music in a new way.
/*
Jamie Dorst
Section A
jdorst@andrew.cmu.edu
Project-04
*/

function setup() {
    createCanvas(400, 300);
    background(0);
}

function draw() {
    // variables
    var x1 = 10;
    var y1 = 10;
    var x2 = 20;
    var y2 = 20;
    var x3 = 350;
    var y3 = 15;
    var x4 = 10;
    var y4 = 295;
    var x5 = 10;
    var y5 = 10;
    var x6 = 20;
    var y6 = 20;
    var x7 = 350;
    var y7 = 15;
    var x8 = 10;
    var y8 = 295;
// BOTTOM LEFT CORNER

    // draw bottom left white background lines
    // change y coordinate of first point
    // change x coordinate of second point
    for (var i = 0; i < 50; i++) {
        stroke('white');
        x5 += 9;
        y5 += 11;
        line(0, y5, x5, 300);
    }
    // draw bottom left blue lines
    // change y coordinate of first point
    // change x coordinate of second point
    for (var i = 0; i < 50; i++) {
        stroke('blue');
        x1 += 10;
        y1 += 12;
        line(0, y1, x1, 300);
    }

// TOP RIGHT CORNER

    // draw top right white background lines
    // change y coordinate of first point
    // change x coordinate of second point
    for (var i = 0; i < 50; i++) {
        stroke('white');
        x6 += 19;
        y6 += 22;
        line(400, y6, x6, 0);
    }
    // draw top right green lines
    // change y coordinate of first point
    // change x coordinate of second point
    for (var i = 0; i < 50; i++) {
        stroke('green');
        x2 += 20;
        y2 += 23;
        line(400, y2, x2, 0);
    }

// TOP LEFT CORNER

    // draw top left white background lines
    // change y coordinate of first point
    // change x coordinate of second point
    for (var i = 0; i < 50; i++) {
        stroke('white');
        x7 -= 26;
        y7 += 24;
        line(x7, 0, 0, y7);
    }
    // draw top left red lines
    // change y coordinate of first point
    // change x coordinate of second point
    for (var i = 0; i < 50; i++) {
        stroke('red');
        x3 -= 27;
        y3 += 25;
        line(x3, 0, 0, y3);
    }

// BOTTOM RIGHT CORNER

    // draw bottom right yellow lines
    // change y coordinate of first point
    // change x coordinate of second point
    for (var i = 0; i < 50; i++) {
        stroke('white');
        x8 += 16;
        y8 -= 18;
        line(400, y8, x8, 300);
    }
    // draw bottom right yellow lines
    // change y coordinate of first point
    // change x coordinate of second point
    for (var i = 0; i < 50; i++) {
        stroke('yellow');
        x4 += 15;
        y4 -= 19;
        line(400, y4, x4, 300);
    }
}
For this project I wanted to practice doing for loops. I had trouble figuring out how to move the lines from the bottom left corner, especially getting them into the top left and bottom right corners, because I had to make some values negative. After I figured that out, I wanted to emphasize the shapes of the lines so I made the background black, and added background lines to each corner to make them pop. Overall I found this project sort of difficult, but it was cool once it finally worked.
//Jenny Hu
//Section E
//jjh1@andrew.cmu.edu
//Project 04 — String Art

var R1;
var R2;
var R3;
var R4;
var G1;
var G2;
var G3;
var G4;
var B1;
var B2;
var B3;
var B4;


function setup() {
    createCanvas(400, 300);
}

function draw() {
    background (250);

    //Draw first curve
    for ( var i=0; i<100; i++){
      stroke(R1, G1, B1);
      strokeWeight(1);
      line(i, 0 , i*5, height/2);
    }

    //Draw second curve
    for ( var i=0; i<200; i++){
      stroke(R2, G2, B2);
      strokeWeight(0.5);
      line(i*25, 300-height/2, i*mouseX, 300);
    }

    //Draw third curve
    for ( var i=0; i<100; i++){
      stroke(R3, G3, B3);
      strokeWeight(0.75);
      line(400-i*10, 0, i*15, 300);
    }

    //Draw fourth curve
    for ( var i=0; i<100; i++){
      stroke(R4, G4, B4);
      strokeWeight(0.5);
      line(400-i*(mouseX*0.5), 0, i*15, 300);
    }
  }

  function mousePressed(){
      // //variable stroke colors
      R1 = random(0,250);
      G1 = random(0,250);
      B1 = random(0,250);
      R2 = random(0,250);
      G2 = random(0,250);
      B2 = random(0,250);
      R3 = random(0,250);
      G3 = random(0,250);
      B3 = random(0,250);
      R4 = random(0,250);
      G4 = random(0,250);
      B4 = random(0,250);
  }
In this project, I iterated some simple for-loops for each curve. In some cases, dynamic to the mouse’s X position, and in other cases, static. I think what’s nice about the movement is that it’s a dynamic set of strings, tied to a static set, which creates a satisfying connection between their visual elements and rhythm!
This time I didn’t dabble as much in composition before writing the program, instead, I really enjoyed seeing the composition emerge as I played with the numbers. Another nice touch which makes the interactions a bit more satisfying is the additional randomized color sets.
function setup() {
    createCanvas(400, 300);
}

var ratio = 0.75; // width to height ratio
var radius = 400; // length of radiating center lines

function draw() {
    background(47,19,116);
    // circles:
    // outer circle
    fill(244, 96, 54);
    noStroke();
    ellipse(width / 2, height / 2, 300, 300);
    // middle circle
    fill(245, 110, 72);
    noStroke();
    ellipse(width / 2, height / 2, 150, 150);
    // inner circle
    fill(246, 124, 90);
    noStroke();
    ellipse(width / 2, height / 2, 50, 50);

    // lines:
    // center radial
    for (var a = 0; a < 360; a += 10) {
      stroke(255, 249, 104);
      line(width / 2, height / 2,
        // trig uses var radius as hypotenuse
        width / 2 + radius * cos(radians(a)),
        height / 2 + radius * sin(radians(a)));
    }
    // bottom left corner
    for (var b = 0; b < width; b += 7) {
      stroke(66, 51, 227);
      line(0, b, b / ratio, height);
    }
    // top left corner
    for (var c = 0; c < width; c += 7) {
      stroke(30, 81, 221);
      line(0, c, width - c / ratio, 0);
    }
    // top right corner
    for (var d = 0; d < width; d += 7) {
      stroke(66, 51, 227);
      line(width, d, d / ratio, 0);
    }
    // bottom right corner
    for (var e = 0; e < width; e += 7) {
      stroke(30, 81, 221);
      line(width, e, width - e / ratio, height);
    }
}
It took me a while to catch on, but I hit one good curve and used it to figure out the others. I played around with difference colour schemes and decided to go with a sun, stars, and space theme from there.
Classyfier is a project where a table has the ability to choose the music genre that fits into the situation by detecting the beverages that people are consuming. It is programmed through Wekinator, Processing and the OFX collection, by Benedict Huebener, and 2 other students in Copenhagen Institute of Interaction Design. The music can be changed to the next song by tapping on the table. Huebener originally has passion for mechanics and aesthetics. He applies physical and digital prototyping techniques in order to take on problems in today’s society, which dictated him to take on this project.
I found this project very intriguing because I believe that this kind of technology relating to sound can be used in the bigger world. I think that this is a very possible project that can be actually carried on to a further extent to use in the future. The use of technology to respond to sounds in order to appropriately use in a certain context relates to convenience for humans. This project is aids human’s convenience and does not affect in a harmful way, which I think is very important since technology is consistently developing today. The man made machine table that can use its intelligence due to training, is very fascinating. I wish this project can work for multiple uses, not only limiting to sound of wine glasses, beer cans, and spoons clicking against mugs. Overall, this project is very successful in its use and the conceptual idea must be carried forward, and shared to a wider audience.
/* Dani Delgado
Section E
ddelgad1@andrew.cmu.edu
Project-04
*/
function setup() {
    createCanvas(400, 300);
    background(10);

}
function draw() {
	//draw the sixth layer of lines (brownish black lines)
	//these lines are on the "inside" of all other line layers (its the lowest layer)
    for(var g = 0; g < 1.5 ; g += 0.09) {
	    //set the stroke style
		strokeWeight(0.2);
		stroke(35, 19, 0);
		//determine the lerp values
		x1 = lerp(0, width / 2.15, g);
        y1 = lerp(0, height * 2.15, g);
        x2 = lerp(width * 2.15, 0, g);
        y2 = lerp(height / 2.15, 0, g);
        //draw the curves
		line(x1, 0, width, y1);
		line(x2, height, 0, y2);
		line(x1, height, width, y2);
		line(x2, 0, 0, y1);
    }
	//draw the fifth layer of lines (brown lines)
	//these lines are on the "inside" the above layers of lines
	for(var f = 0; f < 1.4 ; f += 0.08) {
	    //set the stroke style
		strokeWeight(0.3);
		stroke(51, 34, 0);
		//determine the lerp values
		x1 = lerp(0, width / 1.9, f);
        y1 = lerp(0, height * 1.9, f);
        x2 = lerp(width * 1.9, 0, f);
        y2 = lerp(height / 1.9, 0, f);
        //draw the curves
		line(x1, 0, width, y1);
		line(x2, height, 0, y2);
		line(x1, height, width, y2);
		line(x2, 0, 0, y1);
    }
   //draw the fourth layer of line (dark orange lines)
   //these lines are "inside" the above layer of lines
    for(var e = 0; e < 1.3; e += 0.07) {
		//set the stroke style
		strokeWeight(0.4);
		stroke(102, 68, 0);
		//determine the lerp values
		x1 = lerp(0, width / 1.75, e);
        y1 = lerp(0, height * 1.75, e);
        x2 = lerp(width * 1.75, 0, e);
        y2 = lerp(height / 1.75, 0, e);
        //draw the curves
		line(x1, 0, width, y1);
		line(x2, height, 0, y2);
		line(x1, height, width, y2);
		line(x2, 0, 0, y1);
    }
    //draw the third layer of lines (medium orange lines)
    //these lines are "inside" the above layer of lines
    for(var d = 0; d < 1.2; d += 0.06) {
		//set the stroke style
		strokeWeight(0.6);
		stroke(204, 136, 0);
		//determine the lerp values
		x1 = lerp(0, width / 1.5, d);
        y1 = lerp(0, height * 1.5, d);
        x2 = lerp(width * 1.5, 0, d);
        y2 = lerp(height / 1.5, 0, d);
        //draw the curves
		line(x1, 0, width, y1);
		line(x2, height, 0, y2);
		line(x1, height, width, y2);
		line(x2, 0, 0, y1);
	}
	//draw the second layer of lines (light orange lines)
	//these lines are "inside" of the abvoe layer of lines
	for(var c = 0; c < 1.1; c += 0.05) {
		//set the stroke style
		strokeWeight(0.8);
		stroke(255, 204, 102);
		//determine the lerp values
		x1 = lerp(0, width / 1.5, c);
        y1 = lerp(0, height, c);
        x2 = lerp(width * 1.5, 0, c);
        y2 = lerp(height, 0, c);
        //draw the curves
		line(x1, 0, width, y1);
		line(x2, height, 0, y2);
		line(x1, height, width, y2);
		line(x2, 0, 0, y1);
	}
	//draw the uppermost line set (creme colored lines)
	//the first line set will curve the corners
	for(var i = 0; i < 1; i += 0.04) {
		//set the stroke style
		strokeWeight(1);
	    stroke(250, 240, 220);
	    //determine the lerp variables
        x1 = lerp(0, width, i);
        y1 = lerp(0, height, i);
        x2 = lerp(width, 0, i);
        y2 = lerp(height, 0, i);
        //draw the curves
		line(x1, 0, width, y1);
		line(x2, height, 0, y2);
		line(x1, height, width, y2);
		line(x2, 0, 0, y1);
}

}
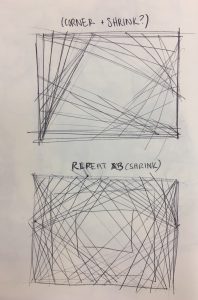
Some initial concept sketches to decide how I wanted to place the lines
Since this is my first experience with for loops (outside of the other class assignments), I found this to be very challenging since I first had to solidify the conceptual aspect of the code before I could begin to work on the physical coding. Once I got into the groove of it though I had fun with the assignment!
![[OLD FALL 2018] 15-104 • Introduction to Computing for Creative Practice](../../../../wp-content/uploads/2020/08/stop-banner.png)