Week 9 Looking Outwards

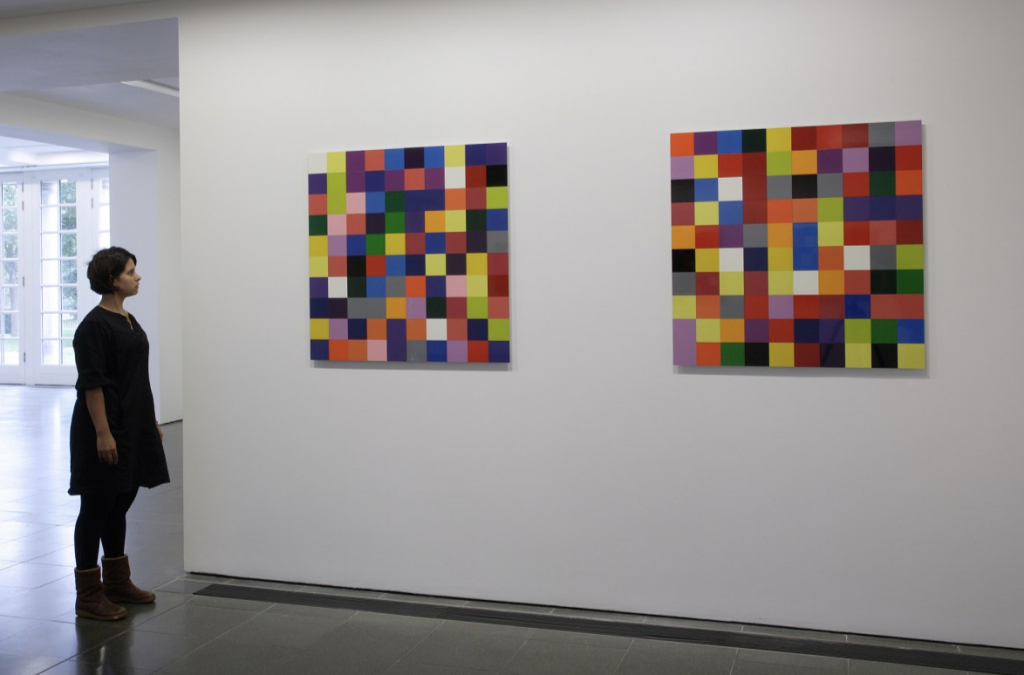
Siwei Xie’s Looking Outwards 06 assignment is about Richter, a German visual artist, who created “4900 Colours: Version II” (2008). The colors used in this series are generated randomly from a palette of 25 colors by a computer program. Xie said: “Creator’s artistic sensibility manifests by how ‘non-random’ the panels look, with some dominated by particular colors which are often placed next to each other. But the whole point of ‘pure’ randomness is that apparent patterns are expected to occur.”

Two panels from the exhibit

To add on, this reminded me of an interesting thing I learned about how the ‘random’ shuffle function for music is not actually random. When they are actually purely random, people will feel like they can detect patterns in even the smallest coincidences — such as when certain songs or artists come after one another.

To deal with this ‘nonrandom’-feeling randomness, Spotify changed its algorithms to feel more random to humans. Instead of using the Fisher-Yates shuffle, which people complained wasn’t genuinely random, Spotify updated its algorithm to distribute artists and genres more evenly. For example, “if there are four songs by the White Stripes in a playlist … the algorithm will aim to play them at roughly 25% intervals.” I think it’s very interesting how much the human tendency to detect patterns can affect the way we interpret randomness.

Steven Fei-Looking Outwards-09


It is important to appreciate the beautiful sound of nature. Meanwhile, it is intriguing to manipulate such sounds through scientific methods. Browsing through my friends’ posts, I find my friend Mike Jin’s post 04 about the Chijikinkutsu really interesting.

Chijikinkutsu represents the art of arranging a series of equipments that take advantage of magnatism to collide and drift to make sounds. Originating from the traditional sound ornamentations for Japanese gardens, this sound equipment uses floating needles in the glasses of water which can be magnetized through electricity. Driven by the magnetic force, the needles will hit the glasses and make delicate sounds. By controling the spatial arrangement of such glass tumblers and the electric current size of each coil attached to the them, people will be able to enjoy the different pitches and magnitudes of the sounds by the needles. A beautiful, yet to some extent intentionless composition of sounds are generated. Like my friend Mike mentioned, such an arrangement is not only a sound art but also a beautiful visual appreciation decorated by the plain, glass tumblers arranging from the near to far on the ground. Meanwhile, Mike mentioned it would be more interesting to carry out such sound equipment around the globe because of the variance across the magnetic field in different countries. However, I have some doubts about that because the magnetic fields are actually initiated temporarily by the small coils attached on the glass tumblers. Maybe it won’t have to have too much relationship with the real geomagnetic field. On the other hand, it would be definitely fun to utilize different materials other than the glass and needles around the globe to make such sound art, and that would be fantastic for different cultures to communicate and create diverse range of sound art compositions.

Click here to see my friend Mike Jin’s post

Click here to visit the sound art website page

A close look at the arrangements of the sound equipments

Sewon Park – LO – 9

As an inspirational project that my peers have assessed, I chose Karl Sims Flow. I completely agree with Sarah Choi’s assessment that the piece is most notable for its use of nature’s existing motion such as gravity and flow of water. However, one important aspect to note is some of the other motions inspired by works of other painters such as Van Gogh. Through using Gogh’s classic bush stroke, Sims recreates the Starry Night in a modern fashion

flow exhibit: paint swirls
Flow inspired by Van Gogh’s Starry Night

One other notable thing is that although the motion itself captures nature, the color orientation of the rippling effects are quite uncommon. Just as Sarah said, the co-existing randomness and configured motion is interesting. I also think the co-existence of the natural motion and artificial colors are also notable. This piece represents the variables of nature and randomness governed by the movement of human beings. That concept lying behind the implementation of the art is that different factors of the peice is all being controlled by the audience to create a truly mesmerizing motion depicted with natural motion and artificial colors.

Link to post: https://courses.ideate.cmu.edu/15-104/f2019/2019/09/06/sarah-choi-looking-outwards-02/

Link to original work: http://www.karlsims.com/flow.html

Sydney Salamy: Looking Outwards-09

I chose to do my blog on the 6th Looking Outwards post of Jenny Lee. The project she did was an installation called “eCloud” built by Aaron Koblin, Nik Hafermaas, and Dan Goods in 2010.

On first glance of the image on Jenny’s post of the installation from below, I decided I already liked it. The way the squares were placed were already pretty on their own. The technological aspect only made it better. I like the concept of incorporating live changes into an art piece. Having these changes be changes in weather, and having the sculpture look like a cloud were really cool ideas. One of my LO posts had a similar idea of incorporating live weather changes, but with music, so I was already inclined towards liking the piece. The squares turning opaque was visually interesting as well. I’m used to seeing stuff change color, but changing clarity was different and I’m very curious to know how it works.

There isn’t much to really disagree with within her post. Most of the things she states are just factual information. The one thing I would critique is the explanation about what the pattern is displaying. She states the piece “transforms the patterns of the tiles to create the “cloud” in the accurate shape of one in particular time zone.” However, what I got from the video was that the patterns weren’t changing so much to emulate the shape but more the weather. So if it was raining hard, the tiles changed in a way that made the piece look like rain, like little squares falling to the ground. It seemed like the speed of the “falling” would also change speed based on how hard it was storming.

Maybe a way to improve the report would be to mention specifically how the piece changes in response to the different types of weather. In the picture I posted, it seemed like the cloud also changed color as well, since some parts are blue, which isn’t shown in the video. She might want to dive into how things like temperature, wind speeds, precipitation, snow, rain, etc… affect opaqueness, what squares are being changed, what speed they’re being changed at, what color the squares are, what areas of the piece is colored or not, etc…

Video Demonstrating eCloud by Dan Goods
Image of eCloud

Chelsea Fan-Project-09-Computational Portrait

I chose a portrait of my friend Katrina. I spent a long time deciding how to create the portrait and I eventually decided on drawing squares in a continuous and slightly randomized line.

Portrait

/* Chelsea Fan
Section 1B
chelseaf@andrew.cmu.edu
Project-09
*/
//important variables
var hiddenImage; 
var xCoord = 200;
var yCoord = 200;
//Speed variables
var xOff = 5;
var yOff = 5;

function preload() {
    //preload image
    var myImage = "https://i.imgur.com/mBLofJe.png"
    hiddenImage = loadImage(myImage);
}

function setup() {
    createCanvas(319, 360); //set canvas to image size
    pixelDensity(1);
    background(0); //black background
    hiddenImage.loadPixels(); //load image
    frameRate(50);
}

function draw() {
    //get image coloring
    var ix = constrain(floor(xCoord), 0, width);
    var iy = constrain(floor(yCoord), 0, height);
    var imageColor = hiddenImage.get(ix, iy);

    //Bounce off right side
    if (xCoord>=width || xCoord<=0){
        xOff = -xOff;
        yOff = random(-5, 5);
    }

    //Bounce off top and bottom
    if (yCoord>=height || yCoord<=0){
        yOff = -yOff;
        xOff = random(-5, 5);
    }

    //Rectangle move
    xCoord = xCoord + xOff;
    yCoord = yCoord + yOff;

    //Rectangle color
    noStroke(); //no outline of rectangles
    fill(imageColor); //fill based on hiddenImage coloring
    rect(xCoord, yCoord, 5, 5); //draw rectangles
}

Image after about 10 minutes
Image after about 1 minute.

Katrina Hu – Project 09 – Computational Portrait

sketch_project09

/*Katrina Hu
15104-C
kfh@andrew.cmu.edu
Project-09*/

var originalImage;

function preload() {
    var myImageURL = "https://i.imgur.com/g3iK76T.jpg";
    originalImage = loadImage(myImageURL);
}
function setup() {
    createCanvas(480, 480);
    background(0);
    originalImage.loadPixels();
    frameRate(500);
}

function draw() {
    //defining the variables
    var px = random(width);
    var py = random(height);
    var ix = constrain(floor(px), 0, width-1);
    var iy = constrain(floor(py), 0, height-1);
    var theColorAtLocationXY = originalImage.get(ix, iy);

    //drawing the random dashes
    strokeWeight(4);
    stroke(theColorAtLocationXY);
    line(px + random(-10, 10), py + random(-10, 10), px + random(-10, 10), py + random(-10, 10));

    //drawing the random ellipses
    fill(theColorAtLocationXY);
    ellipse(px, py, random(1, 8), random(1, 8));
}

I chose to make a portrait of my friend Chelsea. It was fun to experiment with the random sizes and positions of my ellipses and lines.

The finished portrait(after about 5 minutes)
The original photograph

Steven Fei-Project 09-Portrait


sketch

This project is my approach to create an impressionist paintings while giving the drawing some “old-looking” effect by adding the dirt points according to the lightness of each pixel in the original image. Random lines are drawn with the same pixel color to imply a sense of brush or pencil stroking. The larger rectangles are the protagonists in the drawing to fulfill the portrait by occupying relatively large pixel areas.

Self Portrait Original Photo

Stage 0-a scattering layout of brush strokes

stage 1-the final progression by applying the brush strokes with the dirt points


//Steven Fei
//Project 09
//Section - A
//zfei@andrew.cmu.edu
var underlyingImage;

function preload() {
    // preload the photo
    var myImageURL = "https://i.imgur.com/GI56Ww2.jpg";
    underlyingImage = loadImage(myImageURL);
}

function setup() {
    // setting up the canvas according to the dimensions of the photo
    createCanvas(600, 450);
    background("pink");
    underlyingImage.loadPixels();
    frameRate(400);
}

function draw() {
    
    var px = random(width); // random points to have strokes
    var py = random(height); // random points to have strokes
    var count = int(px) % 2; // decide the conditionals when to apply the two drawing schedules
    var colorAt = underlyingImage.get(px, py); // retrieve the pixel of the photo
    var brightnessAt = brightness(colorAt); // retrieve the brightness of the point
    var light = lightness(colorAt); // retrieve the lightness of the point
    var cR = map(brightnessAt, 0, 255, 4, 12); // maping the corresponding radius and size of the circles and rectangles
    var angle = random(0, PI); // give a random stroke angle 
    noStroke();
    //conditionals to draw some grey scale dirt points when count is 0
    if(count == 0){
        push();
        fill(light, px % width * 0.07);
        translate(px,py);
        circle(0,0,cR * 0.8);
        pop();
    }
    //conditionals to draw the rectangular strokes to re-portray the original photo
    if(count == 1){
        push();
        fill(colorAt, px % width * 0.5);
        rectMode(RADIUS);
        translate(px, py);
        rotate(angle);
        rect(0,0,cR,cR);
        pop();
        //draw a random trace to represent the brush stroke
        stroke(colorAt, px % width * 0.2);
        strokeWeight(2);
        line(px + random(10), py + random(10), px + random(10), py + random(10));
    }
    
    
}

Emma NM-Project-09(Custom Pixels)


customPixels

/* 
Emma Nicklas-Morris
Section B
enicklas
Project-09
Custom Pixels
*/

var portraitImg;

function preload() {
    var myImageURL = "https://i.imgur.com/Zfspsky.jpg";
    portraitImg = loadImage(myImageURL);
}

function setup() {
    // canvas proportional to image size
    createCanvas(portraitImg.width / 6, portraitImg.height / 6);
    background(255);
    portraitImg.loadPixels();
    frameRate(150);

}

function draw() {
    // get pixel color at that random location in image
    var ix = floor(random(portraitImg.width));
    var iy = floor(random(portraitImg.height));
    var colorLoc = portraitImg.get(ix, iy);

    noStroke();
    fill(colorLoc);

    // scale it to canvas size
    x = map(ix, 0, portraitImg.width, 0, width);
    y = map(iy, 0, portraitImg.height, 0, height);
    
    // creates a spiral like look
    var d = dist(width / 2, height / 2, x, y);
    d = d % 10;

    // draws the hexagons
    polygon(x, y, d, 6);


}

// https://p5js.org/examples/form-regular-polygon.html 
function polygon(x, y, radius, npoints) {
  let angle = TWO_PI / npoints;
  beginShape();
  for (let a = 0; a < TWO_PI; a += angle) {
    let sx = x + cos(a) * radius;
    let sy = y + sin(a) * radius;
    vertex(sx, sy);
  }
  endShape(CLOSE);
}

I really enjoyed this project. It was fun to see it come about. I wanted to make my generative pixel image to be a bit more interesting by adding a circular/spiral like look and use hexagons instead of circles or rectangles. 

Siwei Xie- Project 11 – Landscape

sketch

//Siwei Xie
//Section B
//sxie1@andrew.cmu.edu
//project-10-landscape

var terrainSpeed = 0.0002;//speed of terrian moving
var terrainDetail = 0.015;//smoothness of terrian
var star = [];

function setup() {
    createCanvas(480, 480);
    frameRate(20);//speed of refreshing frames (stars changing)
}

function draw() {
    background("black");

    makeMountain();
    makeMoon();
    makeStar();
    makeCar();
}

//moving terrian
function makeMountain(){
    noStroke();
    fill("blue"); 
    beginShape(); 

    for (var x = 0; x < width; x++) {
      var t = (x * terrainDetail) + (millis() * terrainSpeed);//shape & moving speed of terrian 
      var y = map(noise(t), 0, 1.8, height/8, height);//y-coordinate of terrian
      vertex(x, y);//draw terrian continuously
    }

    vertex(width, height);//constrain range of terrian
    vertex(0, height);//terrian restarts at left side of canvas
    endShape();
}

function makeMoon(){
    noStroke();
    fill(252, 242, 166);
    ellipse(2 * width / 3, height / 4, 120, 120);//outer layer
    fill(239, 207, 104);
    ellipse(2 * width / 3, height / 4, 80, 80);//inner layer
}

function makeStar(){
    fill(270);
    for (var i = 0; i < 30; i++) {
      var starX = random(width); //random stars on upper canvas
      var starY = random(0, 200);
      ellipse(starX, starY, 3, 3);
    }
}

function makeCar(){
    fill("yellow");
    rect(100, random(375, 380), 100, 30);//lower body of shaking car
    rect(100, 350, 70, 30);//uppper body of shaking car

    fill("green");
    stroke("black");
    circle(120, random(410, 415), 30, 30);//left wheel
    circle(170, random(410, 415), 30, 30);//right wheel
}
   

I had fun creating this project. Moving the background (terrain) implies the moving of the main object (car). The process of generating mountain in the back was fascinating, because I learned how to randomize height and width in order to indicate moving scenes. Creating mountains creates a very peaceful and relaxing scene, which is something I desperately want.

I also utilize randomly-positioned stars in the background to make it a starry night. For the car, I used randomized y-coordinates in order to show it is driving on a bumpy road. Overall, I think I achieved my goal of giving the viewer a sense of wonderment.

Sketch on my notebook.

Fanjie Jin-Looking Outward-09

WDCH Dreams, Refik Anadol

A Looking Outwards assignment that I found interesting was my classmate Taisei Manheim’s week 8 LookingOutwards post. I think this project, WDCH Dreams, that Tai has chosen is really interesting in that the data visualization was projected onto the facades of the Walt Disney Concert Hall. The displayed dataset was the 45 terabytes of data from the LA Phil data archives and through artificial intelligence algorithm, Refik Anadol utilized a computational ‘mind’ to mimic how humans dream – by processing memories to form a new combination of images and ideas. 

Agreeing with Tai, this project truly shows really high levels of rigorous and endeavors as every detail of the Disney Concert Hall from old Catia models has been remodeled so that all the projection and data visualization will be smoothly and coherently mapped on the very irregular surfaces. As an architecture student, this project is really exciting to me in that it is fascinating to see a new layer of meaning and information on top of the original complex geometry. Through the use of light as an architectural median showing the memories that are associated with this concert hall, Refik Anadol has established a new sense of visual performance that has a hybrid relationship between architecture and media arts with machine intelligence.