Taisei Manheim – Project 09 – Computational Portrait

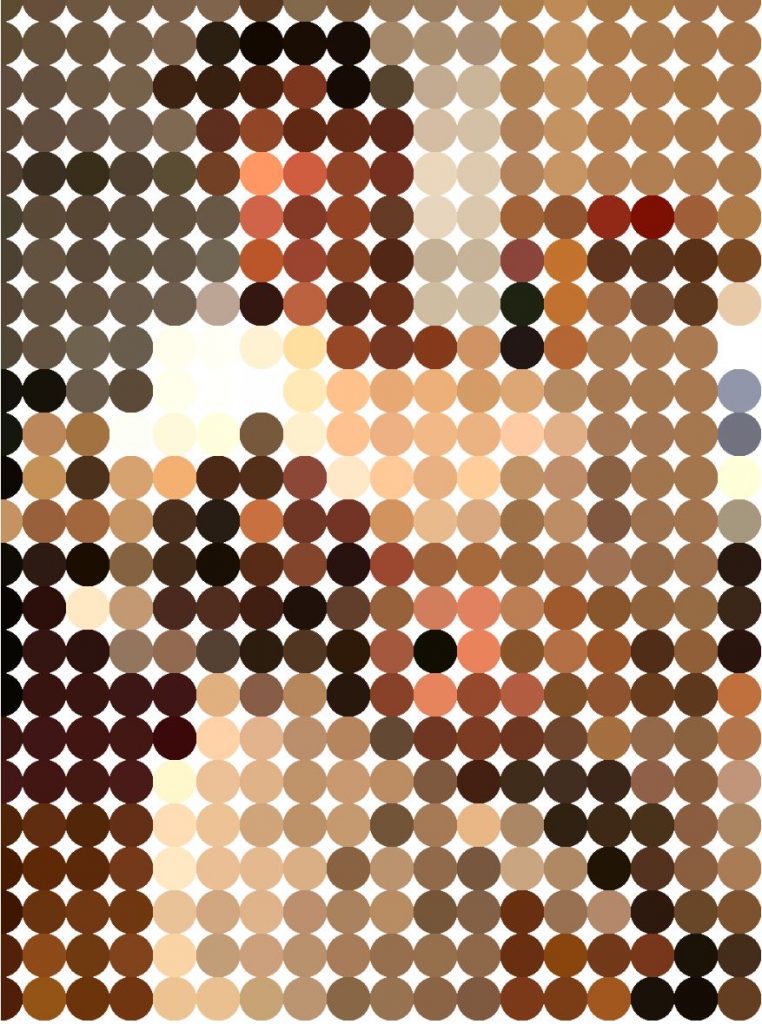
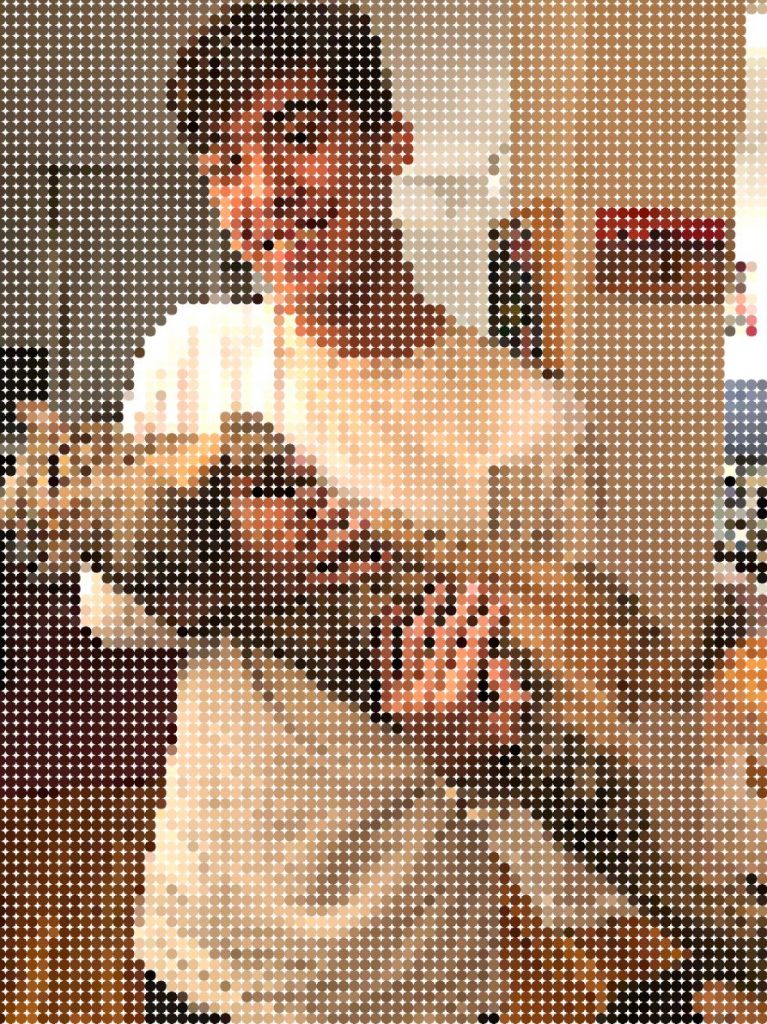
Click ‘u’ to move grid amount up and ‘d’ to move grid amount down!!!

(If it doesn’t work make sure your caps lock is off and click on the image first before typing)
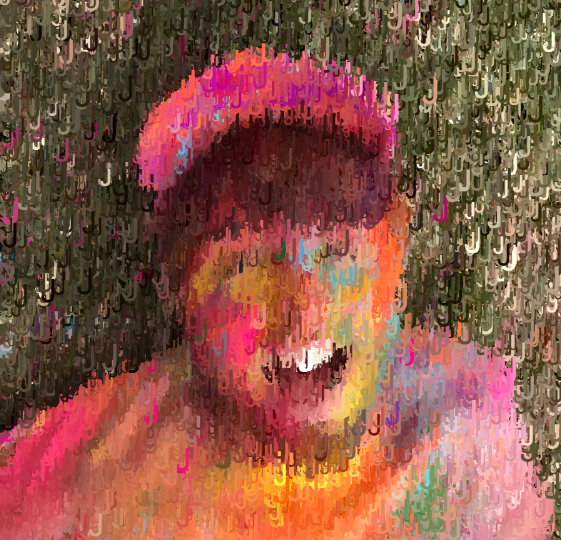
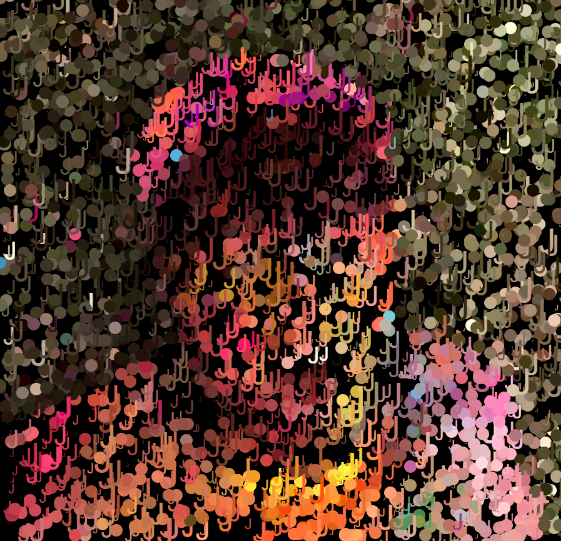
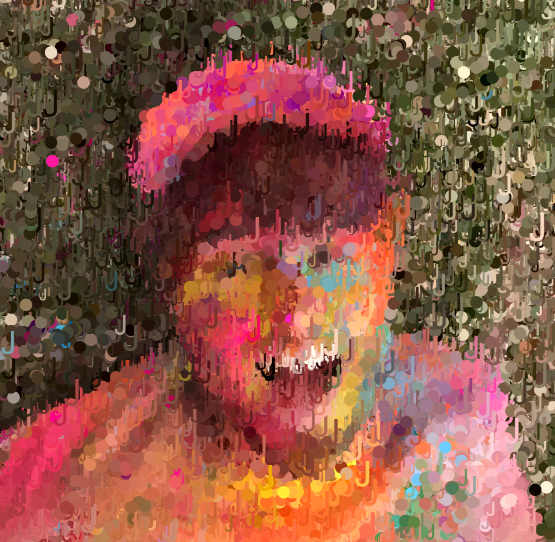
sketch

//Taisei Manheim
//Section C
//tmanheim@andrew.cmu.edu
//Assignment-09

var underlyingImage;
//starting grid size
var grid = 20;

function preload() {
    var myImageURL = "https://i.imgur.com/9Jjikbd.jpg";
    underlyingImage = loadImage(myImageURL);
}

function setup() {
    createCanvas(360, 480);
    background(255);
    underlyingImage.loadPixels();
}

function draw() {
    //creates grid of circles
    noStroke();
    for (var x = 0; x < underlyingImage.width; x += grid) {
        for (var y = 0; y < underlyingImage.height; y += grid) {
            var theColorAtLocationXY = underlyingImage.get(x, y)
            fill(theColorAtLocationXY);
            ellipse(x, y, grid, grid);
        }
    }
}

function keyTyped() {
    //if grid reaches 5 it wont get smaller (or else it would crash)
    if (grid < 5) {
        grid = 5;
    }
    //if grid reaches 100 it wont get bigger
    if (grid > 100) {
        grid = 100;
    }
    //if you hit u key size of grid would increase
    if (key === 'u') {
        clear(); //need this or else old grids would show underneath
        grid += 1
    }
    //if you hit d key size of grid would decrease
    if (key === 'd') {
        clear(); //need this or else old grids would show underneath
        grid -= 1
    }
}

For my portrait I did a picture of myself.  When I first started this project I was experimenting with the amount of circles in a grid to create a more abstract or realistic portrait.  I then thought it would be interesting to have it controllable so that people looking at the portrait could control the resolution.  I tried to tie the grid size to mouse location at first but it was too much for the program to process that quickly so I made it so that you hit the ‘u’ and ‘d’ key to move the grid amount up and down.

Starting position (grid size at 20). Medium level abstractness.
Grid size at 5 (lowest limit). Higher level of realism.
Grid size at 100 (highest limit). Higher level of abstraction.
Original picture.

Monica Chang – Looking Outwards – 09

Refik Anadol’s portfolio
http://refikanadol.com/works-grid
Melting Memories by Refik Anadol

For this Looking Outwards post, I was intrigued by one of Kristine Kim’s Looking Outwards post where she looked into the artist, Refik Anadol. Something that really pulls me towards Anadol’s whole portfolio is his ability to create visuals that are able to take the viewers to an alternate universe. Kristine also articulates his ability to play around with the functionalities of that of architectural characteristics which makes sense when his pieces often take the space into account when being presented.

There is one particular piece which Kristine included in her response which was Melting Memories by Anadol which held a concept of materializing memory. It was interesting to see something so fragile and non-tactile like memory was manifested into a visual and perceptive form. With methods like this, Anadol is able to create a new world with digital processed as Kristine also mentions in her response. Anadol’s body of work consists of these ideas of materializing areas/things in the world where one would not really be able to visual or imagine in physical form and he wants to create a path towards a future that connects the digital world with the one that surrounds us already.

Joseph Zhang – Looking Outwards – 09

http://refikanadol.com/works/melting-memories/

For this week, I looked at Jenny Lee’s Looking Outward-07 article focused on Refik Anadol and his project Melting Memories. Refik is a computational media artist who blurs the lines between computation and installation-based digital art.

https://courses.ideate.cmu.edu/15-104/f2019/category/looking-outwards-07/

Like Jenni, I am also completely fascinated by Refik’s algorithmic methods and uses of brain data. It’s always really incredible to see the thought process behind certain projects and this was one of them. I was also in love with the way Refik decided to actually render the information in visual graphics. The forms are so elegant and natural, but so clearly computational.

Below are screenshots of data used in the project. Seeing the backend of Refik’s practices is really inspiring to analyze.

Ankitha Vasudev – Looking Outwards – 11

Reactive Canopy is a project by Caitlin Morris, made in 2011. Caitlin Morris is a designer, researcher and educator who uses various software and digital fabrication techniques to create projects relating to the theme of perception and the human-environment relationship. She is currently a research assistant at the MIT Media Lab and has previously taught at NYU and Parsons. As a student she studied Design and Technology, Architectural Building Sciences and Cognitive Psychology.

Reactive Canopy interests me because it combines traditional architectural modelling using Rhino with algorithmic computer vision using openFrameworks (and Grasshopper – parametric design).

Process of creating Reactive Canopy using grasshopper, openFrameworks and Rhino

This project consists of a canopy (modeled in Rhino and Grasshopper) situated overhead that people pass under as they walk past. Cameras track motion below the canopy that causes the apertures of the canopy to open, which creates areas of light on those passing by. The motion data of pedestrians is collected using openFrameworks and passed onto Rhino and Grasshopper.

Demonstration of Reactive Canopy

Click here to watch a video that shows how amount of motion from frame to frame in openFrameworks is translated to aperture size in a Grasshopper model.

Xiaoyu Kang – Looking Outwards – 09

For this assignment, I looked at Xu Xu’s looking outward 05: 3D computer graphics. She looked at the work of Alexey Kashpersky, who is a 3D digital artist. Kashpersky’s work mostly focused on CG art and 3D modeling and printing.

For this particular project, by modeling a series of virus, he attempted to raise people’s awareness through his artwork. He created a beautiful model of Hepatitis C to remind people the deadliness of virus despite their visually pleasing appearance. Through his artwork, he tried to make people be aware of the danger of HCV infection and bloodborne pathogens.

In Xu’s looking outward, she stated how she really appritiate the cleaness of Kashpersky’s model and how she thinks the VR technology really helps to create a sense of realism. I agree with her that the artist is admirable in putting a lot of effort into makeing the model perfect. The result product definitly captures people’s attentation. But I also think the artist’s intention of wanting to help people with his artwork is admirable and how he actually achieved his goal of creating awareness through his work. 

Xu Xu’s original post: https://courses.ideate.cmu.edu/15-104/f2019/2019/09/24/xu-xu-looking-outwards-05/

Project website: https://kashpersky.com/hepatitis-c-virus

YouieCho-LookingOutwards-09

A snapshot of “blue scrolling” by Dan Gries

Blog: https://courses.ideate.cmu.edu/15-104/f2019/2019/10/04/jina-lee-looking-outwards-06/

Original Work: http://rectangleworld.com/blog/archives/733

This is a randomness project that Jina explored on her LO. When I first took a look at this project on the artist’s website, I was surprised to see that it was animated because I didn’t imagine “scrolling endlessly” in such a dynamically animated way. Like Jina said, it is very interesting that the color and pattern is randomized, but the overarching system is very systematic. I was personally fascinated by the choice of spot color and gradient in this specific work. The gradient is not used simply in a decorative way, but it adds an interesting depth across the work, and the red becomes an important spot color that highlights the form and flow of a single braid. To add on to the post, the braid group consists of braid diagrams that have n strings that are attached to n points at the top and bottom of the diagram. Each braid is attached at the string ends to another braid to form a longer braid, then the whole braid is shrunk down vertically in half for an appropriate scale.

Emma NM-LO-11

Caroline Sinders Nudge

Caroline Sinders created a prototype of a wearable watch that told time in terms of user’s schedule. She uses Python, Google Calendar API, Arduino, LEDs, Illustrator to create this prototype. I like that it is a new way of thinking about time and the idea makes sense to me. We typically only want to know the time in reference to an event, so this watch will tell us how much time we have left until that event. I would be curious to try this way of telling time out and see how it works for me.

Caroline Sinders is in her own words a “machine learning designer/user researcher, artist, and digital anthropologist.” She is interested in natural language processing and how it intersects with artificial intelligence, abuse, online harassment, and politics in digital, conversational spaces. She founded Convocation Design + Research agency. Here they focus on the intersections of machine learning, user research, designing for public good, and solving difficult communication problems.

Ankitha Vasudev – Project 09 – Computational Portrait

sketch

// Ankitha Vasudev
// ankithav@andrew.cmu.edu
// Section B
// Project 09

var portrait;

// load image of friend
function preload() {
	var ImageURL = "https://i.imgur.com/vtBUV2J.jpg";
	portrait = loadImage(ImageURL);
}

function setup() {
	createCanvas(450, 437);
	background(0);
	frameRate(1000);
	portrait.loadPixels();
}

function draw() {
	var x = random(width);
	var y = random(height);
	var px = constrain(floor(x), 0, width);
	var py = constrain(floor(y), 0, height);
	var size = random(1, 30);
	var colorxy = portrait.get(px, py);
	var colmouse = portrait.get(mouseX, mouseY);
    
    //circles controlled by mouse
    fill(colmouse);
    ellipse(mouseX, mouseY, 10);
    
    //text "J" to fill canvas
    noStroke();
    fill(colorxy);
    textSize(size);
    textFont('Arial');
    text("J", x, y);
}

This project was fun to do because I liked playing with different shapes and text and watching the pixels create the image. I chose a picture that I took of my friend a few months ago. I like this image because of how colorful it is. The images below show different stages of progress during this project.

Original picture of my friend

Claire Lee – Looking Outwards – 09

Weather Thingy by Adrien Kaeser

I decided to write about the project cited in Katrina Hu’s Looking Outwards-04, called the Weather Thingy. Created by Adrien Kaeser, the Weather Thingy is a real-time climate sound controller that essentially converts climactic data into instrument-friendly midi data. One aspect that I found particularly interesting was that the creator put a special focus on being able to listen to the real-time impact of the weather on a piece. I think this project captures a little piece of a moment in a very unique way, and I thought it was interesting how it was similar in concept (and presumably execution) to Pierry Jacquillard’s Prélude in ACGT, which I wrote about in one of my previous blog posts. It just goes to show that the modern conception of art is very different from the traditional paint-on-canvas ideas– the versatility of code even allows us to create art out of seemingly mundane data.

Claire Lee – Project 09 – Computational Portrait

project09

/* 
Claire Lee
15-104 Section B
Project-09
*/

var portraitImage;

function preload() {
    var portraitImageURL = "https://i.imgur.com/yxlQW1j.jpg"
    portraitImage = loadImage(portraitImageURL);

}

function setup() {
    createCanvas(600, 800);
    background(0);
    portraitImage.loadPixels();
    frameRate(100);
}

function draw() {
    var px1 = random(width);
    var py1 = random(height);
    var px2 = px1 + random(-20, 20);
    var py2 = py1 + random(-20, 20);
    var px3 = px1 + random(-20, 20);
    var py3 = py1 + random(-20, 20);
    var px4 = px1 + random(-20, 20);
    var py4 = py1 + random(-20, 20);
    var ix = constrain(floor(px1), 0, width - 1);
    var iy = constrain(floor(py1), 0, height - 1);
    var colorAtXY = portraitImage.get(ix, iy);

    noStroke();
    fill(colorAtXY);
    quad(px1, py1, px2, py2, px3, py3, px4, py4);

}

This portrait project was really interesting because we got to work with inserting and manipulating images from external sources. It took me a while to understand what each piece of code was meant to do, but it turned out to be fairly straightforward. I tried experimenting with different degrees of randomness for the shapes. Orignally, I was trying to go for a clean-cut geometric look, but I ended up liking the look of multi-layered small shapes better because the smaller shapes kind of resemble rough brushstrokes.

The “finished” portrait
Original image. This is a self-portrait!