Sihand – Final Project – Snapchat Dog Filter

Dog Filter

filter demonstration

My initial proposal was to create a piece of shadow art. However as I proceeded with the project, I realized that it wasn’t feasible because of two reasons. First is that based on what I am capable of, creating a sufficiently detailed silhouette will cause the image to load very slowly, but in order to make it load at an acceptable speed, the compromise in quality is too big. Second is that the implementing different “monsters” further bogged down the program and was not able to achieve what I pictured.

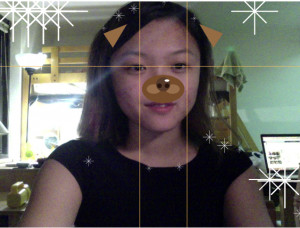
However, during the course of exploration, I figured out that the falling effect resembles that of a snapchat filter to some extent. So I decided to recreate a primitive version of Snapchat’s signature filter – The Snapchat Dog Filter – and add in some falling snow, since it’s almost Christmas.

To play around with it, carefully place one eye at its corresponding crosshair point, and the filter will come into effect! Have fun!

sihan 23:09

//Sihan Dong
//sihand@andrew.cmu.edu
//Section B
//FINAL PROJECT: snapchat filter

var px;
var py;
var darknessThreshold = 10;
var outlines = [];

//update the falling stuff
function outlineUpdate() {
    var theColorAtPxPy = myCaptureDevice.get(this.px, this.py);

    if(isColor(theColorAtPxPy)){
        var theBrightnessOfPxPy = brightness(theColorAtPxPy);
        if (theBrightnessOfPxPy > darknessThreshold) {
            this.py = this.py + 3;
    } 
 
    while (this.py > 0 & theBrightnessOfPxPy < darknessThreshold) {
            this.py = this.py - 3;
            col = myCaptureDevice.get(this.px, this.py);
            if (isColor(col)) {
                theBrightnessOfPxPy = brightness(col);
            } 
        }     
    }
    
}


function isColor(c) {
    return (c instanceof Array);
}
 

//draw the falling snow
function outlineRender() {

    var theColorAtPxPy = myCaptureDevice.get(this.px, this.py);
    if(isColor(theColorAtPxPy)){
        var theBrightnessOfPxPy = brightness(theColorAtPxPy);
    
            stroke(255);
            strokeWeight(theBrightnessOfPxPy/20);
            
            //render the flake
            line(this.px - theBrightnessOfPxPy, this.py, this.px+theBrightnessOfPxPy, this.py);
            line(this.px, this.py + theBrightnessOfPxPy, this.px, this.py - theBrightnessOfPxPy);
            line(this.px - theBrightnessOfPxPy/2, this.py - theBrightnessOfPxPy/2,
                        this.px + theBrightnessOfPxPy/2, this.py + theBrightnessOfPxPy/2);
            line(this.px + theBrightnessOfPxPy/2, this.py - theBrightnessOfPxPy/2,
                        this.px - theBrightnessOfPxPy/2, this.py + theBrightnessOfPxPy/2);
        
        
        fill(255, 255, 255, 100 - theBrightnessOfPxPy);


    }
}

//start from the top once the falling snow reach the bottom
function outlineReset() {
    if (this.py > height-3) {
        this.py = 0;


    }
}


//the object function that make the falling snow
function makeOutline(inputX, inputY){
    outline = {px: inputX, py: inputY, 
            update: outlineUpdate,
            reset: outlineReset,
            render: outlineRender  
           };
    return outline;
}


//draw the eye detector
function drawGrid(){
    stroke(246, 192, 94);
    strokeWeight(1);
    line(300, 0, 300, height);
    line(400, 0, 400, height);
    line(0, 2*height/7, width, 2*height/7);
   
}

//draw the left ear of the filter
function drawLeft(lx, ly){
    fill(149, 108, 67);
    noStroke();
    triangle(lx, ly + noise(60), lx - 20, ly - 30+ noise(60), 
        lx + 30, ly - 50+ noise(60));

}

//draw the right ear of the filter
function drawRight(rx, ry){
    fill(149, 108, 67);
    noStroke();
    triangle(rx, ry + noise(60), rx + 20, ry - 30, 
        rx - 30, ry - 50);

}

//draw the nose of the filter
function drawMiddle(mx, my){
    fill(117, 76, 43);
    ellipseMode(CENTER);
    ellipse(mx, my + 10, 90, 60);

    fill(152, 111, 77);
    ellipse(mx - 20, my + 10, 30, 20);
    ellipse(mx + 20, my + 10, 30, 20);
    
    fill(86, 58, 43);
    ellipse(mx, my, 30, 30);

    fill(39, 19, 12);
    ellipse(mx - 8, my + 3, 10, 10);
    ellipse(mx + 8, my + 3, 10, 10);

    fill(255);
    ellipse(mx + 8, my - 8, 10, 5);

}

function setup() {
    createCanvas(640, 480);
    myCaptureDevice = createCapture(VIDEO);
    myCaptureDevice.size(640, 480); // attempt to size the camera. 
    myCaptureDevice.hide(); 
    
    var nb = 20;
    var pointPosition = 0;
     for (var i = 0; i < nb; i++) {

        pointPosition++;
        var outlineFormation = makeOutline(pointPosition*width/nb, 0);//, height - 20);
        outlines.push(outlineFormation);

    }
}

function draw(){
    background(220);
    myCaptureDevice.loadPixels(); //camera setup
    image(myCaptureDevice, 0, 0);
    noStroke();
    
    drawGrid();
    var colorOfEye1 = myCaptureDevice.get(width*4/9, 2*height/7);
    var colorOfEye2 = myCaptureDevice.get(2*width/3, 2*height/7);
    var bOfEye1 = brightness(colorOfEye1);
    var bOfEye2 = brightness(colorOfEye2);
    
 //if either eye is detected at the crosshair, start the filter
    if (bOfEye1 < 20 || bOfEye2 < 20){
        push();
        translate(30, 50);
        drawLeft(width/3, height/10);
        drawRight(2*width/3, height/10);
        drawMiddle(width/2, height/5 + 30);
        pop();


        for (var i = 0; i < outlines.length; i++) {
            var silhouette = outlines[i];
            silhouette.update();
            silhouette.reset();
            silhouette.render();
        }
    }
    
    print(bOfEye1);
}


sihand – Project Proposal

What’s in the Shadows?

As you’ve probably guessed, my final project is going to be on shadows! Well, for it to look like shadows, at least.

Here’s a very rough sketch:

shadow

I want to create a changing shadow according to movements of the mouse. As the mouse moves around the “item” places in the middle, a shadow will be generated as if the light was cast on the “item” from where the cursor rests.

The additions to the shadow will be made randomly, but I would like them to follow some basic rules. For example, as indicated in the sketch, a closed space will be interpreted as an eye and a protruding shape will have spikes and/or tentacles generated on it. (I’m not sure if this will be too challenging, since the original work was made by “blob detection.”)

I would also like to add the music element to it. Depending on the progress of major part – monster generation – I would like to add various sound effects as different interpretations are made. But regardless, I will have a background music.

At this point, I haven’t thought through how I am going to achieve the visual effect that I intend to achieve. I would very much like to get some suggestions!

sihand – LookingOutwards 12 – Prior Art

Shadow Art

Rubber duck turned into burglar

The first piece of art that inspired my to-be final project is illustrations by artist Vincent Bal. Bal, a Belgium filmmaker and illustrator, finds sparks in everyday objects. By clever use of lighting, angle, and a tad of imagination, he creates playful doodles of the shadows. His drawings particularly interested me because of how well he manipulates angles and produces interesting results based on them.

Tinted glass turned into the sea and the sky

Another piece of shadow art that inspired me was Shadow Monsters by Philip Worthington. Shadow Monsters was Worthington’s project at the Royal College of Art. His project adds a whimsical twist to the usual shadow puppet fun. As told by Worthington himself, the installation consists of a light box that produces the perfect silhouette, which is fed into a real-time program. The algorithm utilized “blob detection” that isolates, analyzes, and assumes features of the curvature of the shadows. In such, an arm movement can be captured and interpreted into a fire-breathing mouth.

It’s a technological magic trick.   -Philip Worthington

Doodles by Vincent Bal from thisiscolossal

Another video on Shadow Monsters


sihand – Project Week 11 – Free Turtle

sketch-sihan

//Sihan Dong
//sihand@andrew.cmu.edu
//Section B
//Week 11: Project turtle

var gravity = 0.3;   // downward acceleration
var springy = 0.7; // how much velocity is retained after bounce
var drag = 0.0001;    // drag causes particles to slow down
var np = 50;      // how many particles
var turtleColor = [];

function particleStep() {
    this.age++;
    this.x += this.dx;
    this.y += this.dy;
    stroke(this.dr, this.dg, this.db);
    strokeWeight(this.dw);
  
    if (this.x > width) { // bounce off right wall
        this.x = width - (this.x - width);
        this.dx = -this.dx * springy;
    } else if (this.x < 0) { // bounce off left wall
        this.x = -this.x;
        this.dx = -this.dx * springy;
    }
    if (this.y > height) { // bounce off bottom
        this.y = height - (this.y - height);
        this.dy = -this.dy * springy;
    } else if (this.y < 80) { // bounce off top
        this.y = 80 - (this.y - 80);//-this.y;
        this.dy = -this.dy * springy;
    }
    this.dy = this.dy + gravity; // force of gravity
    // drag is proportional to velocity squared
    // which is the sum of the squares of dy and dy
    var vs = Math.pow(this.dx, 2) + Math.pow(this.dy, 2);
    // d is the ratio of old velocty to new velocity
    var d = vs * drag;
    // d goes up with velocity squared but can never be
    // so high that the velocity reverses, so limit d to 1
    d = min(d, 1);
    // scale dx and dy to include drag effect
    this.dx *= (1 - d);
    this.dy *= (1 - d);

}

function particleDraw() {
    point(this.x, this.y);
}


// create a "Particle" object with position and velocity
function makeParticle(px, py, pdx, pdy, pr, pg, pb, pw) {
    p = {x: px, y: py,
         dx: pdx, dy: pdy, 
         dr: pr, dg: pg, db: pb,
         dw: pw,
         age: 0,
         step: particleStep,
         draw: particleDraw
        }
    return p;
}

var particles = [];


function setup() {
    createCanvas(500, 500);
    frameRate(8);
    turtleSlope = new makeTurtle(0, 0);

}


function draw() {
  background(184, 197, 245);

  //draw the chains
	for (i = 0; i < 25; i++) {
    turtleSlope.penUp();
    turtleSlope.right(30);
    turtleSlope.setColor(255);
    tSlope(20*i, 70); //1
    turtleSlope.setColor(0);
    tSlope(width/2, height/2-20); //2
    turtleColor[i] = color(random(100, 255), random(100, 255), random(100, 255));
    turtleSlope.setColor(turtleColor[i]);
    tSlope(100*i, 370); //3
    fill(0); 
	}

    if (mouseIsPressed) {
        var newp = makeParticle(mouseX, mouseY,
                                random(-10, 10), random(-10, 0), 
                                255, 255, 255,
                                random(10, 30));
        particles.push(newp);
    }

    newParticles = [];
    for (var i = 0; i < particles.length; i++) { // for each particle
        var p = particles[i];
        p.step();
        p.draw();
        if (p.age < 200) {
            newParticles.push(p);
        }
    }
    
    particles = newParticles;

}

function tSlope(lx, ly){
	turtleSlope.goto(lx, ly);
  turtleSlope.setWeight(4);
  turtleSlope.right(90);
  turtleSlope.forward(random(7));//the amount of fluctuation
  
  turtleSlope.penDown();
  turtleSlope.left(60);
  turtleSlope.forward(10);
  turtleSlope.right(60);
  turtleSlope.forward(10);
  turtleSlope.right(30);
  turtleSlope.forward(17.3);
  turtleSlope.right(120);
  turtleSlope.forward(17.3);
  turtleSlope.right(30);
  turtleSlope.forward(10);
  turtleSlope.right(60);
  turtleSlope.forward(10);
  turtleSlope.right(30);
	turtleSlope.penUp();

}

//========== TURTLE GRAPHICS ===============//
function turtleLeft(d) {
    this.angle -= d;
}
 
 
function turtleRight(d) {
    this.angle += d;
}
 
 
function turtleForward(p) {
    var rad = radians(this.angle);
    var newx = this.x + cos(rad) * p;
    var newy = this.y + sin(rad) * p;
    this.goto(newx, newy);
}
 
 
function turtleBack(p) {
    this.forward(-p);
}
 
 
function turtlePenDown() {
    this.penIsDown = true;
}
 
 
function turtlePenUp() {
    this.penIsDown = false;
}
 
 
function turtleGoTo(x, y) {
    if (this.penIsDown) {
      stroke(this.color);
      strokeWeight(this.weight);
      line(this.x, this.y, x, y);
    }
    this.x = x;
    this.y = y;
}
 
function turtleSetColor(c) {
    this.color = c;
}
 
function turtleSetWeight(w) {
    this.weight = w;
}
 
function makeTurtle(tx, ty) {
    var turtle = {x: tx, y: ty,
                  angle: 0.0, 
                  penIsDown: true,
                  color: color(128),
                  weight: 1,
                  left: turtleLeft, right: turtleRight,
                  forward: turtleForward, back: turtleBack,
                  penDown: turtlePenDown, penUp: turtlePenUp,
                  goto: turtleGoTo, 
                  setColor: turtleSetColor, setWeight: turtleSetWeight,
                  };
    return turtle;
}

I’ve wanted to experiment with how turtle moves so I did so with this project. The turnout is not exactly ideal and I will continue practicing with turtles.

I also experimented with the particles because I think their movements are fascinating.

Sihand – LookingOutwards 11 – Sound Art

Project VoCo by Adobe

With just 20 minutes of prep work, you can have anyone say anything. -Geektime on Project VoCo

At some point of our lives, we’ve all witnessed the borderline sorcery power of Adobe Photoshop. Recently, an announcement at MAX 2016 brought the jaw-dropping power of Project VoCo, known as the “photoshop for audio contents”, into attention. Here’s a sneak peek of its magical power:

As part of Adobe’s Creative Cloud, Project VoCo features state-of-the-art audio editing capabilities. According to Zeyu, who unveiled the product, provided with a 20-minute speech of a person, Project VoCo will be able to generate any word, phrases, and sentences in the his/her voice. Certain concerns are addressed, too. As much effort as Adobe is putting into generating audio that can pass reality check, Adobe is also building “watermarks” in synthesized audio that can be detected when necessary.

The algorithm was not discussed during the reveal, as one would expect. But Project VoCo essentially breaks down a speech into phonemes, and in piecing the phonemes together, “predicts” the unsaid speech. It is really fascinating to me because it is an advancement in fundamental technology, on which so many achivements can build.

Read more about the implications of Project VoCo here.

Sihand – LookingOutwards 10 – Women Practitioners

Milica Zec

As Virtual Reality technologies become more and more developed, many artists have turned to this new form of media as the canvas for their creation. Milica Zec is among the rising new artists in this field. Earlier in 2016, she debuted as a director at Sundance Film Festival New Frontier with a short piece, “Giant“, which is about a family struggling to survive in an active war zone.

Before exploring into the storytelling property of Virtual Reality, Zec was already an experienced film director. Her directorial work highlights the short film “Marina Abramovic Presents MACCOC, telling the life story of the legendary Serbian performance artist.

I really look forward to seeing more works of Zec, not only as a Virtual Reality Director, but also as a voice from a woman, of women.

Learn more about Milica Zec.

Sihand – project 10 – Generative Landscape

Pandora

This project was inspired by the landscape of the planet Pandora created by director James Cameron in the blockbuster Avatar.

sketch-pandora

//Sihan Dong
//sihand@andrew.cmu.edu
//Section B
//Project Week 10: generative landscape


var buds = [];
var terrainSpeed = 0.0001;
var terrainDetail = 0.007;


function setup() {
    createCanvas(600, 300); 
    
    // create the initial buds
    for (var i = 0; i < 10; i++){
        var budx = random(width);
        buds[i] = makeBuds(budx);
    }
    frameRate(50);
}


function draw() {
    background(0); 

    updateAndDisplayBuds();
    removeBudsThatHaveSlippedOutOfView();
    addNewBudsWithSomeRandomProbability(); 
    updateHalo();	
}

function updateHalo() {
    //update the halo's position
	for (var x = 0; x < width; x++) {
        var t = (x * terrainDetail) + (millis() * terrainSpeed);
        var y = map(noise(t), 0,1, 0, height/2);
        fill(90, 240, 248, 40);//upper halo
        ellipse(x, y, 2, 80);
        fill(37, 142, 242, 40);//lower halo
        ellipse(x, y+50, 2, 90);
    }
}

function updateAndDisplayBuds(){
    // Update the bud's positions, and display them.
    for (var i = 0; i < buds.length; i++){
        buds[i].move();
        buds[i].display();
    }
}


function removeBudsThatHaveSlippedOutOfView(){
    var budsToKeep = [];
    for (var i = 0; i < buds.length; i++){
        if (buds[i].x + buds[i].budWidth/2 > 0) {
            budsToKeep.push(buds[i]);
        }
    }
    buds = budsToKeep;
}


function addNewBudsWithSomeRandomProbability() {
    var newBudLikelihood = 0.03; 
    if (random(0,1) < newBudLikelihood) {
        buds.push(makeBuds(width));
    }
}

    
function budsMove() {
	this.x += this.speed;
}

function budsDisplay(birthLocationX) {
	fill(this.color);
	noStroke();
	
    //draw the flower
	push();
	translate(this.x, height);
	//draw the stem
    rect(0, -this.stemHeight-5, this.stemWidth, this.stemHeight+5);
	ellipseMode(CENTER);
	//draw the petals
    ellipse(0, -this.stemHeight-this.budHeight/2, this.budWidth, this.budHeight);
	ellipse(10, -this.stemHeight-this.budHeight/2, this.budWidth, this.budHeight);
	ellipse(-5, -this.stemHeight-this.budHeight/2-5, this.budWidth, this.budHeight-5);
	ellipse(15, -this.stemHeight-this.budHeight/2-5, this.budWidth, this.budHeight-5);
	ellipse(this.stemWidth/2, -this.stemHeight-this.budHeight/2-5, this.budWidth+5, this.budHeight+5);
	pop();
}

function makeBuds(birthLocationX) {
	var bds = {x:birthLocationX, 
			   speed: -1.5,
			   color: color(random(150, 200), random(180), 255,
			   	            random(100, 155)), //produce a blue-purple-ish color
			   stemHeight: random(10, height/2),
			   stemWidth: random(8, 10),
			   budHeight: random(40, 60),
			   budWidth: random(15, 25),
			   move: budsMove,
			   display: budsDisplay}
	return bds;
}

Here’s a preliminary sketch of the color choices. I did not end up doing the green leafy plants.

Pandora sketch
Pandora sketch

Here’s an image from the movie of which my project is a doodle-y representation.

Pandora landscape still from the movie Avatar

Sihand – Project Week 09 – Spiral

pixel-portrait-hillary
Finish View

sihand – pixel portrait

//Sihan Dong
//sihand@andrew.cmu.edu
//Section B
//Project Week 09: pixel portrait

var sAngle = 5;
var sRadius = 1;
var sFrameCount = 0;
var ellipseW = 5;
var portraitW;
var portraitH;

function preload() {
	var myImageURL = "http://i.imgur.com/GJ7CafK.jpg";
	portrait = loadImage(myImageURL);
}

function setup() {
    portraitW = portrait.width;
    portraitH = portrait.height;
    
    //canvas size is identical to that of the portrait
    createCanvas(portraitW, portraitH);
    background(240);
    portrait.loadPixels();
}

function drawSpiral() {
    //spiral starts at the middle of the canvas
    translate(width/2, height/2);
    var centerX = 0;
    var centerY = 0;
    var x = cos(radians(sAngle)) * sRadius;
    var y = sin(radians(sAngle)) * sRadius;

    //capture the color of the pixels
    noStroke();
    var theColorAtLocationXY = portrait.get(width/2 - x, height/2 + y);
    fill(theColorAtLocationXY);
    
    ellipseMode(CENTER);
    ellipse(centerX - x, centerY + y, ellipseW, ellipseW);
    
    //pixel dimensions
    sAngle = sAngle + 3; //the angle between rays of pixels
    sRadius = sRadius + 0.05; //the density of the spiral
    sFrameCount = sFrameCount + 1; //count of number of pixels
    ellipseW = ellipseW + .0003; //the increase in pixel size

    //when there are more than a certain number of pixels, start over
    if (sFrameCount > 10000) {
        sAngle = 5;
        sFrameCount = 0;
        sRadius = 1;
        ellipseW = 5;
        background(240);
    }

    print(frameCount);

}


function draw() {
	drawSpiral();
}

I experimented with a few images on pixel sizes, pixel distance, and spiral “density”. Overall, portraits with a focus in the middle work best for two reasons 1) when the distance between pixels is small,  more details are “smudged” towards the periphery; 2) when the distance is larger, the pixels are further apart towards the periphery, therefore depicting fewer details. Below are some screenshots.

Morticia
Since it’s almost Halloween….I ran Mortica Addams with my code. It is portrayed with smaller pixel sizes that increase more over frames, and closer pixel distance.
sihand-pixel
Another variance contains multiple spirals. For this one, I did not reset the spiral every time it reaches a count. Instead, I let it run over and over with modified dimensions each time.

Sihand – LookingOutwards 09 – 3D Rendering (from Christine Kim)

3D Rendering in Architecture

Christine Kim’s post [1] on 3D rendering captured my attention when I was looking through the posts for week 5. In her post, Christine discusses how the 3D rendering of an architectural piece often differs from the real experience, which is an increasing problem because it has compromised the trust between clients and architects. “Most of the time, the 3D computer graphic photos focus on artistic values of the render rather than the creating realistic experiential render”, Christine identifies the cause of the disparities, suggesting that clients should be more understanding of the gist the rendering, instead of focusing on the “realistic experience.”

3D Rendering v.s. Actual Office Space Credit: archdaily.com
3D Rendering v.s. Actual Office Space
Credit: archdaily.com

When I was reading the original article mentioned in Christine’s post [2], I noticed a recommended article by the website named “How to render your building to sell it, not just show it.”[3] It is interesting that, although most of the differences can be attributed to limitations of the rendering software and the variability of the reality, architects’ intentions might also play a crucial role. Just for clarification, I am not implying that architects knowingly deceive their clients; instead, architects are often forced to accentuate certain details of their designs to sell their projects to their clients. For example, going for an impactful POV (point of view) or composition instead of one that most accurately depicts the reality.

Going back to Kim’s advice to clients of not focusing on the”realistic experience”, a question arises: do the client actually want the “realistic experience” in a rendering, or rather a heightened representation that deviates from the reality within an acceptable amount?

[1] Christine (Hae Wann) Kim – LookingOutwards post

[2] “Are 3D renderings deceiving architects and clients?” read here

[3] “How to render your building to sell it, not just show it” read here

Sihand – LookingOutwards 08 – Burak Arikan

Burak Arikan and Network Mapping

Burak Arikan is an artist who finds his inspiration in two worlds, New York City and Istanbul. Arikan completed his master’s degree at the MIT Media Laboratory, where he explored networked systems that address “the transition from connectivity to collectivity” (eyeo speaker bio) in creative expression. Before his MIT experience, he received a M.A. degree in Visual Communication Design from Istanbul Bilgi University and a B.S. in Civil Engineering from Yildiz Technical University.

Graph Commons – Project Timeline-Map (Highlight on Marmaray)

Post MIT, Arikan founded Graph Commons Platform, which is dedicated to provide “network intelligence.” In his own words, he describes Graph Commons as a “collaborative network mapping platform and knowledge base of relationships.” Arikan believes that the modern day networks, whether it is social media input or social or economic issues, are rich with information and yet we have no handy tool to tap into such a resource. This is the exact vacuum where Graph Commons fits in, as a machinery which generates maps that render the relationship visible. Like how Arikan intended it to be, Graph Commons is a powerful tool that enables not only face collaboration, but also easy subtraction and isolation of information within a network. For example, this cumulative project timeline-map he presented at Eyeo below. Based on the infrastructure of the dataset, the resulting interactive map could be in various appearances, which are both interesting and informative to look at. A networked piece of information powered by Graph Commons can also shed new light on a discussed issue, by revealing previously overlooked connections.

Network is an unique medium for expression and for action.

Burak Arikan, Eyeo Festival 2014


Watch Arikan’s speech at Eyeo 2014 here

Burak Arikan: Eyeo Speaker bio 

Check out Graph Commons here