Flight Patterns

Aaron Koblin 2009

Aaron Koblin 2009
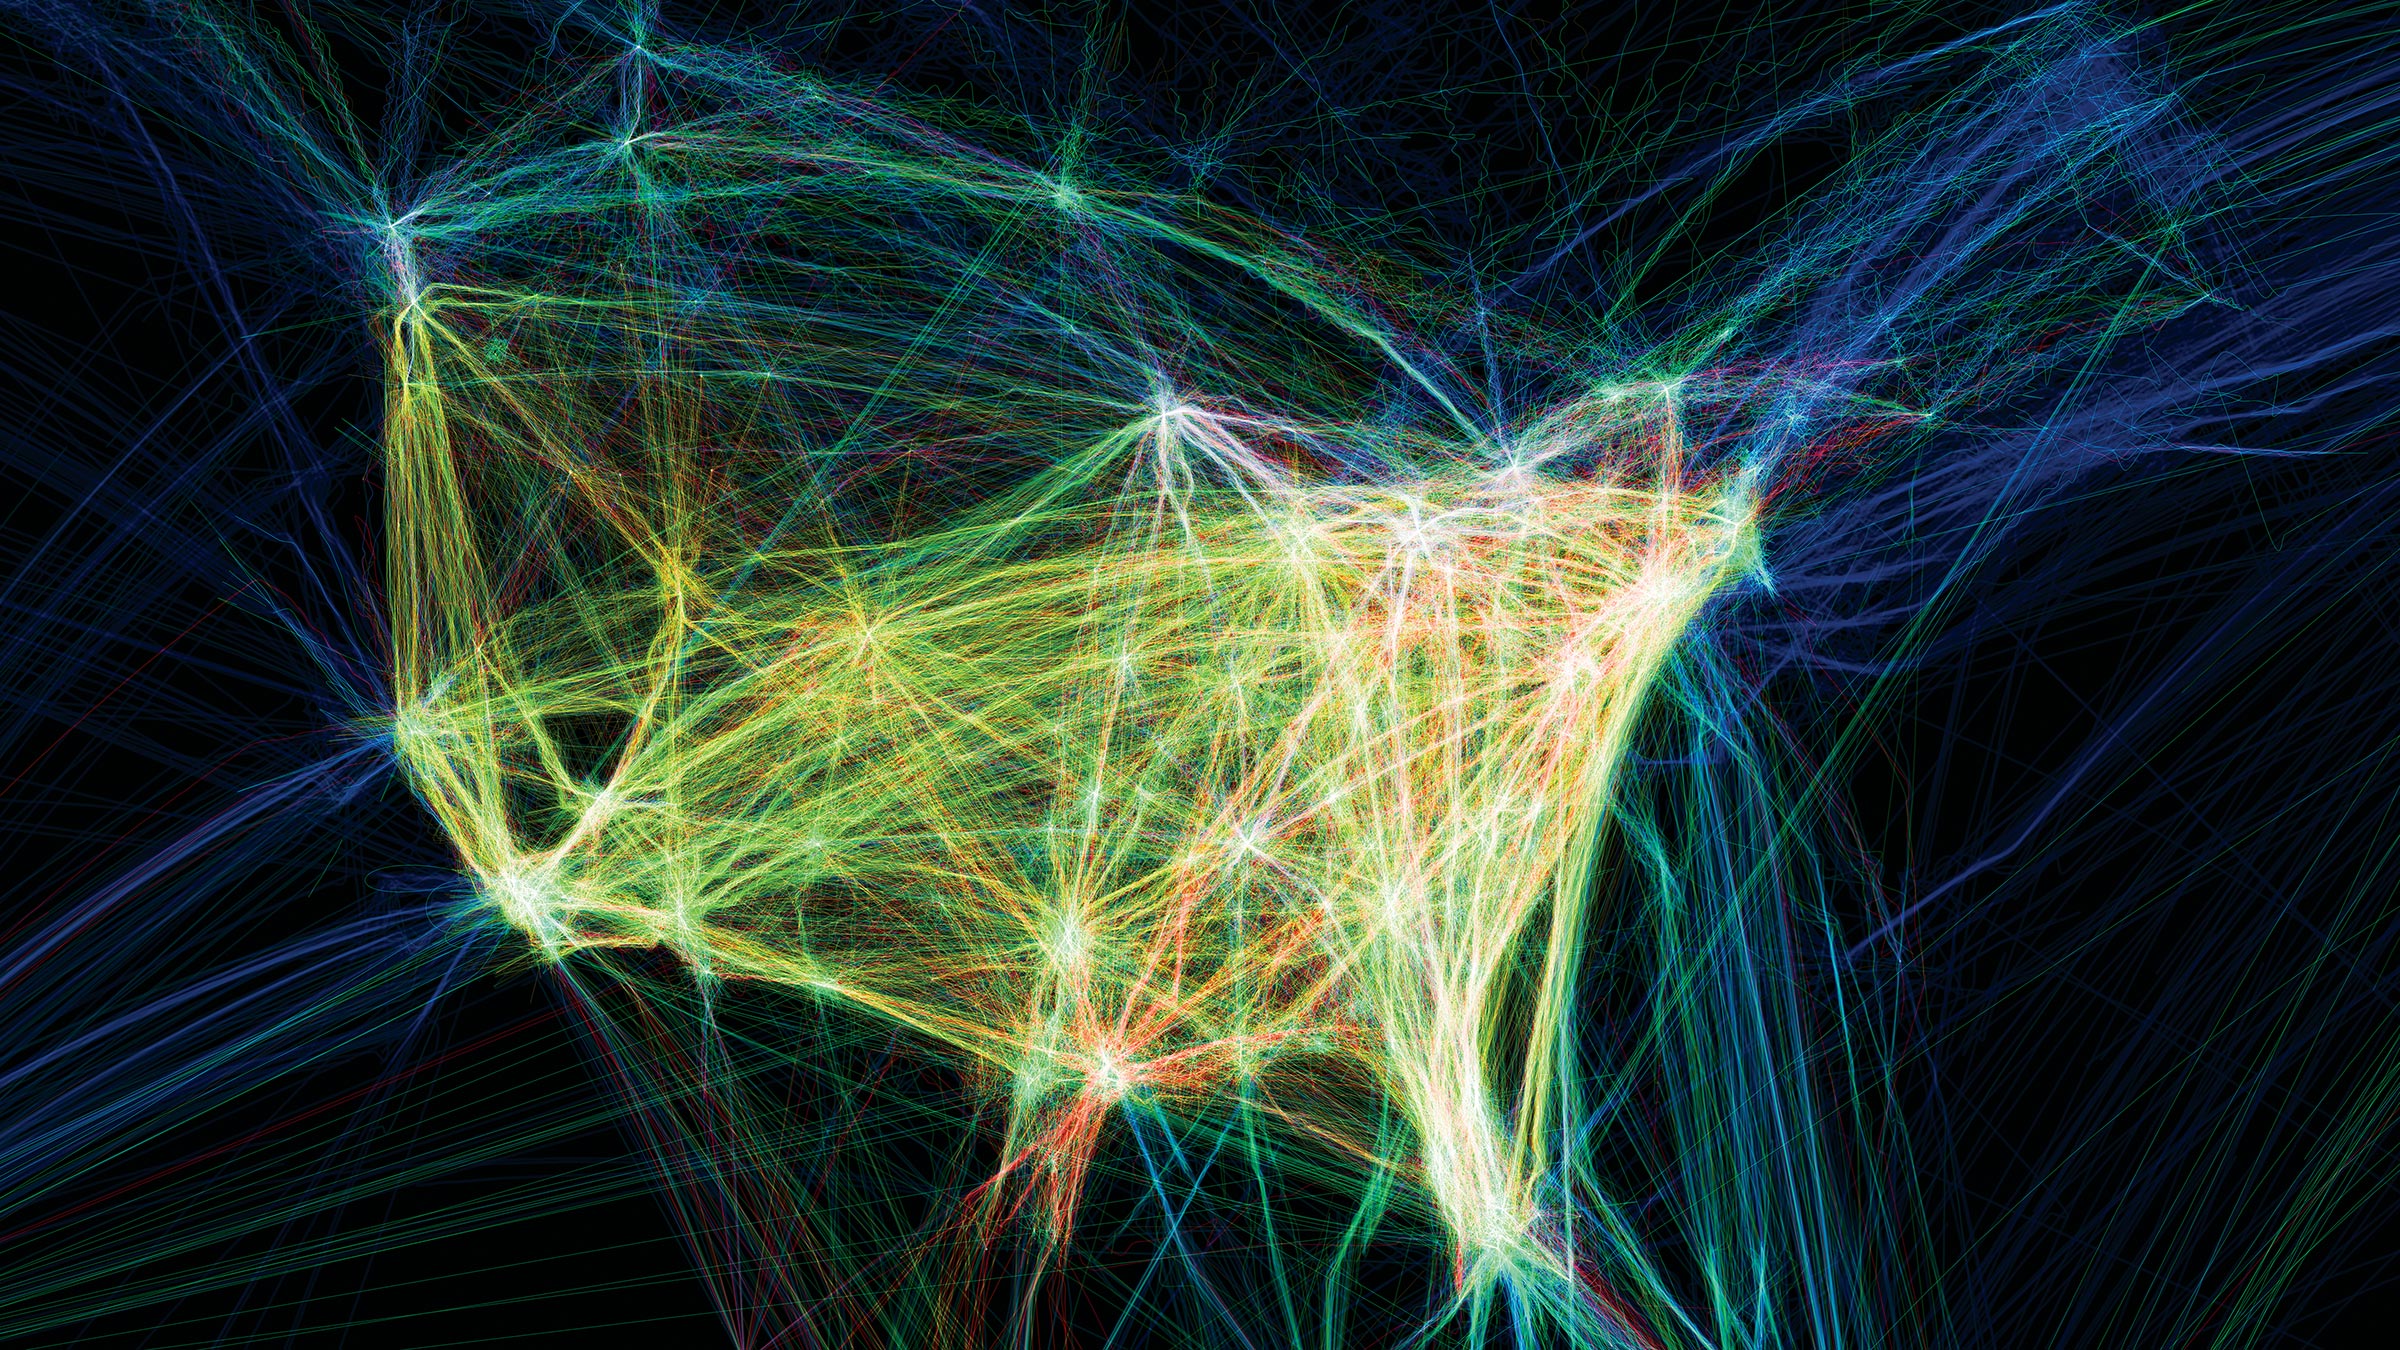
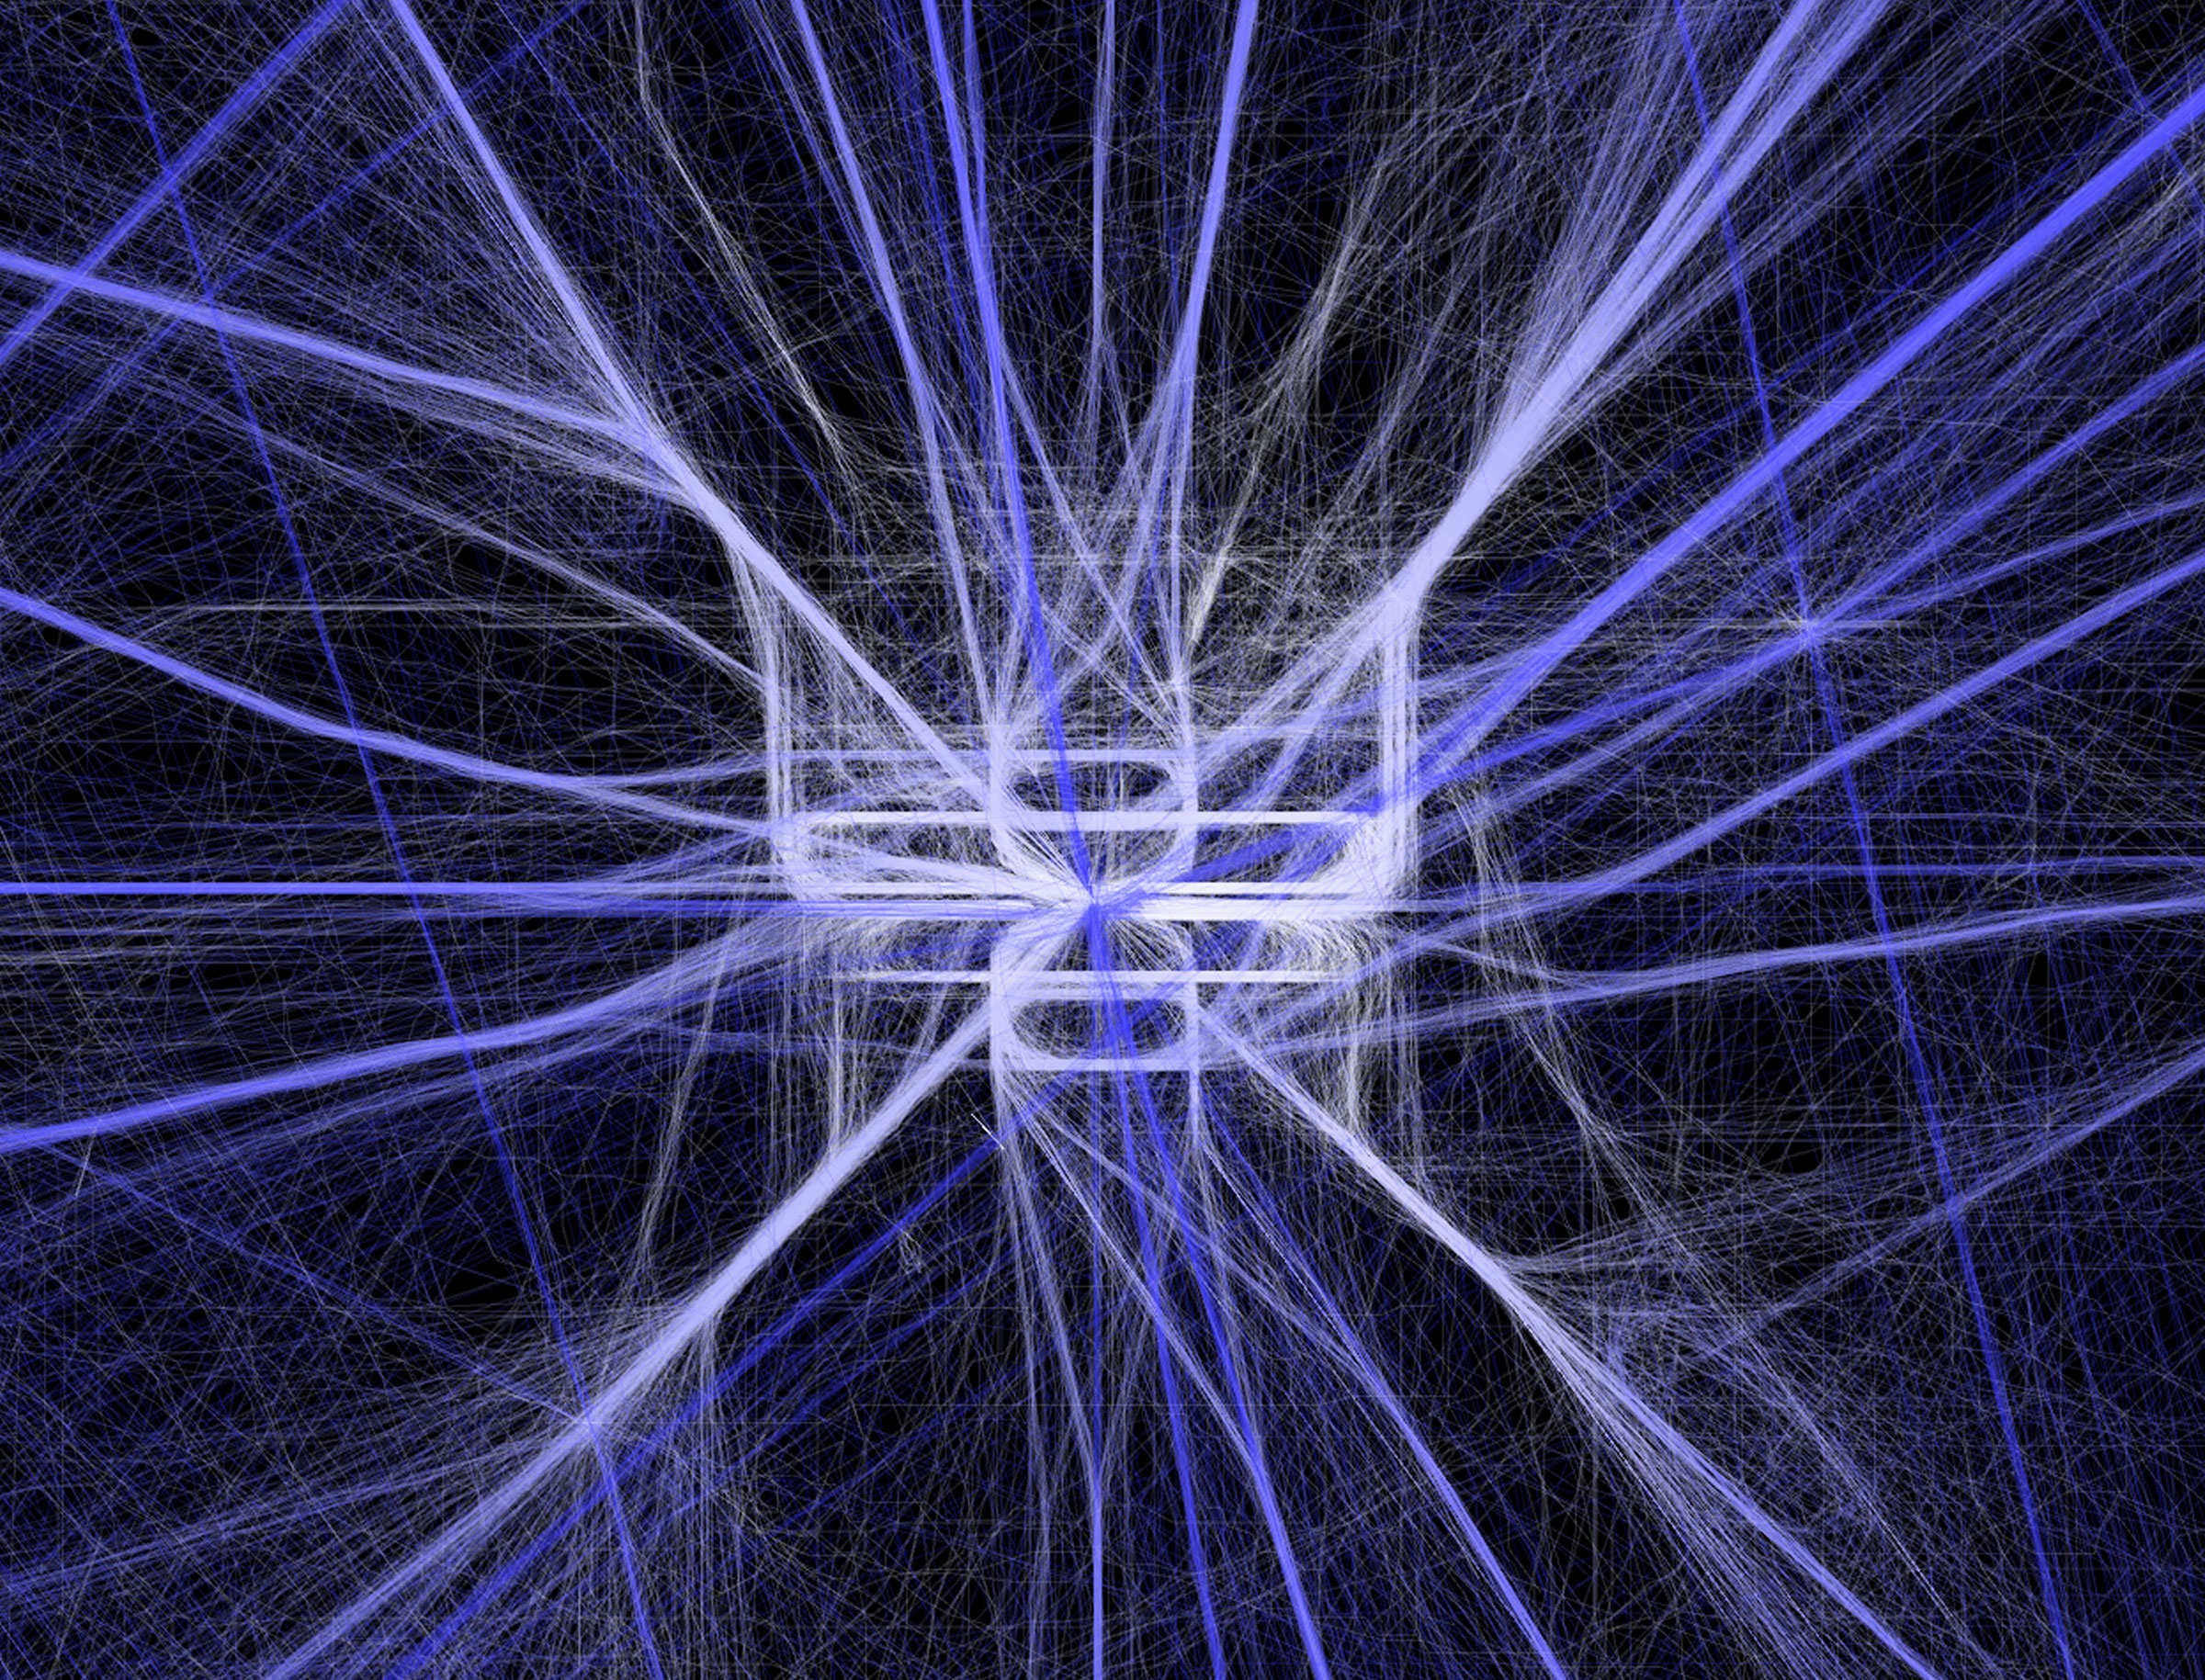
While browsing his website, I found Aaron Koblin’s visualization of flight patterns very interesting. Aaron is a great designer who has co-founded a virtual reality company called “Within” and had led the Google Data Arts team from 2008 to 2015. In his project “Flight Patterns”, he used data from FAA(Federal Aviation Administration) and mapped them onto the north American landscape. To do that, he parsed the data information and plotted them using the “Processing” programming environment. His data visualizes both in color and form. It is also extremely detailed even when zooming in closely. The flight routes naturally form clusters at where the airports are, making it visually compelling. In the animations, he presented a time lapse of the flight patterns, which lead the viewer to further visualize the information in a larger scale and in a new dimension(time).
Author: zhentinj@andrew.cmu.edu
Denise Jiang-Looking Outwards 06
Ramdom #1
Nicholas Hanna
2014
Nicholas Hanna is an artist and inventor who resides in Los Angeles. This piece of installation art called “Random #1” was created in 2014. All of the circles have a side that is black and the other white. They are joined to the structure frame by two pivot points. They are able to flip sides according to random algorithms.The motion of these circles flipping sides also make sounds according to the flipping rate. I think this piece is aesthetically satisfying that the circles are organized in a rational way but the movement is not. The randomness makes the whole piece interesting and the speed is just right to make noticeable changes without redundancy.
Denise Jiang-Project 06
My project is 800*800, but the full width wouldn’t show. The idea is that within one minute, the egg is going to be fried, so the color is changing gradually(orange to yellow). The pan is going to turn every minute. There is also a dozen of eggs representing the current hour. Every hour an egg is going to disappear from the box. sketch
function setup() {
    createCanvas(800, 800);
}
function draw() {
	var S=second();
	var mappedS=map(S,0,60,0,600);
	background(220);
	//second
	rectMode(CORNER);
	noStroke();
	fill(200);
	rect(40,90,600,20);//darker background
	noStroke();
	fill("white");
	rect(40,90,mappedS,20);//second
	strokeWeight(1);
	//fill(0);
	//text(S,30,70);
	//little clock
	fill(200);
	ellipse(690,100,30,30);
	strokeWeight(2);
	stroke(150);
	line(690,100,690,86);
	line(690,100,700,100);
	//pan
	noStroke();
	fill(100);
	ellipse(width/2,height/2,250,250);//gray outer layer
	angleMode(DEGREES);
	push();
	translate(height/2,width/2);
	rotate(minute()/5*30);
	rectMode(CORNERS);
	rect(0,0,-20,-250);	//handle
	ellipse(-10,-250,20,20);
	pop();
	fill(60);
	ellipse(width/2,height/2,220,220);//dark inner layer
	//egg
	fill("white");
	noStroke();
	ellipse(width/2-10,height/2,100,90);
	var r=map(S,0,60,255,251);
	var g=map(S,0,60,127,238);
	var b=map(S,0,60,80,167);
	fill(r,g,b);
	ellipse(width/2,height/2,30,30);
	println();
	//hour
	var eggX=120;
	var boxX=60;
	var baseX=105;
	for (i=0;i<12-hour()%12;i++){
	fill("white");
	noStroke();
	ellipse(eggX,720,38,53);//one egg
	eggX+=50;
	}
	//box
	fill(158, 151, 142);
	noStroke();
	quad(boxX,725,boxX+670,725,boxX+650-20,760,boxX+40,760);
	for(i=0;i<12;i++){
		fill(158, 151, 142);
		noStroke();
		rectMode(CORNERS);
		rect(baseX,760,baseX+30,770);
		baseX+=50;
	}
}
Denise Jiang-Project 05
function setup() {
    createCanvas(500,600);
}

function draw() {
	background(230);
		for (var y1=-150; y1<height+120; y1=120+y1){
			for(var x1=0; x1<width+120; x1++){
				var x2=x1-30;
				var x4=x1+30;
				var w=40;
				var yspacing=30;
				var y2=y1+yspacing;
				var y3=y2+yspacing;
				var y4=y3+2*yspacing;
				var y5=y4+yspacing;
				noStroke();
				fill(193, 232, 242);
				quad(x1,y2,x2,y4,x1,y5,x4,y3);//blue
				x1+=100;
				x2+=100;
				x4+=100;
				fill(242, 238, 193);
				quad(x4-100,y3,x1,y2,x2,y4,x1-100,y5);//yellow
				fill(242, 209, 193)
			    quad(x1-100,y2,x2,y1,x1,y2,x4-100,y3);//pink
			}
		}
	println();
	noLoop();

}
Using nested loops, I made this seamless pattern by drawing quadrilaterals and create an illusion of boxes.
Denise Jiang- Looking Outwards 05
Emmet Truxes, Nathan Shobe, Julian Bushman-Copp, Mijung Kim, Jeffrey Laboskey, Misato Odanaka
2014,GSD
Looking through all kinds of 3D computer graphic projects, I naturally paid more attention to architectural visualization since it relates to my major. I discovered a rendering animation of Kenzo Tange’s Yoyogi Olympic Arena in celebrating the 50th anniversary of Tokyo hosting the Summer Olympics. The rendering is created by professors and students from Harvard GSD as part of their course projects. I admire it because architectural rendering takes a huge amount of time and could be repetitive or boring during the process. Their animation pictures the Arena even better than photos. Not only architectural details are shown, but also the relationship between the surrounding and the building was nicely integrated. In order to make such rendering, the students have to make a digital model of both the exterior and interior of the arena. Then they would render the building in softwares such as Vray and Maya. They also have to match all the materials to every single part of the arena. Their product is very impressive aesthetically. Natural lighting and shadows are time-lapsed and even the reflections on the windows are nicely mimicked. Different angles of camera takes the viewer to multiple key details that might lost in photos. The materials and colors all fit together to make it a really successful visualization.
Denise Jiang-Project 04- String Art
var hstep=20;//horizontal
var dstepX=10;//diagonal x
var dstepY=15;//diagonal y
function setup() {
    createCanvas(640, 480);
}

function draw() {
	background("lightpink");
	stroke("white");
	line(0,height/2,width,height/2);

	var dxTL=310;//x of top left diagonal
	var dyTL=1.5*dxTL-240;//y of top left diagonal
	var x1=0;//x for top left

	var dxBL=310;//x for bottom left diagonal
	var dyBL=-1.5*dxBL+720;//y for bottom left diagonal
	var x2=0;//x for bottom left

	var dxTR=480;//x for top right diagonal
	var dyTR=-1.5*dxTR+720;//y for top right diagonal
	var x3=320;//x for top right

	var dxBR=480;//x for bottom right diagonal
	var dyBR=1.5*dxBR-240;//y for bottom right diagonal
	var x4=320;//x for bottom right

	var dxMTL=320;
	var dyMTL=-1.5*dxMTL+720;
	var dxMTR=480;
	var dyMTR=1.5*dxMTR-240;

	var dxMBL=320;
	var dyMBL=1.5*dxMBL-240;
	var dxMBR=480;
	var dyMBR=-1.5*dxMBR+720;

	var x=0;
	var x5=640;

	for (i=0; i<17; i++) {

		stroke("white");
		strokeWeight(1);
		line(x1,height/2,dxTL,dyTL);//top left
		x1=x1+hstep;
		dxTL+=-dstepX;
		dyTL+=-dstepY;

		line(x2,height/2,dxBL,dyBL);//bottom left
		x2=x2+hstep;
		dxBL+=-dstepX;
		dyBL+=dstepY;

		line(x3,height/2,dxTR,dyTR);//top right
		x3=x3+hstep;
		dxTR+=-dstepX;
		dyTR+=dstepY;

		line(x4,height/2,dxBR,dyBR);//bottom right
		x4=x4+hstep;
		dxBR+=-dstepX;
		dyBR+=-dstepY;

		line(dxMTR,dyMTR,dxMTL,dyMTL);
		dxMTL+=-dstepX;
		dyMTL+=dstepY;
		dxMTR+=-dstepX;
		dyMTR+=-dstepY;

		line(dxMBL,dyMBL,dxMBR,dyMBR);
		dxMBL+=-dstepX;
		dyMBL+=-dstepY;
		dxMBR+=-dstepX;
		dyMBR+=dstepY;

		line(x5,0,x5,479);
		x5=x5-hstep;
		line(x,0,x,480);
		x=x+hstep;

	}

	noLoop();
	println();
}
For this project, I used straight lines and their tangents to form curves. The overall shape contains six modules.
Denise Jiang- Looking Outwards 4
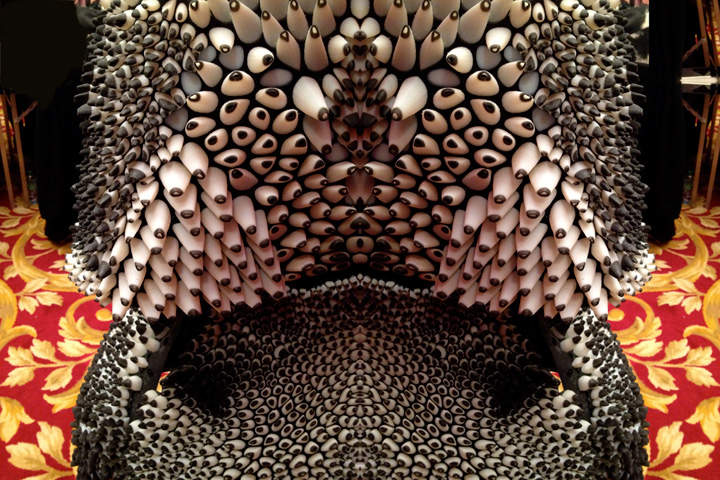
I found a sound project named “Mew” a very interesting experiment of interactive computational art. It is designed by students of Royal College of Art in London, UK. It is an responsive object, containing a distance sensor that let “Mew” interact with people when they walk towards it and encourages them to make further interactions. When they stroke the fur, it emits animal sounds according to the angle and how hard the press is. Observer can manipulate the sound while experiencing a touch of the fur. According to one of the student’s website, they created the project using sensors by Arduino. They had in total four circuits that each connects a sensor. They created sound effects using Max MSP, and there is a mini Mac imbedded inside the “Mew”. This project also took aesthetic values in. Through a simple form a stool, “Mew” reminds the observer that the animal sounds are programmed, although it gives a feeling that it is alive. The fur grabs the attention as it should, making the project interesting.

Emily Groves,Jackie Ford, Jakub Pollág and Paula Arntzen
2012
Denise Jiang-Looking-Outwards-03

2012, 3D Print
Museum of Fine Arts, Boston

2012, 3D Print
Museum of Fine Arts, Boston

2012, 3D Print
Museum of Fine Arts, Boston
Anthozoa is a 3D printed fashion project created by Neri Oxman and fashion designer Iris Van Herpen. It is debuted in the 2013 Paris Fashion Week. I admire how this project represent technology infused art, especially that fashion is a highly customized industry, so there must be variables that controls the individual module. The 3D printed skirt is powered by Stratasys’ Objet Connex multi-material 3D printing technology, which allows both soft and hard materials to be printed in a single build. Variables also can be changed in the 3D model to fit on the show model. Oxman incorporated aesthetic values into the project. The skirt and cape are tectonic that they are modular and their orientation and sizes vary. Getting inspirations from anthozoa, Oxman mimicked its form and texture to create creative high-end fashion.
link to Neri Oxman
Denise Jiang-Project-03-Dynamic-Drawing
Move mouse to the left,the size of the circles will be smaller; move mouse to the right, the size of the circles will be bigger. Mouse X and Mouse Y also control colors of the circles.
sketch
var a=100;//square size
var b=200;//circle size
var c=100;//x,y of squares and circles

function setup() {
    createCanvas(640, 480);

}

function draw() {
	background(220);

	fill(232,180,mouseY);
	strokeWeight(5);
	ellipse(mouseX,height/2,480,480);

	//element 1
	push()
	translate(width/2,height/2);
	rotate(millis()/500);
	strokeWeight(5);
	fill(mouseX,155,mouseY);
	rect(-c,-c,a,a);
	ellipse(-c,-c,b,b);
	pop();


	//element 2
	push()
	translate(width/2,height/2);
	rotate(millis()/-500);
	strokeWeight(5);
	fill(234,mouseX,mouseY);
	rect(-c,-c,a,a);
	ellipse(-c,-c,b,b);
	pop();

	//element 3
	push()
	translate(width/2,height/2);
	rotate(millis()/-500);
	strokeWeight(5);
	fill(120,mouseX+50,178);
	rect(0,0,a,a);
	ellipse(c,c,b,b);
	pop();

	//element 4
	push()
	translate(width/2,height/2);
	rotate(millis()/500);
	strokeWeight(5);
	fill(mouseX,202,178);
	rect(0,0,a,a);
	ellipse(c,c,b,b);
	pop();

	//element 4-2
	push()
	translate(width/2,height/2);
	rotate(millis()/2000);
	strokeWeight(5);
	fill(mouseX,202,178);
	rect(0,0,a,a);
	ellipse(c,c,b,b);
	pop();

	//element 2-2
	push()
	translate(width/2,height/2);
	rotate(millis()/-2000);
	strokeWeight(5);
	fill(234,mouseX,mouseY);
	rect(-c,-c,a,a);
	ellipse(-c,-c,b,b);
	pop();


	//element 3-2
	push()
	translate(width/2,height/2);
	rotate(millis()/-2000);
	strokeWeight(5);
	fill(120,mouseX+50,178);
	rect(0,0,a,a);
	ellipse(c,c,b,b);

	pop();

	//element 1-2
	push()
	translate(width/2,height/2);
	rotate(millis()/2000);
	strokeWeight(5);
	fill(mouseX,155,mouseY);
	rect(-c,-c,a,a);
	ellipse(-c,-c,b,b);
	pop();

	if (mouseX>width/2){
		b+=0.5;

	}

	if (mouseX<width/2){
		b=b-0.5;

	}

}
I used basic geometries(squares and circles) in this project. There are two layers of the elements rotating in different speed and directions. Mouse X controls the sizes of the circles and Mouse X, Mouse Y together change the colors.
Project2-Variable-Face
//color
var colorA=255;
var colorB=240;
var colorC=178;
var skinA=242;
var eyeballcolorA=35;
var eyeballcolorB=39;
//size
var earsize=50;
var eyesize=88;
var nosesize=18;
var facesizeY=344;
var facesizeX=310;
//XY
var earY=276;
var eyeballLX=227;
var eyeballRX=eyeballLX+140;
var eyeballY=230;
var noseX=312;
var noseY=294;
var mouseLX=263;
var mouseLY=357;
var mouseRX=350;
var mouseRY=337;

function setup() {
    createCanvas(640, 480);
}

function draw() {
    background(180);

    //hair
    fill(colorA,colorB,colorC);
    noStroke();
    arc(320,254,420,425,2*PI,2*PI);

    //ears
    fill(247,skinA,216);
    ellipse(163,earY,earsize,earsize);
    ellipse(462,earY,earsize,earsize);

    //neck
    rect(245,369,140,155);

    //face
    stroke(220);
    strokeWeight(3);
    ellipse(312,260,facesizeX,facesizeY);

    //eyes
    fill(255);
    stroke(1);
    strokeWeight(2);
    ellipse(237,243,61,eyesize);
    ellipse(377,243,61,eyesize);

    //eyeballs
    fill(58,eyeballcolorB,eyeballcolorA);
    stroke(1);
    ellipse(eyeballLX,eyeballY,33,48);
    ellipse(eyeballRX,eyeballY,33,48);

    //nose
    noFill();
    stroke(1);
    ellipse(noseX,noseY,nosesize,nosesize);

    //mouse
    stroke(1);
    line(mouseLX,mouseLY,mouseRX,mouseRY);

    //hairban
    fill(colorA,colorB,colorC);
    noStroke();
    ellipse(396,125,150,75);

    //brows
    noFill();
    stroke(1);
    //browLeft
    beginShape();
    curveVertex(218,164);
    curveVertex(238,165);
    curveVertex(250,168);
    curveVertex(261,176);
    curveVertex(280,199);
    endShape();
    //browRight
    beginShape();
    curveVertex(350,193);
    curveVertex(351,190);
    curveVertex(354,184);
    curveVertex(364,176);
    curveVertex(375,171);
    curveVertex(403,167);
    endShape();
}

function mousePressed() {
	//color
	colorA = random(0,255);
	colorB = random(220,240);
	colorC = random(160,200);
	skinA = random(221,242);
	eyeballcolorA=random(0,255);
	eyeballcolorB=random(0,255);
	//size
	earsize = random(50,70);
	eyesize = random(80,120);
	nosesize=random(15,25);
	facesizeY=random(320,360);
	facesizeX=random(270,330);
	//XY
	earY = random(250,285);
	eyeballLX=random(227,250);
	eyeballRX=eyeballLX+140;
	eyeballY=random(230,250);
	mouseLX=random(265,290);
	mouseLY=random(340,365);
	mouseRX=random(340,360);
	mouseRY=random(325,360);
}
I used simple geometries to create this face. Hair colour, eye size, eyeball colour and size, mouth, nose and ears are set random each time mouse is clicked.
![[OLD – FALL 2016] 15-104 • COMPUTING for CREATIVE PRACTICE](../../../../wp-content/uploads/2020/08/stop-banner.png)