![[OLD FALL 2017] 15-104 • Introduction to Computing for Creative Practice](../wp-content/uploads/2020/08/stop-banner.png)
The readings, assignments, and projects below constitute the Week 10 Deliverables and are due by 11:59pm EDT on Friday, November 3rd:
- Technical Readings
- Looking Outwards 10 [Blog]
- Assignment-10-A (Turtle Meander) [Autolab]
- Assignment-10-B (Phyllotactic Spiral) [Autolab]
- Project-10: (Generative Landscape) [Blog]
1. Technical Readings
- Concepts: Turtles, Using objects
- (no special readings this week)
2. Looking Outwards 10: A Focus on Women Practitioners
Although there are many innovative women producing exceptional work in the fields of computational design and new-media arts, they remain statistically under-represented in many festivals, media, exhibitions, conferences, museums, and panels. In this week’s Looking Outwards assignment, we aim to deepen our familiarity with their work, as a step towards building a more equitable economy of attention. You are asked to identify an interesting interactive artwork, visualization, tactical media project, or other computational design, that was created by someone who happens to not be a dude.
To help you get started, we have prepared a partial list of accomplished women working in these fields. You are welcome to consult this list — and you are also welcome to depart from it if there is someone we’ve accidentally overlooked. Please try to select a project that involved the creation of custom software.
Once you have identified a particular project or work which you find intriguing or inspirational, then, in a blog post of about 100-200 words,
- Please discuss the project. What do you admire about it, and why do you admire these aspects of it?
- Provide a short biography of the creator. What did she study? Where does she work? What kind of work does she do, broadly speaking?
- Link (if possible) to the work. To the best of your abilities, be sure to provide the creator’s name, title of the work, and year of creation.
- Embed and caption an image and/or a YouTube/Vimeo video of the project (if available).
- Label your blog post with the Category, LookingOutwards-10 and with your Section Category.
3. Assignment 10-A: Turtle Meander
In this Assignment, you will use Turtle Graphics to render a series of meanders. The purpose of the assignment is to introduce you to the use of Turtle Graphics. The Assignment also stresses the use of the while() iterative construct.
Background
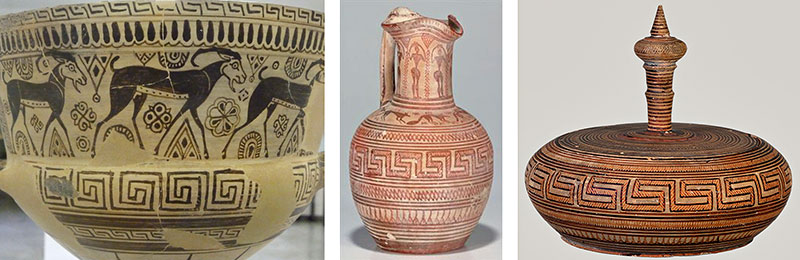
Meander motifs on Greek vases, 1st millennium B.C.E.
A meander or meandros (Greek: Μαίανδρος), also called a Greek fret or Greek key, is a decorative border constructed from a continuous line, shaped into a repeated motif. Meanders are common decorative elements in Greek and Roman art, used as running ornaments. On one hand, the name “meander” recalls the twisting and turning path of the Maeander River in Asia Minor, and on the other hand, as Karl Kerenyi has pointed out, “the meander is the figure of a labyrinth in linear form” [Wikipedia].
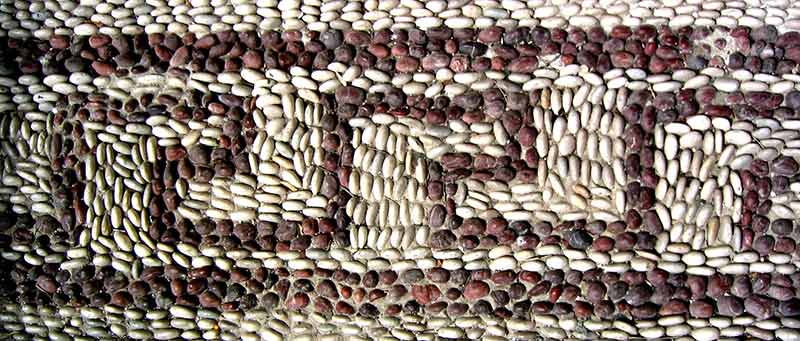
A meander, in pavement on the Greek island of Rhodes (source: Wikipedia)
The meander, we are reminded, is like the zig-zagging course traced by someone… someone, perhaps, like our Turtle.
Requirements
For Assignment 09-A, you will use our p5.js Turtle Graphics API to render the following six meanders:
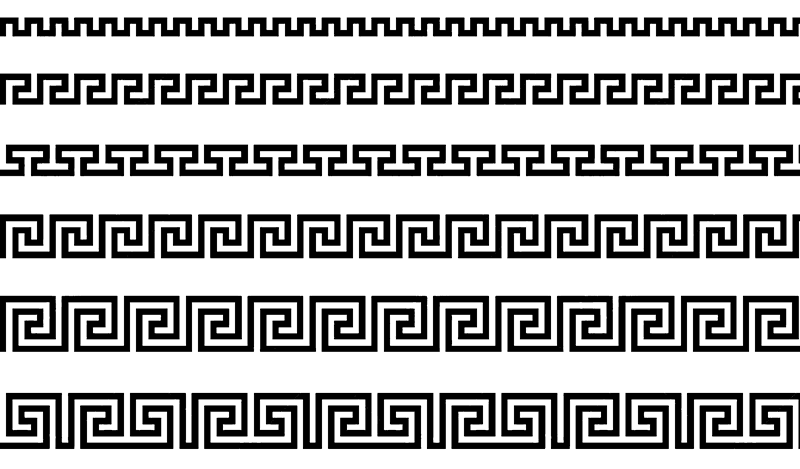
- Observe the above designs carefully, noting their differences. Trace them out with your finger, making a note of when you turn left, when you turn right, and how far you travel on each leg of the motif.
- Using our p5.js lightweight sketch template, prepare a canvas whose dimensions are 600 x 400. Using Turtle Graphics, you are asked to render all six meanders into the same canvas. You will render them all in one single instant, using
noLoop(). Our p5.js Turtle Graphics code and API can be found here (Turtle Graphics). - Using pencil and paper, take a moment to figure out what is the “irreducible unit” that is repeated in each of the above designs. You must use an iterative code structure to direct your Turtle to repeat this unit across the canvas. You will notice the obvious fact that the smaller motifs (for example, in the top row) are repeated more frequently.
- For full credit, you must use a while() structure to govern the repetition of your turtle. Thus, instead of asking your turtle to (for example) repeat the bottom motif precisely 7 times, you would instead ask it to repeat that motif so long as (i.e., while) the turtle’s horizontal position is less than the width of the canvas.
- Your turtle(s) should draw a black line against a white background. We strongly recommend you set your
strokeWeightto 6 pixels, yourstrokeJointoMITER, and yourstrokeCaptoPROJECT. - You may choose to execute this Assignment with six different turtles, or with a single one; either way is fine.
Then, as per usual for all Assignments uploaded to Autolab:
- Put the following information into comments at the top of your code: Your name; Your class section or time; Your email address, including @andrew.cmu.edu; and Assignment-10-A.
- Name your project folder UserID
-10-a.For example, if your Andrew ID isplacebo, then your project folder should beplacebo-10-a. - Zip and upload your code to Autolab, using the provided instructions. Zip a directory (folder) containing this and also Assignment-10-B.
Assignment 10-B: Turtle’s Phyllotactic Spiral
In this Assignment, you will use Turtle Graphics to render a phyllotactic (golden) spiral. The purpose of the Assignment is to reinforce your understanding of Turtle Graphics. The Assignment also introduces a key form in computational graphics and biological morphology.
Background
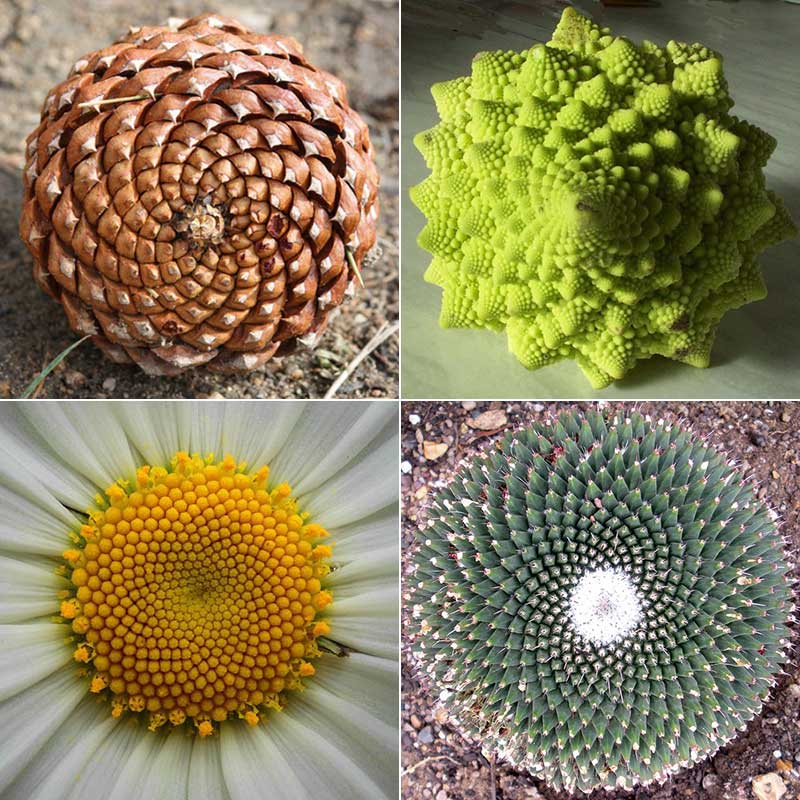
Phyllotaxis is one of the best-known patterns in nature — a core principle of biological growth which governs the morphology of many plants. This beautiful arrangement of leaves in some plants obeys a number of subtle mathematical relationships, which are closely connected to both the Fibonacci number series and to the Golden Ratio.
The phyllotactic spiral has been shown to be an optimally-efficient solution for the close-packing of growing elements — such as leaves, petals, and seeds. More information about this important pattern can be found at this excellent site.
Perhaps owing to their “natural” beauty, phyllotactic spirals are also widely employed in the arts and design. For example, John Edmark developed this phyllotactic animated sculpture in a residency at the Autodesk Pier9 3D-printing facility:
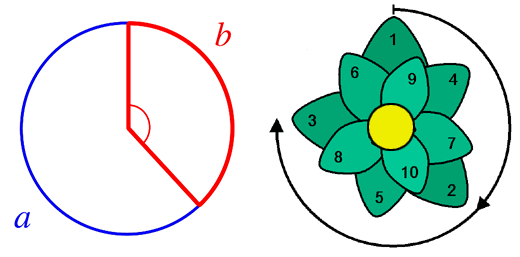
In a phyllotactic spiral, subsequent elements (such as leaves) are rotated from their previous elements by the Golden Angle. This angle, which is approximately 137.507764°, is obtained from 360°/ϕ², where ϕ (phi) is the Golden Ratio (approximately 1.618034, or precisely [1+√5]/2).
In the illustration at left below, the Golden Angle is the angle subtended by the smaller (red) arc when two arcs that make up a circle are in the Golden Ratio. In the lower right, you can see that each (numbered) leaf of the plant is rotated by this angle from the leaf with the previous number. The optimality of this arrangement becomes clear when you consider that more “common” angles (90°, 45°, 30°, etc.) would cause leaves to overlap precisely, blocking the sunlight from leaves lower down….
Requirements
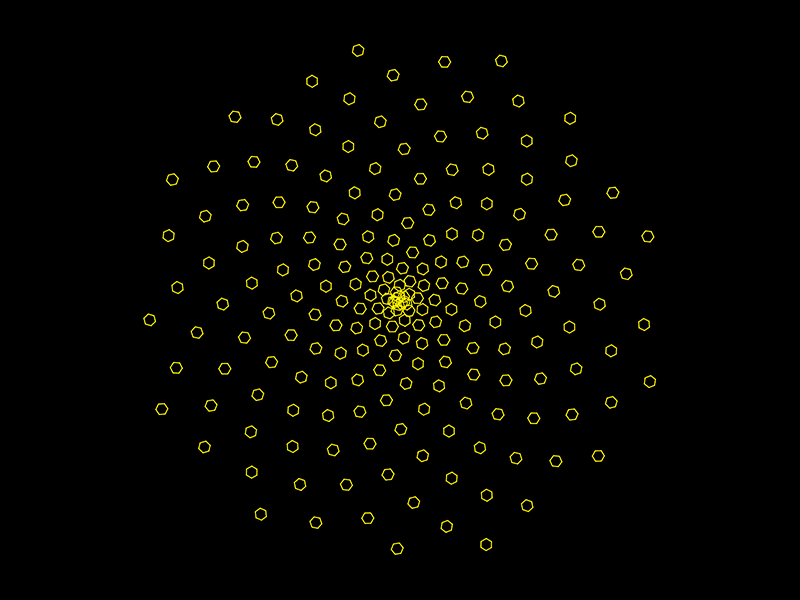
In this Assignment, you will use Turtle Graphics to generate a phyllotactic spiral comprised of small geometric “seeds”. Your final result should resemble something like the following:
- Using our sketch template, prepare a canvas whose dimensions are 600 x 400. Have your turtle start drawing at the center of the canvas.
- At each step in the spiral, your turtle should draw a small regular polygon, such as the hexagonal “seeds” shown above.
- Note that you will need to control the turtle’s
penDown()andpenUp()functions appropriately, so that the “seeds” are not connected by lines as the turtle proceeds outwards. (It’s OK if some of the seeds in the center overlap.) - Be sure to have your turtle use the Golden Angle, ~137.507764°, to reckon where to place the next seed.
Please note, you are prohibited from using p5.js drawing commands (such as ellipse(), rect(), etc.).
Then, as per usual for all Assignments uploaded to Autolab:
- Put the following information into comments at the top of your code: Your name; Your class section or time; Your email address, including @andrew.cmu.edu; and Assignment-10-B.
- Name your project folder UserID
-10-b.For example, if your Andrew ID isplacebo, then your project folder should beplacebo-10-b. - Zip and upload your code to Autolab, using the provided instructions. Zip a directory (folder) containing this and also Assignment-10-A.
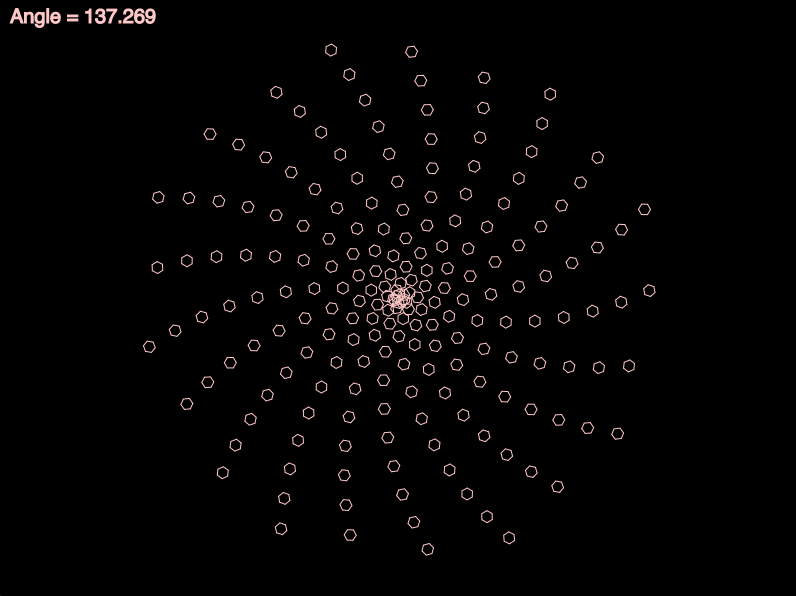
By the way — you might be interested to know that even a tiny deviation from the Golden Angle can fail to produce phyllotaxis. The following animation shows what happens when the angle between spiral elements deviates from the Golden Angle by as little as ±0.25°! (The spiral turns yellow when it’s closest to the Golden Angle.)
5. Project 10: Generative Landscape
(Also known as: “stuff passing by”.)

Create a program which presents an ever-changing (generative) and imaginative “landscape”. Come up with a concept, and populate your landscape with features and objects that are suitable for your concept: perhaps trees, apartment buildings, huts, vehicles, animals, people, asteroids, sea anemones, food items, body parts, hairs, zombies, etc.
The landscape should move past the “camera”, but you can elect the way in which it does so; for example, it might appear to scroll by (as if you were looking out the window of a train or submarine); or approach from a first-person point of view (as if you were driving); or slide underneath (as if you were looking out of a glass-bottomed airplane). The camera might be viewing an outside environment, or viewing objects on a conveyor belt, etc.
Give consideration to the depth of variation in your landscape: after how much time does your landscape become predictable? How might you extend this inevitability as much as possible? How can you make a landscape which is consistent, yet surprising? You may need to make a variety of different elements, and continually change how you clump them. Consider how these elements themselves can be generative, which is to say, synthesized on-the-fly, with all sorts of subtle variation.
Some possibilities to consider:
- people + trees + buildings (According to Jungian psychology, these are the “three verticals”, the basic psychological features of landscapes)
- foreground, middleground, and background “layers”
- variation at the macro-scale, meso-scale, and micro-scale.
- surprise: unusual and/or infrequent items in the landscape
- utopia, dystopia, heterotopia
Requirements:
- Sketch first on paper.
- Create your landscape in p5.js.
- Your assignment must incorporate at least one type of JavaScript Object that you yourself have defined (i.e. “building”, “vehicle”, etc.) where the objects we see are instances with randomized properties (such as their number of floors, color, etc.)
- Limit your design to a canvas which is no larger than 480 x 480 pixels, please.
- When you’re done, embed your p5.js sketch in a WordPress blog post on this site, using the (usual) instructions here.
- Ensure that your p5.js code is visible and attractively formatted in the post.
- In your blog post, write a paragraph or two (~100-150 words) reflecting on your process and product.
- Document your work by embedding images of paper sketches from your notebook; these could be as simple as photos captured with your phone.
- Label your project’s blog post with the Category Project-10-Landscape and with your Section Category.
Here are some possibly helpful code fragments to help you understand how you could get started.
The following program generates a row of Building objects, which continually slip out of view. New buildings are randomly added from time to time (with a low probability). Buildings have a random number of floors.
var buildings = [];


function setup() {
    createCanvas(640, 240);

    // create an initial collection of buildings
    for (var i = 0; i < 10; i++){
        var rx = random(width);
        buildings[i] = makeBuilding(rx);
    }
    frameRate(10);
}


function draw() {
    background(200);

    displayStatusString();
    displayHorizon();

    updateAndDisplayBuildings();
    removeBuildingsThatHaveSlippedOutOfView();
    addNewBuildingsWithSomeRandomProbability();
}


function updateAndDisplayBuildings(){
    // Update the building's positions, and display them.
    for (var i = 0; i < buildings.length; i++){
        buildings[i].move();
        buildings[i].display();
    }
}


function removeBuildingsThatHaveSlippedOutOfView(){
    // If a building has dropped off the left edge,
    // remove it from the array.  This is quite tricky, but
    // we've seen something like this before with particles.
    // The easy part is scanning the array to find buildings
    // to remove. The tricky part is if we remove them
    // immediately, we'll alter the array, and our plan to
    // step through each item in the array might not work.
    //     Our solution is to just copy all the buildings
    // we want to keep into a new array.
    var buildingsToKeep = [];
    for (var i = 0; i < buildings.length; i++){
        if (buildings[i].x + buildings[i].breadth > 0) {
            buildingsToKeep.push(buildings[i]);
        }
    }
    buildings = buildingsToKeep; // remember the surviving buildings
}


function addNewBuildingsWithSomeRandomProbability() {
    // With a very tiny probability, add a new building to the end.
    var newBuildingLikelihood = 0.007;
    if (random(0,1) < newBuildingLikelihood) {
        buildings.push(makeBuilding(width));
    }
}


// method to update position of building every frame
function buildingMove() {
    this.x += this.speed;
}


// draw the building and some windows
function buildingDisplay() {
    var floorHeight = 20;
    var bHeight = this.nFloors * floorHeight;
    fill(255);
    stroke(0);
    push();
    translate(this.x, height - 40);
    rect(0, -bHeight, this.breadth, bHeight);
    stroke(200);
    for (var i = 0; i < this.nFloors; i++) {
        rect(5, -15 - (i * floorHeight), this.breadth - 10, 10);
    }
    pop();
}


function makeBuilding(birthLocationX) {
    var bldg = {x: birthLocationX,
                breadth: 50,
                speed: -1.0,
                nFloors: round(random(2,8)),
                move: buildingMove,
                display: buildingDisplay}
    return bldg;
}


function displayHorizon(){
    stroke(0);
    line (0,height-50, width, height-50);
}


function displayStatusString(){
    noStroke();
    fill(0);
    var statusString = "# Buildings = " + buildings.length;
    text(statusString, 5,20);
}
If your Project looks like the above template, we will become really, deeply, profoundly sad. We implore you to think beyond the provided sample code, and to come up with something more interesting.
Incidentally, the sketch below shows what’s “really” going on here, in terms of the way buildings are added (on the right) and removed (on the left). Check out the technique to remove an item from an array (or more precisely, the technique to construct a replacement array with one or more items removed), and the little pattern we use to decide whether or not to add a new building.
var buildings = [];
function setup() {
createCanvas(640, 240);
// create an initial collection of buildings
for (var i = 0; i < 10; i++){
var rx = random(width);
buildings[i] = makeBuilding(rx);
}
frameRate(10);
}
function draw() {
background(200);
push();
translate(0.1 * width, 0.1 * height);
scale(0.8);
stroke(0);
fill(200);
rect(0,0, width, height);
displayStatusString();
displayHorizon();
updateAndDisplayBuildings();
removeBuildingsThatHaveSlippedOutOfView();
addNewBuildingsWithSomeRandomProbability();
pop();
}
function updateAndDisplayBuildings(){
// Update the building's positions, and display them.
for (var i = 0; i < buildings.length; i++){
buildings[i].move();
buildings[i].display();
}
}
function removeBuildingsThatHaveSlippedOutOfView(){
// If a building has dropped off the left edge,
// remove it from the array. This is quite tricky, but
// we've seen something like this before with particles.
// The easy part is scanning the array to find buildings
// to remove. The tricky part is if we remove them
// immediately, we'll alter the array, and our plan to
// step through each item in the array might not work.
// Our solution is to just copy all the buildings
// we want to keep into a new array.
var buildingsToKeep = [];
for (var i = 0; i < buildings.length; i++){
if (buildings[i].x + buildings[i].breadth > 0) {
buildingsToKeep.push(buildings[i]);
}
}
buildings = buildingsToKeep; // remember the surviving buildings
}
function addNewBuildingsWithSomeRandomProbability() {
// With a very tiny probability, add a new building to the end.
var newBuildingLikelihood = 0.007;
if (random(0,1) < newBuildingLikelihood) {
buildings.push(makeBuilding(width));
}
}
// method to update position of building every frame
function buildingMove() {
this.x += this.speed;
}
// draw the building and some windows
function buildingDisplay() {
var floorHeight = 20;
var bHeight = this.nFloors * floorHeight;
fill(255);
stroke(0);
push();
translate(this.x, height - 40);
rect(0, -bHeight, this.breadth, bHeight);
stroke(200);
for (var i = 0; i < this.nFloors; i++) {
rect(5, -15 - (i * floorHeight), this.breadth - 10, 10);
}
pop();
}
function makeBuilding(birthLocationX) {
var bldg = {x: birthLocationX,
breadth: 50,
speed: -1.0,
nFloors: round(random(2,8)),
move: buildingMove,
display: buildingDisplay}
return bldg;
}
function displayHorizon(){
stroke(0);
line (0,height-50, width, height-50);
}
function displayStatusString(){
noStroke();
fill(0);
var statusString = "# Buildings = " + buildings.length;
text(statusString, 5,20);
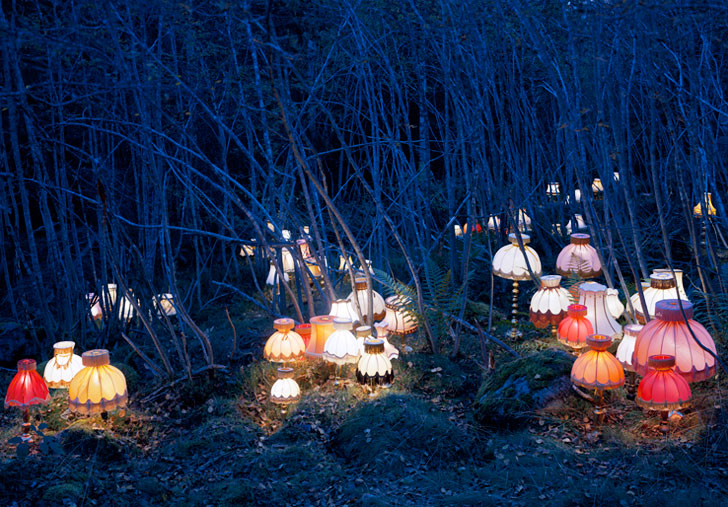
}Here’s a simple demonstration of the noise() function, which is very useful for generating randomized terrain:
// Simple demonstration of the noise() function.
// Change these for different effects:
var terrainSpeed = 0.0005;
var terrainDetail = 0.005;

function setup() {
    createCanvas(640, 240);
    frameRate(10);
}

function draw() {
    background(255);

    noFill();
    beginShape();
    for (var x = 0; x < width; x++) {
        var t = (x * terrainDetail) + (millis() * terrainSpeed);
        var y = map(noise(t), 0,1, 0, height);
        vertex(x, y);
    }
    endShape();

    rect(0, 0, width - 1, height - 1);
}
Finally, here’s a pretty picture of a landscape made from recycled lamps, by artist Rune Guneriussen.