![[OLD FALL 2017] 15-104 • Introduction to Computing for Creative Practice](../wp-content/uploads/2020/08/stop-banner.png)
The readings, assignments, and projects below constitute the Week 11 Deliverables and are due by 11:59pm EDT on Friday, November 10th:
- Technical Readings
- Looking Outwards 11 [Blog]
- Assignment-11-A (Text Rain) [Autolab]
- Assignment-11-B (Sound Effects) [Autolab]
- Project-11: (Turtle Free Style) [Blog]
1. Technical Readings
- Concepts: Sound, Local Server, Video, search, hashing
- How Binary Search Works
- What is a HashTable Data Structure – Introduction to Hash Tables, Part 0 – this a simple and clear introduction to hashing. The video is so low-key, it is worth adding that the result is a data structure where you can insert and look up information using a key (such as a person’s name) in constant time, i.e. the cost of inserting and looking up is independent of the number of items in the hash table. Compare this to linear search and binary search.
2. Looking Outwards 11: Computer Music
Our Looking Outwards topic for this week is music and is specifically concerned with how artists use computation compose and perform music. (If your Looking Outwards 04 – Sound Art – was really about Music, you should take this opportunity to investigate a sound art project – please note in your blog that you are taking this option).
What’s the difference between sound art and music? There’s no clear distinction, but for the sake of this assignment, let’s say that music is created by musicians, composers, performers, and is ultimately intended for specific performances or recordings that have a beginning and an end, whereas sound art is more associated with installations, conceptual art, exhibits, galleries, and would be less likely to appear in a concert hall. For this assignment, you should restrict yourself in either case to computational music (or sound), and you may also consider new musical instruments as long as they are decidedly computational.
Identify a particular project or work in the area of music which you find interesting. In a blog post of about 100-200 words,
- Please discuss the project. What do you admire about it, and why do you admire these aspects of it?
- What do you know (or what do you suppose) about the algorithms that generated the work?
- It what ways are the creator’s artistic sensibilities manifest in the final form?
- Link (if possible) to the work. To the best of your abilities, be sure to provide the creator’s name, title of the work, and year of creation.
- Embed an image, sound, and/or a YouTube/Vimeo video of the project (if available).
- Label your blog post with the Category, LookingOutwards-11.
- Label your blog post with the Section, e.g. Section C.
Some references to sound art and computer music can be found in the Looking Outward 04 assignment.
3. Assignment 11-A: Text Rain
In this Assignment, you are asked to create a “cover version” (re-implementation) of the interactive video work, Text Rain. The purpose of this assignment is to strengthen your skills in pixel-processing and image analysis, while introducing classic principles of interactive video art. For this Assignment, you will need to work at a computer with a webcam. You will be making a real, interactive video system that works in the browser!
Background: About Text Rain
Let’s begin with a brief discussion of a key precursor: Myron Kruger’s Video Place. If you’ve ever wondered who made the first software system for camera-based play, wonder no longer; Video Place is not only the first interactive artwork to use a camera, it’s also one of the first interactive artworks, at all. Krueger (born 1942) is a pioneering American computer artist who developed some of the earliest computer-based interactive systems; he is also considered to be among the first generation of virtual reality and augmented reality researchers. Below is some 1988 documentation of Myron Krueger’s landmark interactive artwork, which was developed continuously between ~1972 and 1989, and which premiered publicly in 1974. The Video Place project comprised at least two dozen profoundly inventive scenes which comprehensively explored the design space of full-body camera-based interactions with virtual graphics — including telepresence applications, drawing programs, and interactions with animated artificial creatures. Many of these scenes allowed for multiple simultaneous interactants, connected telematically over significant distances. Video Place has influenced several generations of new media artworks — including Camille Utterback’s Text Rain:
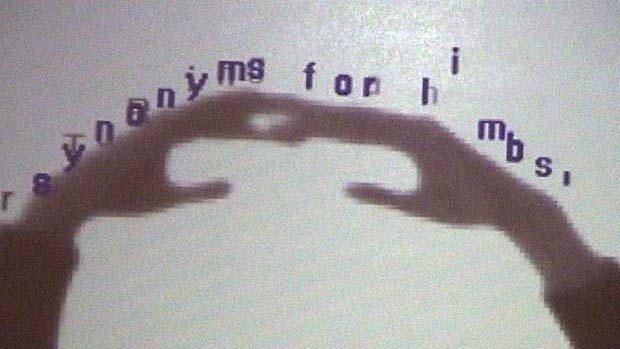
Below is Text Rain (1999) by Camille Utterback and Romy Achituv — also widely regarded as a classic work of interactive media art. (You can experience Text Rain for yourself at the Pittsburgh Children’s Museum.) In watching this video, pay careful attention to how Camille describes her work’s core computational mechanism, in 0:48-0:55:
Did you hear Camille when she says, “The falling text will land on anything darker than a certain threshold, and fall whenever that obstacle is removed.” That’s what you’re going to be implementing in this Assignment!
Getting There: Testing Your Webcam Setup
Let’s make sure that p5.js is working properly with your computer’s webcam.
- NOTE: We will be using
index.htmlfrom template-all for this Assignment. - NOTE 2: Use the Chrome browser. Others might work, but Firefox and Safari on OS X both seem to have problems with this video code.
So: below you should see a live feed from your webcam, which uses this template:
// See: http://p5js.org/examples/examples/Dom_Video_Capture.php
// See: https://github.com/processing/p5.js/wiki/Local-server
// To run this example locally in a browser, you will need the p5.dom library
// (included in template-all) and a running local server.
var myCaptureDevice;
function setup() {
createCanvas(640, 550);
myCaptureDevice = createCapture(VIDEO);
myCaptureDevice.size(640, 480); // attempt to size the camera.
myCaptureDevice.hide(); // this hides an unnecessary extra view.
}
function isColor(c) {
return (c instanceof Array);
}
//--------------------------------------------------------------------
function draw() {
background(220);
myCaptureDevice.loadPixels(); // this must be done on each frame.
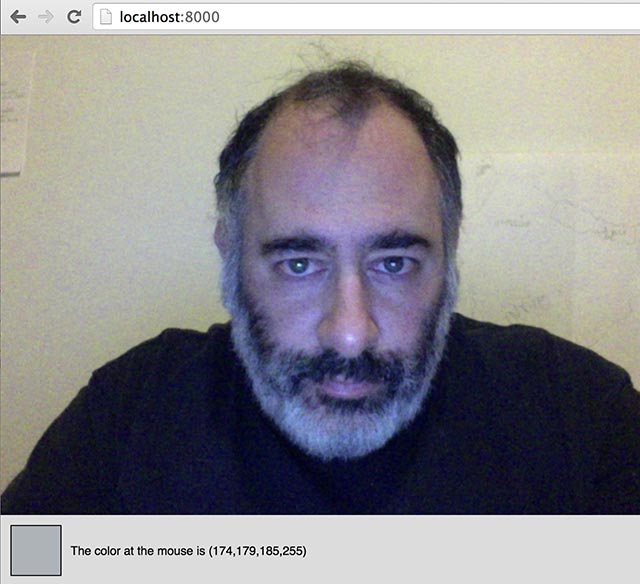
image(myCaptureDevice, 0, 0); // draw the camera at 1:1 resolution
// Fetch the color at the mouse, and display it.
var theColorAtTheMouse = myCaptureDevice.get(mouseX, mouseY);
if (isColor(theColorAtTheMouse)) {
fill(theColorAtTheMouse);
rect(10,490,50,50);
fill(0);
text("The color at the mouse is (" + theColorAtTheMouse + ")", 70, 520);
}
}If you don’t see any live camera, please be sure to troubleshoot the following 3 things:
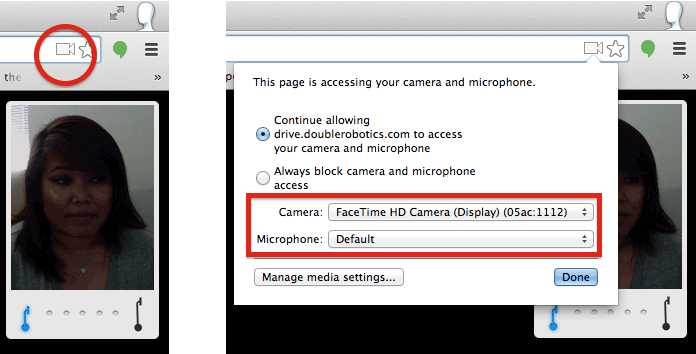
- Device Permissions? It’s necessary to give your browser permission to access your webcam, else people could violate your privacy. You’ll see a popup like one of the following; be sure to click “allow”:

Note that if you have clicked “Block” at some point in the past, while visiting your test page, then Chrome will remember this setting. You may need to manage the camera settings for your browser; see the screenshot image in the section below for some clues for fixing this.
- Correct Device? It’s possible that your browser may be defaulting to the incorrect video capture device. This is definitely a problem if you’re using the Macs in the CMU Computing Services cluster in CFA-318. Those machines have a second capture device called CamCamX (an app used for screencasting); because this occurs alphabetically before your Facetime HD Camera, your browser may be connecting to CamCamX instead of your webcam. In the upper right corner of your Chrome browser, click on the little camera icon, and then select your web camera from the pulldown menu:
- Is the Camera already in use? Devices like cameras generally don’t allow themselves to be accessed by more than one piece of software at a time. If you don’t see any video coming from your webcam, check to see if there might be another process running in the background that is currently accessing the camera. One pro-tip is that Google Chrome will indicate which tabs are accessing the camera, with a small red dot. Be sure to close any other tabs that might be trying to access the camera:

If everything is working correctly, you should be able to see your video in a working p5.js environment. For the Text Rain assignment in particular, we strongly recommend that you set yourself up against a light-colored wall, and that you wear dark colors, as follows:
Below is an animated-GIF recording of my version of TextRain, based off the provided code template, and written in p5.js:
If you’re still unable to get your webcam working: this is certainly a bummer, but you can still complete the Assignment. Instead of using the webcam, use this static image instead (or a similar one that you make yourself). Your code will be almost exactly the same if you use the static image; you’ll just have less fun.
Requirements
- Test your camera/browser relationship in p5.js, for example, by visiting the p5.js reference page for camera capture devices.
- Create a sketch derived from the provided capture template embedded above. If you have problems testing your sketch in the browser, check some of the other suggestions above. Your canvas should be 640×480, which is a very common camera capture dimension.
- Set yourself up in dark clothing against a light-colored wall, or swap in the test image provided above (or something similar) if you don’t have a good background to work against.
- Do it. Here’s a step-by-step guide to get started coding Text Rain:
- Our strategy will be to design the behavior of a single letter-particle first, and then (eventually) extend it to a whole bunch of them. Begin writing your code with a single particle whose location is represented by a pair of global variables,
pxandpy.Place that particle at the top of the canvas somewhere (for example, the location(320,0)), and — for the time being — display it with a small ellipse. - On each frame of the
draw()call, fetch the color in the video at that particle’s location using thecapture.get()command, and store that color in a local variable calledtheColorAtPxPy. - Important:
capture.get()does not always return a color!. You should testtheColorAtPxPy, and if it is not a color, do not do anything with it. In the capture example code above, the function isColor() is used to test for a color. You can copy this function definition into your code. You should also read the example and see howisColor()is called to test for color and conditionally use that color. - If in fact you got a color, use the
brightness()command to compute the brightness of that color, and store this in a variable calledtheBrightnessOfTheColorAtPxPy. (Alternatively, you could compute the brightness of that color by averaging itsred(),green(), andblue()components.) - On each frame, check to see if
theBrightnessOfTheColorAtPxPyis greater than some threshold — we recommend a global variable calledbrightnessThreshold). If it is, then move the particle downwards, by summing in a small positive amount topy. - On the other hand, if
theBrightnessOfTheColorAtPxPyis less than a different global variable,darknessThreshold, then the behavior is slightly more complex. (FYI: This is the situation in which the particle has somehow worked its way down into a dark region. For example, perhaps the visitor, wearing a black shirt, abruptly moved their body upwards. If this happens, then the particle can become “trapped” in the interior of the dark region; it needs to climb back “up” to sit on the user’s shoulder.) If this is the case, then — within a single frame ofdraw()— use awhile()loop to move the particle upwards until it is either no longer in a dark region, or it hits the top of the canvas. - If a particle reaches the bottom of the screen, it should reappear at the top of the canvas.
- For some recommended starting values, try using 50 for the
brightnessThreshold, and try having darknessThreshold, be 45 (in other words, just a few gray-levels darker than thebrightnessThreshold.) You could also try setting them to be the same value, initially. (The exact thresholds to use will depend on your camera, lighting, clothing, and wall color.) A downward velocity of 1 pixel per frame is fine. - Suggestion: If your code does not work (and probably it will not on the first try), keep in mind there are lots of simple things that can go wrong. It is critical to display the status of your “letter” or particle — where is it? what’s the color? what’s the brightness? Keep in mind that if the letter goes out of bounds of the image, the color might be black or undefined. Also, your thresholds may be wrong, but how will you know if you do not know the brightness of the image under the letter?
- When you achieve the above, then now it’s time to generalize the single particle into an array of particles… and make them look like letters.
- Find or write a short poem (or line of text) “about bodies”. It should have at least 12 characters, preferably more.
- Below you’ll find a partially-written prototype for a class called
TextRainLetter, which stores a horizontal positionpx, a vertical positionpy, and a single letter. We advise you to complete the code in this class. For example, itsrender()method should draw its letter at(px, py). You might find functions liketextSize()andtextAlign()to be helpful. - Create a globally-scoped array of
TextRainLetters, and in yoursetup()function, populate this array with objects created from the characters in your poem. We think you’ll find thestring.lengthandstring.charAt()functions very useful for obtaining and assigning the letters. You’ll also probably want to use the p5.jsmap()function to distribute the positions of the letters across the canvas. - For full credit, move all of the decision-making “intelligence” for animating the particles into the
update()method of theTextRainLetterclass, so that the letters individually know how to move themselves in relationship to the underlying video pixels.
- Our strategy will be to design the behavior of a single letter-particle first, and then (eventually) extend it to a whole bunch of them. Begin writing your code with a single particle whose location is represented by a pair of global variables,
Then, as per usual for all Assignments uploaded to Autolab:
- Put the following information into comments at the top of your code: Your name; Your class section or time; Your email address, including @andrew.cmu.edu; and Assignment-11-A
- Name your project
UserID-11-A. For example, if your Andrew ID is placebo, then your project name should beplacebo-11-A. - Zip and upload your code to Autolab, using the provided instructions. Zip the folder that contains both projects A and B for this week.
4. Assignment 11-B: Sound Effects
In this Assignment, you are asked to add sounds to a simple animation.
Starting with the following template, produce a program that plays a sound whenever the ball hits a wall. You are free to modify the program in any way, as long as there is animation and four distinct events that trigger sounds.
Suggestions
You can find lots of free sounds at freesound.org. You can also search for “sound effects” and find many sources.
“Sound effects” can be interpreted broadly. The sounds can be spoken words, musical tones, animal sounds, natural sound, etc. No profanity, please.
Once you get a collection of sounds, you may wish to edit them or select the parts you want. I suggest using Audacity unless you already have a favorite audio editor. In Audacity, you can easily select the part of a sound that you want, and then use “File:Export Selected Audio…” to write the selection as a .wav file.
You can use mono or stereo sounds. If you don’t know the difference, please ask, but it probably does not matter for this assignment.
Audacity gives you many other options, e.g. you can adjust the volume (amplitude) of a sound.
You will probably need to run a local server to make the sounds accessible to the browser running your sketch. If you put the sound files in the same directory as index.html and sketch.js, then you can load the files by name, e.g. loadSound("ping.wav");
As with images, load all sounds in preload() so that the sounds are actually available to play when you try to play them.
Speaking of play(), the documentation is not very good. Basically, to play a sound, you call play() as a method, i.e. if you load a sound in preload with mySound = loadSound("mysound.wav"); then you can play it (in draw() perhaps) by calling mySound.play();. See the documentation for parameters. The nominal rate seems to be 1 (but in my test, it did not seem to do anything), and the nominal amp is also 1, so mySound.play(0, 1, 2); will play the sound louder (because amp is 2).
Requirements
- You must play at least 4 different sounds, one for each wall.
- A sound should play each time the ball bounces from a wall.
- The sound durations should be less than 1 second.
- The sounds must be included in your submission zip file so that we can run your program.
- For extra credit, add some background sound. This can be ambient sound or random or regular sound “events”. You will have to think about how to “re-trigger” or regenerate background sounds. Consider using
millis()to get the time. Your background sound files should be less than 20s in total duration to facilitate uploading and downloading. - Name your project
UserID-11-B. For example, if your Andrew ID is placebo, then your project name should beplacebo-11-B. - Submit your project with sound files as zipped directory along with Assignment 11 A as usual.
5. Project 11: Freestyle: Playing with your Turtle(s)
This is a highly open-ended creative Project in which you are asked to create an interesting composition using Turtle Graphics. Essentially, you are invited to explore your own interests while using this very different approach to drawing and rendering. Below are a handful of possible suggestions for paths of exploration; please note that this is not a complete list of possibilities:
- A turtle which responds to the cursor. You could have a turtle that responds to the position of the user’s cursor, for example, fleeing away from it, spiraling around it, etc.
- A turtle which responds to an image on which it is crawling. You could use an image (hidden or otherwise) as the “terrain” on which a turtle is crawling, and the turtle could make decisions about which way to turn based on the color of the pixel underneath it.
- A family of turtles which are following or avoiding each other. With the addition of some noise() or randomness, this can produce very surprising results.
- Using a turtle to draw different kinds of visual forms. Turtle Graphics are particularly well-suited to drawing complex curves, dotted lines, calligraphic curlicues, and other unusual structures. Google around to see what’s possible…
- A big flock of turtles that…?
Here are the Project-11 Requirements:
- Create a composition using Turtle Graphics using p5.js, as described above. Your canvas should be no larger than 480 pixels in any dimension, please.
- When you’re done, strong>embed your p5.js sketch in a blog post on this site, using the (usual) instructions here. Make sure that your p5.js code is visible and attractively formatted in the post. Include some comments in your code.
- In your blog post, write a sentence or two reflecting on your process and product. In discussing your process, it would be awesome if you included any of your paper sketches from your notebook; these could be as simple as photos captured with your phone.
- Please include one or two screen-shots of your finished composition.
- Label your project’s blog post with the Category Project-11-Composition.
- Label your project’s blog post with your Section, e.g. “Section C”.