![[OLD FALL 2017] 15-104 • Introduction to Computing for Creative Practice](../wp-content/uploads/2020/08/stop-banner.png)
Week 11 Plan
- Nov 6 – sound basics
- Activity 1: install “full” p5js template.
- Activity 2: use mouseX, mouseY to control amplitude and frequency of an oscillator.
- Activity 3: play a sound with p5js when you press the mouse.
Introduction
In this lecture, we look at some basics of audio representation and audio editing.
Audio signals are essentially vibrations that travel through the air (and other materials). We characterize sound as rapid but measurable changes in pressure over time. The following image shows a graph of pressure vs. time, often called a “waveform”: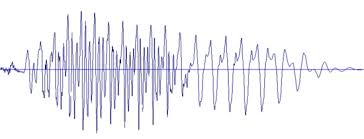
Audio Representation
We represent audio waveforms digitally by measuring the amplitude or pressure of the waveform many times per second:
From www.jaguaraudiodesign.com
In the figure above, the continuous (red) waveform is measured many times per second and rounded to an integer value from 0 to 15.
In typical audio, such as audio on a CD, an audio “sample” is measured 44,100 times per second to a resolution of 16 bits, resulting in an integer from -32768 to 32767.
What Is a Sample?
The term “sample” as described above led to the term “sampler” — an audio synthesizer based on recording, storing, and playing back audio recordings of instrumental notes. Whether it was misunderstanding, laziness, or simply the lack of a better term, people began referring to these short sound recordings as “samples,” e.g. a “flute sample” or a “piano sample” or a “sample library” containing a collection of sounds.
Even later, DJ culture began to use “samplers” to “repurpose” existing commercial recordings, and short excerpts of music began to be referred to as “samples.”
For this class, we’ll usually use “sample” to mean a single number representing the amplitude of a waveform at a point in time, but be aware that context is important.
Multichannel Audio
Many audio files contain multiple channels. E.g. stereo has a left channel and a right channel, where a channel is just a single waveform represented by a sequence of samples.
To store multichannel audio, we interleave samples so that all the samples at time 0 precede all the samples at time 1 and these are followed by samples at time 2, etc. All of the samples at a given time are called a frame. Thus, a multichannel audio file is a sequence of frames, where each frame is a sequence of samples.
This is not rocket science, but the terms are important.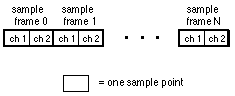
Credit: http://paulbourke.net/dataformats/audio/
Sample Rate
The sample rate of digital audio is the number of samples per second. Samples are always measured periodically, that is, the time interval between successive samples is exactly the same (good converters measure timing error in picoseconds, and even the cheapest converters are probably accurate to 1 nanosecond).
The sample rate determines what frequencies can be recorded. For example, speech signals have very little content above 8000 Hz (cycles per second). Telephone systems often limit audio frequencies to somewhere between 3000 and 4000 Hz (which is one reason Skype often sounds so much better than the phone system). High quality music has frequencies up to (and beyond) 20,000 Hz.
To capture a frequency of X, you must sample the signal at a sample rate of 2X. This is a fundamental result of sampling theory and is a mathematical law. For this reason, the sample rate for CD audio is 44,100 Hz (a little above double the highest frequency we can here, 20,000 Hz) and the phone company has a standard sample rate of 8000 Hz (enough, theoretically, to allow speech signals up to 4,000 Hz).
Images are another example of sample-based digital representation! In images, we have a two-dimensional “signal” which is a function of X and Y rather than time. The samples are pixels and the “sample rate” is the number of pixels per inch. Sampling theory applies here too. Higher “frequencies” (technically, we might call these “spacial frequencies”) in images correspond to higher resolution. The more pixels per inch, the higher the spacial frequencies we can capture and the higher the image resolution. If we remove high frequencies, we lose image resolution, resulting in a blurry image.
Audio in p5js Sketches
Be sure to use the “all” template, not the “min” template.
Play a sound from a file
Make a tone using an oscillator
Audio Editing
Audio editing and production is a broad topic. Here we want to touch on some highlights. We believe every student in this class should know the basics of audio editing. (Just as we believe you should know how to edit text and images, but we assume everyone has encountered at least a minimal editor for images and you certainly know how to edit text.)
The basics we believe you should know are:
- Combining files.
- Fade-in and Fade-out.
- Adjusting levels.
- Panning.
We will use Audacity to demonstrate these operations, but any audio editor is capable of performing these operations.
Combining files.
In Audacity, use the command File:Import:Audio… to load a file into a track. You can load as many files as you like into separate tracks. When you play, all tracks play at the same time. To combine all the files, use File:Export… to save to a Wave file (or some other format). All the files will be combined together.
This is an illustration of two tracks (one mono, one stereo) after some editing, ready to be exported. You can read more about mixing by following this link.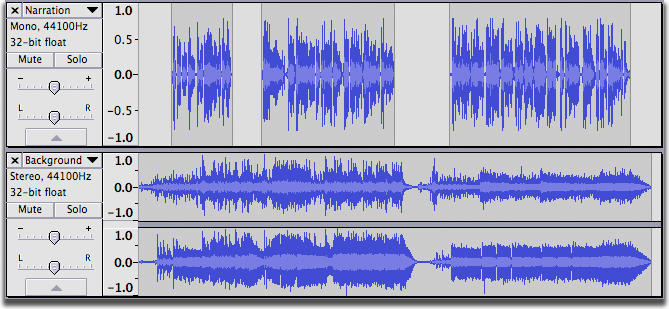
http://manual.audacityteam.org/o/man/mixing.html
Fade-in/Fade-out
One of the first signs of an amateur audio production is sound that pops on and pops off suddenly and jarringly, often with a click or pop that sounds a little like static. This happens if your audio clips start and stop instantaneously, often creating discontinuities in the signal.
Consider the following speech signal which has been “edited” by selecting a portion of the waveform. Notice how the end of the signal is “chopped off” — this not only looks bad, it creates an audible click that can be very distracting to listeners.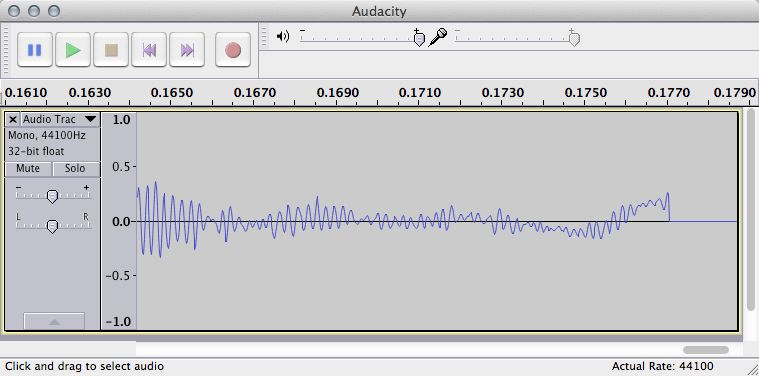
The solution is to “fade” the signal to zero to avoid the abrupt ending. First, zoom in (View:Zoom In) to select from some point prior to the ending to the exact end point of the audio clip. At this point the selection might look like this: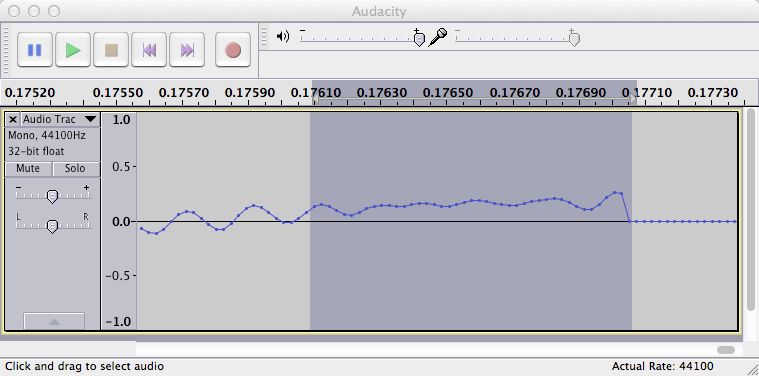
Then, zoom out
(View:Zoom Out) until you can drag the left edge of the selection and make the selection about 10ms long. (You can make the fade out much longer if this makes sense with your material. To avoid a sudden ending — which is the whole point — the selection should be at least a couple of ms, but use your ears. There are no absolute rules here.) The selection will look like this: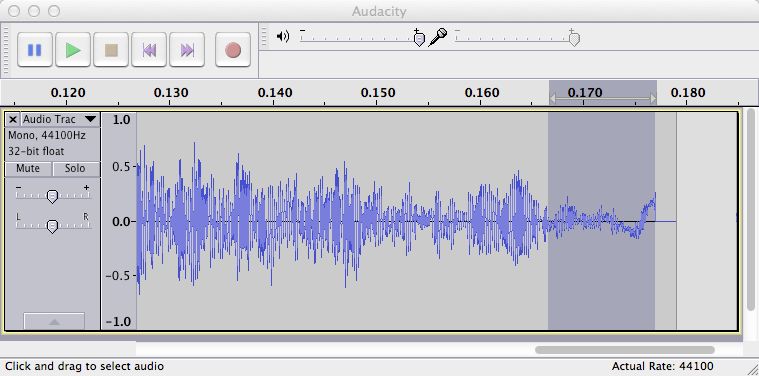
Finally, use the Effect:FadeOut command, which will decrease the selection’s amplitude smoothly from the original waveform to zero. This amounts to “turning down the volume” smoothly over the selection so there’s no sound left at the end to create a click. Here is the result: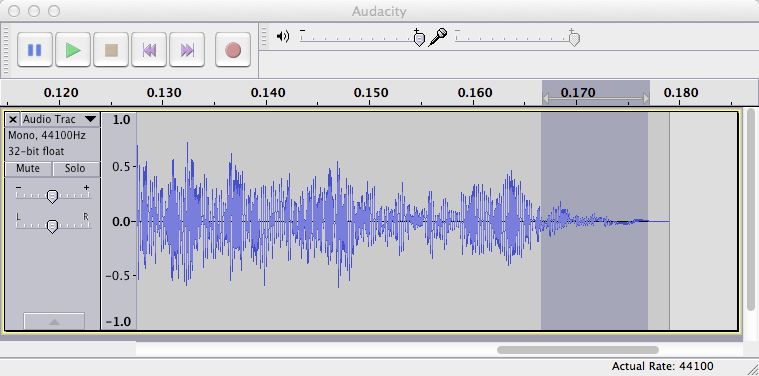
Fading in works just like fading out: Select a region of sound starting exactly at the first sample of the audio clip with the abrupt beginning. Adjust the selection to be on the order of 10ms long. Use the Effect:Fade In command to smoothly bring up the volume within the selection.
Although fading in and fading out at every edit is a bit painful (and Audacity really should provide some better automation for this), this is critical for professional-sounding editing. Fading in and out over longer time spans can be used in creative and artistic ways to subtly introduce background music or sound effects — it’s not just about removing pops and clicks.
Adjusting Levels
Each track in Audacity has a continuously adjustable volume control called the amplitude envelope. You access the amplitude envelope by selecting the envelope tool (see the selected tool at the upper left in the figure below) and you click and drag on the envelope to make adjustments. To get rid of an envelope breakpoint, drag the breakpoint out of the track (up or down).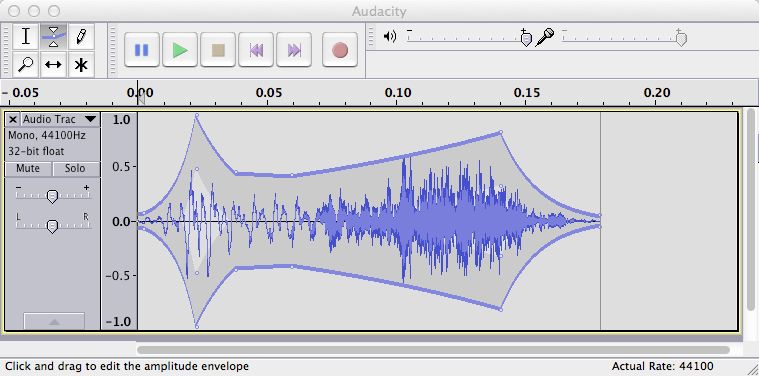
Global Levels and Pan
Every track also has a volume control and a pan control. These are available at the left margin of the track. Volume does what you would expect: It scales the amplitude of the entire track. Pan assign a variable amount of signal from left to right in a stereo mix.