![[OLD FALL 2017] 15-104 • Introduction to Computing for Creative Practice](../wp-content/uploads/2020/08/stop-banner.png)
The readings, assignments, and projects below constitute the Week 5 Deliverables and are due by 11:59pm EDT on Friday, September 29th:
- Technical Readings
- Looking Outwards 05 [Blog]
- Assignment-05-A (Tally Marks) [Autolab]
- Assignment-05-B (Hexagonal Grid) [Autolab]
- Project-05: (Wallpaper) [Blog]
1. Technical Readings
- Some good examples of nested looping and their explainations:
https://www.khanacademy.org/computing/computer-programming/programming/looping/p/nested-for-loops
http://www.scriptingmaster.com/javascript/nesting-loops.asp
https://www.mindstick.com/blog/390/using-javascript-nested-loops
2. Looking Outwards 05: 3D Computer Graphics
Our Looking Outwards topic for this week is 3D Computer Graphics and is specifically concerned with how artists use computation to create images that portray 3-dimensional scenes. In Looking Outwards 03, you looked at true three-dimensional work. By “3D Computer Graphics,” we mean the production of 2D images that depict 3D scenes and objects. Typically, this involves a computer representation of 3D form followed by a rendering algorithm that produces a 2D view of the form. You might consider how digital storage and networks change the way we think about images; how 3D form is generated digitally or processed digitally; and how 3D form is visualized. Computation creates the possibility of sophisticated generative forms, images and data visualization.
 Aggregation 2 by Andy Lomas is a printed image inspired by the artist’s fascination with complex natural forms, particularly coral-like structures, and their relationship to simple mathematical rules. |
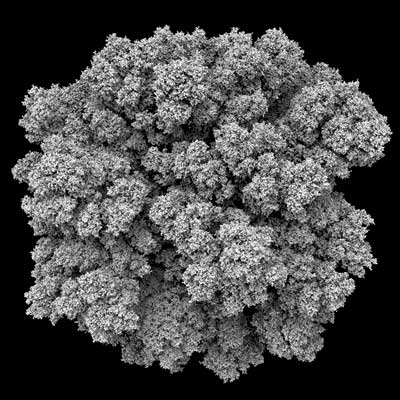
 Alexey Kashpersky’s Ebola Virus |
Identify a particular project or work in the area of 3D Computer Graphics which you find interesting. [Let me encourage you to avoid 3D games — I have nothing against them, but this is “Looking Outwards” and you are probably very familiar with images in 3D games, so please look outwards to other areas. There’s plenty of other work to discover.]
In a blog post of about 100-200 words,
- Please discuss the project. What do you admire about it, and why do you admire these aspects of it?
- What do you know (or what do you suppose) about the algorithms that generated and/or rendered the work?
- It what ways are the creator’s artistic sensibilities manifest in the final form?
- Link (if possible) to the work. To the best of your abilities, be sure to provide the creator’s name, title of the work, and year of creation.
- Embed an image, sound, and/or a YouTube/Vimeo video of the project (if available).
- Label your blog post with the Category, LookingOutwards-05.
3. Assignment 05-A: Tally Marks
In this Assignment, your program will display a tally of the user’s clicks. This Assignment is to be submitted through Autolab.
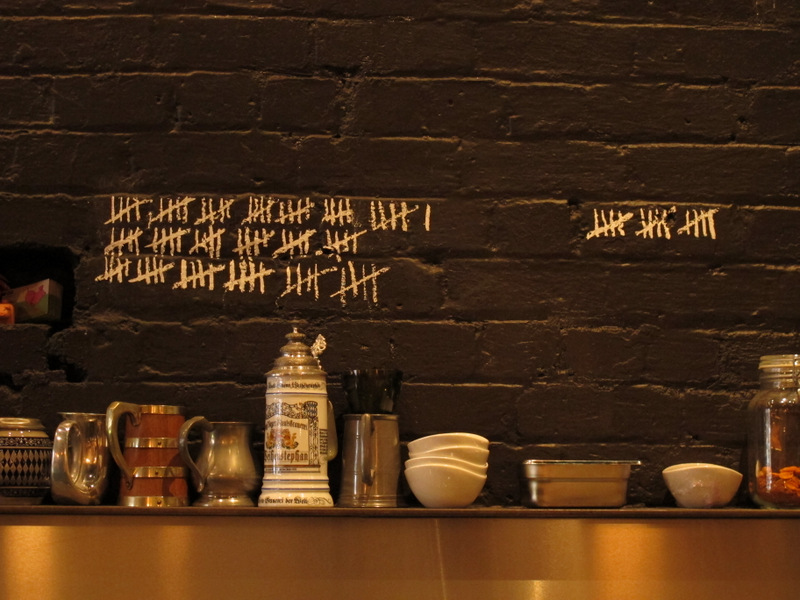
Tally marks counting visitors’ drinks at a well-known British pub.
Tally marks, also called hash marks, are a unary numeral system, typically used for counting. According to Wikipedia, counting aids (other than body parts) first appeared in the Upper Paleolithic or Late Stone Age; the oldest tally sticks date to between 35,000 and 25,000 years ago, in the form of notched bones, and were likely used to mark time. The above image shows tally marks that count visitors’ drinks at a well-known British pub.
In this Assignment, you will create a p5.js application that uses classic tally marks (in five-mark groupings) to display the number of times that the user has clicked on the screen. Here’s an animated GIF screencap showing an example of what a successful solution would look like:

Requirements:
- Using our lightweight sketch template (
template-p5only.zip), create a p5.js program with a canvas of 800 x 100 pixels. - Give your program a global variable called
gClickCount, which is initialized to 0. Increment thegClickCountvariable whenever the user presses the mouse button. - Add some additional functionality that resets
gClickCountto zero whenever the user presses a keyboard key. - Now it’s time to visually display the
gClickCountquantity. One possible way to get started is to create afor()loop that draws a series of vertical lines, and then uses thegClickCountvariable as part of the termination condition in thatfor()loop. Doing so will produce a rudimentary tally similar to the following. (If you get this far, you’ll get partial credit):
- Really, however, we ask you to display
gClickCountusing good-old “classic” tally marks: the kind you’ve seen a million times in cartoons, consisting of visual groupings of five marks, where the fifth mark in each group is a diagonal slash that intersects the other four. - For full credit, you must erase and redraw the canvas every time
draw()is called. This will probably require aforloop. - All of your code should adhere to the style guidelines found in our “Style Do’s and Don’ts”.
- Don’t forget to comment your code, and please give attention to code style.
Then, as usual for all Assignments uploaded to Autolab:
- Put the following information into comments at the top of your code: Your name; Your class section or time; Your email address, including @andrew.cmu.edu; and Assignment-05-A
- Name your project UserID
-05-a.For example, if your Andrew ID isplacebo, then your project directory (folder) name should beplacebo-05-a. Please be attentive to this! - Zip and upload your code to Autolab, using the provided instructions. Zip a directory (folder) containing this and also Assignment-05-B.

Assignment 05-B: Hexagonal Grid
In this Assignment, you are asked to modify some provided code that generates a square grid, so that it generates a regular hexagonal grid instead. The purpose of this assignment is to use a simple geometric problem to reinforce your understanding of nested iteration. This Assignment is to be submitted through Autolab.
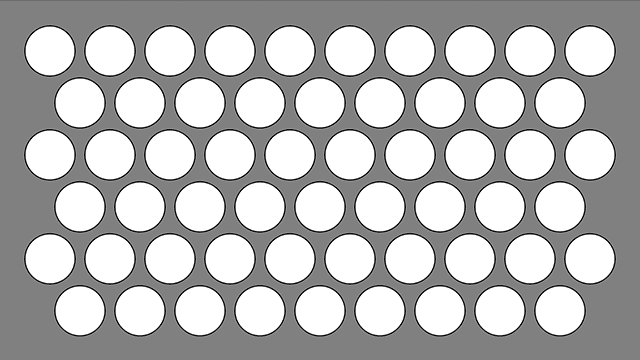
Here’s an example of embedded iteration that creates a square grid.
function setup() {
    createCanvas(640, 400);
    background(128);
    var tw = 60;
    var th = 60;
    var oy = 50;
    var ox = 50;

    for (var y = 0; y < 6; y++) {
        for (var x = 0; x < 10; x++) {
            var py = oy + y * th;
            var px = ox + x * tw;
            ellipse(px, py, 50, 50);
        }
    }
    noLoop();
}


function draw() {
    // draw is not called due to noLoop() in setup()
}
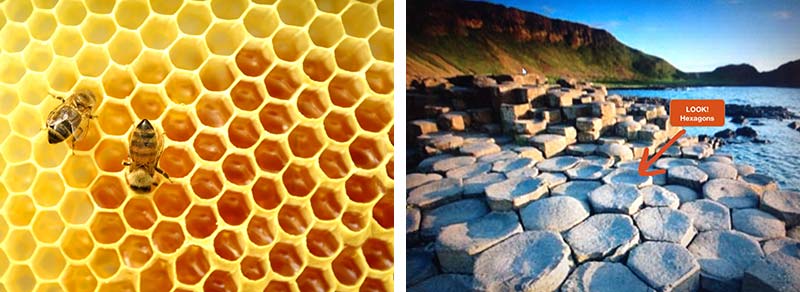
Images of hexagonal grids in nature from Jose De La Torre.
But square grids aren’t the only game in town! In fact, for many purposes, hexagonal grids offer a far more economical (or even, optimal) use of material and energy. That’s why we observe hexagonal grids so frequently in nature — whether in structures like bees’ honeycombs or in the close-packed basalt column formations in the Giant’s Causeway in Northern Ireland.
You should be able to make a hexagonal grid, too. In this Assignment, your task is to modify the above code so that it generates a regular hexagonal grid. When you’re done, it should look something like the following:
The most important thing to remember about regular hexagonal grids is that, unlike square grids, the vertical spacing between elements is not the same as the horizontal spacing. This is because regular hexagonal grids are composed of equilateral triangles — and equilateral triangles are shorter than they are wide:
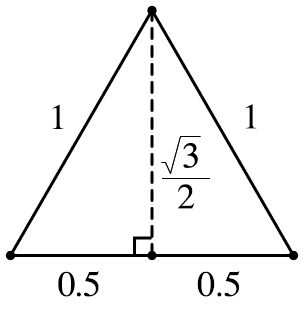
How much shorter? Well, given an equilateral triangle whose baseline is 1 unit wide, its height is roughly 87% of that — or, as Pythagoras would tell us, one-half of the square root of 3 as much, to be precise. So, here now are your…
Requirements:
- Using the code above as a starting point, and our new lightweight sketch template (
template-p5only.zip), create a p5.js program that displays a regular hexagonal grid of visual elements. Keep your canvas dimensions under 800×400. - Your grid should have precisely 6 rows of elements. The number of elements per row should alternate between 10 and 9. You may find it very helpful to use the modulus (%) operator to know whether you are examining an odd or even row.
- The vertical distance between rows should be precisely computed, according to the proportions of an equilateral triangle as discussed above. You’ll lose points if we see the constant 0.8660254… (or something similar) in your code.
- The shapes, colors and sizes of elements are up to you, as long as you meet the requirements about how they are positioned.
As per usual for all Assignments uploaded to Autolab:
- Put the following information into comments at the top of your code: Your name; Your class section or time; Your email address, including @andrew.cmu.edu; and Assignment-05-B
- Name your project UserID
-05-b.For example, if your Andrew ID isplacebo, then your project directory (folder) name should beplacebo-05-b. Please be attentive to this! - Zip and upload your code to Autolab, using the provided instructions. Zip a directory (folder) containing this and also Assignment-05-A.
Project 5: Wallpaper
In this Project, you’re asked to use iterative techniques to generate a repeating pattern, such as for wallpaper or fabric.
This Project is to be submitted through the WordPress site. Its purpose is to allow you to explore generative aesthetics through iterative computation.
Before you begin, take a moment (or lose an afternoon) to check out this mind-boggling archive of more than 6000 antique wallpapers, dating from the 18th and 19th centuries, all scanned at high resolution. (You can also learn more than you ever thought there was to know about the history of wallpaper in New England, as written by wallpaper expert, Richard Nylander.)
Requirements:
- Sketch first on paper to design a repeating pattern which would make (for example) an attractive wallpaper wallpaper pattern or textile design. Give consideration to aesthetic issues like symmetry, rhythm, color; details at multiple scales; and a balance between organic and geometric forms.
- Write code, using p5.js, that generates this attractive visual rhythm. Please limit the dimensions of your work so that the largest side of your canvas is no greater than 480 pixels (in keeping with WordPress constraints).
- Your design should be rendered as a 2-dimensional repeating pattern, not just a single “tile.”
- Make something you could imagine yourself actually wearing. Because that’s easier than ever, with “fabrication-on-demand services” such as:
- https://paom.com/ (“Print All Over Me” custom-printed clothing)
- http://constrvct.com/ (custom-printed clothing)
- http://www.spoonflower.com/ (custom-printed fabric, wallpaper, decals, gift wrap, etc.)
- Per your artistic inclination, you may include subtle randomness for added visual interest.
- You are asked to produce a static (rather than dynamic, interactive or time-based) design. We therefore recommend you use place a noLoop() command in the setup block of your final submission.
And, as usual,
- Embed your p5.js sketch in a blog post on this site. Make sure that your code is visible in the post and attractively formatted/commented.
- In your blog post, write a couple of sentences (perhaps 100 words) reflecting on your process and product.
- Please include a scan or photo of some of your paper sketches from your notebook, if possible.
- Label your project’s blog post with the Category, Project-05-Wallpaper.
Incidentally, wallpaper can be interesting as well as beautiful. For example, here’s some recent computational wallpaper by the Italian group ToDo: Spamghetto Wallpaper. (Examine it closely and you’ll see it’s full of text from junk mail.)
