![[OLD FALL 2017] 15-104 • Introduction to Computing for Creative Practice](../wp-content/uploads/2020/08/stop-banner.png)
The readings, assignments, and projects below constitute the Week 9 Deliverables and are due by 11:59pm EDT on Friday, October 27th:
- Technical Readings
- Looking Outwards 09 [Blog]
- Assignment-09 (Animation Walk Cycle) [Autolab]
- Project-09 (Custom Pixel) [Blog]
1. Technical Readings
- (Concepts are: animation, particle systems, objects)
- Animating a walking character with sprite images.
- Dan Shiffman’s p5.js Pointillism Example
2. Looking Outwards 09: on Looking Outwards
Our Looking Outwards topic for this week is: the Looking Outwards assignments by your peers!
This week, we hope you’ll find inspiration in the things your friends have discovered. Find one or two peers in the course whom you know. Browse through their Looking Outwards assignments until you find something unfamiliar, that sounds like it could be interesting. Read your peer’s reviews, then check out the project they cite. In a blog post of about 100-200 words,
- What are your thoughts about the cited project? In what ways do you agree or disagree with your peer’s assessment? Respond to their report with some thoughts of your own. What can you productively add to their discussion of the project?
- Link (if possible) to the original work, and to your peer’s Looking Outwards post. (Be sure to provide the creator’s name, title of the work, and year of creation.)
- Embed an image, sound, and/or a YouTube/Vimeo video of the project (if available).
- Label your blog post with the Category, LookingOutwards-09.
3. Assignment 09: Animation Walk Cycle
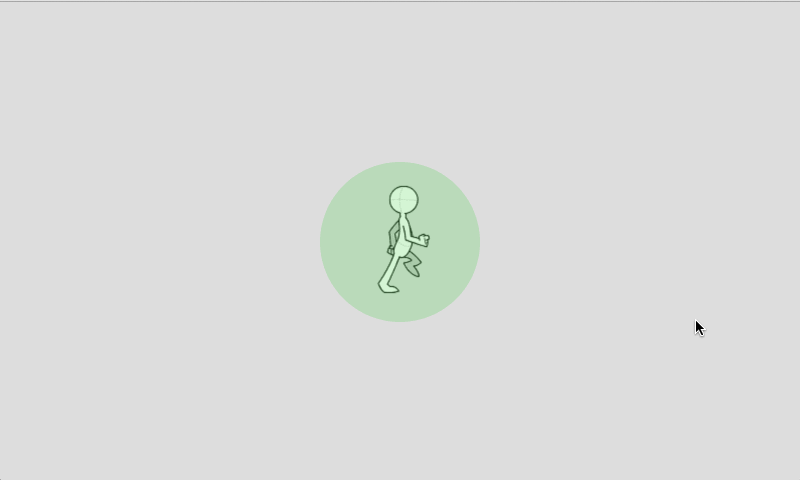
In this Assignment, you are asked to write code to animate a walking character with sprite images. (You are provided, below, with the necessary sprite images and some template code to complete.) The final goal of this Assignment is to create an interactive scene, in which the character walks over to the places where the user clicks. Here is a animated GIF demonstrating what your solution will resemble:
Here is the source image for the walk cycle of the animated character we’ll be using:
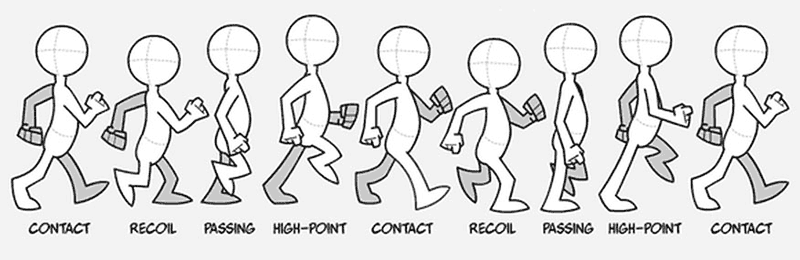
The individual frames of this animation can be found in this Imgur.com album, and also in this zip file. There are 8 frames, which are provided to you as .PNG images with transparent backgrounds. (We recommend that you don’t use the local copies of the images unless you plan to be working offline and you understand how to test p5.js sketches from a local server.)
Below is the starter “template” code you will use to create your project. Please carefully note the places where you are expected to add code.
|
1 2 3 4 5 6 7 8 9 10 11 12 13 14 15 16 17 18 19 20 21 22 23 24 25 26 27 28 29 30 31 32 33 34 35 36 37 38 39 40 41 42 43 44 45 46 47 48 49 50 51 52 53 54 55 56 57 58 59 60 61 62 63 64 65 66 67 68 69 70 71 72 73 74 75 76 77 78 79 80 |
var frames = []; // An array to store the images var characterX; // The X location of the character var characterY; // The Y location of the character var targetX; // The X goal, from the user's click var targetY; // The Y goal, from the user's click var exampleImgOnly; //--------------------------------------- function preload(){ // These URLs are for the individual walk cycle images, // stored in the imgur album http://imgur.com/a/85DTu var filenames = []; filenames[0] = "http://i.imgur.com/svA3cqA.png"; filenames[1] = "http://i.imgur.com/jV3FsVQ.png"; filenames[2] = "http://i.imgur.com/IgQDmRK.png"; filenames[3] = "http://i.imgur.com/kmVGuo9.png"; filenames[4] = "http://i.imgur.com/jcMNeGq.png"; filenames[5] = "http://i.imgur.com/ttJGwkt.png"; filenames[6] = "http://i.imgur.com/9tL5TRr.png"; filenames[7] = "http://i.imgur.com/IYn7mIB.png"; // PUT CODE HERE TO LOAD THE IMAGES INTO THE frames ARRAY, // USING THE FILENAMES STORED IN THE filenames ARRAY. exampleImgOnly = loadImage("http://i.imgur.com/svA3cqA.png"); } //--------------------------------------- function draw() { background(222); // PUT CODE HERE TO MOVE THE CHARACTER TOWARDS THE TARGET. var dx = targetX - characterX; var dy = targetY - characterY; var distanceFromCharacterToTarget = sqrt(dx*dx + dy*dy); // ... // PUT CODE HERE TO DISPLAY THE CHARACTER, CYCLING THROUGH THE FRAMES. // WHEN YOU GET THAT WORKING, FLIP THE IMAGE IF THE CHARACTER'S HEADING LEFT. // ... image(exampleImgOnly, characterX, characterY); // temporary only! // Don't touch this: // Draw a spot at the target, colored based on the character's proximity. drawTargetEllipse (distanceFromCharacterToTarget); } //======================================================= // PROBABLY NO REASON TO CHANGE ANYTHING BELOW THIS LINE. function setup() { createCanvas(800, 480); imageMode(CENTER); frameRate(12); // Initialize the character and target positions. characterX = width / 2; characterY = height / 2; targetX = characterX; targetY = characterY; } //--------------------------------------- function drawTargetEllipse(distanceFromCharacterToTarget){ if (distanceFromCharacterToTarget < 80){ fill(0,200,0, 40); // Green if we're nearby } else { fill(255,0,0, 40); // Red if we're far away } noStroke(); ellipse(targetX, targetY, 160,160); } //--------------------------------------- function mousePressed() { targetX = mouseX; targetY = mouseY; } |
Instructions:
- Copy-paste the code above into your local development environment in order to get started.
- Run the starter program. You should see the program above running.
- There are 4 fragments of code for you to write, which are described in more detail below:
- Load the images into an array;
- display the character with a cycling frame number;
- move the character across the canvas;
- flip the character left/right appropriately.
- Load the images. Currently the program loads just a single frame of the walk cycle, purely for demonstration purposes. Inside the preload() function, around line 24, you are advised to
PUT CODE HERE TO LOAD THE IMAGES INTO THE frames ARRAY, USING THE FILENAMES STORED IN THE filenames ARRAY. In other words, this is where you should write code that loads all 8 of the walk cycle images. Specifically, you should write aforloop that fills up the frames array with images obtained by loading the (respective) URLs given in the array offilenamesstrings. - Display the current frame. In the
draw()function, around line 40, you are advised toPUT CODE HERE TO DISPLAY THE CHARACTER, CYCLING THROUGH THE FRAMES. You’ll be successively displaying each of the images in theframesarray, incrementing the array-index of the image you display on each refresh of thedraw()function. (Don’t forget to restart the index at zero when your index advances beyond that of the last image in theframesarray.) One possibility is to apply the modulus operator to theframeCountsystem property. - Move the character across the canvas. The target (“goal”) location is set in the
mousePressed()function, whenever the user clicks the canvas. In line 34, you are advised toPUT CODE HERE TO MOVE THE CHARACTER TOWARDS THE TARGET. You’ll need to devise some way of moving the character a small portion of the way from its current location towards the target location, essentially reassigning the character’s position on every frame. There’s no single correct way to achieve this, and we’re curious what you come up with. One solution is to uselerp(). Another method uses some simple trigonometric proportions based on the numbersdx,dy, anddistanceFromCharacterToTarget. - Flip the direction the character is facing, if you’re able, when the character is moving towards the left. You are advised to do this in Line 41 (
FLIP THE IMAGE IF THE CHARACTER'S HEADING LEFT), just before the character is rendered to the screen. We recommend you achieve this by applying ascale()of (-1,1) to the character’s image inside apush()/pop()structure. This step may be tricky, so save it for last. - Don’t forget to comment your code, and please give attention to code style.
- You may find the following reference materials helpful for this Assignment:
Then, as per usual upload to Autolab:
- Put the following information into comments at the top of your code: Your name; Your email address, including @andrew.cmu.edu; and Assignment-09
- Name your project
UserID-09. For example, if your Andrew ID isplacebo, then your project name should beplacebo-09. - Zip and upload your code to Autolab, using the provided instructions. Zip your entire sketch folder.
Project 09: Computational Portrait (Custom Pixel)
In this creative Project, to be uploaded to WordPress, you will create a computational portrait, using some kind of original surface treatment (such as a “custom pixel”) of a hidden underlying photograph.
Background.
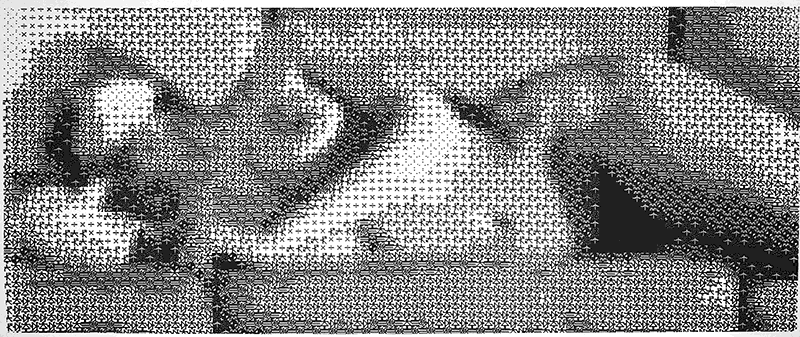
“Studies in Perception,” by Ken Knowlton (1931-) and Leon Harmon (1922-1982)
In Peripheral Vision: Bell Labs, the S-C 4020, and the Origins of Computer Art, Zabet Patterson writes:
In 1959, the electronics manufacturer Stromberg-Carlson produced the S-C 4020, a device that allowed mainframe computers to present and preserve images. In the mainframe era, the output of text and image was quite literally peripheral; the S-C 4020 — a strange and elaborate apparatus, with a cathode ray screen, a tape deck, a buffer unit, a film camera, and a photo-paper camera — produced most of the computer graphics of the late 1950s and early 1960s. At Bell Laboratories in Murray Hill, New Jersey, the S-C 4020 became a crucial part of ongoing encounters among art, science, and technology.
The above image, created with the S-C 4020, is one of the first and most famous computer artworks ever made: “Studies in Perception”, by Ken Knowlton (1931-) and Leon Harmon (1922-1982), developed as an experiment at Bell Laboratories in 1966. According to MedienKunstNet,
The reclining nude represented the first experiment to scan a photograph into a computer and reconstitute it with a gray scale, using 12 discrete levels of gray, produced by mathematical and electronic symbols. The scanning process established a certain level of gray in a certain area of the photo and replaced it with one of the symbols. This process was used to try to establish the minimum amount of information the human eye needed to resolve an image.
The curators of the V&A Museum write:
Only by stepping back from the image (which was 12 feet wide), did the symbols merge to form the figure of a reclining nude. Although the image was hastily removed after their colleague returned, and even more hastily dismissed by the institution’s PR department, it was leaked into the public realm, first by appearing at a press conference in the loft of Robert Rauschenberg, and later emblazoned across the New York Times. What had started life as a work-place prank became an overnight sensation.
Around the same time, American painter Chuck Close (1940-) — an associate of Rauschenberg — began working to systematically deconstruct photography through painting. After achieving “photorealistic” effects through paint alone (as in his famous 1966-1967 self-portrait), Close moved on to create his own, highly personal “picture-elements”. In one series of portraits, Close’s images are broken down into regions comprised of numerous small circles in complementary colors. (Note how no square actually contains the color of the subject’s skin! Instead, a skin tone is approximated by a pair of blue and orange circles.)
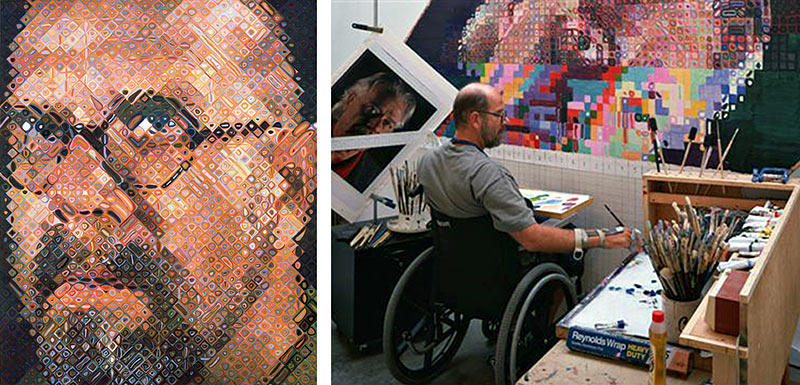
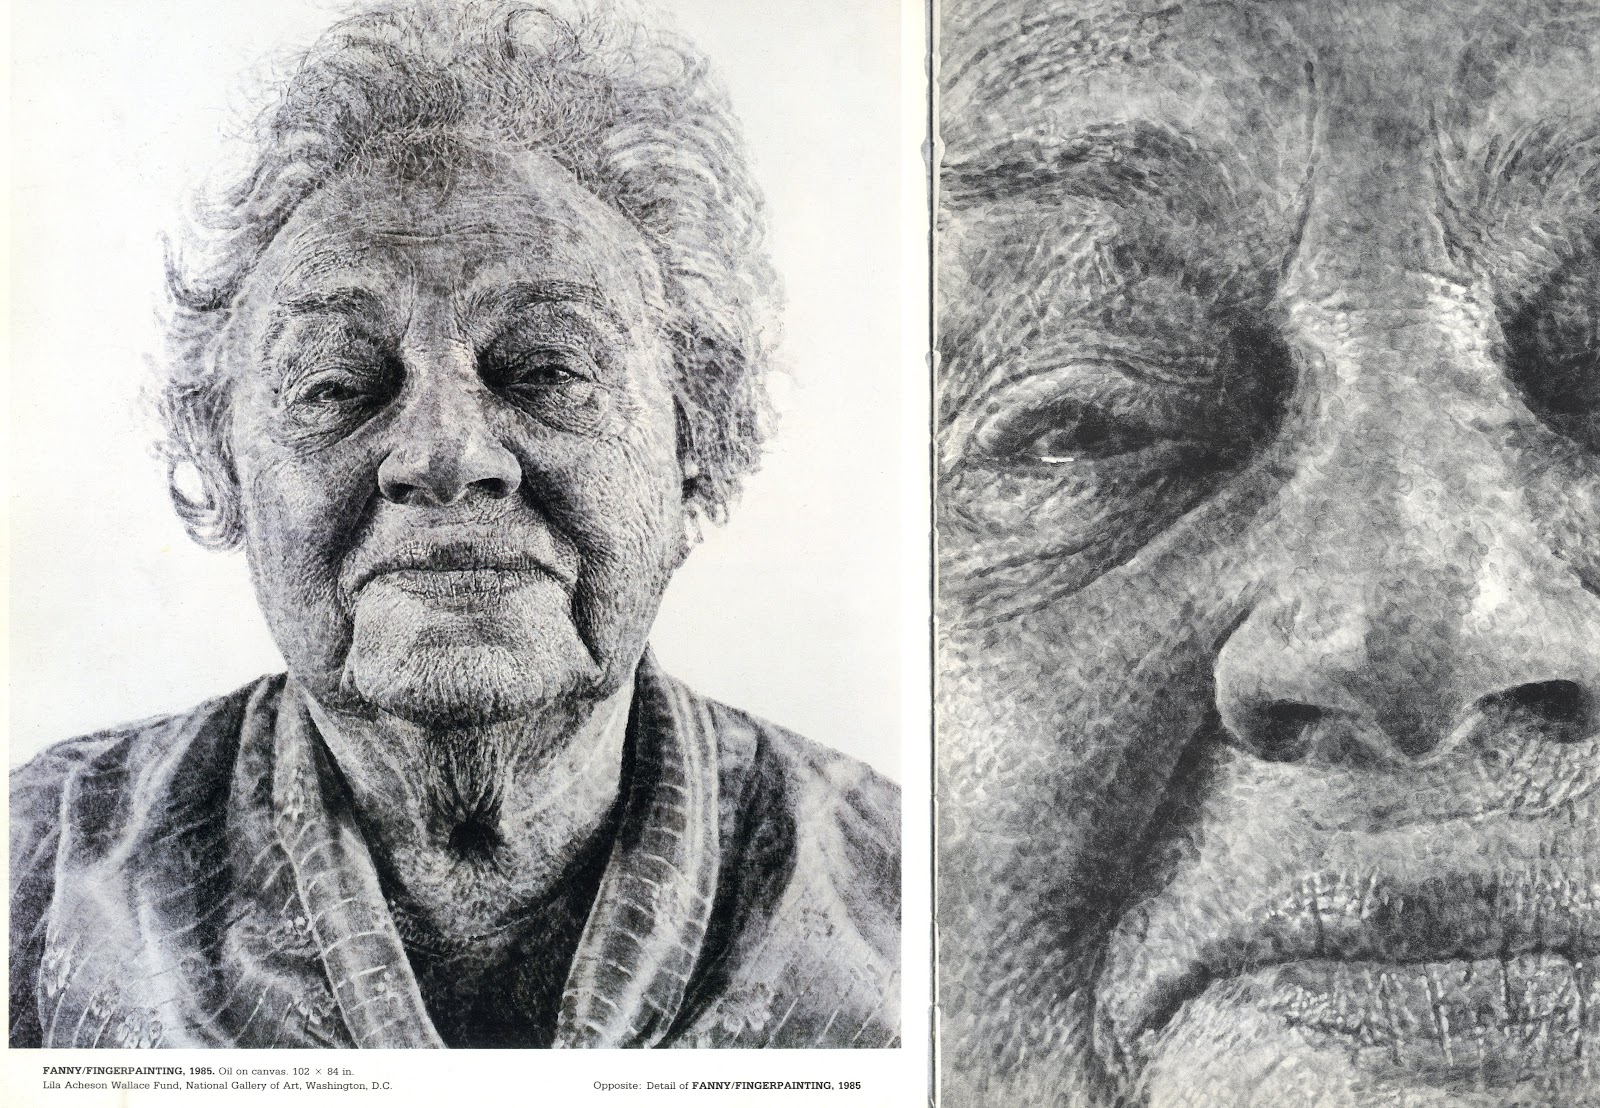
Close has been at this for decades and has devised many provocative and truly astonishing picture elements, the most “personal” of which are undoubtedly the thumbprints he used to construct this 8-foot tall portrait of Fanny, his wife’s grandmother (click to enlarge).
Close is a man who keenly understands procedural art; his portrait of his friend Roy Liechtenstein (below), is as algorithmic as anything you’ll see in this CS course. Check out this astounding time-lapse, in which a group of workers accrete more than 40 different colors of paper pulp through specially-cut stencils:
Time Lapse Video of Chuck Close Roy Paper/Pulp from Corcoran School of Art @ GW on Vimeo.
Whereas Chuck Close’s colored square-circle self-portrait suggests a translation strategy of direct pixel-for-paint substitution, his “Fanny” portrait suggests an altogether different strategy, in which values are rendered through the accumulation (or massing) of marks in different densities. In a word: more thumbprints = darker. We will see both of these visual strategies in the works of computational new-media artists, below.
Primary among these is New York-based artist Danny Rozin, who for nearly two decades has been exploring “physicalized” custom pixels. His 1999 “Wooden Mirror” is widely considered a classic work of new media art; it consists of 840 pieces of wood which tilt toward or away from an overhead light. This is the “substitution” strategy; Rozin directly maps each (camera) pixel’s brightness to the orientation angle of a servo motor. Brightness = angle.
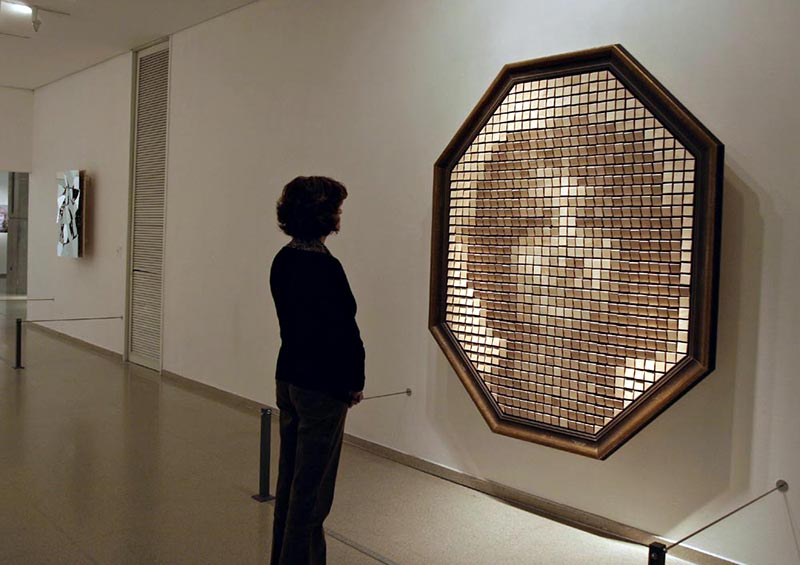
His “Peg Mirror” (2007) likewise rotates 650 cylindrical elements towards or away from the light:
Rozin’s “Weave Mirror” creates an image by rotating interlocking elements, whose exteriors are colored with a gradient from light to dark.
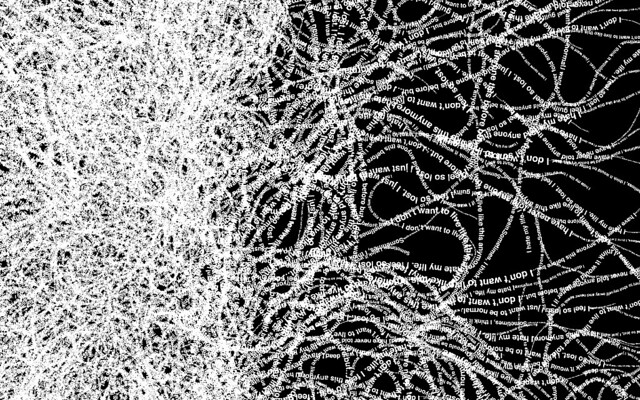
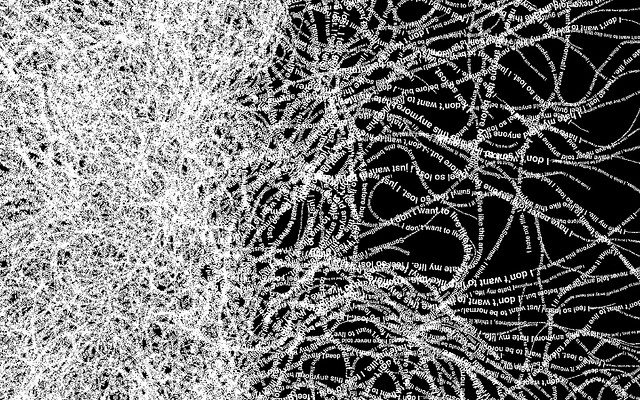
Ryan Alexander allows fungus-like filaments to grow according to forces from an underlying image. It turns out that those filaments are actually strings of words.
In the work below by Robert Hodgin, 25,000 dots recreate a portrait by Rembrandt Peale. According to Hodgin, “Each dot pushes away its neighbors. The strength at which the dot repulses and the radius of the dot are both governed by a source greyscale photo.”

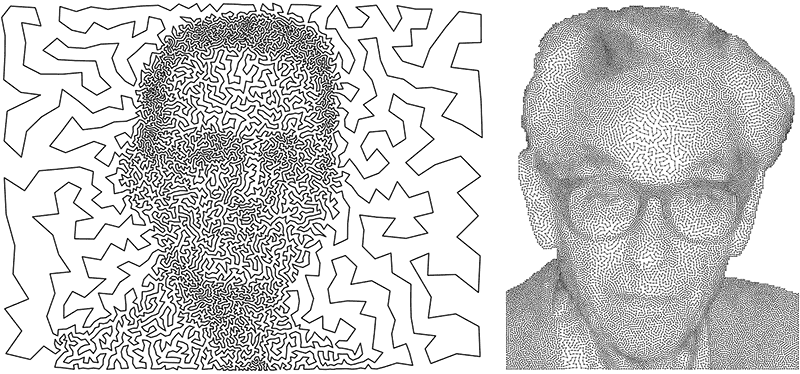
We see the massing or density-based strategy once again in the portraits below, each of which consist entirely of just a single line! These are examples of so-called “TSP art”, in which an algorithm which solves the well-known Traveling Salesman Problem algorithm is applied to a set of points whose density is based on the darkness of the image. On the left is a self-portrait by Mark Bruce made with StippleGen; on the right is a portrait of Paul Erdős by Robert Bosch. (Click to enlarge.)
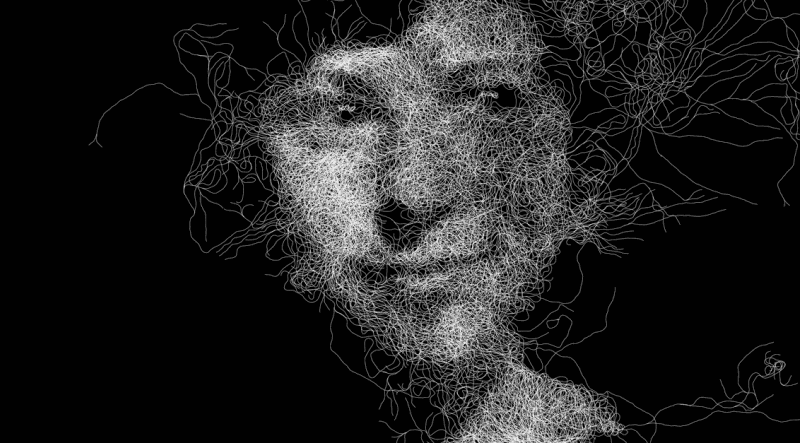
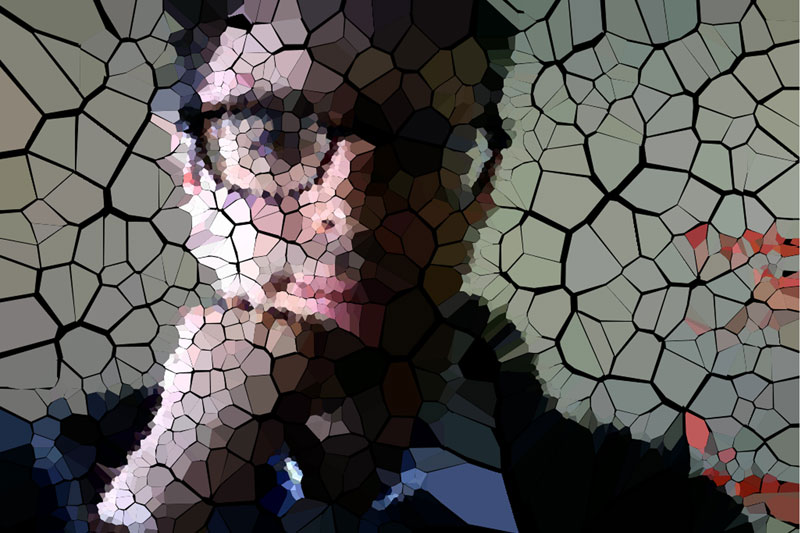
Below is a computational self-portrait of Dan Shiffman.
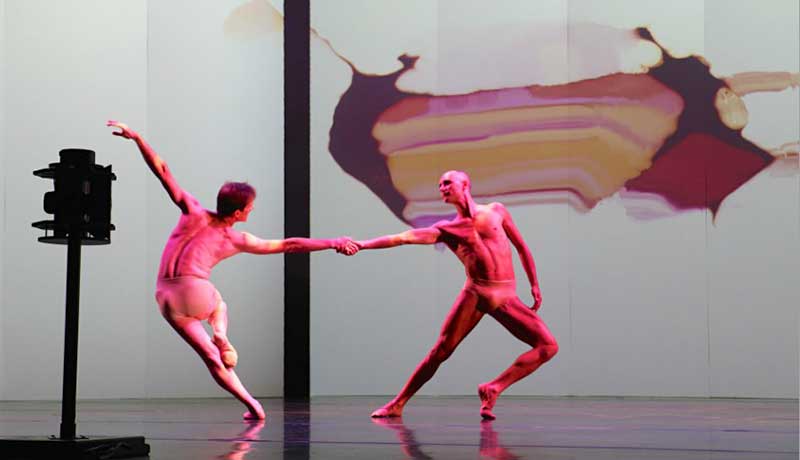
In this interactive dance performance by Camille Utterback, the space between the performers is filled with colors derived from their bodies and movements.
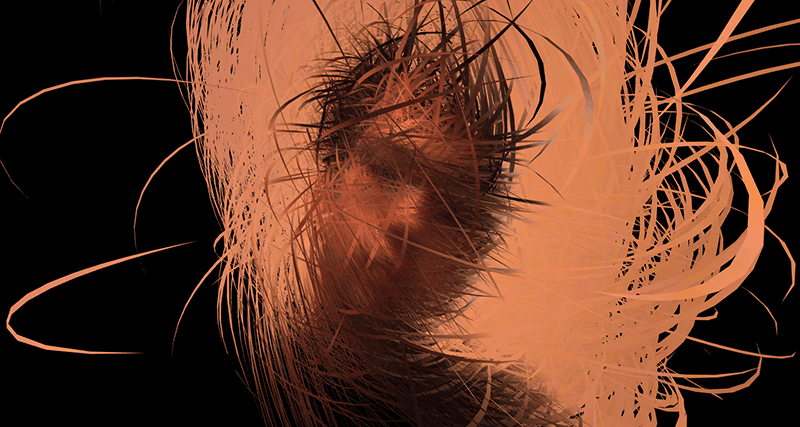
The use of dynamism to resynthesize photographic imagery is another important visual strategy. In this self-portrait from 2007, Robert Hodgin uses “a 3D flowfield to control [moving] particles that pick up their color based on webcam input.” In essence: moving particles pick up color, and shmear it, as they move around on top of an underlying photo.
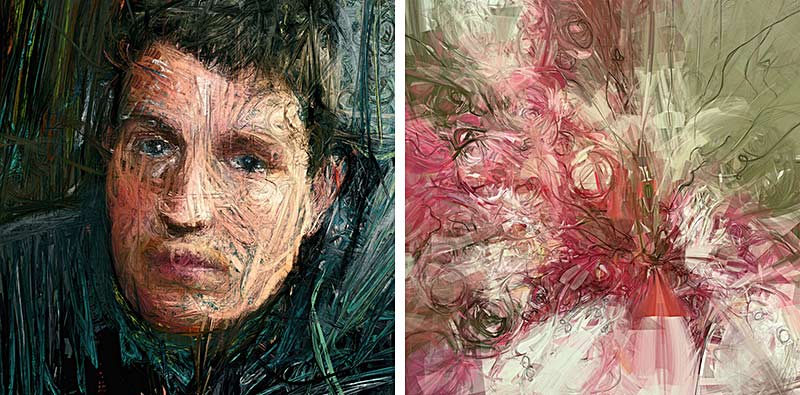
Erik Natzke also uses moving particles to create his compositions:
The Task: A Computational Portrait / Custom Pixel
Ok, enough already. In this Project, you will create a computational portrait, rendering data from a (hidden) photograph with a “custom pixel” or other original algorithmic graphical treatment.
Constraints:
- The portrait must be a real living person that you know personally. It may not be Donald, Hillary, Marilyn Monroe, Elvis, Bob Marley, Jesus Christ, or any other celebrity or religious figure. You must secure permission from your subject, and use a photo you’ve taken yourself. Self-portraits are permissible.
- You wanted to make a portrait of the course faculty (Roger, TAs)? Ha, ha, nobody has thought of that before. No.
- Students whose religions prohibit the representation of sentient beings are excused from the first constraint, and may create a representation of an animal instead, or make some other proposal by arrangement with the professors.
- You may not display the original photograph in unaltered form at any time. You may only display the portrait generated from it.
- You must use an actual photograph as a starting point for a computational interpretation; you may not synthesize a portrait “from scratch” (as you did in your Variable Faces project).
- Optional: Get some practice using a local server to develop and test sketches that load external media such as images.
- Be sure to test your work when you upload it to the WordPress blog. You may need to change the URL of the source image for it display correctly. We recommend storing your image on Imgur.com, which simplifies development and deployment.
- Dimensions may be no larger than 480×480 pixels, though smaller canvases are fine.
Sample Code:
We hope the above examples are stimulating, and as usual, we hesitate to provide sample code. Still, it’s helpful to know how to set up an image for algorithmic interpretation. We highly recommend you look at Dan Shiffman’s great p5.js Pointillism Example. Here also is Golan’s simple self-portrait, composed of random dots and mouse-drawn lines:
var underlyingImage;

function preload() {
    var myImageURL = "http://i.imgur.com/sHwEYeb.jpg";
    underlyingImage = loadImage(myImageURL);
}

function setup() {
    createCanvas(500, 500);
    background(0);
    underlyingImage.loadPixels();
    frameRate(10);
}

function draw() {
    var px = random(width);
    var py = random(height);
    var ix = constrain(floor(px), 0, width-1);
    var iy = constrain(floor(py), 0, height-1);
    var theColorAtLocationXY = underlyingImage.get(ix, iy);

    noStroke();
    fill(theColorAtLocationXY);
    ellipse(px, py, 6, 6);

    var theColorAtTheMouse = underlyingImage.get(mouseX, mouseY);
    stroke(theColorAtTheMouse);
    line(pmouseX, pmouseY, mouseX, mouseY);
}
Here are the Project-08 Requirements:
- Create a computational portrait program in p5.js, as described above.
- When you’re done, embed your p5.js sketch in a blog post on this site, using the (usual) instructions here. Make sure that your p5.js code is visible and attractively formatted in the post. Include some comments in your code.
- In your blog post, write a sentence or two reflecting on your process and product. In discussing your process, it would be awesome to see any of your paper sketches from your notebook; these could be as simple as photos captured with your phone.
- Include a couple screen-shots of your finished portrait.
- Label your project’s blog post with the Category Project-09-Portrait.