Rebecca Kim – Project 02 – Variable Face

rebecca-variableface

/*
Rebecca Kim
Section C
rykim@andrew.cmu.edu
Project-O2
*/


//define variables
var eyeSize = 20;
var faceWidth = 250;
var faceHeight = 200;
var colorX = 200;
var petalY1 = 50;
var petalY2 = 30;
var wordNumber = 0;
var colorR = 255;
var colorG = 120;
var colorB = 120;
var y1 = 285;
var y2 = 295;
var smileY=320;

function setup() {
	createCanvas(640,480);
}

function draw() {
	//face
	strokeWeight(5);
	background(colorX,180,180);
    ellipse(width/2, height/1.9, faceWidth, faceHeight);
    noFill(0);
    stroke(255,255,colorB);
    strokeWeight(.5);
    ellipse(width/2.1, height/1.95, faceWidth, faceHeight);

	//eyes
	strokeWeight(0);
	var eyeLX = width / 2 - faceWidth * 0.25
	var eyeRX = width / 2 + faceWidth * 0.25
	fill(colorR, colorG, colorB);
	ellipse(eyeLX, height / 2, eyeSize, eyeSize);
	ellipse(eyeRX, height / 2, eyeSize, eyeSize);

	//blush
	strokeWeight(5);
	stroke(colorR,colorG,colorB);
	line(385,y1,390,y2);
	line(395,y1,400,y2);
	line(405,y1,410,y2);

	//facial expression
	noFill();
	stroke(0);
	strokeWeight(2);
	beginShape();
	curveVertex(width/2-faceWidth*.15,smileY);
	curveVertex(width/2+faceWidth*.025,310);
	curveVertex(width/2-faceWidth*.025,310);
	curveVertex(width/2+faceWidth*.15,smileY);
	endShape();


	//larger flower
	translate(200, 300);
	strokeWeight(0);
	stroke(colorR,120,120);
	for (var i = 0; i < 10; i ++) {
	ellipse(0, 10, 10, petalY1);
	rotate(PI/5);
	}

	//smaller flower
	translate(240, -40);
	strokeWeight(0);
	fill(colorX,120,120);
	for (var i = 0; i < 10; i ++) {
	ellipse(1, 5, 7, petalY2);
	rotate(PI/3);
	}


	//text
	var word = int(wordNumber);
	if (word == 1) {
		strokeWeight(.1);
		textSize(12);
		fill(160);
		text("???", 50, 50);
	} else if (word == 2){
		noStroke();
		textSize(20);
		fill(200,160,160);
		text(":-(", 50, 50);
	} else if (word == 3){
		strokeWeight(1);
		textSize(15);
		fill(255);
		text(":-/", 50, 50);
	}

 }

 function mousePressed() {
 	faceWidth = random(200, 300);
 	faceHeight = random(150, 300);
 	eyeSize = random(10,25);
 	colorX = random(180,255);
 	colorR = random(240,255);
 	colorG = random(100,150);
 	colorB = random(80,140);
 	petalY1 = random(50,80);
 	petalY2 = random(25,40);
 	word = random(0,4);
 	wordNumber = random(0,4);
 	y1 = random(275,285);
 	y2 = random(285,295);
 	smileY = random(280,350);
 }

Navigating the world of arcs and curves was new and a bit challenging, but nonetheless rewarding once I successfully embedded it into my code!

YingyangZhou-LookingOutwards-2

Client: In collaboration with JAC studios & No Parking and supported by the Esbjerg Municipality

Location: Wadden Sea Visitor Centre, Vester Vedsted, Denmark

Year: 2017

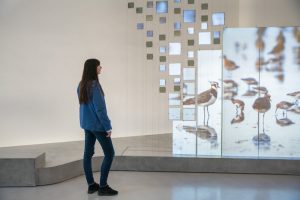
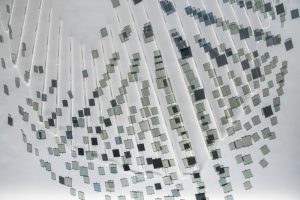
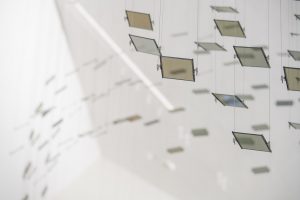
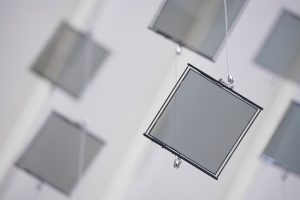
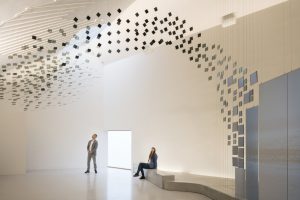
In 2014 Jason Bruges Studio won the competition, in collaboration with JAC Studios, to create an immersive installation that represents the 12 million migratory birds and the unique landscape of the Nationalpark. Digital Ornithology is the last sequence of the exhibition, which follows a journey of exploration and discovery of the native birds, to being fully immersed in their unique habitat and behaviours. The space allows visitors to be at eye height and experience the take off and landings at close proximity, thereby amplifying the presence of the birds. The installation is comprised of 562 LCD screens suspended from the ceiling in a sequence that represents the migration of the birds. With an amalgamation of projection mapping of live footage and the light-modulating behaviour of the LCD’s, the result is an ephemeral and captivating acquaintance.


This is a very neat project which has no extra unnecessary information, but still you can immerse yourself in it by simple light, shadow and sound. It has strong intent of raising the awareness of  protecting creatures by looking into the way they live closer than we usually.

Looking Outwards 02 – Sara Frankel


caption: Arnold Schoenberg, mastermind of twelve tone technique, expresses himself within a more mathematical template than traditional music theory.

I found the composer Arnold Schoenberg quite fitting and admirable for this looking outwards post.  Schoenberg, a composer from the mid 20th century, expanded the idea of music with his usage of twelve tone music in his compositions. While he was not necessarily the creator of this concept, he is the so called “poster child” of this concept as he explored its use in his work of the relationship between mathematics and music, bringing more attention to the idea.  Twelve tone technique is the concept that every 12 notes in a chromatic scale must be used before repeating any note again.  What I admire about this concept is the fact that while there are so many constrains and listening to this off hand, everything about it seems quite atonal.  In actuality however, this method is far from atonal.  Somehow, with the introduction of having every note possible at your disposal, you are not only limited to that of the key signature but to so much more.  If anything, that makes my job as the musician that much harder as the possibilities of phrasing and my voice are endless. The video I attached does a great job to explain the work and point of view of Arnold Schoenberg.


Connor McGaffin – Project 02

sketch

/*
Connor McGaffin
Section C
cmcgaffi@andrew.cmu.edu
Project-02
*/

// Simple beginning template for variable face.
var eyeSize = 20;
var faceWidth = 100;
var faceHeight = 150;
var noseSize = 30;
var browHeight = 137;
var bodyWidth = 70
 
function setup() {
    createCanvas(640, 480);
}
 
function draw() {
    background(215,120,0);
    var eyeLX = width / 2 - faceWidth * 0.5;
    var eyeRX = width / 2 + faceWidth * 0.25;
    var noseX = width / 2 - faceWidth * .33;
    

    //body
    fill(0,50,150);
    strokeWeight(0);
    ellipse(width*.52,height, bodyWidth, height);

    //head
    strokeWeight(0);
    fill(0,80,180);
    ellipse(width / 2, height / 2, faceWidth, faceHeight);
   
    //left eye
    fill(0,0,60);
    ellipse(eyeLX, height / 2, eyeSize, eyeSize);
  
    //nose
    fill(0,180,180);
    rect(noseX,height * .45, noseSize,50);

    //right eye
    fill(0,0,60);
    ellipse(eyeRX, height / 2, eyeSize, eyeSize);
 
    //mouth
    strokeWeight(3);
    fill(0,0,60);
    line(eyeLX+32,height*.6,eyeRX,height*.6);
 
    //left brow
    line(eyeRX+eyeSize/2, browHeight, eyeRX-eyeSize/2, browHeight); 
    //right brow
    line(eyeLX+eyeSize/2, browHeight, eyeLX-eyeSize/2, browHeight); 
    
}
 
function mousePressed() {
    faceWidth = random(100, 200);
    faceHeight = random(120, 200);
    eyeSize = random(10, 30);
    noseSize = random(10,40);
    browHeight = random(180,220);
    bodyWidth = random(70,220);
    
}

There was definitely a learning curve to this project and it took me a good bit before I felt comfortable with the new functions. As a communication designer, I am drawn to the idea of showing just enough to understand what I am trying to express. I carried that mindset into this project through attempting to show a range of character with just a few simple shapes.

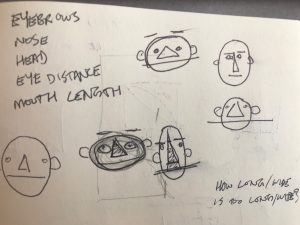
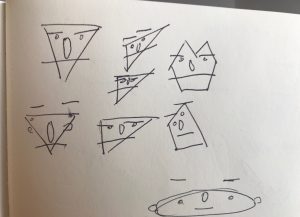
Below are some of the preliminary sketches I did in deciding what I wanted my faces to look like, although I eventually created my portraits in three-quarters view.


Yingyang Zhou-Project-02-Variable-Face

Variable Face

//Yingyang Zhou
//Section A
//yingyanz@andrew.cmu.edu
//Project-02-A


var faceWidth =235;
var eyebrow = 8;
var mouth = 20;
var nose = 30;
var eyeSize = 20;
var neck = 150;
var shoulder = 450;
var noseR = 200;
var noseG = 100;
var noseB = 100;
var hairR = 130;
var hairG = 120;
var hairB = 110;
var shoulderCurve = 50;

function setup() {
    createCanvas(600, 600);
    background(208, 142, 44);

}

function draw() {
    //face
    fill(255);
    noStroke();
    ellipse(width/2, width/3, faceWidth, 1.2*faceWidth);
    //neck
    rect(width/2 - neck/4, height/2, neck/2, neck);
    //shoulder
    fill(147, 91, 4);
    rect(width/2 - shoulder/2, width - shoulder/3, shoulder, shoulder/2, shoulderCurve);
    //eye
    fill(0);
    ellipse(225, 141, eyeSize, eyeSize);
    ellipse(290, 156, eyeSize, eyeSize);
    //nose
    noStroke();
    fill(noseR, noseG, noseB);
    triangle(217, 210, 217+nose/2, 210-nose, 210+nose/2, 210);
    //hair
    fill(hairR, hairG, hairB);
    noStroke();
    beginShape();
    curveVertex(270, 290);
    curveVertex(270, 370);
    curveVertex(196, 395);
    curveVertex(175, 220);
    curveVertex(220, 80);
    curveVertex(325, 25);
    curveVertex(438, 80);
    curveVertex(466, 421);
    curveVertex(317, 423);
    curveVertex(347, 131);
    curveVertex(301, 72);
    curveVertex(190, 198);
    curveVertex(208, 274);
    curveVertex(270, 290);
    curveVertex(270, 375);
    curveVertex(270, 377);
    endShape();
    //mouth
    ellipse(225, 250, mouth, mouth/3)
}

function mousePressed(){
    eyeSize = random(5, 20);
    noseR = random(0, 255);
    noseG = random(0, 255);
    noseB = random(0, 255);
    hairR = random(0, 255);
    hairG = random(0, 255);
    hairB = random(0, 255);
}

I started using CurveVertex in this project and turn out a very smooth curve.
Hair color, mouth color and size of eyes and nose are changing with every click. I had a lot of fun in this.

Han Yu Looking Outwards 02

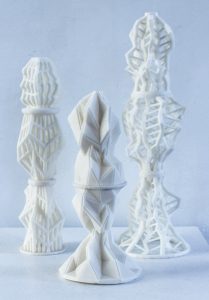
Marius Watz is a generative artist based in New York and Oslo. I admire his modular lattice because the design is abstract but extremely intricate. It looks spiky and  lifeless when you first see it but the longer you stare at it, the more complex and vivid it starts to become, like some carefully engineered DNA tower. In fact, Watz 3D printed the parametric objects using ABS plastic. He is known for using pure software technology and digital fabrication technology to generative hard-edged, and often vivid colored artworks. At any Watz displays, he would always show the simulation and processing on display to let people truly experience the making of generative arts. He aspire to show the audience the real side of generative art, not just the final product like Hollywood which aspires to imitate the real world.

Modular Lattice by Marius Watz. Max height 16”. Aug 8, 2012.

Sharon Yang Looking Outwards – 02

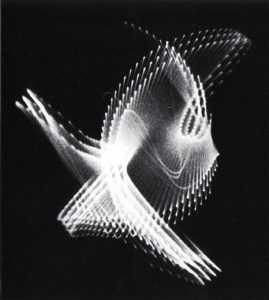
Algorithmic artwork that I find highly inspirational and intriguing are of  Herbert W. Franke, named ‘Lightforms’ (Lichtformen) and ‘Ultra Light'(Ultralicht). Franke is a German scientist and artist of the 1950s. His contributions to digital art is admirable as he pioneered the very first form of generative/algorithmic art. His first work in the mid 1950s was created through using an oscilloscope and a camera to generate patterns in groups of continuous lines. (Source: dada.compart-bremen.de/item/agent/188) The artwork ‘Lichtformen’ consists of a multitude of mathematically generated curves without any interruptions or kinks. The gradient has been created through mechanically generating vibrations.

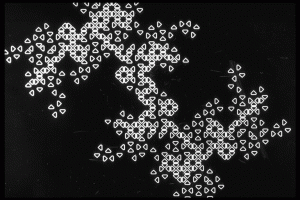
The following image is the Dracula series created in 1970/71. It has been generated by computer graphics based on “Dragon curves”, which is a form of mathematical fractals. (Source: digitalartmuseum.org/franke/1953-1978a.html)

The creativity of the artist to pioneering incorporating scientific and mathematical algorithms into arts is very inspiring and his artworks continue to inspire many scientists and artists in the field.

rrandell project02- variable face

sketch

/* Rani Randell
Section A
rrandell@andrew.cmu.edu
Project 2 variable faces */


// Simple beginning template for variable face.
var eyeSize = 20;
var faceWidth = 100;
var faceHeight = 150;
var backcolor;
var mouthW = 70;
var mouthH = 30;
 
function setup() {
    createCanvas(640, 480);
    var R = random(20, 250);
    var G = random(100, 200);
    var B = random(10, 200);
    backcolor = color(R, G, B);

}
 
function draw() {
    background(backcolor);
    fill(230, 10, 200)
    ellipse(width / 2, height / 2, faceWidth,  faceHeight);//face

    var eyeLX = width / 2 - faceWidth * 0.25;
    var eyeRX = width / 2 + faceWidth * 0.25;
    fill(10, 30, 200);
    ellipse(eyeLX, height / 2, eyeSize, eyeSize);//left eye
    fill(30, 70, 70);
    ellipse(eyeRX, height / 2, eyeSize, eyeSize); //right eye

    rect(width/2 - 35, height/2- 20, 20, 3)//eyebrows
    rect(width/2 + 15, height/2- 20, 20, 3)

    fill(200, 10, 120); //mouth color
    ellipse(width/2, height/2+40, mouthW, mouthH)//mouth


}
 
function mousePressed() {
    // when the user clicks, these variables are reassigned
    // to random values within specified ranges. For example,
    // 'faceWidth' gets a random value between 75 and 150.
    faceWidth = random(75, 150);
    faceHeight = random(100, 200);
    eyeSize = random(10, 30);
    var R = random(20, 250);
    var G = random(100, 200);
    var B = random(10, 200);
    backcolor = color(R, G, B);
    mouthH = random(10, 40);
    mouthW = random(60, 90);
}

For my Variable Faces project, I wanted to explore randomizing different colors of the background when the mouse is pressed. I accomplished this by making distinct RGB variables and then randomizing them in the mousePressed function.

Alexandra Kaplan-Project 02

aekaplan.js

/* Alexandra Kaplan
   Section C
   aekaplan@andrew.cmu.edu
   Project-02*/

var headW = 250;
var headH = 300;

var eyeSizeW = 40;
var eyeSizeH = 60;
var eyeY = headH/1.3;

var pupilSize = eyeSizeW - 10;
var pupilY = eyeY;
var pupilR =0;
var pupilG =0;
var pupilB =0;

var noseW = 20;
var noseH = 25;

var mouthH = 1;
var mouthW = 1;

var hatH = headH/2.5;
var hatW = 320;
var hatR = 100
var hatG = 50
var hatB = 60


function setup() {
    createCanvas(640, 480); 
}

function draw() {
	background(200, 200, 230);
	strokeWeight(0);

	//draw head
	fill(220, 190, 160);
	ellipse(width/2, height/2, headW, headH);
	
	//draw eyes
	fill(255);
	var eyeXL = width/2 - headW/4;
    var eyeXR = width/2 + headW/4;
	ellipse(eyeXL, eyeY, eyeSizeW, eyeSizeH);
	ellipse(eyeXR, eyeY, eyeSizeW, eyeSizeH);

    //draw pupils
    fill(pupilR, pupilG, pupilB);
    ellipse(eyeXL, pupilY, pupilSize, pupilSize);
    ellipse(eyeXR, pupilY, pupilSize, pupilSize);

    //draw nose
    fill(200, 170, 140);
    ellipse(eyeXL/2 + eyeXR/2 , height/2 + headH/6 , noseW, noseH);

    //draw mouth
    fill(200,100,100);
    arc(eyeXL/2 + eyeXR/2, height/2 + headH/3, 30 * mouthW, 20 * mouthH, 0, PI + QUARTER_PI, OPEN);
    
    //draw hat
    fill(hatR, hatG, hatB);
    rectMode(CENTER);
    rect(hatW, hatH, headW + 20, headH/2, 100, 100, 10, 10);
}

function mousePressed() {

   //head size
   headW = random(200, 500);
   headH = random(200, 350);

   //pupil color
   pupilR = random(100, 255);
   pupilG = random(100, 255);
   pupilB = random(100, 255);

   //pupil location
   pupilY = random(220, 250);
   
   //nose size
   noseW = random(10, 50);
   noseH = random(10, 50);

   //mouth size
   mouthW = random(0.5, 3);
   mouthH = (0.5, 3);
  
  //hat color
  hatR = random(0, 255);
  hatG = random(0, 255);
  hatB = random(0, 255);

}

I found this project to be pretty difficult to wrap my head around at first, though as I continued on with the project it started to make more sense. As I got into the random manipulation, I started to enjoy myself more than when I was figuring out the arithmetic. I definitely want to use more variables in future projects so I can continue to get more comfortable with them.

Kyle Leve – Looking Outwards – 02

link: http://iquilezles.org/apps/soundtoy/index.html
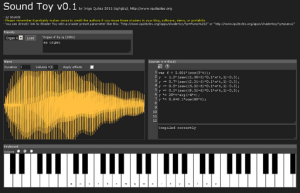
Sound Toy Software

A generative art that I discovered this week that I found very interesting is the application known as Sound Toy. This application was created by Inigo Quilez in 2011, and its function is the use different mathematical formulas to create and design music and visuals only using the keys on a standard computer. The software utilizes a keyboard where different keys serve as different keys on the piano, thus making it possible to play a note with a single press of a key. There are also many other instruments that you can use and create sounds from! In addition, there are ways to design a wave using mathematical formulas to create a visual cue that goes with the music. I feel as though Quilez wanted to combine his love of visual effects as well as his love for sound/music, and that is apparent in his algorithms. What inspires me about this project is that there are so many elements to it that would make it seem so complicated to use, however all it takes to figure it out is just to mess around with different tools for a little while. I like how this application combines both sound and visual art to allow the user to easily create something that one may have previously assumed to be too complicated to use.