Lan Wei-Project-05-Wallpaper

my-sketch.js
>sketch

/* Lan Wei
Section D
lanw@andrew.cmu.edu
Project 05
*/

function setup(){
    createCanvas(600, 600);
    background(0);
}

var gap = 20; //vertical distance between two waves
var dens = 20; //horizontal density of the waves
var waveRev = 4; // control how big the wave is

function draw(){
    //draw ocean
    var i = 0;
    for (var y = -gap; y < height - gap; y += gap){
        noFill();
        stroke(255);
        beginShape();
        i ++; //will be used for color setting
        for (var x = -50; x < width + 50; x += dens){
            y += random(-gap/waveRev , gap/waveRev );//wave
            curveVertex(x, y);
        }
        curveVertex(width, height);
        curveVertex(0, height);
        curveVertex(0, y - gap/waveRev);//just to find a point to close the shape
        var blue = map(y, 0, height, 255, 30);
        var green = map(y, 0, height, 220, 10);
        fill(50, green, blue);
        noStroke();
        endShape();
    }
    noLoop();
    drawFish();
}

//draw fish pattern
function drawFish(){
    var dist = 100; //horizontal distance between fish
    var level = 70; //vertical distance between fish
    i = 0;
    for (var x = dist; x < width; x += dist){
        i ++;
        if (i % 2 == 0){
            for (var y = level; y < height; y += level){
                fish(x, y);
            }
        }
        else{
            for (var y = level * 1/2; y < height; y += level){
                fish(x, y);
            }
        }
    }
}

//how the fish looks like
function fish(x, y){
    var fishW = 30;
    var fishH = 10;
    var tailL = 10;
    fill(240, 230, 140);
    ellipse(x, y, fishW, fishH);//body
    fill(0);
    ellipse(x-10, y, 5, 5);//eye-black part
    fill(255);
    ellipse(x - 9, y, 1.5, 1.5);//eye-white part
    fill(255, 215, 0);
    triangle(x + fishW/2, y, x + fishW/2 + tailL, y + 5, x + fishW/2 + tailL, y - 5);
    //tail
}

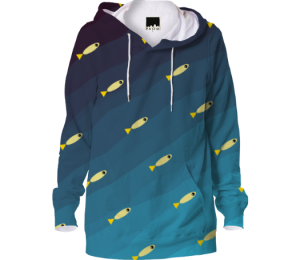
My initial idea was to create a scene of different depth of the ocean. I want to make the waves of some randomness and change the color to show depth difference. After I finished the waves, I added some fish to fulfill the project requirement, and surprisingly the effect is very good. What I feel the most helpful through the project is that I get  familiar with ‘helper functions’ and practiced to create shape with irregular curves.

The sketch I did before draw in P5.js
How the wallpaper looks on a hoody.

Julie Choi – Project 05 – Wallpaper

bubble wallpaper

function setup() {
    createCanvas(600, 400);
}

function draw() {
    background(255);
    drawPatter(); //call function drawPatter
    noLoop(); 
}
function drawPatter() {
    // draw blue background line
    for(var i = 20; i < width; i += 60){
        strokeWeight(7);
        stroke(60, 211, 206, 50);
        line(i, 0, i, height);
    }
    // draw red background line
    for(var p = 10; p < width; p += 90){
        strokeWeight(3);
        stroke(255, 66, 0, 70);
        line(p, 0, p, height);
     }
    // draw the bubbles with ellipses with low opacity
    for (var y = 50; y < height + 50; y += 100) {
      for (var x = 50; x < width + 50; x += 100) {
          noStroke();
          var r = (y/200) * 255;
          var w = (x/200) * 255;

          fill(r / 32, w, 180, 50);
          ellipse(x, y, 30, 30);

          fill(134, w / 2, r, 50);
          ellipse(x + 18, y + 15, 30, 30);

          fill(r, w, 100, 50);
          ellipse(x + 18, y - 10, 30, 30);

          fill(r, w, 100, 50);
          ellipse(x + 10, y + 23, 20, 20);

          fill(r / 40, 0, 100, 50);
          ellipse(x + 10, y + 10, 10, 10);

          fill(r / 2, w, 100, 50);
          ellipse(x + 10, y + 10, 10, 10);

          fill(r, 0, 100, 50);
          ellipse(x + 30, y + 30, 50, 50);
      }
    }
}

I enjoyed this assignment because it really allowed me to be creative. My wallpaper is a pattern of colorful bubbles, and I was inspired by the old wallpaper I had as a child. Although it does not look similar to my actual wallpaper, I had fun making new designs from my memory.

Kai Zhang-Looking Outwards-05

Image result for doctor strange cgi

The Making of Movie CGI Effects – Doctor Strange

At the bottom of the page is a video that breaks down the computer generated imagery of the blockbuster movie Doctor Strange. I’m rather fascinated by the making process because at current time it’s getting more and more difficult to differentiate the CGI and real shooting in large budget Hollywood movies. And the reason is due to the rapid increasement of computing power and software capabilities.

However, one might not expect from the process is that the CGI making is not all about 3D generated objects that’s plugged into the filmed footages. There is a combination of  2D and 3D layers that makes up the full imagery, for example, the fogs or the ashes are usually 2D painted. And also a lot of the “people” in the movie aren’t real at all. In some cases, to create some of the visual effects, modeling human figures and manipulate it is even more efficient than shooting using chroma key.

The methodology is straightforward. Exporting 3D imagery into 2D workspaces and layer them in the timeline. Aftereffects is usually the most common tool to use. But in most cases, despite different components are exported from different files, algorithms are used to make sure they line up in 3D spaces. For example, the light-whip is tied virtually to the hand in another work file. Also, a large portion of the physical reaction of objects, particle effects, etc. are calculated using 3D engines that embeds all the physical equations needed for the result. One rather amazing thing is – by moving sliders of the physical reaction level can often result in totally different film styles easiliy perceived by the audiences.

In the end, the combination of different aspects of the element are tied together and rendered out as static imageries (frames) and played in the sequence, which results in the final grand state of the art.

Image result for doctor strange cgi

Image result for doctor strange cgi


Christine Chen-Project-05-Wallpaper

Christine Chen-Project-05-Wallpaper

/*
Christine Chen
Section E
cyc1@andrew.cmu.edu
Project-05-Wallpaper
*/

var x;
var y;
var offset = 10; //offset for left/right leaf positions

function setup() {
    createCanvas(600, 400);
    noStroke();
}
 
function draw() {
    background(255, 184, 214); //pink background
    polkaDots(); //dots for background
    fruit();
    noLoop(); 
}


function polkaDots(){ //background dots
    for (var y = 30; y < height; y += 120) {
        for (var x = 0; x < width + 100; x += 100) {
            fill(191, 212, 252); //light blue
            ellipse(x, y, 100, 100);
        }
    }
}

function fruit() {
    //odd row (bright pink peach)
    for (var y = 30; y < height; y += 120) { 
        for (var x = 50; x < width; x += 100) {
            //peach
            fill(255, 104, 168); //bright pink
            ellipse(x , y, 50, 50);

            //leaf
            fill(2, 133, 0); //dark green
            ellipse(x - offset - 4, y - 25, 30, 15); //left leaf
            ellipse(x + offset , y - 25, 20, 10); //right leaf
        }
    }

    //even row (dark pink peach)
    for (var y = 90; y < height; y += 120) { 
        for (var x = 100; x < width; x += 100) {
            //peach
            fill(220, 72, 134); //dark pink
            ellipse(x, y, 50, 50);

            //leaf
            fill(0, 217, 20); //bright green
            ellipse(x - offset - 4, y - 25, 30, 15); //left leaf
            ellipse(x + offset , y - 25, 20, 10); //right leaf
        }
    }
}


I had a lot of fun writing the codes for this project! Initially, I just wanted a simple wallpaper with repeating peaches. After I wrote the codes for that, I realized that it would be fun to have big repeating dots at the background that contrasts with the pink background. I also experimented with having gradients on the peaches using what I learned in recitation this week, but the results don’t look good, so I didn’t use that for the final.

Hand-drawn draft
Experiment with using gradient for pattern

Alexandra Kaplan – Looking Outwards – 05

Image from Nicopicto’s Duracell Advertising Campaign

Nikopinto is a global 3d animation and illustration studio. One project of theirs that really stood out to me was their Duracell print advertising campaign. It is a series of 3d graphics of a bunch of Duracell bunnies creating different shapes such as a rhino or tornado. I think that it has some really cute aspects (all of the bunnies!) as well as having an overall eye-catching image. Looking at it from a coding standpoint, I am sure that the many layers of bunnies have some sort of algorithm to have some sort of structured randomness.

Dani Delgado – Looking Outwards 5

A screencapture of “Miquela”

Lil Miquela is an  instagram “model” created using 3D computer modeling techniques. While not much is known about the artist or their motivation to create a full social media page for their model, other than that they work for a startup named Brud, I find it very impressive that the page amassed thousands of followers who believed Miquela was a real person from Brazil. While there is much controversy that surrounds this project because of this, I believe that as an art piece, this project is both beautifully rendered and raises some important questions: Have computer graphics advanced so far that we can  create realities indistinguishable from our own? Are we now a society focused on purely visuals without needed any further context? Do we not care? The instagram, which has been publishing content since 2016,  is only gaining a larger and larger following with time.

While this is not necessarily traditional computer graphics, I believe that Miquela is an impressive work of both computer generated and performance art (as we follow “her” lifestyle, we become a part of the artist’s performance).

Lil Miquela was hired by many brands to “model” their clothes due to her popularity.

Link to “her” instagram: https://www.instagram.com/lilmiquela/

Connor McGaffin – Project 05 – Wallpaper

sketch

/*
Connor McGaffin
Section C
cmcgaffi@andrew.cmu.edu
Project-05
*/
var ang = 120;

function setup() {
    createCanvas(600, 400);
    background(80,50,0);
    noStroke();

    //olive
    for(x=0; x<width; x+=50){
        for(j=0; j<height; j+=50){
            fill(100,70,0);
            ellipse(x+25,j+25,50,50);
        }
    }
    //pits
    for(x=0; x< width+50; x+=50){
        for(y=0; y<height; y+=50){
            stroke(60,0,0);
            strokeWeight(2);
            fill(85,0,0);
            ellipse (x-35, y+15, 15,15);

        }
    }
    //skewers
    for(x=0; x< width; x+=50){
        for(y=0; y<height; y+=50){
            fill(100,0,0);
            stroke(50,0,0);
            strokeWeight(2);
            line(x-7,y-7,x+15,y+15);
        }
    }
    //glass
    for(x=0; x<width; x+=100){
        for(y=0; y<width; y+=100){

            noStroke();
            fill('rgba(250, 250, 250, 0.6)');
            triangle(x+10,y+10,x+80,y+10,x+45,y+35);
            rect(x+42.5,y+33,5,45);
            triangle(x+10,y+10,x+80,y+10,x+45,y+35);
            triangle(x+20,y+83,x+70,y+83,x+45,y+75);
        }
    }
}


I created this pattern after being inspired by the art deco visuals of AMC’s “Mad Men”. I had fun finding a way to visualize the olives while still speaking to the visual aesthetic of the 1960’s era. Initially, I approached the olives in an projected view, but they were indistinguishable from everyday beads. When rotating the olives to a 3/4 view from above, an interesting sense of space is established. The choice to connect all of the olives on the same skewer creates a surreal atmosphere to the environment, which speaks to the inability to place where this pattern is located when viewed on a screen.

I would anticipate that this pattern could potentially be used in a restaurant. It’s fun but also a little gaudy, so it would likely go in there bathroom, rather than the front lobby.

Xindi Lyu-Looking Outwards 05

One of the art pieces in the series

The  prize winning generative art series in 2015 during Independent Festival of Creative Communication in Chroatia in 3D category– “Papilarnie”  really pushed and blurred the boundary between 2 dimensional lines and three dimensional forms. Graphics of this series were published in the second part of the album “The Magic of Lines: Line Illustration by Global Artists.” The author of this art series, Polish artist Janusz Jurek, showed the seemingly “deconstruction” of human features, while adding volume to the overall form but also showed movement and a sense of tension within this dynamic piece.
showing movement

This art series really inspired me because it is a successful outcome of attempting to use simple geometries or modules to create a incredibly dynamic art piece, and also it showed that capturing a moment in the constructing process could result in very interesting outcomes.

Kevin Thies Looking Outwards 05

Da Vinci in color space
Da Vinci in hsb
Monet in color space
Monet in hsb

Walking in Color Space is a series of data visualizations by Leonardo Solaas produced in 2010. The data represented takes pixel rows and draws a line between the two points in HSB color space. More contrast means the resulting line will be longer, and more visible. It also highlights the colors the artists used. Images were generated using Processing, but unfortunately the blog describing the process has been taken down.
The models themselves become dynamic furry masses, and I appreciate that the artist took a new look at old pieces as well as newer ones. It’s the kind of data where you could take a guess and just figure it out by eye, but because the level of detail is so fine, it just makes it more interesting. By virtue of its digital nature, it could be possible to either move interaction with the pieces to a fully digital landscape, like being able to hold them in your hands in virtual reality, or they could theoretically be translated to the physical realm via 3 printing, although that would be one delicate print.

Rachel Lee Project 05 Section E

sketch

/* Rachel Lee
Section E
rwlee@andrew.cmu.edu
Project 05
*/


var spacing = 80; // spacing between elements
var kiwiSize = 60;

function setup() {
    createCanvas(480, 480);
    background(255, 210, 225);

    // drawing kiwi
    for (var x = 75; x < width - 75; x += spacing) { // width of rows
        for (var y = 85; y < height - 85; y += spacing * 1.2) { // length of columns
            noStroke();
     // brown kiwi skin
            fill(165, 115, 65);
            ellipse(x, y, kiwiSize, kiwiSize);
   
    // green kiwi flesh
            fill(190, 215, 90);
            ellipse(x, y, kiwiSize * 0.9, kiwiSize * 0.9);

    // beige kiwi core
            fill(240, 240, 205);
            ellipse(x, y, kiwiSize * 0.5, kiwiSize * 0.5);
    
    // kiwi seeds
            fill(0);
            ellipse(x - 15, y, 3, 3);
            ellipse(x + 15, y, 3, 3);
            ellipse(x, y - 15, 3, 3);
            ellipse(x, y + 15, 3, 3);
        }
    } 

    // text that aligns with kiwi
    for (var a = 45; a < width - 75; a += spacing) {
    	for (var b = 105; b < height - 85; b += spacing * 0.9) {
            fill(40, 140, 70);
            textSize(9);
            textFont('Akkurat Mono');
            text("kiwi dreams", a, b * 1.3);    
    	}
    }
    noLoop(); // drawing only once
}


function draw() {

}


I decided to base my wallpaper on my current favourite fruit, the kiwi. I wanted to incorporate more playful colors as well as a dreamier caption, since it is turning cold in Pittsburgh and I miss warm weather. I was inspired by a cherry printed shirt I came across when I was online shopping, and numerous fruit illustrations I found on Pinterest (such as this pomegranate one). Overall, it was really fun playing with symmetry and pattern, and I would like to continue this project to perhaps feature alternating sliced and whole kiwis.

Pomegranate pattern I took inspiration from
Cherry shirt I came across when online shopping